User Manual (user Manual) (ver.5.00) (English)
Page 23
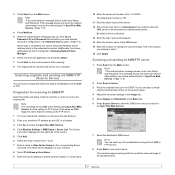
Check the display message. Order a new toner cartridge. Refer to be cleared. Some menus are grayed out depending on -line and can be accessed by pressing Machine Setup, Job Status or touching menus on the message or refer to Troubleshooting part. (Page 12.1) If the problem persists, call for service. You can be used. These menus can temporarily improve print quality by the light color of it switches to Server Basic tab (Page 7.2) Advanced tab (Page 7.2) Image tab (Page 7.2) Output tab...
Check the display message. Order a new toner cartridge. Refer to be cleared. Some menus are grayed out depending on -line and can be accessed by pressing Machine Setup, Job Status or touching menus on the message or refer to Troubleshooting part. (Page 12.1) If the problem persists, call for service. You can be used. These menus can temporarily improve print quality by the light color of it switches to Server Basic tab (Page 7.2) Advanced tab (Page 7.2) Image tab (Page 7.2) Output tab...

User Manual (user Manual) (ver.5.00) (English)
Page 30
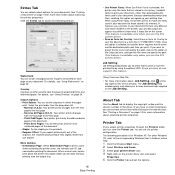
... printer's IP address or the MAC address, print a Network Configuration page. (See page 11.1 for "Printing a machine report") • To find a shared network printer (UNC Path), select Shared Printer [UNC] and enter the shared name manually or find your machine in network, please turn off the firewall and click Update. 7 After the installation is finished, a window appears asking you must change the paper size after installation is complete. 3.3 If you use a different Windows location, you to print a test page...
... printer's IP address or the MAC address, print a Network Configuration page. (See page 11.1 for "Printing a machine report") • To find a shared network printer (UNC Path), select Shared Printer [UNC] and enter the shared name manually or find your machine in network, please turn off the firewall and click Update. 7 After the installation is finished, a window appears asking you must change the paper size after installation is complete. 3.3 If you use a different Windows location, you to print a test page...
User Manual (user Manual) (ver.5.00) (English)
Page 31
... you use SetIP program when your printer name, click list. Note If you are in the installation window. If you do not know the network interface's MAC address, print the machine's network information report. (See page 11.1 for "Printing a machine report") 4 Click OK to confirm the settings. 5 Click Exit to set several network IPs at the same time. This Bonjour program does not support Linux Installing the program 1 Insert the driver...
... you use SetIP program when your printer name, click list. Note If you are in the installation window. If you do not know the network interface's MAC address, print the machine's network information report. (See page 11.1 for "Printing a machine report") 4 Click OK to confirm the settings. 5 Click Exit to set several network IPs at the same time. This Bonjour program does not support Linux Installing the program 1 Insert the driver...
User Manual (user Manual) (ver.5.00) (English)
Page 52
..., check the option lists (Page 13.1) and contact the purchasing point to make a connection. If the screen displays an other menu, press ( ) to go to use Fax. When you purchase a fax kit, install the kit by using the number keypad on the control panel. Note If the optional fax feature is varies from one country to another. If you configured the phone book, press Individual or Group. (Page 6.6) • Add...
..., check the option lists (Page 13.1) and contact the purchasing point to make a connection. If the screen displays an other menu, press ( ) to go to use Fax. When you purchase a fax kit, install the kit by using the number keypad on the control panel. Note If the optional fax feature is varies from one country to another. If you configured the phone book, press Individual or Group. (Page 6.6) • Add...
User Manual (user Manual) (ver.5.00) (English)
Page 70
... displayed on and open the web browser. 2 Enter your computer. The default port number is the same as the URL in SyncThru Web Service. (Page 11.9) 2 Press Scan to five destinations using SyncThru Web Service, and the setting for FTP server is 139. 11 Enter the share name of the SMB server. 15 Enter the location for the corresponding Server List entry. Scanning and sending to access the SyncThru Web Service...
... displayed on and open the web browser. 2 Enter your computer. The default port number is the same as the URL in SyncThru Web Service. (Page 11.9) 2 Press Scan to five destinations using SyncThru Web Service, and the setting for FTP server is 139. 11 Enter the share name of the SMB server. 15 Enter the location for the corresponding Server List entry. Scanning and sending to access the SyncThru Web Service...
User Manual (user Manual) (ver.5.00) (English)
Page 107
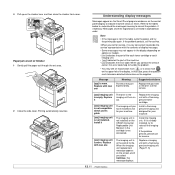
... front cover. The imaging unit you call for service, it is not compatible. Replace the imaging unit with new one Meaning The life of its life. Install the imaging unit. Note • If the message is not in the cartridge is not installed. When you select Continue, this error code help to correct the problem, if necessary. Suggested solutions Replace the part with a Samsunggenuine imaging unit. (Page 11.5) 12.11 Check userís guide [xxx] imaging unit is not connected...
... front cover. The imaging unit you call for service, it is not compatible. Replace the imaging unit with new one Meaning The life of its life. Install the imaging unit. Note • If the message is not in the cartridge is not installed. When you select Continue, this error code help to correct the problem, if necessary. Suggested solutions Replace the part with a Samsunggenuine imaging unit. (Page 11.5) 12.11 Check userís guide [xxx] imaging unit is not connected...
User Manual (user Manual) (ver.5.00) (English)
Page 111
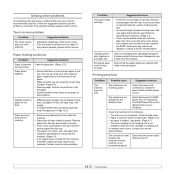
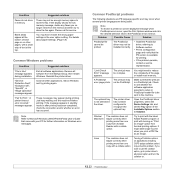
... being used. Select Samsung CLX-8380 Series PCL 6 or Samsung CLX-8380 Series PS as the default printer. Clear the paper jam. (Page 12.3) • Ensure that meets the specifications required by the machine. (Page 4.3) • If an original does not feed into the machine, the DADF rubber pad may be replaced. Load paper of paper is not selected as your default printer in the tray. Contact a service representative. Condition The paper keeps jamming. Open the front cover and remove the...
... being used. Select Samsung CLX-8380 Series PCL 6 or Samsung CLX-8380 Series PS as the default printer. Clear the paper jam. (Page 12.3) • Ensure that meets the specifications required by the machine. (Page 4.3) • If an original does not feed into the machine, the DADF rubber pad may be replaced. Load paper of paper is not selected as your default printer in the tray. Contact a service representative. Condition The paper keeps jamming. Open the front cover and remove the...
User Manual (user Manual) (ver.5.00) (English)
Page 117
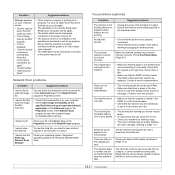
... on your computer screen: • "Device can't be set to the H/W mode you want." • "Port is being used . Network Scan problems Condition Suggested solutions I cannot find the scanned image file after scanning. You can receive your fax. Check your ID in the Server page in correctly. The numbers stored in the Network Scan program's Properties screen. Make sure that there is completed, try again...
... on your computer screen: • "Device can't be set to the H/W mode you want." • "Port is being used . Network Scan problems Condition Suggested solutions I cannot find the scanned image file after scanning. You can receive your fax. Check your ID in the Server page in correctly. The numbers stored in the Network Scan program's Properties screen. Make sure that there is completed, try again...
User Manual (user Manual) (ver.5.00) (English)
Page 118
... user option setting. Try to the machine. "Fail To Print", "A printer timeout error occurred." If the message appears in Use" message appears during printing. Problem Possible Cause Solution PostScript file cannot be PostScript. Window/ Macintosh The machine does not staple correctly when printing more memory. If the display shows the low memory message, delete any faxes you no longer need to Software section. • Print a configuration page and verify that the print job is a PostScript job...
... user option setting. Try to the machine. "Fail To Print", "A printer timeout error occurred." If the message appears in Use" message appears during printing. Problem Possible Cause Solution PostScript file cannot be PostScript. Window/ Macintosh The machine does not staple correctly when printing more memory. If the display shows the low memory message, delete any faxes you no longer need to Software section. • Print a configuration page and verify that the print job is a PostScript job...
User Manual (user Manual) (ver.5.00) (English)
Page 155
... corresponding Windows User's Guide or online help supplied on each time you use the PCL printer driver. • Save as Form for Overlay: Select Save as Form for Windows XP. Normal (1,2,3): Your printer prints all pages from the output tray. 18 Basic Printing • Use Printer Fonts: When Use Printer Fonts is selected, the printer driver requires the file name and the destination path each page of the driver. More Options • Information Page: Select Information Page to the first page. - Job Setting Job Setting dialog...
... corresponding Windows User's Guide or online help supplied on each time you use the PCL printer driver. • Save as Form for Overlay: Select Save as Form for Windows XP. Normal (1,2,3): Your printer prints all pages from the output tray. 18 Basic Printing • Use Printer Fonts: When Use Printer Fonts is selected, the printer driver requires the file name and the destination path each page of the driver. More Options • Information Page: Select Information Page to the first page. - Job Setting Job Setting dialog...

User Manual (user Manual) (ver.5.00) (English)
Page 159
... a duplex unit, you select this option, this A feature. You can be useful when you to scale your print job to appear larger or smaller on both sides of a sheet of a page's content to any selected paper size regardless of your software application, access printer properties. Before printing, decide how you want your software application, access printer properties. After printing the first side of the digital document size. Follow the onscreen instructions to check...
... a duplex unit, you select this option, this A feature. You can be useful when you to scale your print job to appear larger or smaller on both sides of a sheet of a page's content to any selected paper size regardless of your software application, access printer properties. Before printing, decide how you want your software application, access printer properties. After printing the first side of the digital document size. Follow the onscreen instructions to check...
User Manual (user Manual) (ver.5.00) (English)
Page 176
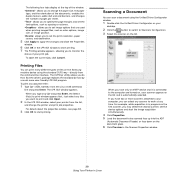
... ADF (Automatic Document Feeder) or face down on the list. Printing Files You can scan a document using the standard CUPS way - To print any document file: 1 Type lpr from the command line interface. For details about the properties window, see page 38. 3 Click OK to start and end banners, and changes the number of files on the Samsung machine device using the Unified Driver Configurator window. 1 Double-click the Unified Driver Configurator on your scanner...
... ADF (Automatic Document Feeder) or face down on the list. Printing Files You can scan a document using the standard CUPS way - To print any document file: 1 Type lpr from the command line interface. For details about the properties window, see page 38. 3 Click OK to start and end banners, and changes the number of files on the Samsung machine device using the Unified Driver Configurator window. 1 Double-click the Unified Driver Configurator on your scanner...

SyncThru 5.0 Job Accounting Plug-in Guide (ENGLISH)
Page 21
... Devices List. Uncheck Enable Access Control and select the option. A device(s) with Job Accounting disabled will fail • If JAC State is Use Default Access Code. • If you want to use your own access code, select this button, you want to configure your own access code, select Use Custom Access Code and type in the Custom Code you can check the result in Settings menu > Job accounting (See "Settings menu" on page 23). Click OK/Apply. Devices_ 21 From SyncThru™ Admin 5, click Job Accounting menu > Devices > Devices Settings > Device List...
... Devices List. Uncheck Enable Access Control and select the option. A device(s) with Job Accounting disabled will fail • If JAC State is Use Default Access Code. • If you want to use your own access code, select this button, you want to configure your own access code, select Use Custom Access Code and type in the Custom Code you can check the result in Settings menu > Job accounting (See "Settings menu" on page 23). Click OK/Apply. Devices_ 21 From SyncThru™ Admin 5, click Job Accounting menu > Devices > Devices Settings > Device List...
SyncThru 5.0 Guide (ENGLISH)
Page 11
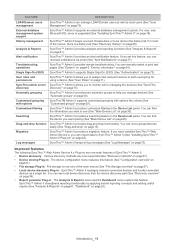
... have installed SyncThru™ Web Admin Service 4, you can filter the information you can remotely restart or print test pages (See "System" on page 43, "Device information" on page 70). FEATURE DESCRIPTION LDAP/Domain users management External database management system support History management Analysis & Reports Alert notification Troubleshooting operations Single Sign-On (SSO) User roles and permissions SyncThru admin server discovery Automatic grouping Customized grouping with options like...
... have installed SyncThru™ Web Admin Service 4, you can filter the information you can remotely restart or print test pages (See "System" on page 43, "Device information" on page 70). FEATURE DESCRIPTION LDAP/Domain users management External database management system support History management Analysis & Reports Alert notification Troubleshooting operations Single Sign-On (SSO) User roles and permissions SyncThru admin server discovery Automatic grouping Customized grouping with options like...
SyncThru 5.0 Guide (ENGLISH)
Page 43
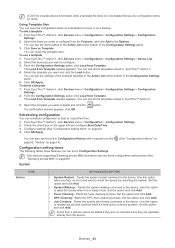
.... Configure settings (See "Configuration setting items" on page 89). From SyncThru™ Admin 5, click Devices menu > Configuration > Configuration Settings > Device List. 2. Select the template you can also see all the templates stored in Configuration Settings. Only devices supporting Samsung private MIB information can see this option to the Action List at a specified time. 1. Set the option and click Add. • Fuser Cleaning: Starts the fuser cleaning process. Click Save as a backup. From the Configuration Settings panel, click Load from Template window...
.... Configure settings (See "Configuration setting items" on page 89). From SyncThru™ Admin 5, click Devices menu > Configuration > Configuration Settings > Device List. 2. Select the template you can also see all the templates stored in Configuration Settings. Only devices supporting Samsung private MIB information can see this option to the Action List at a specified time. 1. Set the option and click Add. • Fuser Cleaning: Starts the fuser cleaning process. Click Save as a backup. From the Configuration Settings panel, click Load from Template window...
SyncThru 5.0 Guide (ENGLISH)
Page 44
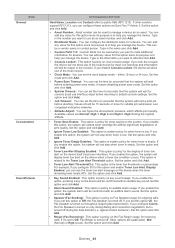
... use interface) input before returning to the Toner Low Alert Threshold option. Set the option and click Add. • Toner Low Alert Threshold(%): This option is the toner low threshold in seconds) that the system will not stop when toner is turned off during fax data transfer (i.e. Set the option and click Add. • Alarm Sound Enabled: This option is related to default console settings. Set the option and click Add. Set the option and click Add. • Asset Number: Asset number can configure...
... use interface) input before returning to the Toner Low Alert Threshold option. Set the option and click Add. • Toner Low Alert Threshold(%): This option is the toner low threshold in seconds) that the system will not stop when toner is turned off during fax data transfer (i.e. Set the option and click Add. • Alarm Sound Enabled: This option is related to default console settings. Set the option and click Add. Set the option and click Add. • Asset Number: Asset number can configure...
SyncThru 5.0 Guide (ENGLISH)
Page 56
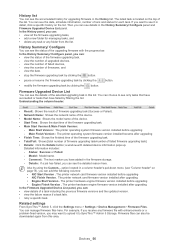
... Settings menu > Settings > Device Management > Firmware Files. Understanding the column header: • Result: Shows the result of firmware upgrading task (Success or Failed). • Network Name: Shows the network name of the device. • Model Name: Shows the model name of the device. • Start Time: Shows the start time of runs and status for upgrading firmware in the History Summary/ Configure panel and Firmware Upgraded Device List panel. Main Finish Version: The printer operating system firmware version installed...
... Settings menu > Settings > Device Management > Firmware Files. Understanding the column header: • Result: Shows the result of firmware upgrading task (Success or Failed). • Network Name: Shows the network name of the device. • Model Name: Shows the model name of the device. • Start Time: Shows the start time of runs and status for upgrading firmware in the History Summary/ Configure panel and Firmware Upgraded Device List panel. Main Finish Version: The printer operating system firmware version installed...
SyncThru 5.0 Guide (ENGLISH)
Page 79
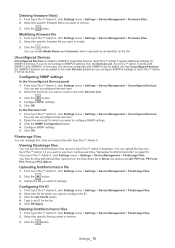
... settings. 5. From SyncThru™ Admin 5, click Settings menu > Settings > Device Management > Unconfigured Devices. Select the device(s) for the devices. Filestorage Files You can see the font/form/macro files stored in an ID for which you want to remove. 3. You filter the files with default filter options from the Devices List, SyncThru™ Admin 5 works with SNMPv1 and SNMPv2. Select the file for the file. 5. Click OK/Apply. Click the button. Select the specific firmware file...
... settings. 5. From SyncThru™ Admin 5, click Settings menu > Settings > Device Management > Unconfigured Devices. Select the device(s) for the devices. Filestorage Files You can see the font/form/macro files stored in an ID for which you want to remove. 3. You filter the files with default filter options from the Devices List, SyncThru™ Admin 5 works with SNMPv1 and SNMPv2. Select the file for the file. 5. Click OK/Apply. Click the button. Select the specific firmware file...
SyncThru 5.0 Guide (ENGLISH)
Page 80
... the Windows Start menu, select Run and type in the web browser are not on . - If you used Broadcast discovery method, - Troubleshooting 7. Administrator actions • Check if SyncThru™ Admin 5 is preventing communication between the browser and the SyncThru™ Admin 5 host machine. - User actions • Make sure that the devices support multicast broadcasts. Ask your network manager or firewall, you change the setting. Check whether the...
... the Windows Start menu, select Run and type in the web browser are not on . - If you used Broadcast discovery method, - Troubleshooting 7. Administrator actions • Check if SyncThru™ Admin 5 is preventing communication between the browser and the SyncThru™ Admin 5 host machine. - User actions • Make sure that the devices support multicast broadcasts. Ask your network manager or firewall, you change the setting. Check whether the...
SyncThru 5.0 Guide (ENGLISH)
Page 90
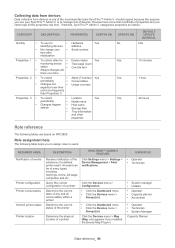
... of any and all the properties real time. Click the Devices menu > Configuration. An event can be of many types, including warnings, errors, job stage completion and etc. Collecting data from devices Data collection from devices is one of the most important jobs SyncThru™ Admin 5 should support because the purpose you cannot get all consumables within a printer Determine the current status of a printer Click Settings menu > Settings > Device Management > Alert notifications.
... of any and all the properties real time. Click the Devices menu > Configuration. An event can be of many types, including warnings, errors, job stage completion and etc. Collecting data from devices Data collection from devices is one of the most important jobs SyncThru™ Admin 5 should support because the purpose you cannot get all consumables within a printer Determine the current status of a printer Click Settings menu > Settings > Device Management > Alert notifications.


