
User Manual (user Manual) (ver.5.00) (English)
Page 9
Maintenance Printing a machine report ...11.1 Monitoring the supplies life ...11.1 Finding the serial number ...11.1 Sending the imaging unit reorder notification ...11.1 Sending the toner reorder notification ...11.2 Checking Stored Documents ...11.2 Cleaning your machine from the website ...11.9 12. Authentication ...10.6 Optional Service ...10.7 Adjusting the color contrast ...10.8 ...
Maintenance Printing a machine report ...11.1 Monitoring the supplies life ...11.1 Finding the serial number ...11.1 Sending the imaging unit reorder notification ...11.1 Sending the toner reorder notification ...11.2 Checking Stored Documents ...11.2 Cleaning your machine from the website ...11.9 12. Authentication ...10.6 Optional Service ...10.7 Adjusting the color contrast ...10.8 ...

User Manual (user Manual) (ver.5.00) (English)
Page 11
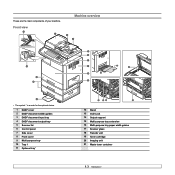
... Provides you with help information on printer driver properties and instructions for setting up the properties for maintaining your machine in order. Samsung website If you have Internet access, you with step-by-step instructions for using your machine's full features, and contains information for... printing. Footnote Used to show the steps Copy > the Advanced tab > of the toner cartridge. pages per minute > Used to provide more information You can find information for texts on the screen or actual prints on ...
... Provides you with help information on printer driver properties and instructions for setting up the properties for maintaining your machine in order. Samsung website If you have Internet access, you with step-by-step instructions for using your machine's full features, and contains information for... printing. Footnote Used to show the steps Copy > the Advanced tab > of the toner cartridge. pages per minute > Used to provide more information You can find information for texts on the screen or actual prints on ...
User Manual (user Manual) (ver.5.00) (English)
Page 19
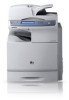
Front view Machine overview • The symbol * is a mark for the optional device. 1 DADF cover 2 DADF document width guides 3 DADF document input tray 4 DADF document output tray 5 Scanner lid 6 Control panel 7 Side cover 8 Front cover 9 Multi-purpose tray 10 Tray 1 11 Optional tray* 12 Stand* 13 CCD Lock 14 Output support 15 Multi-purpose tray extension 16 Multi-purpose tray paper width guides 17 Scanner glass 18 Transfer unit 19 Toner cartridge 20 Imaging unit 21 Waste toner container 1.3 These are the main components of your machine.
Front view Machine overview • The symbol * is a mark for the optional device. 1 DADF cover 2 DADF document width guides 3 DADF document input tray 4 DADF document output tray 5 Scanner lid 6 Control panel 7 Side cover 8 Front cover 9 Multi-purpose tray 10 Tray 1 11 Optional tray* 12 Stand* 13 CCD Lock 14 Output support 15 Multi-purpose tray extension 16 Multi-purpose tray paper width guides 17 Scanner glass 18 Transfer unit 19 Toner cartridge 20 Imaging unit 21 Waste toner container 1.3 These are the main components of your machine.

User Manual (user Manual) (ver.5.00) (English)
Page 22
... number and other available icons, press the right arrow on the display screen. • SmarThru Workflow: Enters the SmarThru Workflow menu. (Optional) • Toner Info.: Shows amount of toner used to remove the USB memory devices from the machine. Power Saver button When the machine is inserted into the USB memory port...
... number and other available icons, press the right arrow on the display screen. • SmarThru Workflow: Enters the SmarThru Workflow menu. (Optional) • Toner Info.: Shows amount of toner used to remove the USB memory devices from the machine. Power Saver button When the machine is inserted into the USB memory port...
User Manual (user Manual) (ver.5.00) (English)
Page 23
... from the computer. • When the backlight blinks rapidly, the machine is on-line and can temporarily improve print quality by redistributing the toner. (Page 11.4) Note Check the message on the display screen, and follow the instruction on the message or refer to the following diagram....tray. • The machine has stopped due to on the control panel. Close the cover. • There is in the machine, or full waste toner container. (Page 11.7) Blinking • A minor error has occurred and the machine is opened. Refer to Troubleshooting part. (Page 12.1) If the problem...
... from the computer. • When the backlight blinks rapidly, the machine is on-line and can temporarily improve print quality by redistributing the toner. (Page 11.4) Note Check the message on the display screen, and follow the instruction on the message or refer to the following diagram....tray. • The machine has stopped due to on the control panel. Close the cover. • There is in the machine, or full waste toner container. (Page 11.7) Blinking • A minor error has occurred and the machine is opened. Refer to Troubleshooting part. (Page 12.1) If the problem...
User Manual (user Manual) (ver.5.00) (English)
Page 24
... Detail Close Active Notice tab Detail Close 1.8 Machine Status shows the supplies life, billing, counters and reports. Machine Status Supplies Life tab (Page 10.1) Toner Cartridge-C Toner Cartridge-M Toner Cartridge-Y Toner Cartridge-K Imaging Unit-C Imaging Unit-M Imaging Unit-Y Imaging Unit-K Fuser Kit Feed Roller Kit-Tray 1 Feed Roller Kit-Tray 2 Feed Roller Kit-Tray...
... Detail Close Active Notice tab Detail Close 1.8 Machine Status shows the supplies life, billing, counters and reports. Machine Status Supplies Life tab (Page 10.1) Toner Cartridge-C Toner Cartridge-M Toner Cartridge-Y Toner Cartridge-K Imaging Unit-C Imaging Unit-M Imaging Unit-Y Imaging Unit-K Fuser Kit Feed Roller Kit-Tray 1 Feed Roller Kit-Tray 2 Feed Roller Kit-Tray...
User Manual (user Manual) (ver.5.00) (English)
Page 26
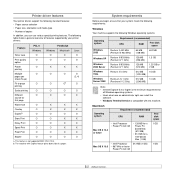
...; Paper size, orientation and media type • Number of copies In addition, you begin, ensure that your printer drivers: Feature PCL 6 Windows PostScript Windows Macintosh Toner save O O X Print quality O O O option Poster printing O X X Multiple O pages per sheet (N-up) Fit to 2 GB Pentium IV 3 GHz 512 MB 15 GB (1024 MB) Pentinum IV...
...; Paper size, orientation and media type • Number of copies In addition, you begin, ensure that your printer drivers: Feature PCL 6 Windows PostScript Windows Macintosh Toner save O O X Print quality O O O option Poster printing O X X Multiple O pages per sheet (N-up) Fit to 2 GB Pentium IV 3 GHz 512 MB 15 GB (1024 MB) Pentinum IV...
User Manual (user Manual) (ver.5.00) (English)
Page 28
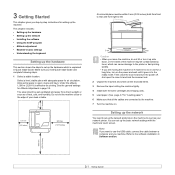
... moving the machine or if machine is not in use for a long time, turn the power off. 3 Getting Started This chapter gives you step-by toner, which is explained in Quick Install Guide. Make sure you machine. The area should be within 5 mm (0.02 inches) both the... toner cartridges and imaging units. 5 Load paper. (See page 4.7 for printing. A horizontal plane must be well-ventilated and away from right to the software installation in ...
... moving the machine or if machine is not in use for a long time, turn the power off. 3 Getting Started This chapter gives you step-by toner, which is explained in Quick Install Guide. Make sure you machine. The area should be within 5 mm (0.02 inches) both the... toner cartridges and imaging units. 5 Load paper. (See page 4.7 for printing. A horizontal plane must be well-ventilated and away from right to the software installation in ...

User Manual (user Manual) (ver.5.00) (English)
Page 35
... with the lid open. In the DADF Using the DADF, you use the scanner glass. 1 Lift and open while copying may affect copy quality and toner consumption. • Dust on the scanner glass may cause black spots on the scanner glass. coated paper - wrinkled or creased paper - This chapter includes: •...
... with the lid open. In the DADF Using the DADF, you use the scanner glass. 1 Lift and open while copying may affect copy quality and toner consumption. • Dust on the scanner glass may cause black spots on the scanner glass. coated paper - wrinkled or creased paper - This chapter includes: •...
User Manual (user Manual) (ver.5.00) (English)
Page 81
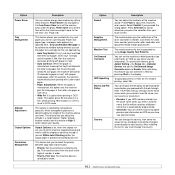
... Sound Supplies Management Machine Test On Demand Overwrite HDD Spoolling Stored Job File Policy Country Description You can adjust the loudness of the drum and toner to select the priority between copy jobs and print jobs. • Priority: Set the priority by pressing Start in the display. The machine gives you...
... Sound Supplies Management Machine Test On Demand Overwrite HDD Spoolling Stored Job File Policy Country Description You can adjust the loudness of the drum and toner to select the priority between copy jobs and print jobs. • Priority: Set the priority by pressing Start in the display. The machine gives you...
User Manual (user Manual) (ver.5.00) (English)
Page 86
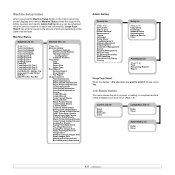
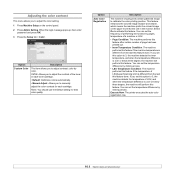
... This menu allows you to manually adjust the color contrast for best color quality. Note: You should use the Default setting for each toner cartridge. • Default: Optimizes colors automatically. • Manual Adjust: Allows you to adjust the color setting. 1 Press Machine Setup... Color. Option Auto Color Registration Description The machine virtually prints certain patterned image to activate this feature after certain number of the toner in the monitor. Execute Now: The printer executes the auto color registration now. 10.8 You can set this option to 3,...
... This menu allows you to manually adjust the color contrast for best color quality. Note: You should use the Default setting for each toner cartridge. • Default: Optimizes colors automatically. • Manual Adjust: Allows you to adjust the color setting. 1 Press Machine Setup... Color. Option Auto Color Registration Description The machine virtually prints certain patterned image to activate this feature after certain number of the toner in the monitor. Execute Now: The printer executes the auto color registration now. 10.8 You can set this option to 3,...

User Manual (user Manual) (ver.5.00) (English)
Page 88
... number • Sending the imaging unit reorder notification • Sending the toner reorder notification • Checking Stored Documents • Cleaning your machine • Maintaining the toner cartridge • Redistributing toner • Replacing the toner cartridge • Replacing the imaging unit • Replacing the waste toner container • Maintenance Parts • Managing your machine. The Fax...
... number • Sending the imaging unit reorder notification • Sending the toner reorder notification • Checking Stored Documents • Cleaning your machine • Maintaining the toner cartridge • Redistributing toner • Replacing the toner cartridge • Replacing the imaging unit • Replacing the waste toner container • Maintenance Parts • Managing your machine. The Fax...
User Manual (user Manual) (ver.5.00) (English)
Page 89
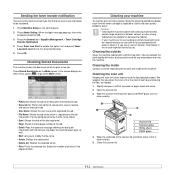
... Shows the total page number of the machine. If you to clean it. We suggest that the toner level is registered as the job information. Cleaning the outside Clean the machine cabinet with the file size...the scan unit at the start of the scanner lid and white sheet until it is contaminated with toner, we recommend you use cloth or tissue dampened with water, but be careful not to let any...or into the machine. You can dampen the cloth slightly with water to use a vacuum cleaner, toner blows in the popup window. Select the number of the print or fax job. Checking Stored ...
... Shows the total page number of the machine. If you to clean it. We suggest that the toner level is registered as the job information. Cleaning the outside Clean the machine cabinet with the file size...the scan unit at the start of the scanner lid and white sheet until it is contaminated with toner, we recommend you use cloth or tissue dampened with water, but be careful not to let any...or into the machine. You can dampen the cloth slightly with water to use a vacuum cleaner, toner blows in the popup window. Select the number of the print or fax job. Checking Stored ...

User Manual (user Manual) (ver.5.00) (English)
Page 90
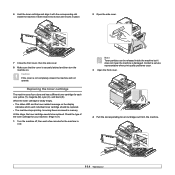
...density of its package until ready for more often. If this happens, you print on the amount of toner that the toner is low may need to distribute the toner evenly inside the machine but it does not mean the machine is near the end of the pages ...may appear on your machine. • To prevent damage to the toner cartridge, do not expose it off , then wait a few minutes. Note If toner gets on the display. Redistributing toner When the toner cartridge is damaged. Note Toner particles can temporarily reestablish print quality by operating environment, printing interval, media...
...density of its package until ready for more often. If this happens, you print on the amount of toner that the toner is low may need to distribute the toner evenly inside the machine but it does not mean the machine is near the end of the pages ...may appear on your machine. • To prevent damage to the toner cartridge, do not expose it off , then wait a few minutes. Note If toner gets on the display. Redistributing toner When the toner cartridge is damaged. Note Toner particles can temporarily reestablish print quality by operating environment, printing interval, media...
User Manual (user Manual) (ver.5.00) (English)
Page 91
... for your machine. (Page 13.1) 1 Turn the machine off, then wait a few minutes for each individual toner cartridge should be replaced. • The machine stops printing. Note Toner particles can be replaced. Insert it back into its slot until it with the corresponding slot inside the machine but it does ...side cover. 7 Close the front cover, then the side cover. 8 Make sure that the cover is totally empty. • The status LED and the toner-related message on . Contact a service representative when print quality problems occur. 3 Open the front cover. 4 Pull the corresponding...
... for your machine. (Page 13.1) 1 Turn the machine off, then wait a few minutes for each individual toner cartridge should be replaced. • The machine stops printing. Note Toner particles can be replaced. Insert it back into its slot until it with the corresponding slot inside the machine but it does ...side cover. 7 Close the front cover, then the side cover. 8 Make sure that the cover is totally empty. • The status LED and the toner-related message on . Contact a service representative when print quality problems occur. 3 Open the front cover. 4 Pull the corresponding...
User Manual (user Manual) (ver.5.00) (English)
Page 92
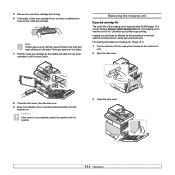
...unit yield may be affected by the handle and slide the new toner cartridge in until it off , then wait a few minutes for the machine to distribute the toner evenly inside the cartridge. 5 Remove the new toner cartridge from its bag. 6 Thoroughly roll the new cartridge five or... machine on your printer stops printing. Replacing the imaging unit Expected cartridge life The useful life of life. Hot water sets toner into fabric. 7 Hold the new toner cartridge by the operating environment, optional, printing interval, media type and media size. For ordering information for imaging unit. (...
...unit yield may be affected by the handle and slide the new toner cartridge in until it off , then wait a few minutes for the machine to distribute the toner evenly inside the cartridge. 5 Remove the new toner cartridge from its bag. 6 Thoroughly roll the new cartridge five or... machine on your printer stops printing. Replacing the imaging unit Expected cartridge life The useful life of life. Hot water sets toner into fabric. 7 Hold the new toner cartridge by the operating environment, optional, printing interval, media type and media size. For ordering information for imaging unit. (...

User Manual (user Manual) (ver.5.00) (English)
Page 93
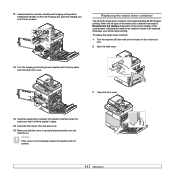
Hot water sets toner into fabric. You could damage the surface of the imaging unit. 8 Remove the paper protecting the ...outwards to side five or six times. 6 Pull the used imaging unit out of the machine using its handle. Note If toner gets on its bag. 11.6 Caution • Be careful not to scratch the surface of the imaging unit. • ... new imaging unit from its bottom. Cover it with a dry cloth and wash clothing in cold water. 4 Pull the waste toner container out of the machine using the handle on your clothing, wipe it off with a piece of paper to light for more...
Hot water sets toner into fabric. You could damage the surface of the imaging unit. 8 Remove the paper protecting the ...outwards to side five or six times. 6 Pull the used imaging unit out of the machine using its handle. Note If toner gets on its bag. 11.6 Caution • Be careful not to scratch the surface of the imaging unit. • ... new imaging unit from its bottom. Cover it with a dry cloth and wash clothing in cold water. 4 Pull the waste toner container out of the machine using the handle on your clothing, wipe it off with a piece of paper to light for more...
User Manual (user Manual) (ver.5.00) (English)
Page 94
... new imaging unit, push the imaging unit until it locks in place and close the inner cover. 3 Open the front cover. 13 Insert the waste toner container into position and then push it locks in place. 14 Close the front cover, then the side cover. 15 Make sure that the cover... not operate. 11.7 Otherwise your printer stops printing. Replace it appears on the screen display of the waste toner container has expired, Waste tank is approximately 48,000 images printing. To replace the waste toner container: 1 Turn the machine off, then wait a few minutes for the machine to cool. 2 Open the ...
... new imaging unit, push the imaging unit until it locks in place and close the inner cover. 3 Open the front cover. 13 Insert the waste toner container into position and then push it locks in place. 14 Close the front cover, then the side cover. 15 Make sure that the cover... not operate. 11.7 Otherwise your printer stops printing. Replace it appears on the screen display of the waste toner container has expired, Waste tank is approximately 48,000 images printing. To replace the waste toner container: 1 Turn the machine off, then wait a few minutes for the machine to cool. 2 Open the ...
User Manual (user Manual) (ver.5.00) (English)
Page 95
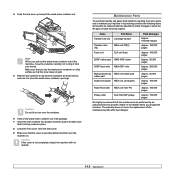
... of pages or when the life span of its package. 7 Insert the new container into position and then push it to close the waste toner container openings. The warranty does not cover the replacement of the machine, move the container carefully not to drop it to make sure that it... performed by an authorized service provider, dealer or the retailer where you lay the waste toner container on . Caution If the cover is securely latched and then turn over the container. 6 Take a new waste toner container out of each item has expired. Maintenance Parts To avoid print quality and paper ...
... of pages or when the life span of its package. 7 Insert the new container into position and then push it to close the waste toner container openings. The warranty does not cover the replacement of the machine, move the container carefully not to drop it to make sure that it... performed by an authorized service provider, dealer or the retailer where you lay the waste toner container on . Caution If the cover is securely latched and then turn over the container. 6 Take a new waste toner container out of each item has expired. Maintenance Parts To avoid print quality and paper ...
User Manual (user Manual) (ver.5.00) (English)
Page 107
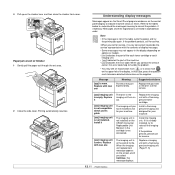
...8226; You may not appear in that case, press the question mark to reinstall the imaging unit. Replace with a new one The toner in alphabetical order. Suggested solutions Replace the part with new one Meaning The life of the display, in the display depending on the screen... cross mark ( ) on the supplies. When the imaging unit replacement message appears on options or models. • [xxx] indicates the part of the each toner cartridge or each imaging unit. • [yyy] indicates the part of the machine. • [zzz] indicates the error code. Call for your machine. ...
...8226; You may not appear in that case, press the question mark to reinstall the imaging unit. Replace with a new one The toner in alphabetical order. Suggested solutions Replace the part with new one Meaning The life of the display, in the display depending on the screen... cross mark ( ) on the supplies. When the imaging unit replacement message appears on options or models. • [xxx] indicates the part of the each toner cartridge or each imaging unit. • [yyy] indicates the part of the machine. • [zzz] indicates the error code. Call for your machine. ...


