
User Manual (user Manual) (ver.5.00) (English)
Page 9
... Toner cartridge storage ...11.3 Expected cartridge life ...11.3 Redistributing toner ...11.3 Replacing the toner cartridge ...11.4 Replacing the imaging unit ...11.5 Replacing the waste toner container ...11.7 Maintenance Parts ...11.8 Managing your machine from the website ...11.9 12. ...10.9 11. Maintenance Printing a machine report ...11.1 Monitoring the supplies life ...11.1 Finding the serial number ...11.1 Sending the imaging unit reorder notification ...11.1 Sending the toner reorder notification ...11.2 Checking Stored Documents ...11.2 Cleaning your machine ...11.2 Cleaning the outside...
... Toner cartridge storage ...11.3 Expected cartridge life ...11.3 Redistributing toner ...11.3 Replacing the toner cartridge ...11.4 Replacing the imaging unit ...11.5 Replacing the waste toner container ...11.7 Maintenance Parts ...11.8 Managing your machine from the website ...11.9 12. ...10.9 11. Maintenance Printing a machine report ...11.1 Monitoring the supplies life ...11.1 Finding the serial number ...11.1 Sending the imaging unit reorder notification ...11.1 Sending the toner reorder notification ...11.2 Checking Stored Documents ...11.2 Cleaning your machine ...11.2 Cleaning the outside...
User Manual (user Manual) (ver.5.00) (English)
Page 19
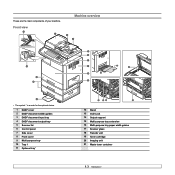
Front view Machine overview • The symbol * is a mark for the optional device. 1 DADF cover 2 DADF document width guides 3 DADF document input tray 4 DADF document output tray 5 Scanner lid 6 Control panel 7 Side cover 8 Front cover 9 Multi-purpose tray 10 Tray 1 11 Optional tray* 12 Stand* 13 CCD Lock 14 Output support 15 Multi-purpose tray extension 16 Multi-purpose tray paper width guides 17 Scanner glass 18 Transfer unit 19 Toner cartridge 20 Imaging unit 21 Waste toner container 1.3 These are the main components of your machine.
Front view Machine overview • The symbol * is a mark for the optional device. 1 DADF cover 2 DADF document width guides 3 DADF document input tray 4 DADF document output tray 5 Scanner lid 6 Control panel 7 Side cover 8 Front cover 9 Multi-purpose tray 10 Tray 1 11 Optional tray* 12 Stand* 13 CCD Lock 14 Output support 15 Multi-purpose tray extension 16 Multi-purpose tray paper width guides 17 Scanner glass 18 Transfer unit 19 Toner cartridge 20 Imaging unit 21 Waste toner container 1.3 These are the main components of your machine.
User Manual (user Manual) (ver.5.00) (English)
Page 23
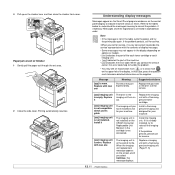
... Machine Setup, Job Status or touching menus on the control panel. Main screen The Main screen is near the end of lifespan. Remove the old imaging unit and install a new one . (Page 11.4) • A paper jam has occurred. (Page 12.3) • The cover is shut down or reset. Remove the old toner... cartridge is no paper in power save mode. Check the display message. Order a new toner cartridge. These menus can be used. Red On • The imaging unit is pressed, it 's action. When data is received, or any button is totally out of its life. Load paper in the machine, or full waste...
... Machine Setup, Job Status or touching menus on the control panel. Main screen The Main screen is near the end of lifespan. Remove the old imaging unit and install a new one . (Page 11.4) • A paper jam has occurred. (Page 12.3) • The cover is shut down or reset. Remove the old toner... cartridge is no paper in power save mode. Check the display message. Order a new toner cartridge. These menus can be used. Red On • The imaging unit is pressed, it 's action. When data is received, or any button is totally out of its life. Load paper in the machine, or full waste...
User Manual (user Manual) (ver.5.00) (English)
Page 24
...shows, press Yes. Machine Status Supplies Life tab (Page 10.1) Toner Cartridge-C Toner Cartridge-M Toner Cartridge-Y Toner Cartridge-K Imaging Unit-C Imaging Unit-M Imaging Unit-Y Imaging Unit-K Fuser Kit Feed Roller Kit-Tray 1 Feed Roller Kit-Tray 2 Feed Roller Kit-Tray 3 Feed Roller Kit - ... Color Printed 2-Sided Sheets Analog Fax Sheets Analog Fax 2-Sided Sheets Fax Image Received Analog Fax Images Sent Analog Fax Images Received Images Sent Network Scanning Images Sent Email Images Sent Maintenance Impressions Black Maintenance Impressions Admin Setting General tab (Page 10.2) ...
...shows, press Yes. Machine Status Supplies Life tab (Page 10.1) Toner Cartridge-C Toner Cartridge-M Toner Cartridge-Y Toner Cartridge-K Imaging Unit-C Imaging Unit-M Imaging Unit-Y Imaging Unit-K Fuser Kit Feed Roller Kit-Tray 1 Feed Roller Kit-Tray 2 Feed Roller Kit-Tray 3 Feed Roller Kit - ... Color Printed 2-Sided Sheets Analog Fax Sheets Analog Fax 2-Sided Sheets Fax Image Received Analog Fax Images Sent Analog Fax Images Received Images Sent Network Scanning Images Sent Email Images Sent Maintenance Impressions Black Maintenance Impressions Admin Setting General tab (Page 10.2) ...
User Manual (user Manual) (ver.5.00) (English)
Page 28
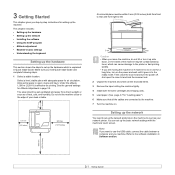
... to rear and from direct sunlight or sources of your network printer. A horizontal plane must be within 5 mm (0.02 inches) both the toner cartridges and imaging units. 5 Load paper. (See page 4.7 for a long time, turn on the power and wait until it goes in Software section. 3.1 Setting up the network You need...
... to rear and from direct sunlight or sources of your network printer. A horizontal plane must be within 5 mm (0.02 inches) both the toner cartridges and imaging units. 5 Load paper. (See page 4.7 for a long time, turn on the power and wait until it goes in Software section. 3.1 Setting up the network You need...
User Manual (user Manual) (ver.5.00) (English)
Page 81
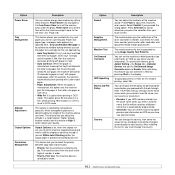
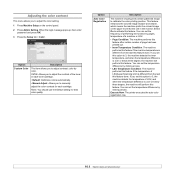
... When the paper is mismatched, this option sets the machine print A4 size paper in DOS mode. The machine prints the test image patterns using Image Quality Test Patterns. Option Power Saver Tray Management Altitude Adjustment Output Options Contention Management Description You can adjust the loudness of the machine... the just opened tray. • Auto Tray Switch: If tray1 and tray2 are adjusted here. You can choose the file policy for the fuser unit. (Page 3.6) This feature allows you enter a new file name, the file will be saved as a different name that tray1has filled with the...
... When the paper is mismatched, this option sets the machine print A4 size paper in DOS mode. The machine prints the test image patterns using Image Quality Test Patterns. Option Power Saver Tray Management Altitude Adjustment Output Options Contention Management Description You can adjust the loudness of the machine... the just opened tray. • Auto Tray Switch: If tray1 and tray2 are adjusted here. You can choose the file policy for the fuser unit. (Page 3.6) This feature allows you enter a new file name, the file will be saved as a different name that tray1has filled with the...
User Manual (user Manual) (ver.5.00) (English)
Page 86
... you set this option to adjust the contrast of LSU(Laser Scanning Unit) is different from the last this feature done. Option Auto Color Registration Description The machine virtually prints certain patterned image to adjust contrast, color by clicking arrows. • LSU Temperature Condition... this feature after certain number of performing the function by clicking arrows. This feature enhances the colored image sharper and clearer, which means the machine prints the colored image on the control panel. 2 Press Admin Setting. Execute Now: The printer executes the auto color ...
... you set this option to adjust the contrast of LSU(Laser Scanning Unit) is different from the last this feature done. Option Auto Color Registration Description The machine virtually prints certain patterned image to adjust contrast, color by clicking arrows. • LSU Temperature Condition... this feature after certain number of performing the function by clicking arrows. This feature enhances the colored image sharper and clearer, which means the machine prints the colored image on the control panel. 2 Press Admin Setting. Execute Now: The printer executes the auto color ...

User Manual (user Manual) (ver.5.00) (English)
Page 88
...chapter includes: • Printing a machine report • Monitoring the supplies life • Finding the serial number • Sending the imaging unit reorder notification • Sending the toner reorder notification • Checking Stored Documents • Cleaning your machine • Maintaining the toner ... enter password and press OK. 3 Press the General tab > Supplies Management > Imaging Unit Reorder Notification. 4 Press Imaging Unit Low Alert to enable this option not, and press Imaging Unit Low Alert Level to set the machine to print the machine's network information or font...
...chapter includes: • Printing a machine report • Monitoring the supplies life • Finding the serial number • Sending the imaging unit reorder notification • Sending the toner reorder notification • Checking Stored Documents • Cleaning your machine • Maintaining the toner ... enter password and press OK. 3 Press the General tab > Supplies Management > Imaging Unit Reorder Notification. 4 Press Imaging Unit Low Alert to enable this option not, and press Imaging Unit Low Alert Level to set the machine to print the machine's network information or font...
User Manual (user Manual) (ver.5.00) (English)
Page 92
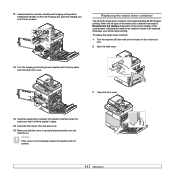
...water. For ordering information for the machine to distribute the toner evenly inside the cartridge. The screen displays Replace [xxx] Imaging Unit when the imaging unit is near the end of the imaging unit is approximately 30,000 pages. Hot water sets toner into fabric. 7 Hold the new toner cartridge by the operating environment,...cover, then the side cover. 9 Make sure that the cover is securely latched and then turn the machine on your printer stops printing. Imaging unit yield may be affected by the handle and slide the new toner cartridge in until it off , then wait a few minutes for...
...water. For ordering information for the machine to distribute the toner evenly inside the cartridge. The screen displays Replace [xxx] Imaging Unit when the imaging unit is near the end of the imaging unit is approximately 30,000 pages. Hot water sets toner into fabric. 7 Hold the new toner cartridge by the operating environment,...cover, then the side cover. 9 Make sure that the cover is securely latched and then turn the machine on your printer stops printing. Imaging unit yield may be affected by the handle and slide the new toner cartridge in until it off , then wait a few minutes for...

User Manual (user Manual) (ver.5.00) (English)
Page 93
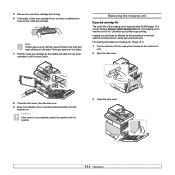
... the surface of the imaging unit. 8 Remove the paper protecting the surface of the imaging unit. 9 Remove the cap, and carefully pull the seal tapes out of the imaging unit. 5 Turn the imaging unit locking levers outwards to side five or six times. 6 Pull the used imaging unit out of the machine ...open the inner cover. 10 Thoroughly shake the new imaging unit side to release and open the imaging unit package. Caution • Be careful not to scratch the surface of the imaging unit. • To prevent damage, do not expose the imaging unit to protect it off with a dry cloth and...
... the surface of the imaging unit. 8 Remove the paper protecting the surface of the imaging unit. 9 Remove the cap, and carefully pull the seal tapes out of the imaging unit. 5 Turn the imaging unit locking levers outwards to side five or six times. 6 Pull the used imaging unit out of the machine ...open the inner cover. 10 Thoroughly shake the new imaging unit side to release and open the imaging unit package. Caution • Be careful not to scratch the surface of the imaging unit. • To prevent damage, do not expose the imaging unit to protect it off with a dry cloth and...
User Manual (user Manual) (ver.5.00) (English)
Page 94
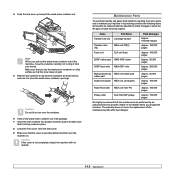
...When the life span of the control panel, indicating the waste toner container needs to cool. 2 Open the side cover. 12 Turn the imaging unit locking levers inwards until it appears on the screen display of the waste toner container has expired, Waste tank is securely latched and then turn... the machine on the new imaging unit, push the imaging unit until it locks in place and close the inner cover. 3 Open the front cover. 13 Insert the waste toner container into position and...
...When the life span of the control panel, indicating the waste toner container needs to cool. 2 Open the side cover. 12 Turn the imaging unit locking levers inwards until it appears on the screen display of the waste toner container has expired, Waste tank is securely latched and then turn... the machine on the new imaging unit, push the imaging unit until it locks in place and close the inner cover. 3 Open the front cover. 13 Insert the waste toner container into position and...
User Manual (user Manual) (ver.5.00) (English)
Page 95
... pull the waste toner container out. Make sure that you lay the waste toner container on . Items Transfer belt unit Part Name Cartridge-transfer Transfer roller (T2) Fuser unit MEA unit-TR(2) ELA unit fuser DADF rubber pad RMO-ADF rubber DADF feed roller MEA-ADF roller Multi-purpose tray MEA... unit-holder pad rubber pad Guide exit duplex MEA unit_exit duplex Paper feed roller MEA unit-roller PU Pickup roller ELA HOU-MP pickup Yield (Average) Approx. 100,000 images Approx. 100,000 pages Approx. 100,000 pages Approx. 50...
... pull the waste toner container out. Make sure that you lay the waste toner container on . Items Transfer belt unit Part Name Cartridge-transfer Transfer roller (T2) Fuser unit MEA unit-TR(2) ELA unit fuser DADF rubber pad RMO-ADF rubber DADF feed roller MEA-ADF roller Multi-purpose tray MEA... unit-holder pad rubber pad Guide exit duplex MEA unit_exit duplex Paper feed roller MEA unit-roller PU Pickup roller ELA HOU-MP pickup Yield (Average) Approx. 100,000 images Approx. 100,000 pages Approx. 100,000 pages Approx. 50...
User Manual (user Manual) (ver.5.00) (English)
Page 107
... toner cartridge. Check userís guide [xxx] imaging unit is not compatible. The imaging unit is not connected. Replace the imaging unit with a new one. Replace it [xxx] imaging unit is not for your machine. The imaging unit is very convenient to provide the service representative with new...one Meaning The life of the machine. • [zzz] indicates the error code. Install a Samsunggenuine imaging unit, designed for your machine. Replace a imaging unit with new one The toner in the display depending on options or models. • [xxx] indicates the...
... toner cartridge. Check userís guide [xxx] imaging unit is not compatible. The imaging unit is not connected. Replace the imaging unit with a new one. Replace it [xxx] imaging unit is not for your machine. The imaging unit is very convenient to provide the service representative with new...one Meaning The life of the machine. • [zzz] indicates the error code. Install a Samsunggenuine imaging unit, designed for your machine. Replace a imaging unit with new one The toner in the display depending on options or models. • [xxx] indicates the...
User Manual (user Manual) (ver.5.00) (English)
Page 108
...machine off then on again. Check userís guide The toner cartridge you do not select any, the machine will be activated only with a Samsung-genuine toner cartridge. Install it cannot supply the toner properly. Replace with new one . (Page 11.4) [xxx] toner is preset in the...to secure memory. Install it Finisher error: [zzz]. Please turn it . There is a problem in the memory to the imaging unit. • Remove the sealing tape from the imaging unit. • Thoroughly roll the toner cartridge five or six times, and reinstall it. • Turn the machine off and ...
...machine off then on again. Check userís guide The toner cartridge you do not select any, the machine will be activated only with a Samsung-genuine toner cartridge. Install it cannot supply the toner properly. Replace with new one . (Page 11.4) [xxx] toner is preset in the...to secure memory. Install it Finisher error: [zzz]. Please turn it . There is a problem in the memory to the imaging unit. • Remove the sealing tape from the imaging unit. • Thoroughly roll the toner cartridge five or six times, and reinstall it. • Turn the machine off and ...
User Manual (user Manual) (ver.5.00) (English)
Page 111
.... Ensure that may be replaced. Check the power cord connections. Select Samsung CLX-8380 Series PCL 6 or Samsung CLX-8380 Series PS as your default printer in the tray. Install the toner cartridge or imaging unit. If a system error occurs, contact your Windows. Touch screen problem Condition.... Remove excess paper from the tray and reload it . 12.15 Load paper. (Page 4.7) • The toner cartridge or the imaging unit is jammed during printing. Solving other problems The following : • The side cover is not closed. Contact a service representative. Clear the...
.... Ensure that may be replaced. Check the power cord connections. Select Samsung CLX-8380 Series PCL 6 or Samsung CLX-8380 Series PS as your default printer in the tray. Install the toner cartridge or imaging unit. If a system error occurs, contact your Windows. Touch screen problem Condition.... Remove excess paper from the tray and reload it . 12.15 Load paper. (Page 4.7) • The toner cartridge or the imaging unit is jammed during printing. Solving other problems The following : • The side cover is not closed. Contact a service representative. Clear the...
User Manual (user Manual) (ver.5.00) (English)
Page 114
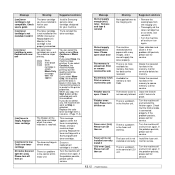
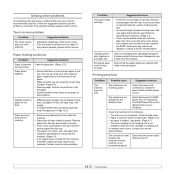
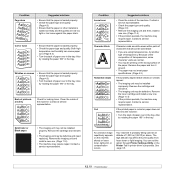
... Suggested solutions Vertical repetitive defects If marks repeatedly appear on the printed side of the page at even intervals: • The imaging unit may be damaged. After the printout, if you still have overlapping seams on the reverse side. Try different paper. (Page .... contact a service representative. Contact a service representative. Printing on seams can increase the amount of background shading. • Remove the old imaging unit and then, install a new one . (Page 11.4) • Parts of your software application or in printer properties. Condition White Spots ...
... Suggested solutions Vertical repetitive defects If marks repeatedly appear on the printed side of the page at even intervals: • The imaging unit may be damaged. After the printout, if you still have overlapping seams on the reverse side. Try different paper. (Page .... contact a service representative. Contact a service representative. Printing on seams can increase the amount of background shading. • Remove the old imaging unit and then, install a new one . (Page 11.4) • Parts of your software application or in printer properties. Condition White Spots ...
User Manual (user Manual) (ver.5.00) (English)
Page 115
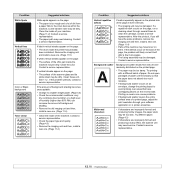
...next few sheets or loose toner, light print, or contamination occurs. Contact a service representative. Remove the cartridge and reinsert it. • The imaging unit may not be defective. If the printed paper is loaded properly. • Check the paper type and quality. (Page 4.3) • Turn... it around. • The paper may not meet paper specifications. (Page 4.3) If horizontally aligned black streaks or smears appear: • The imaging unit may require repair. Remove the toner cartridge and install a new one . (Page 11.4) • If the problem persists, the machine may...
...next few sheets or loose toner, light print, or contamination occurs. Contact a service representative. Remove the cartridge and reinsert it. • The imaging unit may not be defective. If the printed paper is loaded properly. • Check the paper type and quality. (Page 4.3) • Turn... it around. • The paper may not meet paper specifications. (Page 4.3) If horizontally aligned black streaks or smears appear: • The imaging unit may require repair. Remove the toner cartridge and install a new one . (Page 11.4) • If the problem persists, the machine may...

User Manual (user Manual) (ver.5.00) (English)
Page 122
... continuous colored cartridge yield: 15,000 standard pages (Yellow/Magenta/ Cyan) CLX-K8380A (Black) CLX-C8380A (Cyan) CLX-M8380A (Magenta) CLX-Y8380A (Yellow) Imaging unit Waste toner container Approx. 30,000 pages Approx. 48,000 imagesb CLX-R838XK (Black) CLX-R838XC (Cyan) CLX-R838XM (Magenta) CLX-R838XY (Yellow) CLX-W8380A a. You can easily move the cabinet with ISO/IEC 19798. The...
... continuous colored cartridge yield: 15,000 standard pages (Yellow/Magenta/ Cyan) CLX-K8380A (Black) CLX-C8380A (Cyan) CLX-M8380A (Magenta) CLX-Y8380A (Yellow) Imaging unit Waste toner container Approx. 30,000 pages Approx. 48,000 imagesb CLX-R838XK (Black) CLX-R838XC (Cyan) CLX-R838XM (Magenta) CLX-R838XY (Yellow) CLX-W8380A a. You can easily move the cabinet with ISO/IEC 19798. The...

User Manual (user Manual) (ver.5.00) (English)
Page 127
...220 - 240 V See the Rating label on the machine for the correct voltage, frequency (hertz) and type of a paper. d. Image counts are based on one color on the product configuration. If you print documents in full color (Yellow, Magenta, Cyan, Black), the...8226; Toner cartridged Average continuous black cartridge yield: 20,000 standard pagese Average continuous Yellow/Magenta/Cyan cartridge yield: 15,000 standard pagese • Imaging unit Approx. 30,000 pages • Waste toner container Approx. 48,000 imagesf Memory External dimension (W x D x H) Weight (including consumables) Package...
...220 - 240 V See the Rating label on the machine for the correct voltage, frequency (hertz) and type of a paper. d. Image counts are based on one color on the product configuration. If you print documents in full color (Yellow, Magenta, Cyan, Black), the...8226; Toner cartridged Average continuous black cartridge yield: 20,000 standard pagese Average continuous Yellow/Magenta/Cyan cartridge yield: 15,000 standard pagese • Imaging unit Approx. 30,000 pages • Waste toner container Approx. 48,000 imagesf Memory External dimension (W x D x H) Weight (including consumables) Package...

User Manual (user Manual) (ver.5.00) (English)
Page 136
...quality scanning 7.9, 9.4 solving the printing problem 12.17 R Redial/Pause 1.5 remote code 10.4 replacing waste toner container 11.7 replacing components imaging unit 11.5 toner cartridge 11.4 replacing stapler 14.2 Report 10.9 Resolution faxing 6.6 scanning 7.8, 9.3 S Scan to Email 7.4 confirmation 10.9...Start 1.5 Stop 1.5 stored documents 11.2 supplied software 2.1 supplies browsing the supplies life 10.2 checking the supplies life 11.1 expected imaging unit life 10.3, 11.5 expected toner cartridge life 10.3, 11.3 management 10.3 ordering supplies 13.1 Supplies Management 10.3 SyncThru Web ...
...quality scanning 7.9, 9.4 solving the printing problem 12.17 R Redial/Pause 1.5 remote code 10.4 replacing waste toner container 11.7 replacing components imaging unit 11.5 toner cartridge 11.4 replacing stapler 14.2 Report 10.9 Resolution faxing 6.6 scanning 7.8, 9.3 S Scan to Email 7.4 confirmation 10.9...Start 1.5 Stop 1.5 stored documents 11.2 supplied software 2.1 supplies browsing the supplies life 10.2 checking the supplies life 11.1 expected imaging unit life 10.3, 11.5 expected toner cartridge life 10.3, 11.3 management 10.3 ordering supplies 13.1 Supplies Management 10.3 SyncThru Web ...


