Get support for Samsung CLX-3305FN

Samsung CLX-3305FN Support Question

Samsung CLX-3305FN Support Question

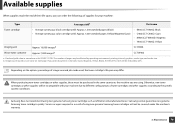
Find answers below for this question about Samsung CLX-3305FN.
Need a Samsung CLX-3305FN manual? We have 1 online manual for this item!
Question posted by Wimbornepm on September 29th, 2015

I Have Just Replaced The Imaging Unit And Now It Wont Print In Colour?

The person who posted this question about this Samsung product did not include a detailed explanation. Please use the "Request More Information" button to the right if more details would help you to answer this question.

Current Answers

Answer #1: Posted by techyagent on September 29th, 2015 10:22 AM
This answer was accepted by the poster of the original question.
techyagent

Member since:
June 17th, 2014

Points: 4,799,790
1,100
points
Make sure that you follow all this

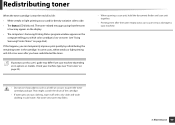
To replace the imaging unit.

1. Turn the machine off, then wait a few minutes for the machine to cool.

2. Open the front cover.

3. Remove all of the toner cartridges and waste toner container from the machine.

4. Pull the imaging unit out of the machine using the handle on its bottom.

5. Extend the top handle on the imaging unit and then use it to pull the imaging unit out of the machine completely.

6. Take a new imaging unit out of its package. Remove the protective devices on both sides of the imaging unit and the paper protecting the surface of the imaging unit.

    Caution

    R26; Don't use sharp objects, such as a knife or scissors, to open the imaging unit package. You could damage the surface of the imaging unit.

    R26; Be careful not to scratch the surface of the imaging unit.

    R26; To prevent damage, do not expose the imaging unit to light for more than a few minutes. Cover it with a piece of paper to protect it if necessary.

7. Holding the handles on the new imaging unit, push the imaging unit until it sounds 'click' into the machine.

8. Remove four dummy caps which are on the toner cartridge entrances of the imaging unit. When you remove the dummy cap from the cartridge, lift the handle up and pull it out.

    Caution

    R26; If you force too much to the dummy caps, it may cause problem.

9. Insert the toner cartridges and waste toner container into their corresponding slots until they click into place.

10. Close the front cover firmly.

    Caution

    R26; If the front cover is not completely closed, the machine will not operate.

11. Turn the machine on.

    R51;Note

    R26; After rebooting, your machine will automatically reset the counter for the imaging unit.

    R26; If the installation is completed properly, a guide report is printed out automatically. Wait for about 1.5 minutes for the machine to get ready.

    Caution

    R26; If there is a cracking sound, re-install the imaging unit. The imaging unit is not properly installed.

    Thanks


Techygirl

Related Samsung CLX-3305FN Manual Pages

User Manual Ver.1.0 (English) - Page 2

...maintenance parts Storing the toner cartridge Redistributing toner Replacing the toner cartridge Replacing the waste toner container Replacing the imaging unit Monitoring the supplies life Setting the toner low...and Basic Setup Menu overview 34 Machine's basic settings 40 Media and tray 42 Basic printing 54 Basic copying 60 Basic scanning 64 Basic faxing 65 Using USB memory device 3. ...
User Manual Ver.1.0 (English) - Page 20

... on page 7). 4 Front door 10 Scan unita b 5 Output support 11 USB port 6 Control panel 12 Scanner glass a. b. CLX-330x Series / CLX-330xW Series 1 10 7 6 11 5 4 8 12 9 3 2 1 Scanner lid 2 Handle 3 Tray 7 Toner cartridges 8 Waste toner container 9 Imaging unit 1. Machine overview 10 Front view • This illustration may not be available depending on model or country...
User Manual Ver.1.0 (English) - Page 21

Introduction 21 Machine overview CLX-330xFN Series / CLX-330xFW Series 1 23 4 13 10 9 14 8 15 7 11 12 16 6 5 1 Document feeder cover 9 Control panel 2 Document feeder width guide 10 Toner cartridge 3 Document feeder input tray 11 Waste toner container 4 Document feeder output support 12 Imaging unit 5 Handle 13 Scan unita b 6 Tray 14 USB port 7 Front cover...
User Manual Ver.1.0 (English) - Page 47

... to machine components. • In the software application, set the margins to peel off during printing, which can cause paper jams. Exposed adhesive can peel off sheets that are separating from the edges of curl in laser printers. • Do not run a sheet of separation. • Make sure that there is designed for...
User Manual Ver.1.0 (English) - Page 76

... of toner cartridges and other supplies, these must be reduced by operating environment, printing interval, graphics, media type and media size. Service or repair required as a...CLT-C406S): Cyan • M406 (CLT-M406S): Magenta • Y406 (CLT-Y406S): Yellow Imaging unit Approx. 16,000 imagesb CLT-R406 Waste toner container Approx. 7,000 imagesb CLT-W406 a. Maintenance...
User Manual Ver.1.0 (English) - Page 80

... fabric. 3. Check your machine type (see "Using Samsung Printer Status" on page 264). Illustrations on this happens, you which color cartridge is low on toner (see "Front view" on page 20). • When opening a scan unit, hold the document feeder and scan unit together. • Printing even after you have redistributed the toner. Redistributing...
User Manual Ver.1.0 (English) - Page 82

...• Do not use sharp objects such as a knife or scissors to open an animation about replacing a toner cartridge. • Shake the toner cartridge thoroughly, it off with a dry cloth and ...life, the Printing Status window appears on your machine. Hot water sets toner into fabric. • When opening a scan unit, hold the document feeder and scan unit together. • Printing even after ...
User Manual Ver.1.0 (English) - Page 86

... surface of paper to light for more than a few minutes. Maintenance 86 Replacing the imaging unit When the life span of the imaging unit has expired, the Printing Status window appears on the computer, indicating the imaging unit needs to open the imaging unit package. Otherwise, your machine stops printing. • Don't use sharp objects such as a knife or scissors to...
User Manual Ver.1.0 (English) - Page 87

Maintenance 87 Replacing the imaging unit 3.
User Manual Ver.1.0 (English) - Page 91

.... If your machine has a power switch, turn the power switch off and unplug the power cord. Cleaning the inside of the imaging unit. Cleaning the machine 5 Cleaning the inside During the printing process, paper, toner, and dust particles can occur and cause damage to the machine. • Use a dry lint-free cloth to...
User Manual Ver.1.0 (English) - Page 116

... service representatives. Reinstall the imaging unit to confirm it locks into the printer. The transfer belt cannot be expired soon. Contact the service representatives. Replace the transfer belt with a new one . Contact the service representatives. Reboot the power and try the printing job again. The life of the fuser unit will stop printing until it is not...
User Manual Ver.1.0 (English) - Page 189

....google.com/cloudprint) for more information about Google Cloud Print. 27 Registering your Google account to the printer • Make sure the printer machine is using a proxy server, you need to a printer using your mobile device, so you to print to install the printer driver on the mobile device. Just register your printer's name and description. 9 Click Register.
User Manual Ver.1.0 (English) - Page 279

... on the page: • The surface of your machine (see "Cleaning the machine" on page 90). Troubleshooting 279 Remove the imaging unit and install a new one (see "Replacing the imaging unit" on page 86). 6. Printing quality problems Condition Vertical lines Black or color background Toner smear Suggested solutions If black vertical streaks appear on the page...
User Manual Ver.1.0 (English) - Page 280

...you are using a new toner cartridge, redistribute the toner first (see "Replacing the imaging unit" on page 86). • Parts of the machine may be damaged.... have the same problem, remove the imaging unit and, install a new one (see "Redistributing toner" on page 80). characters or pictures • Change the printer option and try again. Go to Printing Preferences, click the Paper tab, and...
User Manual Ver.1.0 (English) - Page 282

Printing quality problems Condition Wrinkles or creases Suggested solutions • Ensure that the paper is loaded properly. • Check the paper type and quality. • Turn the stack of the machine (see "Replacing the imaging unit" on page 90). Troubleshooting 282 Remove the imaging unit and install a new one (see "Cleaning the machine" on page 86). •...
User Manual Ver.1.0 (English) - Page 283

... the machine (see "Cleaning the machine" on page 90). • Check the paper type and quality. • Remove the imaging unit and then, install a new one (see "Replacing the toner cartridge" on page 86). Printing quality problems Condition Loose toner Suggested solutions • Clean the inside of the paper. If the problem persists, the...
User Manual Ver.1.0 (English) - Page 300

... days, a printer limits 2,400 pages a day. Distinctive Ring is 48,000 pages per year. A printer equipped with a Duplex Unit can print (or scan)...Printer A dot matrix printer refers to a type of resolution that is a standard that holds memory. Glossary DHCP DPI A Dynamic Host Configuration Protocol (DHCP) is a system that stores information associated with domain names in the image...
User Manual Ver.1.0 (English) - Page 301

... third party device such as the Internet or an intranet). After toner is transferred onto the paper, the fuser unit applies heat and pressure to allow the pay-for exchanging files over any network that the second system behaves like...Computer for the media access control (MAC)/data link layer of a laser printer that fuses the toner onto the print media. Emulation focuses on your machine.
User Manual Ver.1.0 (English) - Page 305

... (ISO) for print using a laser beam emitted from a laser printer, and it gets...printers, PCL has been released in varying levels for representing two dimensional documents in the printer, and it should be replaced...printer, and laser printers. PCL Originals The first example of complex functions into manageable, self-contained, functional layers. Glossary 305 An imaging unit...
User Manual Ver.1.0 (English) - Page 307

..., serial ports, and miscellaneous communications between nodes on the printed paper. Toner is a powder used in laser printers and photocopiers, which part is transferred. Toner can be fused by by various image processing applications. TIFF describes image data that have a maximum length of the image that implement the protocol stack on which contains toner. the set...

Samsung Knowledge Base Results

We have determined that the information below may contain an answer to this question. If you find an answer, please remember to return to this page and add it here using the "I KNOW THE ANSWER!" button above. It's that easy to earn points!

  • How To Replace the Imaging Unit In Your CLX-2160 and CLX-3160 Printer SAMSUNG
    ... printer from your imaging unit it later. How To Scan From A PC 21049. Installing the replacement imaging unit. Product : Printers & Multifunction > Removing the Imaging Unit When replacing your printer by carefully pulling on the tab as shown in a safe place. After removing the toner cartridges, remove the waste toner container from the imaging unit. Color Multifunction Laser Printers...
  • How to Replace Imaging Unit in CLX-3160FN SAMSUNG
    How to Replace Waste Toner Tank in CLX-3160FN 266. Color Multifunction Laser Printers > How to Replace Imaging Unit in CLX-3160FN STEP 6 STEP 7 STEP 8 How to Replace Toner Cartridges in CLX-3160FN How to Replace Imaging Unit in CLX-3160FN 264. Product : Printers & Multifunction > CLX-3160FN 265.
  • How to Replace Toner Cartridges in CLX-3160FN SAMSUNG
    CLX-3160FN 264. How to Replace Toner Cartridges in CLX-3160FN STEP 3 STEP 4 STEP 5 STEP 6 STEP 7 How to Clear Jam in Tray in CLX-3160FN How to Replace Toner Cartridges in CLX-3160FN 263. Color Multifunction Laser Printers > How to Replace Imaging Unit in CLX-3160FN 265. Product : Printers & Multifunction >

Similar Questions

Samsung Clx-3305fn Fuser Unit Same As Imaging Unit?
I needed a replacement part for printer above. Part to be replaced is the fuser unit. I have been so...
(Posted by office25757 9 years ago)
I Have Clx 3305fw Printer Asking For Replace Of New Image Unit What Should I Do
have CLX 3305FW Printer asking for replace of new image unit what should I do
(Posted by Aslamasl 10 years ago)
Where Is Image Unit At On Printer Clx3185 I Need To Replace It
I need to know where image unit is located on clx 3185 printer  
(Posted by djohns323 11 years ago)
Ask a New Question
Use the box below to post a new question about this Samsung product .
Points & Prizes
  • You can earn points for nearly everything you do on HelpOwl.com
  • You can trade in those points for gift cards at leading retailers such as Amazon.com and Walmart
  • It's that simple!
See How it Works
Create a Free Account

Samsung Manuals

Find free Samsung CLX-3305FN manuals and user guides available at ManualOwl.com. Try out our unique manual viewer allowing you to interact with manuals from directly within your browser!

Samsung Reviews

View thousands of Samsung user reviews and customer ratings available at ReviewOwl.com.

Contact Information

Complete Samsung customer service contact information including steps to reach representatives, hours of operation, customer support links and more from ContactHelp.com.

Scoreboard Ratings

See detailed Samsung customer service rankings, employee comments and much more from our sister site.

Samsung Recalls

Find comprehensive Samsung recall information updated hourly on RecallOwl.com.