User Manual (user Manual) (ver.1.03) (English)
Page 4
... 3.3 Overview of the Paper in the Tray 2.5 Connecting a Printer Cable ...2.7 For Local Printing ...2.7 For Network Printing (CLP-650N only 2.8 Turning the Printer On ...2.8 Printing a Demo Page ...2.8 Changing the Display Language 2.9 Installing the Printer Software ... Your Printer Unpacking ...2.1 Installing the Toner Cartridges 2.2 Loading Paper ...2.4 Changing the Size of Control Panel Menus 3.3 Information Menu ...3.4 Paper Menu ...3.4 Printer Menu ...3.6 Setup Menu ...3.6 PCL Menu ...3.7 PostScript Menu ...3.7 Network Menu (CLP-650N only 3.8 4. Basic Printing Printing a ...
... 3.3 Overview of the Paper in the Tray 2.5 Connecting a Printer Cable ...2.7 For Local Printing ...2.7 For Network Printing (CLP-650N only 2.8 Turning the Printer On ...2.8 Printing a Demo Page ...2.8 Changing the Display Language 2.9 Installing the Printer Software ... Your Printer Unpacking ...2.1 Installing the Toner Cartridges 2.2 Loading Paper ...2.4 Changing the Size of Control Panel Menus 3.3 Information Menu ...3.4 Paper Menu ...3.4 Printer Menu ...3.6 Setup Menu ...3.6 PCL Menu ...3.7 PostScript Menu ...3.7 Network Menu (CLP-650N only 3.8 4. Basic Printing Printing a ...
User Manual (user Manual) (ver.1.03) (English)
Page 5
Using Your Printer on a Network (CLP-650N only) About Sharing the Printer on a Network 8.1 Setting Up a Network-Connected Printer 8.1 Configuring Network Parameters on the Control... in the PS printer properties 9.4 10. Maintaining Your Printer Printing a Configuration Page 6.1 Replacing Supplies ...6.2 Managing Toner Cartridges ...6.2 Toner Cartridge Storage ...6.2 Toner Cartridge Life Expectancy 6.2 Redistributing Toner ...6.2 Replacing Toner Cartridges ...6.4 Replacing the Paper Transfer Belt 6.5 Replacing the Fuser Unit ...6.7 Cleaning the Printer ...6.8 Cleaning the Outside of the...
Using Your Printer on a Network (CLP-650N only) About Sharing the Printer on a Network 8.1 Setting Up a Network-Connected Printer 8.1 Configuring Network Parameters on the Control... in the PS printer properties 9.4 10. Maintaining Your Printer Printing a Configuration Page 6.1 Replacing Supplies ...6.2 Managing Toner Cartridges ...6.2 Toner Cartridge Storage ...6.2 Toner Cartridge Life Expectancy 6.2 Redistributing Toner ...6.2 Replacing Toner Cartridges ...6.4 Replacing the Paper Transfer Belt 6.5 Replacing the Fuser Unit ...6.7 Cleaning the Printer ...6.8 Cleaning the Outside of the...
User Manual (user Manual) (ver.1.03) (English)
Page 11
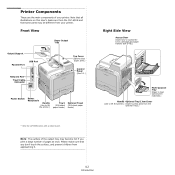
...with a network port. Note that all illustrations on this User's Guide are the main components of your printer. Printer Components These are from the CLP-650N and that you print a large number of pages at once. Please make sure that some parts may become hot if you don't touch the ... the printer.) Tray1 Optional Tray2 (250-sheet (500-sheet paper paper feeder) feeder) Right Side View Access Door (Open fully to access the toner cartridges and paper transfer belt (PTB).) Multi-purpose Tray (Open to load special print materials.) Handle Optional Tray2 Jam Cover (Use to lift the printer.) ...
...with a network port. Note that all illustrations on this User's Guide are the main components of your printer. Printer Components These are from the CLP-650N and that you print a large number of pages at once. Please make sure that some parts may become hot if you don't touch the ... the printer.) Tray1 Optional Tray2 (250-sheet (500-sheet paper paper feeder) feeder) Right Side View Access Door (Open fully to access the toner cartridges and paper transfer belt (PTB).) Multi-purpose Tray (Open to load special print materials.) Handle Optional Tray2 Jam Cover (Use to lift the printer.) ...
User Manual (user Manual) (ver.1.03) (English)
Page 12
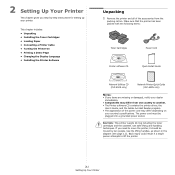
... up your country's specifications. Make sure that the printer has been packed with the following items: Toner Cartridges Power Cord Printer software CD Quick Install Guide Network Utilities CD (CLP-650N only) Network Printer Quick Guide (CLP-650N only) NOTES: • If any items are missing or damaged, notify your dealer immediately. • Components may...
... up your country's specifications. Make sure that the printer has been packed with the following items: Toner Cartridges Power Cord Printer software CD Quick Install Guide Network Utilities CD (CLP-650N only) Network Printer Quick Guide (CLP-650N only) NOTES: • If any items are missing or damaged, notify your dealer immediately. • Components may...

User Manual (user Manual) (ver.1.03) (English)
Page 13
...already installed in order to allow for the printer: • Leave enough room to open the toner cartridge packages. A firm, level surface - If you do not expose the toner cartridges to open the printer trays and covers, and to avoid touching this area. 2.2 Setting Up Your ... fluctuations - 2 Carefully remove all of air conditioners, heaters, or ventilators - Installing the Toner Cartridges 1 Using the handle, completely open the access door. 3 Pull the paper tray out of the toner cartridges. • To prevent damage, do not, print quality problems can occur. Away from the ...
...already installed in order to allow for the printer: • Leave enough room to open the toner cartridge packages. A firm, level surface - If you do not expose the toner cartridges to open the printer trays and covers, and to avoid touching this area. 2.2 Setting Up Your ... fluctuations - 2 Carefully remove all of air conditioners, heaters, or ventilators - Installing the Toner Cartridges 1 Using the handle, completely open the access door. 3 Pull the paper tray out of the toner cartridges. • To prevent damage, do not, print quality problems can occur. Away from the ...

User Manual (user Manual) (ver.1.03) (English)
Page 14
... 2.3 Setting Up Your Printer NOTE: When printing text at 5% coverage, you can expect a toner cartridge life of the printer, a label identifies which color cartridge goes into each toner cartridge. Make sure that the door is not completely closed, the printer will not operate. NOTE: If toner...Magenta Yellow CAUTION: If the access door is securely latched. 3 Holding both handles on the toner cartridges, gently rock them into their corresponding positions in cold water. Align the toner cartridges with a dry cloth and wash it in the following order: Yellow, Magenta, Cyan, and then...
... 2.3 Setting Up Your Printer NOTE: When printing text at 5% coverage, you can expect a toner cartridge life of the printer, a label identifies which color cartridge goes into each toner cartridge. Make sure that the door is not completely closed, the printer will not operate. NOTE: If toner...Magenta Yellow CAUTION: If the access door is securely latched. 3 Holding both handles on the toner cartridges, gently rock them into their corresponding positions in cold water. Align the toner cartridges with a dry cloth and wash it in the following order: Yellow, Magenta, Cyan, and then...
User Manual (user Manual) (ver.1.03) (English)
Page 23
... lamp, indicating the color of the toner cartridge, blinking. Install only Samsung toner cartridges, designed for details on the meaning of the toner cartridge, turns on -line automatically. 3.2 Using the Control Panel Blinking When a toner cartridge is not installed in Power Save mode. Green... has occurred and the printer is on . Check the display message or SmartPanel. Or, if you have installed an invalid toner cartridge, a corresponding lamp turns on -line and can receive data from the computer. • When the light blinks quickly, the printer...
... lamp, indicating the color of the toner cartridge, blinking. Install only Samsung toner cartridges, designed for details on the meaning of the toner cartridge, turns on -line automatically. 3.2 Using the Control Panel Blinking When a toner cartridge is not installed in Power Save mode. Green... has occurred and the printer is on . Check the display message or SmartPanel. Or, if you have installed an invalid toner cartridge, a corresponding lamp turns on -line and can receive data from the computer. • When the light blinks quickly, the printer...
User Manual (user Manual) (ver.1.03) (English)
Page 26
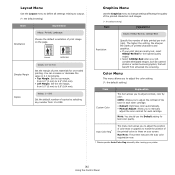
You can increase or decrease the value in each cartridge. Color Menu This menu allows you to adjust the color setting. (*: the default setting) Item Custom Color Explanation This item allows you to adjust the ... the auto color registration now. * Please operate Auto Color Reg manually after moving your print jobs are mostly text, select 600dpi-Normal for each toner cartridge. • Default: Optimizes colors automatically. • Manual Adjust: Allows you to 999. Portrait Landscape Simplex Margin Values: 0.0" (0 mm) Set the margin of print materials for...
You can increase or decrease the value in each cartridge. Color Menu This menu allows you to adjust the color setting. (*: the default setting) Item Custom Color Explanation This item allows you to adjust the ... the auto color registration now. * Please operate Auto Color Reg manually after moving your print jobs are mostly text, select 600dpi-Normal for each toner cartridge. • Default: Optimizes colors automatically. • Manual Adjust: Allows you to 999. Portrait Landscape Simplex Margin Values: 0.0" (0 mm) Set the margin of print materials for...

User Manual (user Manual) (ver.1.03) (English)
Page 28
... by setting the height of consumables. Off: The printer does not display a warning message. Item Maintenance Explanation This item allows you to maintain the toner cartridges and other consumables. • Check Others: This item allows you with the Print PS Error menu item. (*: the default setting) Item Explanation Print PS Error...
... by setting the height of consumables. Off: The printer does not display a warning message. Item Maintenance Explanation This item allows you to maintain the toner cartridges and other consumables. • Check Others: This item allows you with the Print PS Error menu item. (*: the default setting) Item Explanation Print PS Error...

User Manual (user Manual) (ver.1.03) (English)
Page 38
...page from the printer's control panel. This chapter includes: • Printing a Configuration Page • Replacing Supplies • Managing Toner Cartridges • Replacing Toner Cartridges • Replacing the Paper Transfer Belt • Replacing the Fuser Unit • Cleaning the Printer • Managing your printer and ...the toner cartridges, as well as an optional tray. To print a configuration page: 1 In ready mode, press the Menu button ( ) on ...
...page from the printer's control panel. This chapter includes: • Printing a Configuration Page • Replacing Supplies • Managing Toner Cartridges • Replacing Toner Cartridges • Replacing the Paper Transfer Belt • Replacing the Fuser Unit • Cleaning the Printer • Managing your printer and ...the toner cartridges, as well as an optional tray. To print a configuration page: 1 In ready mode, press the Menu button ( ) on ...

User Manual (user Manual) (ver.1.03) (English)
Page 39
... are ready to use them to flawed mixing of toner colors when one of a toner cartridge depends on toner. To purchase replacement parts, contact your Samsung dealer or the retailer where you have printed the specified number of pages or when the life.... 6.2 Maintaining Your Printer Item(s) (Order number) Printer Message Pages Printed See Page Black toner cartridge (CLP-K600A) Replace Black Toner Approx. 6.4 4,000 pages* Color toner cartridges (Cyan: CLP-C600A, Magenta: CLP- The printer warranty does not cover damage caused by a trained service professional, except for more ...
... are ready to use them to flawed mixing of toner colors when one of a toner cartridge depends on toner. To purchase replacement parts, contact your Samsung dealer or the retailer where you have printed the specified number of pages or when the life.... 6.2 Maintaining Your Printer Item(s) (Order number) Printer Message Pages Printed See Page Black toner cartridge (CLP-K600A) Replace Black Toner Approx. 6.4 4,000 pages* Color toner cartridges (Cyan: CLP-C600A, Magenta: CLP- The printer warranty does not cover damage caused by a trained service professional, except for more ...

User Manual (user Manual) (ver.1.03) (English)
Page 40
... of the paper transfer belt. • If you leave the access door open the access door. 3 Holding both handles on the toner cartridge and pull to remove the cartridge from side to side to the OPC drum. NOTE: If toner gets on your clothing, wipe it off with your hands or any... reason. 2 Grasp the handles on the toner cartridge, gently rock it in cold water. Make sure that the door is not completely closed, the printer will cause damage to redistribute the toner. Use...
... of the paper transfer belt. • If you leave the access door open the access door. 3 Holding both handles on the toner cartridge and pull to remove the cartridge from side to side to the OPC drum. NOTE: If toner gets on your clothing, wipe it off with your hands or any... reason. 2 Grasp the handles on the toner cartridge, gently rock it in cold water. Make sure that the door is not completely closed, the printer will cause damage to redistribute the toner. Use...

User Manual (user Manual) (ver.1.03) (English)
Page 41
... door. 3 Grasp the handles on the control panel shows the error message, "[Color] Toner Empty". This will stop printing until a new toner cartridge is put into the printer. Cover it with your hands or any reason. When the '[Color] Toner Empty' message appears, the printer will cause... damage to the OPC drum. Also, the display on the empty toner cartridge and pull to remove the cartridge from side to side to evenly distribute the toner. 6.4 Maintaining Your Printer CAUTION: • Do not touch the green surface, the...
... door. 3 Grasp the handles on the control panel shows the error message, "[Color] Toner Empty". This will stop printing until a new toner cartridge is put into the printer. Cover it with your hands or any reason. When the '[Color] Toner Empty' message appears, the printer will cause... damage to the OPC drum. Also, the display on the empty toner cartridge and pull to remove the cartridge from side to side to evenly distribute the toner. 6.4 Maintaining Your Printer CAUTION: • Do not touch the green surface, the...

User Manual (user Manual) (ver.1.03) (English)
Page 42
...cold water. CAUTION: • Do not touch the green surface, the OPC drum, on the front of the toner cartridge matches the color slot and then grasp the handles on the toner cartridge. Replacing the Paper Transfer Belt The life of the paper transfer belt May be exposed to cool. 2 Using the... handle, completely open for more than a few minutes for any other material. Use the handle on each toner cartridge with a dry cloth and wash it clicks into place. NOTE: The life span of the paper transfer belt is placed into fabric. 7 Make sure that...
...cold water. CAUTION: • Do not touch the green surface, the OPC drum, on the front of the toner cartridge matches the color slot and then grasp the handles on the toner cartridge. Replacing the Paper Transfer Belt The life of the paper transfer belt May be exposed to cool. 2 Using the... handle, completely open for more than a few minutes for any other material. Use the handle on each toner cartridge with a dry cloth and wash it clicks into place. NOTE: The life span of the paper transfer belt is placed into fabric. 7 Make sure that...

User Manual (user Manual) (ver.1.03) (English)
Page 44
... access door are not completely closed, the printer will not operate. 9 Reconnect the power cord and cables and then turn the printer on each toner cartridge with your hands or any reason. 5 Unpack a new fuser unit and insert it is placed into the printer. 6 Tighten the two screws. 7 After making sure...,000 black and color pages. Make sure that it into the printer. Use the handle on . 6.7 Maintaining Your Printer NOTE: The life span of each cartridge in order to avoid touching this stage, replace the fuser unit.
... access door are not completely closed, the printer will not operate. 9 Reconnect the power cord and cables and then turn the printer on each toner cartridge with your hands or any reason. 5 Unpack a new fuser unit and insert it is placed into the printer. 6 Tighten the two screws. 7 After making sure...,000 black and color pages. Make sure that it into the printer. Use the handle on . 6.7 Maintaining Your Printer NOTE: The life span of each cartridge in order to avoid touching this stage, replace the fuser unit.

User Manual (user Manual) (ver.1.03) (English)
Page 45
...Oil from the printer. Remove any reason. 6.8 Maintaining Your Printer Black Cyan Magenta Yellow CAUTION: To prevent damage, do not expose the toner cartridges to let any other strong substances can accumulate inside of the printer, be careful not to be halted for any dust, paper particles, and ...printer to light. This will cause damage to dry completely. 5 Look inside the printer on the front of each toner cartridge and pull to remove the cartridges from your hands or any water drip onto the printer or inside the printer. You can correct and prevent these types of...
...Oil from the printer. Remove any reason. 6.8 Maintaining Your Printer Black Cyan Magenta Yellow CAUTION: To prevent damage, do not expose the toner cartridges to let any other strong substances can accumulate inside of the printer, be careful not to be halted for any dust, paper particles, and ...printer to light. This will cause damage to dry completely. 5 Look inside the printer on the front of each toner cartridge and pull to remove the cartridges from your hands or any water drip onto the printer or inside the printer. You can correct and prevent these types of...

User Manual (user Manual) (ver.1.03) (English)
Page 46
...sure that the door is not completely closed, the printer will not operate. 8 Plug the power cord in and turn the printer on each toner cartridge. Managing your printer to a network and set up network parameters. • Change the print properties. • Set the printer to send email...; Get support for using the printer. CAUTION: If the access door is securely latched. Your printer's embedded web page opens. Align the toner cartridges with the slots inside the printer and insert them into their corresponding positions in the address field and press the Enter key or click Go...
...sure that the door is not completely closed, the printer will not operate. 8 Plug the power cord in and turn the printer on each toner cartridge. Managing your printer to a network and set up network parameters. • Change the print properties. • Set the printer to send email...; Get support for using the printer. CAUTION: If the access door is securely latched. Your printer's embedded web page opens. Align the toner cartridges with the slots inside the printer and insert them into their corresponding positions in the address field and press the Enter key or click Go...
User Manual (user Manual) (ver.1.03) (English)
Page 48
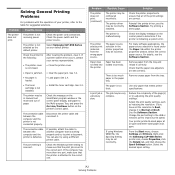
...Tray, and press the On Line/Continue button on the control panel to Best, change it correctly. Possible Cause Solution The printer is malfunctioning. Select Samsung CLP-650 Series as your service representative. • The printer cover is not closed. • Close the printer cover. • Paper is sent ... that all of the print settings are set the resolution to determine if the printer is not installed. • Install the toner cartridge. Select the desired spool setting. 7.2 Solving Problems Check the power switch and the power source. See 2.4. • The toner...
...Tray, and press the On Line/Continue button on the control panel to Best, change it correctly. Possible Cause Solution The printer is malfunctioning. Select Samsung CLP-650 Series as your service representative. • The printer cover is not closed. • Close the printer cover. • Paper is sent ... that all of the print settings are set the resolution to determine if the printer is not installed. • Install the toner cartridge. Select the desired spool setting. 7.2 Solving Problems Check the power switch and the power source. See 2.4. • The toner...

User Manual (user Manual) (ver.1.03) (English)
Page 49
...no more smell. Or, ensure that your application. Disconnect and reconnect the printer cable. Exit Windows and reboot the computer. The toner cartridge is defective or out of the photo is very low. The file may be defective. When you are blank. The print quality of.... The setting in the paper tray. Images are set to Best and then try a new printer cable. If necessary, replace the toner cartridge. There may be debris Open the access door and remove the inside the printer. The wrong printer driver was selected. For details, see ...
...no more smell. Or, ensure that your application. Disconnect and reconnect the printer cable. Exit Windows and reboot the computer. The toner cartridge is defective or out of the photo is very low. The file may be defective. When you are blank. The print quality of.... The setting in the paper tray. Images are set to Best and then try a new printer cable. If necessary, replace the toner cartridge. There may be debris Open the access door and remove the inside the printer. The wrong printer driver was selected. For details, see ...
User Manual (user Manual) (ver.1.03) (English)
Page 50
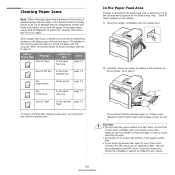
... printing after clearing paper jams, you where the paper jam has occurred. If the paper tears, ensure that it : LED on the front of each cartridge in order to avoid touching this area. • Be careful not to scratch the surface of the paper transfer belt. • If you cannot find... again. In the Paper Feed Area If paper is jammed in the paper feed area, a lamp turns on at the corresponding location on each toner cartridge with your hands or any reason. 7.4 Solving Problems If you leave the access door open the access door. 2 Carefully remove the paper by pulling in...
... printing after clearing paper jams, you where the paper jam has occurred. If the paper tears, ensure that it : LED on the front of each cartridge in order to avoid touching this area. • Be careful not to scratch the surface of the paper transfer belt. • If you cannot find... again. In the Paper Feed Area If paper is jammed in the paper feed area, a lamp turns on at the corresponding location on each toner cartridge with your hands or any reason. 7.4 Solving Problems If you leave the access door open the access door. 2 Carefully remove the paper by pulling in...


