
Universal Print Driver Guide (user Manual) (ver.2.00) (English)
Page 4
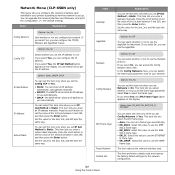
... MODEL SPECIFIC DRIVERS Consistent user interface. Easily locate and access suggested devices from the whole Samsung printer products. Introduction 1. Inconsistent user interface. • Download and install with the installer • Manually locate, download, and install file provided with the Samsung driver for DirectX 9 graphics with the device, or the product based driver. The...
... MODEL SPECIFIC DRIVERS Consistent user interface. Easily locate and access suggested devices from the whole Samsung printer products. Introduction 1. Inconsistent user interface. • Download and install with the installer • Manually locate, download, and install file provided with the Samsung driver for DirectX 9 graphics with the device, or the product based driver. The...
Universal Print Driver Guide (user Manual) (ver.2.00) (English)
Page 13
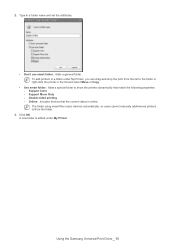
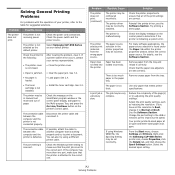
... OK. Support Color - Double-sided printing - Online: Includes devices that match the following properties: - The folder using smart filter scans devices automatically, so users cannot manually add/remove printers to/from the list to show the printers dynamically that the current status is added under My Printer. Type in the list... right-click the printer in a folder name and set the attributes. • Don't use smart folder: Adds a general folder. A new folder is online. Using the Samsung Universal Print Driver_ 13 2.
... OK. Support Color - Double-sided printing - Online: Includes devices that match the following properties: - The folder using smart filter scans devices automatically, so users cannot manually add/remove printers to/from the list to show the printers dynamically that the current status is added under My Printer. Type in the list... right-click the printer in a folder name and set the attributes. • Don't use smart folder: Adds a general folder. A new folder is online. Using the Samsung Universal Print Driver_ 13 2.

User Manual (user Manual) (ver.1.03) (English)
Page 2
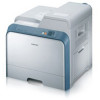
... direct or indirect, arising from or related to change without notice. All rights reserved. • CLP-650 and CLP-650N are model names of Samsung Electronics Co., Ltd. • SAMSUNG and Samsung logo are trademarks of Samsung Electronics co., Ltd. • Apple, TrueType, Laser Writer, and Macintosh are Trademarks of Apple ...and Windows XP are registered trademarks of Microsoft Corporation. • All other brand or product names are trademarks of this manual. © 2005 Samsung Electronics Co., Ltd. This manual is subject to use of their respective companies or organizations.
... direct or indirect, arising from or related to change without notice. All rights reserved. • CLP-650 and CLP-650N are model names of Samsung Electronics Co., Ltd. • SAMSUNG and Samsung logo are trademarks of Samsung Electronics co., Ltd. • Apple, TrueType, Laser Writer, and Macintosh are Trademarks of Apple ...and Windows XP are registered trademarks of Microsoft Corporation. • All other brand or product names are trademarks of this manual. © 2005 Samsung Electronics Co., Ltd. This manual is subject to use of their respective companies or organizations.
User Manual (user Manual) (ver.1.03) (English)
Page 4
...Special Materials 4.1 Loading Paper ...4.2 Using Tray1 ...4.2 Using the Optional Tray ...4.2 Using the Multi-purpose Tray 4.2 Using the Manual Feed ...4.3 Printing on Special Print Materials 4.4 Printing on Envelopes ...4.4 Printing on Labels ...4.5 Printing on Preprinted Paper 4.5 Printing...Panel Menus 3.3 Overview of the Paper in the Tray 2.5 Connecting a Printer Cable ...2.7 For Local Printing ...2.7 For Network Printing (CLP-650N only 2.8 Turning the Printer On ...2.8 Printing a Demo Page ...2.8 Changing the Display Language 2.9 Installing the Printer Software 2.9 System ...
...Special Materials 4.1 Loading Paper ...4.2 Using Tray1 ...4.2 Using the Optional Tray ...4.2 Using the Multi-purpose Tray 4.2 Using the Manual Feed ...4.3 Printing on Special Print Materials 4.4 Printing on Envelopes ...4.4 Printing on Labels ...4.5 Printing on Preprinted Paper 4.5 Printing...Panel Menus 3.3 Overview of the Paper in the Tray 2.5 Connecting a Printer Cable ...2.7 For Local Printing ...2.7 For Network Printing (CLP-650N only 2.8 Turning the Printer On ...2.8 Printing a Demo Page ...2.8 Changing the Display Language 2.9 Installing the Printer Software 2.9 System ...

User Manual (user Manual) (ver.1.03) (English)
Page 25
... to see if your printer. (*: the default setting) Item Explanation Tray Source Values: Auto Select, Tray 1, MP Tray, Tray 2, Manual Tray Using this menu to define all of the fonts currently available in the tray. Menu Map The menu map shows the layout and current...: Select for envelops. • Preprinted: Preprinted is installed. Item Configuration Explanation The configuration page shows the printer's current configuration. If you select Manual Tray, you select any other trays. Custom Height: Set the custom height, from 90 to use . • If you insert paper into the...
... to see if your printer. (*: the default setting) Item Explanation Tray Source Values: Auto Select, Tray 1, MP Tray, Tray 2, Manual Tray Using this menu to define all of the fonts currently available in the tray. Menu Map The menu map shows the layout and current...: Select for envelops. • Preprinted: Preprinted is installed. Item Configuration Explanation The configuration page shows the printer's current configuration. If you select Manual Tray, you select any other trays. Custom Height: Set the custom height, from 90 to use . • If you insert paper into the...
User Manual (user Manual) (ver.1.03) (English)
Page 26
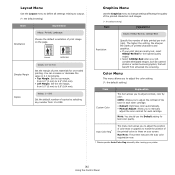
... Menu This menu allows you to adjust the color setting. (*: the default setting) Item Custom Color Explanation This item allows you to manually adjust the color contrast for the highest quality output. • Select 1200dpi-Best when your printer. 3.5 Using the Control Panel Auto Color... Default setting for one-sided printing. Run Now: The printer executes the auto color registration now. * Please operate Auto Color Reg manually after moving your job contains bitmapped images, such as scanned photos or certain business graphics, that will benefit from enhanced line screening. ...
... Menu This menu allows you to adjust the color setting. (*: the default setting) Item Custom Color Explanation This item allows you to manually adjust the color contrast for the highest quality output. • Select 1200dpi-Best when your printer. 3.5 Using the Control Panel Auto Color... Default setting for one-sided printing. Run Now: The printer executes the auto color registration now. * Please operate Auto Color Reg manually after moving your job contains bitmapped images, such as scanned photos or certain business graphics, that will benefit from enhanced line screening. ...
User Manual (user Manual) (ver.1.03) (English)
Page 29
...IP Address Subnet Mask Options: Static, BOOTP, DHCP You can enter an IP address, subnetmask, and gateway manually. • BOOTP: The BOOTP server allots an IP address to you automatically. • DHCP: The... you configure the network. This item lets you select whether or not you enter an IP address manually. This item lets you set the frame type parameter. Values: Auto, EN_8022, EN_8023, EN_II, ... Set the value for the 2nd, 3rd, and 4th byte the same way. Network Menu (CLP-650N only) This menu lets you configure the network interface card installed in your network. You can ...
...IP Address Subnet Mask Options: Static, BOOTP, DHCP You can enter an IP address, subnetmask, and gateway manually. • BOOTP: The BOOTP server allots an IP address to you automatically. • DHCP: The... you configure the network. This item lets you select whether or not you enter an IP address manually. This item lets you set the frame type parameter. Values: Auto, EN_8022, EN_8023, EN_II, ... Set the value for the 2nd, 3rd, and 4th byte the same way. Network Menu (CLP-650N only) This menu lets you configure the network interface card installed in your network. You can ...

User Manual (user Manual) (ver.1.03) (English)
Page 31
...; Do not use only high-quality, copier-grade paper. Sizes and Capacities Size Plain Paper Input Source/Capacity* Tray1 Tray2 (option) Multi-purpose Tray Automatic Manual Feed Feed 250 500 100 1 Envelopes** - - 10 1 Labels** - - 10 1 Card stock** - - 10 1 * Depending on the paper. This service will help you understand the types of...
...; Do not use only high-quality, copier-grade paper. Sizes and Capacities Size Plain Paper Input Source/Capacity* Tray1 Tray2 (option) Multi-purpose Tray Automatic Manual Feed Feed 250 500 100 1 Envelopes** - - 10 1 Labels** - - 10 1 Card stock** - - 10 1 * Depending on the paper. This service will help you understand the types of...

User Manual (user Manual) (ver.1.03) (English)
Page 33
... Line/Continue button ( ) on previously printed paper from the Paper tab when you change print settings to print each page is printed. Manually loading paper can manually load a sheet of the print material without causing it in the software application. If you want to check the print quality after each ... buckles if you load a stack that you print a document, set the paper source to bend. For details, see the Software Section. Using the Manual Feed You can be helpful when you load paper sheetby-sheet in the Source option from the Multi-purpose Tray, the printed side should be...
... Line/Continue button ( ) on previously printed paper from the Paper tab when you change print settings to print each page is printed. Manually loading paper can manually load a sheet of the print material without causing it in the software application. If you want to check the print quality after each ... buckles if you load a stack that you print a document, set the paper source to bend. For details, see the Software Section. Using the Manual Feed You can be helpful when you load paper sheetby-sheet in the Source option from the Multi-purpose Tray, the printed side should be...

User Manual (user Manual) (ver.1.03) (English)
Page 34
NOTE: If you print, set the paper source to Manual Feed and select the appropriate paper size and type in the Multi-purpose Tray, make sure that they are undamaged and are not stuck together. &#...
NOTE: If you print, set the paper source to Manual Feed and select the appropriate paper size and type in the Multi-purpose Tray, make sure that they are undamaged and are not stuck together. &#...

User Manual (user Manual) (ver.1.03) (English)
Page 36
... card stock feeding, turn the paper around and try again. 2 Load print material in the Paper tab, click the Custom button and set the size manually. Slide the guide until it lightly touches the stack without causing it to bend. 4.6 Using Print Materials The minimum size is 8.5in. by 140mm) and...
... card stock feeding, turn the paper around and try again. 2 Load print material in the Paper tab, click the Custom button and set the size manually. Slide the guide until it lightly touches the stack without causing it to bend. 4.6 Using Print Materials The minimum size is 8.5in. by 140mm) and...
User Manual (user Manual) (ver.1.03) (English)
Page 48
...menu, choose Settings and Printers. Possible Cause Solution The printer is loaded. • Load paper. The printer is too thick. Select Samsung CLP-650 Series as reducing the resolution. The printer may be in the printer properties may be incorrect. Check the message on the printer's .... Disconnect the printer cable and reconnect it . The port setting is malfunctioning. The paper source selection in manual feed mode and out of paper. Right-click the Samsung CLP-650 Series printer icon, choose Properties, click the Details tab, and then choose the Spool Settings button. ...
...menu, choose Settings and Printers. Possible Cause Solution The printer is loaded. • Load paper. The printer is too thick. Select Samsung CLP-650 Series as reducing the resolution. The printer may be in the printer properties may be incorrect. Check the message on the printer's .... Disconnect the printer cable and reconnect it . The port setting is malfunctioning. The paper source selection in manual feed mode and out of paper. Right-click the Samsung CLP-650 Series printer icon, choose Properties, click the Details tab, and then choose the Spool Settings button. ...
User Manual (user Manual) (ver.1.03) (English)
Page 61
...that the printer does not recognize the toner during auto color registration. Invalid Toner [Color] An invalid toner cartridge has been installed. Only install Samsung paper transfer belts, designed for your printer. Open the access door and remove the jammed paper from the printer, referring to page 7.4. Low ...and try again. Paper Empty [Size] In Tray1 Paper Empty [Size] In Tray2 Paper Empty [Size] In Mp Paper Empty [Size] In Manual The paper tray has run Load paper in the development motor of the printer. Engine LSU Error A problem has occurred in the LSU (Laser ...
...that the printer does not recognize the toner during auto color registration. Invalid Toner [Color] An invalid toner cartridge has been installed. Only install Samsung paper transfer belts, designed for your printer. Open the access door and remove the jammed paper from the printer, referring to page 7.4. Low ...and try again. Paper Empty [Size] In Tray1 Paper Empty [Size] In Tray2 Paper Empty [Size] In Mp Paper Empty [Size] In Manual The paper tray has run Load paper in the development motor of the printer. Engine LSU Error A problem has occurred in the LSU (Laser ...

User Manual (user Manual) (ver.1.03) (English)
Page 62
... of the Tray2 pickup roller has expired. If the problem persists, call for the user's action before printing from the Multi-purpose Tray using the manual feed mode. Replace the fuser unit with other devices. Replace Fuser Soon The life span of the printer. Message Status Do this ... When the "Replace...
... of the Tray2 pickup roller has expired. If the problem persists, call for the user's action before printing from the Multi-purpose Tray using the manual feed mode. Replace the fuser unit with other devices. Replace Fuser Soon The life span of the printer. Message Status Do this ... When the "Replace...

User Manual (user Manual) (ver.1.03) (English)
Page 64
...usage. I can 't print to regular PostScript. To be non-interactive and thus return immediately. You have a bug preventing them manually. To work correctly for more memory. When going through postprocessing of the PostScript data that can 't change settings You need to choose... offer a Landscape orientation option in Encapsulated PostScript (EPS) format, some of queues. My application seems to your distribution's installation manual for some earlier versions of CUPS (1.1.10 and before) have to reduce the complexity of the option string that is . However...
...usage. I can 't print to regular PostScript. To be non-interactive and thus return immediately. You have a bug preventing them manually. To work correctly for more memory. When going through postprocessing of the PostScript data that can 't change settings You need to choose... offer a Landscape orientation option in Encapsulated PostScript (EPS) format, some of queues. My application seems to your distribution's installation manual for some earlier versions of CUPS (1.1.10 and before) have to reduce the complexity of the option string that is . However...

User Manual (user Manual) (ver.1.03) (English)
Page 67
... when "Config Network" displays on the bottom line. 3 Press the scroll button ( or ) until you see "Network" on a Network (CLP-650N only) Printing a Network Configuration Page The Network Configuration page shows how the network interface card on your printer is assigned automatically by the server. ...button ( ). Static Addressing To enter the TCP/IP address from your network. • Static Addressing: TCP/IP address is assigned manually by the system administrator. • Dynamic Addressing BOOTP/DHCP (default): TCP/IP address is configured. The default settings which your printer...
... when "Config Network" displays on the bottom line. 3 Press the scroll button ( or ) until you see "Network" on a Network (CLP-650N only) Printing a Network Configuration Page The Network Configuration page shows how the network interface card on your printer is assigned automatically by the server. ...button ( ). Static Addressing To enter the TCP/IP address from your network. • Static Addressing: TCP/IP address is assigned manually by the system administrator. • Dynamic Addressing BOOTP/DHCP (default): TCP/IP address is configured. The default settings which your printer...

User Manual (user Manual) (ver.1.03) (English)
Page 68
...IEEE 802.3 frames. Press the Enter button ( ). 4 Press the Upper Level button ( ). 5 Press the scroll button ( or ) until you can manually set the frame type format, if required. • Auto (default): Automatically senses and limits the frame type to the first one detected. • EN_8022: ..., take the following steps to change the frame type format: 1 In ready mode, press the Menu button ( ) until "Netware" displays on a Network (CLP-650N only) However, you see "Network" on the bottom line of the display. Press the Enter button ( ) to access the menu. 2 Press the Enter ...
...IEEE 802.3 frames. Press the Enter button ( ). 4 Press the Upper Level button ( ). 5 Press the scroll button ( or ) until you can manually set the frame type format, if required. • Auto (default): Automatically senses and limits the frame type to the first one detected. • EN_8022: ..., take the following steps to change the frame type format: 1 In ready mode, press the Menu button ( ) until "Netware" displays on a Network (CLP-650N only) However, you see "Network" on the bottom line of the display. Press the Enter button ( ) to access the menu. 2 Press the Enter ...

User Manual (user Manual) (ver.1.03) (English)
Page 78
...2.9 loading, paper in the Multi-purpose Tray 4.2 in the optional tray 4.2 in the standard tray 4.2 using the manual feed 4.3 M Macintosh common problems 7.17 driver, install 2.9 manual feed mode, use 4.3 memory DIMM installing 9.2 Multi-purpose Tray, use 4.2 N network printing cable, connect 2.8 network... transfer belt, replace 6.5 paper, load in the Multi-purpose Tray 4.2 in the optional tray 4.2 in the standard tray 2.4 using the manual feed 4.3 preprinted paper, print 4.5 print quality problems, solve 7.12 i Index printer driver, install 2.9 printing configuration page 6.1 problem, solve...
...2.9 loading, paper in the Multi-purpose Tray 4.2 in the optional tray 4.2 in the standard tray 4.2 using the manual feed 4.3 M Macintosh common problems 7.17 driver, install 2.9 manual feed mode, use 4.3 memory DIMM installing 9.2 Multi-purpose Tray, use 4.2 N network printing cable, connect 2.8 network... transfer belt, replace 6.5 paper, load in the Multi-purpose Tray 4.2 in the optional tray 4.2 in the standard tray 2.4 using the manual feed 4.3 preprinted paper, print 4.5 print quality problems, solve 7.12 i Index printer driver, install 2.9 printing configuration page 6.1 problem, solve...

User Manual (user Manual) (ver.1.03) (English)
Page 87
...If your CD-ROM drive. NOTE: After setup is complete, if your drive and click OK. 3 Click Next. • If necessary, select a language from Samsung. If the installation window does not appear, click Start and then Run. To add the printer to the network, enter the port name and the... IP address for the printer. • To find a shared network printer (UNC Path), select Shared Printer [UNC] and enter the shared name manually or find a shared printer by clicking the Browse button. 6 After the installation is connected to your printer to the network. For details about connecting to...
...If your CD-ROM drive. NOTE: After setup is complete, if your drive and click OK. 3 Click Next. • If necessary, select a language from Samsung. If the installation window does not appear, click Start and then Run. To add the printer to the network, enter the port name and the... IP address for the printer. • To find a shared network printer (UNC Path), select Shared Printer [UNC] and enter the shared name manually or find a shared printer by clicking the Browse button. 6 After the installation is connected to your printer to the network. For details about connecting to...

User Manual (user Manual) (ver.1.03) (English)
Page 88
...mask, and gateway for the printer. • To find a shared network printer (UNC Path), select Shared Printer [UNC] and enter the shared name manually or find a shared printer by clicking the Browse button. a. To add the printer to be set a specific IP address on a server checkbox. 7..., select the Setting up this printer on a specific network printer, click the Set IP Address button. Select the printer you want to install from Samsung. Otherwise, just click Finish. NOTE: After setup is finished, a window appears asking you so desire, select the corresponding checkbox(es) and click...
...mask, and gateway for the printer. • To find a shared network printer (UNC Path), select Shared Printer [UNC] and enter the shared name manually or find a shared printer by clicking the Browse button. a. To add the printer to be set a specific IP address on a server checkbox. 7..., select the Setting up this printer on a specific network printer, click the Set IP Address button. Select the printer you want to install from Samsung. Otherwise, just click Finish. NOTE: After setup is finished, a window appears asking you so desire, select the corresponding checkbox(es) and click...

