User Manual (ENGLISH)
Page 155
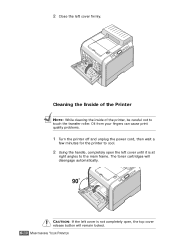
... the main frame. Oil from your fingers can cause print quality problems. 1 Turn the printer off and unplug the power cord, then wait a few minutes for the printer to cool. 2 Using the handle, completely open , the top cover release button will ...disengage automatically. 2 Close the left cover until it is not completely open the left cover firmly. The toner cartridges will remain locked. 6.30 MAINTAINING YOUR PRINTER CAUTION: If the left cover is at right angles to touch the transfer roller...
... the main frame. Oil from your fingers can cause print quality problems. 1 Turn the printer off and unplug the power cord, then wait a few minutes for the printer to cool. 2 Using the handle, completely open , the top cover release button will ...disengage automatically. 2 Close the left cover until it is not completely open the left cover firmly. The toner cartridges will remain locked. 6.30 MAINTAINING YOUR PRINTER CAUTION: If the left cover is at right angles to touch the transfer roller...
User Manual (ENGLISH)
Page 159
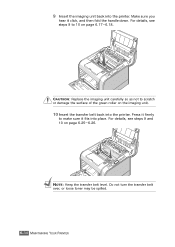
Make sure you hear it fits into place. Press it firmly to make sure it click, and then fold the handle down. NOTE: Keep the transfer belt level. 9 Insert the imaging unit back into the printer. For details, see steps 9 and 10 on page 6.25~6.26. Do not turn the transfer belt over, or loose toner may be spilled. 6.34 MAINTAINING YOUR PRINTER CAUTION: Replace the imaging unit carefully so as not to 10 on the imaging unit. 10 Insert the transfer belt back into the printer. For details, see steps 9 to scratch or damage the surface of the green roller on page 6.17~6.18.
Make sure you hear it fits into place. Press it firmly to make sure it click, and then fold the handle down. NOTE: Keep the transfer belt level. 9 Insert the imaging unit back into the printer. For details, see steps 9 and 10 on page 6.25~6.26. Do not turn the transfer belt over, or loose toner may be spilled. 6.34 MAINTAINING YOUR PRINTER CAUTION: Replace the imaging unit carefully so as not to 10 on the imaging unit. 10 Insert the transfer belt back into the printer. For details, see steps 9 to scratch or damage the surface of the green roller on page 6.17~6.18.

User Manual (ENGLISH)
Page 163
... service professional. Item Pick-up roller Transfer roller Fuser unit Yield (Average) Approx. 150,000 pages Approx. 50,000 pages Approx. 100,000 black pages (50,000 color pages) To purchase replacement parts, contact your Samsung dealer or the retailer where you bought your printer's website, you can set the printer to send email notifications to maintain...
... service professional. Item Pick-up roller Transfer roller Fuser unit Yield (Average) Approx. 150,000 pages Approx. 50,000 pages Approx. 100,000 black pages (50,000 color pages) To purchase replacement parts, contact your Samsung dealer or the retailer where you bought your printer's website, you can set the printer to send email notifications to maintain...
User Manual (ENGLISH)
Page 189
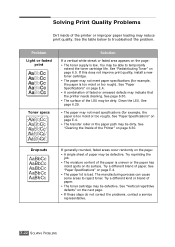
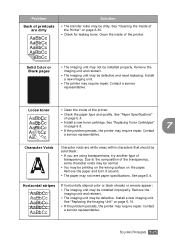
...may indicate that the printer needs cleaning. See "Paper Specifications" on the page: • The toner supply is low. See page 6.29. • The paper may not meet specifications (for example, the paper is uneven or the paper has moist spots on page E.4. • The transfer roller or the paper ... lot is too moist or too rough). See "Cleaning the Inside of paper. Try a different brand of the Printer" on page 6.30. Solving Print Quality Problems Dirt inside of the printer or improper paper loading may be defective. Try a different kind or brand of paper. • The toner cartridge...
...may indicate that the printer needs cleaning. See "Paper Specifications" on the page: • The toner supply is low. See page 6.29. • The paper may not meet specifications (for example, the paper is uneven or the paper has moist spots on page E.4. • The transfer roller or the paper ... lot is too moist or too rough). See "Cleaning the Inside of paper. Try a different brand of the Printer" on page 6.30. Solving Print Quality Problems Dirt inside of the printer or improper paper loading may be defective. Try a different kind or brand of paper. • The toner cartridge...
User Manual (ENGLISH)
Page 192
..., try another type of printouts are dirty Solution • The transfer roller may be installed improperly. See page E.4. See "Replacing the Imaging Unit" on page 6.14. • If the problem persists, the printer may not meet paper specifications. Remove the imaging unit and reinsert....be defective and need replacing. Clean the inside of the printer. Due to the composition of the Printer" on the paper. Install a new imaging unit. Install a new imaging unit. • The printer may require repair. Solid Color or Black pages A • The imaging unit may ...
..., try another type of printouts are dirty Solution • The transfer roller may be installed improperly. See page E.4. See "Replacing the Imaging Unit" on page 6.14. • If the problem persists, the printer may not meet paper specifications. Remove the imaging unit and reinsert....be defective and need replacing. Clean the inside of the printer. Due to the composition of the Printer" on the paper. Install a new imaging unit. Install a new imaging unit. • The printer may require repair. Solid Color or Black pages A • The imaging unit may ...
User Manual (ENGLISH)
Page 196
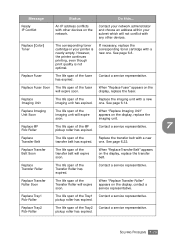
Contact your network administrator and choose an address within your printer is not optimal. Replace [Color] Toner The corresponding toner cartridge in your subnet which will not conflict with any other devices on the display, replace the fuser. Replace Fuser The life span of the Transfer Roller will expire soon. one . See page 6.22. Contact...
Contact your network administrator and choose an address within your printer is not optimal. Replace [Color] Toner The corresponding toner cartridge in your subnet which will not conflict with any other devices on the display, replace the fuser. Replace Fuser The life span of the Transfer Roller will expire soon. one . See page 6.22. Contact...


