

Open Source Guide (ENGLISH)
Page 1
... accord with the major components (compiler, kernel, and so on) of derivative or collective works based on the original authors' reputations. If, as a special exception, the source code distributed need to the absence of a free program will automatically terminate your freedom to share and change free software--to make restrictions that forbid anyone to any such program or work, and a "work means the preferred...
... accord with the major components (compiler, kernel, and so on) of derivative or collective works based on the original authors' reputations. If, as a special exception, the source code distributed need to the absence of a free program will automatically terminate your freedom to share and change free software--to make restrictions that forbid anyone to any such program or work, and a "work means the preferred...

Open Source Guide (ENGLISH)
Page 2
...USE OR INABILITY TO USE THE LIBRARY (INCLUDING BUT NOT LIMITED TO LOSS OF DATA OR DATA BEING RENDERED INACCURATE OR LOSSES SUSTAINED BY YOU OR THIRD PARTIES OR A FAILURE OF THE LIBRARY TO OPERATE WITH ANY OTHER SOFTWARE..., and you want it free software that everyone can do so by permitting redistribution under the terms of the ordinary General Public License). and each source file to the public, ...redistribute and change. To apply these terms (or, alternatively, under these terms, attach the following notices to where the full notice is safest to attach them to the start of warranty; 16...
...USE OR INABILITY TO USE THE LIBRARY (INCLUDING BUT NOT LIMITED TO LOSS OF DATA OR DATA BEING RENDERED INACCURATE OR LOSSES SUSTAINED BY YOU OR THIRD PARTIES OR A FAILURE OF THE LIBRARY TO OPERATE WITH ANY OTHER SOFTWARE..., and you want it free software that everyone can do so by permitting redistribution under the terms of the ordinary General Public License). and each source file to the public, ...redistribute and change. To apply these terms (or, alternatively, under these terms, attach the following notices to where the full notice is safest to attach them to the start of warranty; 16...

User Manual (user Manual) (ver.1.0) (English)
Page 3
... Connecting to Regular Audio and Video Jacks 17 Connecting a Digital TV Set-Top Box 18 Connecting to Y, PB, PR 18 Connecting a Camcorder 19 Connecting to an Analog Amplifier 20 Installing Batteries in the Remote Control 21 Chapter 3: Operation 22 Turning the TV On and Off 22 Plug & Play Feature 22 Viewing the Menus and On-Screen Displays 24 Viewing the Menus 24 Viewing the Display 24 Selecting a Menu Language 25 Memorizing the Channels 26 Selecting the Video Signal-source...
... Connecting to Regular Audio and Video Jacks 17 Connecting a Digital TV Set-Top Box 18 Connecting to Y, PB, PR 18 Connecting a Camcorder 19 Connecting to an Analog Amplifier 20 Installing Batteries in the Remote Control 21 Chapter 3: Operation 22 Turning the TV On and Off 22 Plug & Play Feature 22 Viewing the Menus and On-Screen Displays 24 Viewing the Menus 24 Viewing the Display 24 Selecting a Menu Language 25 Memorizing the Channels 26 Selecting the Video Signal-source...

User Manual (user Manual) (ver.1.0) (English)
Page 4
CONTENTS Picture Control 32 Using Automatic Picture Settings 32 Customizing the Picture 33 Resetting the Picture Settings to the Factory Defaults 34 Sound Control 35 Adjusting the Volume 35 Using the Mute Button 35 Using Automatic Sound Settings 36 Customizing the Sound 37 Viewing an External Signal Source 38 Setting the Signal Source 38 Assigning Names to External input mode 39 Chapter 4: Special Features 40 Fine Tuning Channels 40 Changing the Screen Size (depending on the model 41 Digital Noise Reduction 42 Tilt 43 Using the R.Surf Feature 44...
CONTENTS Picture Control 32 Using Automatic Picture Settings 32 Customizing the Picture 33 Resetting the Picture Settings to the Factory Defaults 34 Sound Control 35 Adjusting the Volume 35 Using the Mute Button 35 Using Automatic Sound Settings 36 Customizing the Sound 37 Viewing an External Signal Source 38 Setting the Signal Source 38 Assigning Names to External input mode 39 Chapter 4: Special Features 40 Fine Tuning Channels 40 Changing the Screen Size (depending on the model 41 Digital Noise Reduction 42 Tilt 43 Using the R.Surf Feature 44...
User Manual (user Manual) (ver.1.0) (English)
Page 5
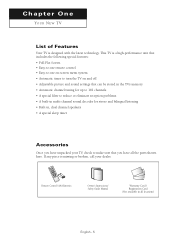
... TV, check to make sure that you have all locations) English - 5 This TV is a high-performance unit that includes the following special features: • Full Flat Screen • Easy-to-use remote control • Easy-to-use on-screen menu system • Automatic timer to turn the TV on and off • Adjustable picture and sound settings that can be stored in the TV's memory...
... TV, check to make sure that you have all locations) English - 5 This TV is a high-performance unit that includes the following special features: • Full Flat Screen • Easy-to-use remote control • Easy-to-use on-screen menu system • Automatic timer to turn the TV on and off • Adjustable picture and sound settings that can be stored in the TV's memory...

User Manual (user Manual) (ver.1.0) (English)
Page 9
... picture settings). (Refer to page 32.) ¨ Number buttons Press to select channels directly on -screen menu. ˝ P.SIZE Press to change the screen size. (Refer to page 41.) Ô R.SURF Press to automatically return to a preferred channel after a userpreset time delay. MODE Selects a target device to be controlled by this remote control (i.e., TV, Samsung STB, VCR, Cable box, or DVD). Ò PRE-CH Tunes to the previous channel. Ú TV/VIDEO...
... picture settings). (Refer to page 32.) ¨ Number buttons Press to select channels directly on -screen menu. ˝ P.SIZE Press to change the screen size. (Refer to page 41.) Ô R.SURF Press to automatically return to a preferred channel after a userpreset time delay. MODE Selects a target device to be controlled by this remote control (i.e., TV, Samsung STB, VCR, Cable box, or DVD). Ò PRE-CH Tunes to the previous channel. Ú TV/VIDEO...

User Manual (user Manual) (ver.1.0) (English)
Page 13
INSTALLATION Connecting to a Cable Box that Descrambles All Channels 1 Find the cable that is connected to the ANTENNA IN terminal on your cable box descrambles only some channels (such as premium channels), follow the instructions below. Incoming Cable Splitter English - 13 Cable Box continued... You will need a two-way splitter, an RF (A/B) switch, and four lengths of this cable to the "ANT IN" terminal on the rear panel. Incoming Cable Splitter 3 Connect a coaxial cable between...
INSTALLATION Connecting to a Cable Box that Descrambles All Channels 1 Find the cable that is connected to the ANTENNA IN terminal on your cable box descrambles only some channels (such as premium channels), follow the instructions below. Incoming Cable Splitter English - 13 Cable Box continued... You will need a two-way splitter, an RF (A/B) switch, and four lengths of this cable to the "ANT IN" terminal on the rear panel. Incoming Cable Splitter 3 Connect a coaxial cable between...
User Manual (user Manual) (ver.1.0) (English)
Page 14
... the RF (A/B) switch. Set the A/B switch to the "B" position to view scrambled channels. (When you set the A/B switch to "B", you 've made this connection, set the A/B switch to the cable box's output channel, which is usually channel 3 or 4.) English - 14 Incoming Cable Splitter Cable Box RF (A/B) Switch 5 Connect another cable between the ANTENNA OUT terminal on the cable box and the B-IN terminal on the rear panel. Incoming Cable Splitter Cable Box RF (A/B) Switch 6 Connect the last coaxial cable between the OUT...
... the RF (A/B) switch. Set the A/B switch to the "B" position to view scrambled channels. (When you set the A/B switch to "B", you 've made this connection, set the A/B switch to the cable box's output channel, which is usually channel 3 or 4.) English - 14 Incoming Cable Splitter Cable Box RF (A/B) Switch 5 Connect another cable between the ANTENNA OUT terminal on the cable box and the B-IN terminal on the rear panel. Incoming Cable Splitter Cable Box RF (A/B) Switch 6 Connect the last coaxial cable between the OUT...
User Manual (user Manual) (ver.1.0) (English)
Page 15
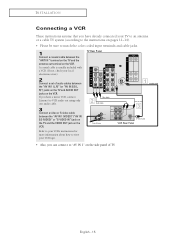
TV Rear Panel 2 Connect a set of TV. INSTALLATION Connecting a VCR These instructions assume that you can connect to "AV IN 1" on the side panel of audio cables between the "ANT IN " terminal on the TV and the antenna out terminal on the VCR. A coaxial cable is usually included with a VCR. (If not, check your TV to an antenna or a cable TV system (according to the instructions on...
TV Rear Panel 2 Connect a set of TV. INSTALLATION Connecting a VCR These instructions assume that you can connect to "AV IN 1" on the side panel of audio cables between the "ANT IN " terminal on the TV and the antenna out terminal on the VCR. A coaxial cable is usually included with a VCR. (If not, check your TV to an antenna or a cable TV system (according to the instructions on...
User Manual (user Manual) (ver.1.0) (English)
Page 16
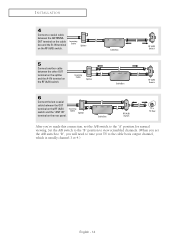
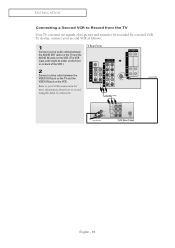
... record using this , connect your second VCR as follows: 1 Connect a set of audio cables between the VIDEO OUT jack on the TV and the VIDEO IN jack on the VCR. INSTALLATION Connecting a Second VCR to be either on the front or on back of its picture and sound to Record from the TV Your TV can send out signals of the VCR.) TV Rear Panel 2 Connect a video cable...
... record using this , connect your second VCR as follows: 1 Connect a set of audio cables between the VIDEO OUT jack on the TV and the VIDEO IN jack on the VCR. INSTALLATION Connecting a Second VCR to be either on the front or on back of its picture and sound to Record from the TV Your TV can send out signals of the VCR.) TV Rear Panel 2 Connect a video cable...

User Manual (user Manual) (ver.1.0) (English)
Page 17
... IN 1 (VIDEO)" (or "AV IN 2/3 (VIDEO)") jack on the TV and the VIDEO OUT jack on the DVD player. TV Rear Panel 2 Connect a video cable between the "AV IN 1 (L, R)" (or "AV IN 2/3 (L, R)") jacks on the TV and the AUDIO OUT jacks on the DVD player. INSTALLATION Connecting a DVD Player The rear panel jacks on your TV make it easy to connect a DVD player to your DVD player's owner's instruction. 2 1 Connecting to Y, PB, PR 1 Connect a set of audio cables between the "COMPONENT IN...
... IN 1 (VIDEO)" (or "AV IN 2/3 (VIDEO)") jack on the TV and the VIDEO OUT jack on the DVD player. TV Rear Panel 2 Connect a video cable between the "AV IN 1 (L, R)" (or "AV IN 2/3 (L, R)") jacks on the TV and the AUDIO OUT jacks on the DVD player. INSTALLATION Connecting a DVD Player The rear panel jacks on your TV make it easy to connect a DVD player to your DVD player's owner's instruction. 2 1 Connecting to Y, PB, PR 1 Connect a set of audio cables between the "COMPONENT IN...
User Manual (user Manual) (ver.1.0) (English)
Page 18
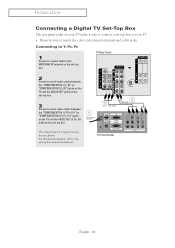
... make it easy to connect a set-top box to your TV. • Please be sure to match the color coded input terminals and cable jacks. The connections for a typical set -top box. INSTALLATION Connecting a Digital TV Set-Top Box The rear panel jacks on the set-top box. Connecting to Y, PB, PR 1 Connect a coaxial cable to the set-top box instruction manual. For detailed information, refer to the ANTENNA IN terminal on the set -top box are shown. English...
... make it easy to connect a set-top box to your TV. • Please be sure to match the color coded input terminals and cable jacks. The connections for a typical set -top box. INSTALLATION Connecting a Digital TV Set-Top Box The rear panel jacks on the set-top box. Connecting to Y, PB, PR 1 Connect a coaxial cable to the set-top box instruction manual. For detailed information, refer to the ANTENNA IN terminal on the set -top box are shown. English...

User Manual (user Manual) (ver.1.0) (English)
Page 19
..., you need to connect a set of two cables. TV Side Panel 1 Locate the A/V output jacks on the Camcorder. If you to match the color coded input terminals and cable jacks. They are usually included with a Camcorder. (If not, check your local electronics store.) If your TV. The audio-video cables shown here are usually found on the side or rear of the Camcorder. 2 Connect a set of audio cables between...
..., you need to connect a set of two cables. TV Side Panel 1 Locate the A/V output jacks on the Camcorder. If you to match the color coded input terminals and cable jacks. They are usually included with a Camcorder. (If not, check your local electronics store.) If your TV. The audio-video cables shown here are usually found on the side or rear of the Camcorder. 2 Connect a set of audio cables between...

User Manual (user Manual) (ver.1.0) (English)
Page 22
Check antenna input. Auto program Skip English - 22 continued... is displayed. You can also use the POWER button on the remote control. œ Plug & Play feature doesn't work in the AV mode. Plug & Play Feature When the TV is initially powered On, basic customer settings proceed automatically and subsequently: Setting the language, Antenna input check, Channel Memorize and Time Setting. • The Plug & Play function operates after plugging in your local cable company to identify the type of cable TV systems. Contact...
Check antenna input. Auto program Skip English - 22 continued... is displayed. You can also use the POWER button on the remote control. œ Plug & Play feature doesn't work in the AV mode. Plug & Play Feature When the TV is initially powered On, basic customer settings proceed automatically and subsequently: Setting the language, Antenna input check, Channel Memorize and Time Setting. • The Plug & Play function operates after plugging in your local cable company to identify the type of cable TV systems. Contact...
User Manual (user Manual) (ver.1.0) (English)
Page 23
... œ or √ button to activate "Auto Program" or press the MENU button to skip. (refer to "Auto program" on page 31.) Time Clock - - : - - is displayed. Setup Plug & Play Time Language : Caption Melody : Child Lock √ √ English √ On √ Move Enter Return English - 23 am Off Sleep Timer : Off On Timer Volume : 10 On Timer Channel : 3 Move Adjust Skip 6 When you want to reset this feature (1)Press the MENU button. (2)Press the ▲...
... œ or √ button to activate "Auto Program" or press the MENU button to skip. (refer to "Auto program" on page 31.) Time Clock - - : - - is displayed. Setup Plug & Play Time Language : Caption Melody : Child Lock √ √ English √ On √ Move Enter Return English - 23 am Off Sleep Timer : Off On Timer Volume : 10 On Timer Channel : 3 Move Adjust Skip 6 When you want to reset this feature (1)Press the MENU button. (2)Press the ▲...

User Manual (user Manual) (ver.1.0) (English)
Page 24
...; You can also use the MENU, VOL+/- Press the INFO button on the screen. Air 10 12 : 00 am MTS : Stereo Signal : Mono English - 24 The "Input" menu appears on the remote control. and CH / buttons on , press the MENU button. OPERATION Viewing the Menus and On-Screen Displays Viewing the Menus 1 With the power on the control panel of the TV to make selections (refer to page 6). Input Source List : TV √...
...; You can also use the MENU, VOL+/- Press the INFO button on the screen. Air 10 12 : 00 am MTS : Stereo Signal : Mono English - 24 The "Input" menu appears on the remote control. and CH / buttons on , press the MENU button. OPERATION Viewing the Menus and On-Screen Displays Viewing the Menus 1 With the power on the control panel of the TV to make selections (refer to page 6). Input Source List : TV √...

User Manual (user Manual) (ver.1.0) (English)
Page 51
... button to adjust volume level. Setup Plug & Play Time Language : Caption Melody : Child Lock √ √ English √ On √ Move Enter Return 2 Press the ... Press the œ or √ button to exit. SPECIAL FEATURES Setting the Preferred Volume Level and Channel The preferred volume and channel can be set for when the timer automatically turns on the TV. 1 Press the MENU button. or † button to select the channel you want. Time...
... button to adjust volume level. Setup Plug & Play Time Language : Caption Melody : Child Lock √ √ English √ On √ Move Enter Return 2 Press the ... Press the œ or √ button to exit. SPECIAL FEATURES Setting the Preferred Volume Level and Channel The preferred volume and channel can be set for when the timer automatically turns on the TV. 1 Press the MENU button. or † button to select the channel you want. Time...

User Manual (user Manual) (ver.1.0) (English)
Page 53
... users, such as children, from children. 1 Press the MENU button. SPECIAL FEATURES Locking the Channel This feature allows you to exit. You can release the Child Lock setting, so keep the remote control away from watching unsuitable programmes by using the control buttons on the TV panel (the "Not Available" is locked, you can not access to be released using front (or side) panel buttons. Setup Plug & Play Time Language : Caption Melody : Child Lock...
... users, such as children, from children. 1 Press the MENU button. SPECIAL FEATURES Locking the Channel This feature allows you to exit. You can release the Child Lock setting, so keep the remote control away from watching unsuitable programmes by using the control buttons on the TV panel (the "Not Available" is locked, you can not access to be released using front (or side) panel buttons. Setup Plug & Play Time Language : Caption Melody : Child Lock...

User Manual (user Manual) (ver.1.0) (English)
Page 55
... (Cable box or DVD player) turns on, your remote control is now set correctly. 6 Once your remote control is set up, press the MODE button any time you enter 3 digits of your particular VCR (Cable box or DVD player). • When your remote is in the STB, VCR, CABLE, or DVD mode, the volume buttons still control your TV's volume. In addition to controlling the TV, the universal remote control can also operate a VCR, Cable box, DVD, and some Samsung Set-top boxes (even if your VCR, Cable box and DVD...
... (Cable box or DVD player) turns on, your remote control is now set correctly. 6 Once your remote control is set up, press the MODE button any time you enter 3 digits of your particular VCR (Cable box or DVD player). • When your remote is in the STB, VCR, CABLE, or DVD mode, the volume buttons still control your TV's volume. In addition to controlling the TV, the universal remote control can also operate a VCR, Cable box, DVD, and some Samsung Set-top boxes (even if your VCR, Cable box and DVD...

User Manual (user Manual) (ver.1.0) (English)
Page 57
... operate your nearest Samsung authorized service center. Make sure the TV is a digital channel. The HD caption that appears when switching channels or when pressing the Information button on the remote control means the selected channel is plugged in the "TV" mode. C hSaP EpC I AtL eF ErAT UFR EiSv e TROUBLESHOOTING If the TV seems to put your remote control in . Poor sound quality. Adjust the antenna. Picture rolls vertically. Check the antenna connections...
... operate your nearest Samsung authorized service center. Make sure the TV is a digital channel. The HD caption that appears when switching channels or when pressing the Information button on the remote control means the selected channel is plugged in the "TV" mode. C hSaP EpC I AtL eF ErAT UFR EiSv e TROUBLESHOOTING If the TV seems to put your remote control in . Poor sound quality. Adjust the antenna. Picture rolls vertically. Check the antenna connections...


