

Open Source Guide (ENGLISH)
Page 1
... such program or work, and a "work based on the Program" means either source or binary form) with a work based on the Program) on a volume of a storage or distribution medium does not bring the other Free Software Foundation software is given a distinguishing version number. they do these rights or to ask you distribute the same sections as part of a whole which is implemented by offering access to...
... such program or work, and a "work based on the Program" means either source or binary form) with a work based on the Program) on a volume of a storage or distribution medium does not bring the other Free Software Foundation software is given a distinguishing version number. they do these rights or to ask you distribute the same sections as part of a whole which is implemented by offering access to...

Open Source Guide (ENGLISH)
Page 2
... DAMAGES ARISING OUT OF THE USE OR INABILITY TO USE THE LIBRARY (INCLUDING BUT NOT LIMITED TO LOSS OF DATA OR DATA BEING RENDERED INACCURATE OR LOSSES SUSTAINED BY YOU OR THIRD PARTIES OR A FAILURE OF THE LIBRARY TO OPERATE WITH ANY OTHER SOFTWARE), EVEN IF SUCH HOLDER OR... free software that everyone can do so by permitting redistribution under the terms of the ordinary General Public License). To apply these terms (or, alternatively, under these terms, attach the following notices to the public, we recommend making it to be of warranty; It is found. and each source...
... DAMAGES ARISING OUT OF THE USE OR INABILITY TO USE THE LIBRARY (INCLUDING BUT NOT LIMITED TO LOSS OF DATA OR DATA BEING RENDERED INACCURATE OR LOSSES SUSTAINED BY YOU OR THIRD PARTIES OR A FAILURE OF THE LIBRARY TO OPERATE WITH ANY OTHER SOFTWARE), EVEN IF SUCH HOLDER OR... free software that everyone can do so by permitting redistribution under the terms of the ordinary General Public License). To apply these terms (or, alternatively, under these terms, attach the following notices to the public, we recommend making it to be of warranty; It is found. and each source...

User Manual (user Manual) (ver.1.0) (English)
Page 2
... RISK OF ELECTRIC SHOCK, DO NOT REMOVE COVER (OR BACK). NO USER SERVICEABLE PARTS INSIDE. Certain Canadian programs may also be connected to the grounding system of contact with this product. This symbol alerts you that unauthorized recording of copyrighted TV programs is dangerous to the point of cable entry as close to make any kind of the building...
... RISK OF ELECTRIC SHOCK, DO NOT REMOVE COVER (OR BACK). NO USER SERVICEABLE PARTS INSIDE. Certain Canadian programs may also be connected to the grounding system of contact with this product. This symbol alerts you that unauthorized recording of copyrighted TV programs is dangerous to the point of cable entry as close to make any kind of the building...
User Manual (user Manual) (ver.1.0) (English)
Page 3
... table. Use only with a cart, stand, tripod, bracket, or table recommended by the manufacturer or sold with any attachments and/or equipment without approval of the manufacturer. If you are not sure of the type of power supplied to -use the TV receiver where contact with or immersion in its cart with slots in television technology. This plug will provide convenient, dependable service...
... table. Use only with a cart, stand, tripod, bracket, or table recommended by the manufacturer or sold with any attachments and/or equipment without approval of the manufacturer. If you are not sure of the type of power supplied to -use the TV receiver where contact with or immersion in its cart with slots in television technology. This plug will provide convenient, dependable service...
User Manual (user Manual) (ver.1.0) (English)
Page 4
... completion of overhead power lines or other controls may result in a safe operating condition. 2 SAFETY Overloading can fall into the TV - Read information with such lines might be sure the antenna or cable system is damaged - If the TV receiver has been exposed to qualified service personnel under the following the operating instructions - When the power-supply cord or plug is grounded so...
... completion of overhead power lines or other controls may result in a safe operating condition. 2 SAFETY Overloading can fall into the TV - Read information with such lines might be sure the antenna or cable system is damaged - If the TV receiver has been exposed to qualified service personnel under the following the operating instructions - When the power-supply cord or plug is grounded so...
User Manual (user Manual) (ver.1.0) (English)
Page 5
... from the TV 2.7 Connecting a DVD Player 2.7 Connecting a Camcorder 2.8 Installing Batteries in the Remote Control 2.9 Chapter 3: Operation 3.1 Turning the TV On and Off 3.1 Plug & Play Feature 3.1 Viewing the Menus and On-Screen Displays 3.3 Viewing the Menus 3.3 Viewing the Display 3.3 Selecting a Menu Language 3.4 Memorizing the Channels 3.5 Selecting the Video Signal-source 3.5 Storing Channels in Memory (Automatic Method 3.6 Adding and Erasing Channels (Manual Method 3.7 Changing Channels 3.8 Using the Channel Buttons 3.8 Directly Accessing Channels 3.8 Using the PRE-CH...
... from the TV 2.7 Connecting a DVD Player 2.7 Connecting a Camcorder 2.8 Installing Batteries in the Remote Control 2.9 Chapter 3: Operation 3.1 Turning the TV On and Off 3.1 Plug & Play Feature 3.1 Viewing the Menus and On-Screen Displays 3.3 Viewing the Menus 3.3 Viewing the Display 3.3 Selecting a Menu Language 3.4 Memorizing the Channels 3.5 Selecting the Video Signal-source 3.5 Storing Channels in Memory (Automatic Method 3.6 Adding and Erasing Channels (Manual Method 3.7 Changing Channels 3.8 Using the Channel Buttons 3.8 Directly Accessing Channels 3.8 Using the PRE-CH...
User Manual (user Manual) (ver.1.0) (English)
Page 6
... Your Remote Control 4.1 Setting Up Your Remote Control to Operate Your VCR. . . . 4.1 Setting Up Your Remote Control to Operate Your Cable Box. . 4.3 Fine Tuning Channels 4.4 Changing the Screen Size 4.5 Digital Noise Reduction 4.6 Tilt 4.7 Using the Surf Feature 4.8 Setting the On/Off Timer 4.9 Setting the Sleep Timer 4.10 Sound Features 4.11 Choosing a Multi-Channel Sound (MTS) Soundtrack. . . . . 4.11 Extra Sound Settings (Turbo Sound, Surround, or Auto Volume 4.12 Viewing Closed Captions 4.13 Viewing the Demonstration 4.14 Chapter 5: Troubleshooting 5.1 Identifying Problems...
... Your Remote Control 4.1 Setting Up Your Remote Control to Operate Your VCR. . . . 4.1 Setting Up Your Remote Control to Operate Your Cable Box. . 4.3 Fine Tuning Channels 4.4 Changing the Screen Size 4.5 Digital Noise Reduction 4.6 Tilt 4.7 Using the Surf Feature 4.8 Setting the On/Off Timer 4.9 Setting the Sleep Timer 4.10 Sound Features 4.11 Choosing a Multi-Channel Sound (MTS) Soundtrack. . . . . 4.11 Extra Sound Settings (Turbo Sound, Surround, or Auto Volume 4.12 Viewing Closed Captions 4.13 Viewing the Demonstration 4.14 Chapter 5: Troubleshooting 5.1 Identifying Problems...
User Manual (user Manual) (ver.1.0) (English)
Page 7
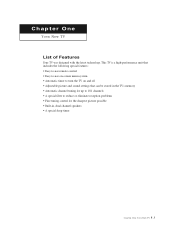
...-to-use remote control • Easy-to-use on-screen menu system • Automatic timer to turn the TV on and off • Adjustable picture and sound settings that can be stored in the TV's memory • Automatic channel tuning for up to 181 channels • A special filter to reduce or eliminate reception problems • Fine tuning control for the sharpest picture possible • Built-in, dual channel speakers...
...-to-use remote control • Easy-to-use on-screen menu system • Automatic timer to turn the TV on and off • Adjustable picture and sound settings that can be stored in the TV's memory • Automatic channel tuning for up to 181 channels • A special filter to reduce or eliminate reception problems • Fine tuning control for the sharpest picture possible • Built-in, dual channel speakers...
User Manual (user Manual) (ver.1.0) (English)
Page 10
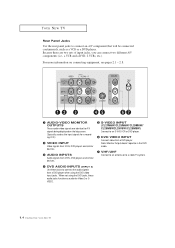
...; AUDIO INPUTS Audio signals from VCRs, DVD players and similar devices. ˆ S-VIDEO INPUT (CL21M6W/CL25M6W/CL29M6W/ CL29M9WCL29V5W/CL29M5W) Connect to an S-VHS VCR or DVD player. Ø DVD VIDEO INPUT Connect video from a DVD player when using the DVD video input jacks. When not using the DVD jacks, these jacks to a cable TV system. ¨ DVD AUDIO INPUTS (INPUT 2) Use these audio jacks function as a VCR or a DVD player. Note: Monitor Output doesn't operate in the DVD mode. ∏ VHF/UHF Connect to an antenna or to connect the audio signals from a DVD player.
...; AUDIO INPUTS Audio signals from VCRs, DVD players and similar devices. ˆ S-VIDEO INPUT (CL21M6W/CL25M6W/CL29M6W/ CL29M9WCL29V5W/CL29M5W) Connect to an S-VHS VCR or DVD player. Ø DVD VIDEO INPUT Connect video from a DVD player when using the DVD video input jacks. When not using the DVD jacks, these jacks to a cable TV system. ¨ DVD AUDIO INPUTS (INPUT 2) Use these audio jacks function as a VCR or a DVD player. Note: Monitor Output doesn't operate in the DVD mode. ∏ VHF/UHF Connect to an antenna or to connect the audio signals from a DVD player.
User Manual (user Manual) (ver.1.0) (English)
Page 11
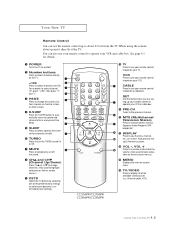
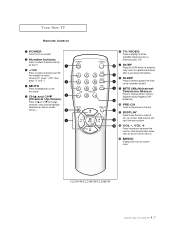
... on-screen menus.) Æ MENU Displays the main on -screen menus.) ' P.STD Adjust the TV picture by selecting one of the available video sources (i.e., Antenna/cable, VCR). CABLE Press to use your remote control to operate your VCR. See page 4.1 for automatic shutoff. Ø TURBO Press to turn the TURBO sound On or Off. ∏ MUTE Press to temporarily cut off . ´ Number buttons Press to select channels directly on -screen...
... on-screen menus.) Æ MENU Displays the main on -screen menus.) ' P.STD Adjust the TV picture by selecting one of the available video sources (i.e., Antenna/cable, VCR). CABLE Press to use your remote control to operate your VCR. See page 4.1 for automatic shutoff. Ø TURBO Press to turn the TURBO sound On or Off. ∏ MUTE Press to temporarily cut off . ´ Number buttons Press to select channels directly on -screen...
User Manual (user Manual) (ver.1.0) (English)
Page 13
... off . ´ Number buttons Press to select channels directly on the TV. ˇ +100 Press to see the time, channel, etc., on -screen menu. Also press to exit (quit) the menu system. VOL -, VOL + Press increase or decrease the volume. (Also used to highlight selections on the on-screen menus.) Ø TV/VIDEO Press to display all of the available video sources (i.e., Antenna/cable, VCR ∏...
... off . ´ Number buttons Press to select channels directly on the TV. ˇ +100 Press to see the time, channel, etc., on -screen menu. Also press to exit (quit) the menu system. VOL -, VOL + Press increase or decrease the volume. (Also used to highlight selections on the on-screen menus.) Ø TV/VIDEO Press to display all of the available video sources (i.e., Antenna/cable, VCR ∏...

User Manual (user Manual) (ver.1.0) (English)
Page 15
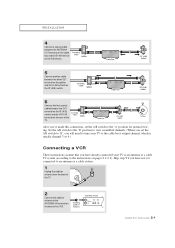
... on the bottom of the rear panel. Cable without a Cable Box 1 Plug the incoming cable into the VHF/UHF antenna terminal on the bottom of the back panel. This procedure requires an optional combiner-adaptor (available at most electronics shops). 1 Connect both antenna leads to a cable TV system, follow the instructions below. INSTALLATION Antennas with 75-ohm Round Leads 1 Plug the antenna lead into the VHF/UHF...
... on the bottom of the rear panel. Cable without a Cable Box 1 Plug the incoming cable into the VHF/UHF antenna terminal on the bottom of the back panel. This procedure requires an optional combiner-adaptor (available at most electronics shops). 1 Connect both antenna leads to a cable TV system, follow the instructions below. INSTALLATION Antennas with 75-ohm Round Leads 1 Plug the antenna lead into the VHF/UHF...
User Manual (user Manual) (ver.1.0) (English)
Page 16
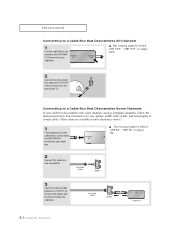
... and the IN terminal on the cable box. 2.3 CHAPTER TWO: INSTALLATION You will need a two-way splitter, an RF (A/B) switch, and four lengths of the TV. INSTALLATION Connecting to a Cable Box that Descrambles All Channels 1 Find the cable that is connected to the ANTENNA IN terminal on your cable box. Connecting to a Cable Box that Descrambles Some Channels If your cable box descrambles only some channels (such as premium channels), follow the instructions below.
... and the IN terminal on the cable box. 2.3 CHAPTER TWO: INSTALLATION You will need a two-way splitter, an RF (A/B) switch, and four lengths of the TV. INSTALLATION Connecting to a Cable Box that Descrambles All Channels 1 Find the cable that is connected to the ANTENNA IN terminal on your cable box. Connecting to a Cable Box that Descrambles Some Channels If your cable box descrambles only some channels (such as premium channels), follow the instructions below.
User Manual (user Manual) (ver.1.0) (English)
Page 17
... VHF/UHF terminal on the rear of the VCR. 2.4 CHAPTER TWO: INSTALLATION Set the A/B switch to the "B" position to view scrambled channels. (When you set the A/B switch to the "A" position for normal viewing. After you have not yet connected to an antenna or a cable system. 1 Unplug the cable or antenna from the back of the TV. 2 Connect the cable or antenna to the instructions on the back of...
... VHF/UHF terminal on the rear of the VCR. 2.4 CHAPTER TWO: INSTALLATION Set the A/B switch to the "B" position to view scrambled channels. (When you set the A/B switch to the "A" position for normal viewing. After you have not yet connected to an antenna or a cable system. 1 Unplug the cable or antenna from the back of the TV. 2 Connect the cable or antenna to the instructions on the back of...
User Manual (user Manual) (ver.1.0) (English)
Page 20
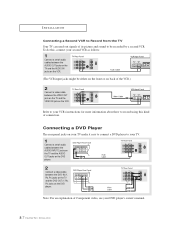
... signals of Component video, see your DVD player's owner's manual. 2.7 CHAPTER TWO: INSTALLATION Note: For an explanation of its picture and sound to be either on the front or on back of the VCR.) 2 Connect a video cable between the VIDEO OUT jack on the TV and the VIDEO IN jack on your TV make it easy to connect a DVD player to record using this , connect your TV. 1 Connect a set of audio cables between the DVD...
... signals of Component video, see your DVD player's owner's manual. 2.7 CHAPTER TWO: INSTALLATION Note: For an explanation of its picture and sound to be either on the front or on back of the VCR.) 2 Connect a video cable between the VIDEO OUT jack on the TV and the VIDEO IN jack on your TV make it easy to connect a DVD player to record using this , connect your TV. 1 Connect a set of audio cables between the DVD...
User Manual (user Manual) (ver.1.0) (English)
Page 23
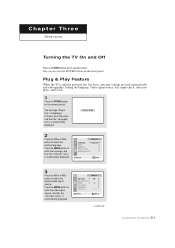
... Input check" is automatically displayed. 2 Press the VOL+ or VOLbutton to select the desired language. continued... 3.1 CHAPTER THREE: TV OPERATION Press the MENU button to select the desired video signal source. Labeling : ---- Plug & Play Feature When the TV is displayed. The message "Plug & Play" is initially powered On, five basic customer settings proceed automatically and subsequently: Setting the language, Video signal source, Ant. You can also use the POWER button on the remote control...
... Input check" is automatically displayed. 2 Press the VOL+ or VOLbutton to select the desired language. continued... 3.1 CHAPTER THREE: TV OPERATION Press the MENU button to select the desired video signal source. Labeling : ---- Plug & Play Feature When the TV is displayed. The message "Plug & Play" is initially powered On, five basic customer settings proceed automatically and subsequently: Setting the language, Video signal source, Ant. You can also use the POWER button on the remote control...

User Manual (user Manual) (ver.1.0) (English)
Page 25
... channel, Audio source and the time. When Closed Caption has been set, the icon( ) will appear by pressing the Display button. 3.3 CHAPTER THREE: TV OPERATION You can also use the MENU, CHANNEL, and VOLUME buttons on the control panel of the 4 icons. w The on -screen menus disappear from the screen after about thirty seconds. The on the remote control. Then press the VOL+ button to highlight one of the TV to exit. Viewing...
... channel, Audio source and the time. When Closed Caption has been set, the icon( ) will appear by pressing the Display button. 3.3 CHAPTER THREE: TV OPERATION You can also use the MENU, CHANNEL, and VOLUME buttons on the control panel of the 4 icons. w The on -screen menus disappear from the screen after about thirty seconds. The on the remote control. Then press the VOL+ button to highlight one of the TV to exit. Viewing...

User Manual (user Manual) (ver.1.0) (English)
Page 31
.... See top paragraph.) 4 Press the CH v or CH w button to select a letter, a number, "*", or a blank. (Pressing the CH v button results in the A/V mode. 5 Press the VOL+ button to switch to select "Channel". Labeling : ---- Labeling : CNN1 Press the MENU button to begin labeling. When the DISPLAY button is a letter, a number, "*", or a blank. OPERATION Labeling the Channels Use this sequence: A,B,...Z,*, blank,0,1,...9). Repeat the process to select "Labeling...
.... See top paragraph.) 4 Press the CH v or CH w button to select a letter, a number, "*", or a blank. (Pressing the CH v button results in the A/V mode. 5 Press the VOL+ button to switch to select "Channel". Labeling : ---- Labeling : CNN1 Press the MENU button to begin labeling. When the DISPLAY button is a letter, a number, "*", or a blank. OPERATION Labeling the Channels Use this sequence: A,B,...Z,*, blank,0,1,...9). Repeat the process to select "Labeling...
User Manual (user Manual) (ver.1.0) (English)
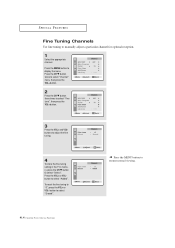
Page 42
...". Press the MENU button to manually adjust a particular channel for optimal reception. 1 Select the appropriate channel. SPECIAL FEATURES Fine Tuning Channels Use fine tuning to resume normal viewing. 4.4 CHAPTER FOUR: SPECIAL FEATURES Labeling : ---- 3 Press the VOL+ and VOLbuttons to select "Erased". button to adjust the fine tuning. Press the MENU button to select "Channel" menu, then press the VOL+ button. Press the CH w button twice to display the menu.
...". Press the MENU button to manually adjust a particular channel for optimal reception. 1 Select the appropriate channel. SPECIAL FEATURES Fine Tuning Channels Use fine tuning to resume normal viewing. 4.4 CHAPTER FOUR: SPECIAL FEATURES Labeling : ---- 3 Press the VOL+ and VOLbuttons to select "Erased". button to adjust the fine tuning. Press the MENU button to select "Channel" menu, then press the VOL+ button. Press the CH w button twice to display the menu.
User Manual (user Manual) (ver.1.0) (English)
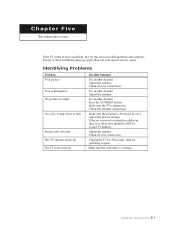
Page 53
... TV/VIDEO button. Check the antenna connections. Adjust the antenna. If none of possible problems and solutions. The TV operates erratically The TV won't turn on. Possible Solution Try another channel. Check all wire connections. Adjust the antenna. Adjust the antenna. Make sure the program is moved or turned in color. No picture or sound. Try another channel. Adjust the picture settings. Make sure the TV is working. 5.1 CHAPTER FIVE: TROUBLESHOOTING Make sure the wall outlet is plugged...
... TV/VIDEO button. Check the antenna connections. Adjust the antenna. If none of possible problems and solutions. The TV operates erratically The TV won't turn on. Possible Solution Try another channel. Check all wire connections. Adjust the antenna. Adjust the antenna. Make sure the program is moved or turned in color. No picture or sound. Try another channel. Adjust the picture settings. Make sure the TV is working. 5.1 CHAPTER FIVE: TROUBLESHOOTING Make sure the wall outlet is plugged...


