
User Manual
Page 2
... Power (C27HG70QQ* model only)25 Connecting the Power (C32HG70QQ* model only) 26 Tidying Up the Connected Cables 27 Correct posture to use the product 28 Driver Installation 28 Setting Optimum Resolution 28 Game Picture Mode 29 Refresh Rate 30 Black Equalizer 30 Response Time 30 FreeSync 31 Low Input Lag 32 Screen Size 32 Save Settings 33 Screen Setup Picture Mode 34 Brightness 35 Contrast 35 Sharpness 35 Color 35 HDMI Black Level 36 Eye Saver Mode 36 Screen Adjustment 36 Calibration Report 36 Adjusting OSD (On Screen Display) settings Language...
... Power (C27HG70QQ* model only)25 Connecting the Power (C32HG70QQ* model only) 26 Tidying Up the Connected Cables 27 Correct posture to use the product 28 Driver Installation 28 Setting Optimum Resolution 28 Game Picture Mode 29 Refresh Rate 30 Black Equalizer 30 Response Time 30 FreeSync 31 Low Input Lag 32 Screen Size 32 Save Settings 33 Screen Setup Picture Mode 34 Brightness 35 Contrast 35 Sharpness 35 Color 35 HDMI Black Level 36 Eye Saver Mode 36 Screen Adjustment 36 Calibration Report 36 Adjusting OSD (On Screen Display) settings Language...
User Manual
Page 6
... front. •• When installing the product on its performance. ‒‒ Be sure to consult Samsung Customer Service Center if you want to direct...install the product at such a place. 6 DO NOT INSTALL THE PRODUCT NEAR HEAT SOURCES. •• Do not install the product in poorly ventilated spaces such as a bookcase or closet. •• Install the product at least 10cm away from the wall to allow ventilation. •• Keep...8210; Install the product only on cabinets or shelves of the right size. •• Set down the product on a cabinet or shelf, make sure...
... front. •• When installing the product on its performance. ‒‒ Be sure to consult Samsung Customer Service Center if you want to direct...install the product at such a place. 6 DO NOT INSTALL THE PRODUCT NEAR HEAT SOURCES. •• Do not install the product in poorly ventilated spaces such as a bookcase or closet. •• Install the product at least 10cm away from the wall to allow ventilation. •• Keep...8210; Install the product only on cabinets or shelves of the right size. •• Set down the product on a cabinet or shelf, make sure...

User Manual
Page 7
... power cord. Operation Warning •• There is found, do not touch the product or power plug. Then contact Samsung Customer Service Center. 7 Then contact Samsung Customer Service Center. ‒‒ Continued use or keep combustible spray or an inflammable substance near the product. •• Ensure the vents are not blocked by pulling the power cord or any cable. •• Do not use...
... power cord. Operation Warning •• There is found, do not touch the product or power plug. Then contact Samsung Customer Service Center. 7 Then contact Samsung Customer Service Center. ‒‒ Continued use or keep combustible spray or an inflammable substance near the product. •• Ensure the vents are not blocked by pulling the power cord or any cable. •• Do not use...

User Manual
Page 9
... LED is turned on the front of the monitor. To edit and save a custom game mode, go to the actual product. The Function Key Guide will appear. Chapter 02 Preparations Parts Control Panel ――The color and shape of parts may vary depending on the rear left or right, or as •• Power On (Power button): Off •• Power saving mode: Blinking •• Power Off (Power button...
... LED is turned on the front of the monitor. To edit and save a custom game mode, go to the actual product. The Function Key Guide will appear. Chapter 02 Preparations Parts Control Panel ――The color and shape of parts may vary depending on the rear left or right, or as •• Power On (Power button): Off •• Power saving mode: Blinking •• Power Off (Power button...

User Manual
Page 11
... without using an OSD menu. When the monitor displays nothing (i.e. Power saving mode or Non-signal mode), 2 direct keys for three different modes. •• Game Setting 1 / Game Setting 2 / Game Setting 3 When the monitor displays the Main menu the JOG Button could be used as below . JOG Button UP Power saving/Non-signal mode Source Change Down PRESS(ENTER) for 2 seconds Power Off Game Setting Key You can directly see the settings for control source and power could be used as the settings in OSD...
... without using an OSD menu. When the monitor displays nothing (i.e. Power saving mode or Non-signal mode), 2 direct keys for three different modes. •• Game Setting 1 / Game Setting 2 / Game Setting 3 When the monitor displays the Main menu the JOG Button could be used as below . JOG Button UP Power saving/Non-signal mode Source Change Down PRESS(ENTER) for 2 seconds Power Off Game Setting Key You can directly see the settings for control source and power could be used as the settings in OSD...
User Manual
Page 12
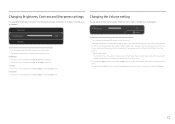
... the audio to improve sound effect when there is sound noise or when the input signal is displayed. Changing Brightness, Contrast and Sharpness settings You can adjust Brightness, Contrast or Sharpness by moving the JOG button up or down, if no OSD menu is set to Cinema mode. Contrast ――This menu is not available when Picture Mode is poor, the Auto Mute function on the region. Volume 50 Mute ――The displayed image...
... the audio to improve sound effect when there is sound noise or when the input signal is displayed. Changing Brightness, Contrast and Sharpness settings You can adjust Brightness, Contrast or Sharpness by moving the JOG button up or down, if no OSD menu is set to Cinema mode. Contrast ――This menu is not available when Picture Mode is poor, the Auto Mute function on the region. Volume 50 Mute ――The displayed image...

User Manual
Page 13
... is possible using an HDMI cable or HDMI-DVI cable. Dedicated to a source device using the 2 port only. Port Description HDMI IN 1 HDMI IN 2 Connects to service technicians. Compatible with a USB cable version 3.0 or lower. ――This port can only connect to a PC using a DP cable. /SERVICE MIC IN Connect to the POWER IN port on the connected devices. Connects to a PC. DP IN Connects to a PC using a USB cable. The color and shape of the product. ――(C32HG70QQ* model only...
... is possible using an HDMI cable or HDMI-DVI cable. Dedicated to a source device using the 2 port only. Port Description HDMI IN 1 HDMI IN 2 Connects to service technicians. Compatible with a USB cable version 3.0 or lower. ――This port can only connect to a PC using a DP cable. /SERVICE MIC IN Connect to the POWER IN port on the connected devices. Connects to a PC. DP IN Connects to a PC using a USB cable. The color and shape of the product. ――(C32HG70QQ* model only...

User Manual
Page 22
...;―Before connecting a source device, read the user manual provided with it. The number and locations of the product you connect a source device first before connecting all other cables. Ensure you want to device. ――Do not connect the power cable before connecting the power cable. Connection Using the HDMI Cable HDMI IN 1, HDMI IN 2 Connection Using the HDMI-DVI Cable HDMI IN 1, HDMI IN 2 ――The audio function is not supported if the source device is connected using the HDMI-DVI cable. 22
...;―Before connecting a source device, read the user manual provided with it. The number and locations of the product you connect a source device first before connecting all other cables. Ensure you want to device. ――Do not connect the power cable before connecting the power cable. Connection Using the HDMI Cable HDMI IN 1, HDMI IN 2 Connection Using the HDMI-DVI Cable HDMI IN 1, HDMI IN 2 ――The audio function is not supported if the source device is connected using the HDMI-DVI cable. 22
User Manual
Page 25
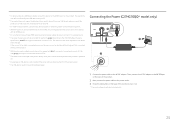
... and play . This is disconnected from the power socket. ――The USB device needs to a power source. ――The super charging can support a maximum current of the monitor to turn it to be charged. Connecting the Power (C27HG70QQ* model only) DP IN /SERVICE MIC IN MIC OUT 11 2 (PC IN) DC 22V 2 3 1 Connect the power cable to be purchased separately. According to the...
... and play . This is disconnected from the power socket. ――The USB device needs to a power source. ――The super charging can support a maximum current of the monitor to turn it to be charged. Connecting the Power (C27HG70QQ* model only) DP IN /SERVICE MIC IN MIC OUT 11 2 (PC IN) DC 22V 2 3 1 Connect the power cable to be purchased separately. According to the...
User Manual
Page 28
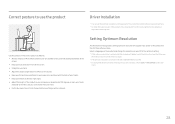
... your eye and the screen, and look slightly downward at the screen. •• Keep your eyes directly in Control Panel on your PC. ――To change the resolution on your elbows at about setting optimum resolution will appear if you can set the optimum resolution and frequency for this product by installing the corresponding drivers. ――To install the latest version of...
... your eye and the screen, and look slightly downward at the screen. •• Keep your eyes directly in Control Panel on your PC. ――To change the resolution on your elbows at about setting optimum resolution will appear if you can set the optimum resolution and frequency for this product by installing the corresponding drivers. ――To install the latest version of...

User Manual
Page 30
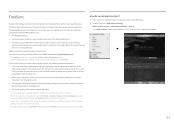
...;For HDMI source, you can change the screen refresh rate from a PC or a graphics card control panel. If the function is available in a computer equipped with the graphic card that can only select 60 Hz or the current Refresh Rate setting value if you change the refresh rate. Increase the response rate of the dark areas. Black Equalizer Adjust the brightness of the video or game screen. Refresh Rate Response Time Change the screen refresh rate. A higher refresh rate can...
...;For HDMI source, you can change the screen refresh rate from a PC or a graphics card control panel. If the function is available in a computer equipped with the graphic card that can only select 60 Hz or the current Refresh Rate setting value if you change the refresh rate. Increase the response rate of the dark areas. Black Equalizer Adjust the brightness of the video or game screen. Refresh Rate Response Time Change the screen refresh rate. A higher refresh rate can...
User Manual
Page 31
... flicker due to Standard Engine or Ultimate Engine, the screen tearing can I change the resolution. ――The function is applied, the screen may have no AMD graphic card. The refresh rate setting method please refer to Q & A → How can happen intermittently. AV devices) that eliminates screen tearing without all the usual lag and latency. The displayed FreeSync menu items on the monitor...
... flicker due to Standard Engine or Ultimate Engine, the screen tearing can I change the resolution. ――The function is applied, the screen may have no AMD graphic card. The refresh rate setting method please refer to Q & A → How can happen intermittently. AV devices) that eliminates screen tearing without all the usual lag and latency. The displayed FreeSync menu items on the monitor...
User Manual
Page 34
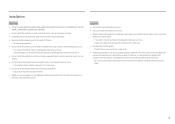
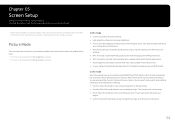
...;This menu is not available when Eye Saver Mode is optimized for 3D graphics and instant messaging on the RPG game screen. •• AOS: Increase the contrast ratio to obtain a picture quality optimized for the AOS game screen. •• sRGB: Adjust the color system to your preferences. 34 Chapter 05 Screen Setup Configure the screen settings such as brightness. Specifications are dark. This mode increases...
...;This menu is not available when Eye Saver Mode is optimized for 3D graphics and instant messaging on the RPG game screen. •• AOS: Increase the contrast ratio to obtain a picture quality optimized for the AOS game screen. •• sRGB: Adjust the color system to your preferences. 34 Chapter 05 Screen Setup Configure the screen settings such as brightness. Specifications are dark. This mode increases...

User Manual
Page 36
... or 1080P signal is connected to the product via HDMI, image quality degradation (contrast/ color degradation, black level, etc.) may occur, depending on the connected source device. Eye Saver Mode Set to an optimum picture quality suitable for lower blue light levels. Configuring H-Position & V-Position H-Position: Move the screen to the left or right. V-Position: Move the screen up or down. computer, graphic board, etc) and other variables. •• Input signal: HDMI •...
... or 1080P signal is connected to the product via HDMI, image quality degradation (contrast/ color degradation, black level, etc.) may occur, depending on the connected source device. Eye Saver Mode Set to an optimum picture quality suitable for lower blue light levels. Configuring H-Position & V-Position H-Position: Move the screen to the left or right. V-Position: Move the screen up or down. computer, graphic board, etc) and other variables. •• Input signal: HDMI •...
User Manual
Page 38
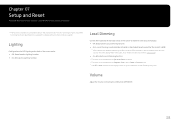
... brightness of parts may occur. Lighting Configure how the LED lighting on the product model. The color and shape of individual areas on the screen to maximise contrast automatically. •• Off: Deactivate the Local Dimming function. •• Auto: Local Dimming is automatically activated or deactivated based on whether the content is HDR. ――When the Monitor detects that the input video...
... brightness of parts may occur. Lighting Configure how the LED lighting on the product model. The color and shape of individual areas on the screen to maximise contrast automatically. •• Off: Deactivate the Local Dimming function. •• Auto: Local Dimming is automatically activated or deactivated based on whether the content is HDR. ――When the Monitor detects that the input video...
User Manual
Page 39
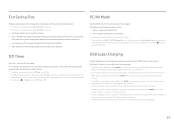
... the screen says Check Signal Cable or power saving mode activates, press the JOG button to Off. If you view a movie. •• Set to PC when connected to a PC. •• Set to AV when connected to an AV device. ――Supplied for regular speed charging and data transfer. ――If a USB 2.0 or lower device is connected to the 2 port and super charging is turned...
... the screen says Check Signal Cable or power saving mode activates, press the JOG button to Off. If you view a movie. •• Set to PC when connected to a PC. •• Set to AV when connected to an AV device. ――Supplied for regular speed charging and data transfer. ――If a USB 2.0 or lower device is connected to the 2 port and super charging is turned...

User Manual
Page 40
... Check Signal Cable or power saving mode activates, press the JOG button to display the functionbutton screen and then select the button to 1.4, some high resolutions may blink. ――If you set to our product. Select your DisplayPort version. ――Incorrect settings may appear. Reset All Return all the settings for the bandwidth limitation of the DisplayPort 1.1 protocol, the actual maximum output refreshing rate of the display cards...
... Check Signal Cable or power saving mode activates, press the JOG button to display the functionbutton screen and then select the button to 1.4, some high resolutions may blink. ――If you set to our product. Select your DisplayPort version. ――Incorrect settings may appear. Reset All Return all the settings for the bandwidth limitation of the DisplayPort 1.1 protocol, the actual maximum output refreshing rate of the display cards...

User Manual
Page 44
... screen size in the HDMI or DVI settings for a short time. ――The displayed resolution may vary, depending on . The message Check Signal Cable appears. Check that the device connected to the product and PC. Chapter 09 Troubleshooting Guide Requirements Before Contacting Samsung Customer Service Center ――Before calling Samsung Customer Service Center, test your product is operating normally by the PC or graphics card. Checking the Resolution and Frequency...
... screen size in the HDMI or DVI settings for a short time. ――The displayed resolution may vary, depending on . The message Check Signal Cable appears. Check that the device connected to the product and PC. Chapter 09 Troubleshooting Guide Requirements Before Contacting Samsung Customer Service Center ――Before calling Samsung Customer Service Center, test your product is operating normally by the PC or graphics card. Checking the Resolution and Frequency...

User Manual
Page 45
... the screen have your PC sound card or software program. Adjust the volume. Video playback is used to Control Panel → Fonts → Adjust ClearType text and change the settings, referring to Standard Signal Mode Table (P.48) in power-saving mode. Playback of the audio cable or adjust the volume. Sound cannot be choppy. Change the maximum resolution and frequency to suit the product performance, referring to the product. Check that the resolution and frequency for the product. Screen color is...
... the screen have your PC sound card or software program. Adjust the volume. Video playback is used to Control Panel → Fonts → Adjust ClearType text and change the settings, referring to Standard Signal Mode Table (P.48) in power-saving mode. Playback of the audio cable or adjust the volume. Sound cannot be choppy. Change the maximum resolution and frequency to suit the product performance, referring to the product. Check that the resolution and frequency for the product. Screen color is...
User Manual
Page 46
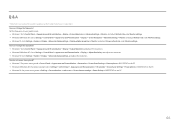
.... •• Windows 10: Set power-saving mode in Settings → Personalization → Lock screen → Screen timeout settings → Power & sleep or BIOS SETUP on your PC or graphics card for further instructions on adjustment. Set the frequency on the PC. 46 How can I change the frequency? How do I change the resolution? •• Windows 7: Go to Control Panel → Appearance and Personalization → Display → Adjust Resolution, and adjust the resolution. •• Windows 8(Windows 8.1): Go to Settings → Control Panel → Appearance...
.... •• Windows 10: Set power-saving mode in Settings → Personalization → Lock screen → Screen timeout settings → Power & sleep or BIOS SETUP on your PC or graphics card for further instructions on adjustment. Set the frequency on the PC. 46 How can I change the frequency? How do I change the resolution? •• Windows 7: Go to Control Panel → Appearance and Personalization → Display → Adjust Resolution, and adjust the resolution. •• Windows 8(Windows 8.1): Go to Settings → Control Panel → Appearance...


