User Manual (user Manual) (ver.1.0) (English)
Page 3
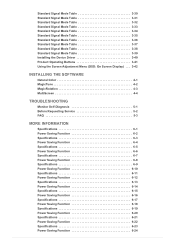
... Signal Mode Table 3-34 Standard Signal Mode Table 3-35 Standard Signal Mode Table 3-36 Standard Signal Mode Table 3-37 Standard Signal Mode Table 3-38 Standard Signal Mode Table 3-39 Installing the Device Driver 3-40 Product Operating Buttons 3-41 Using the Screen Adjustment Menu (OSD: On Screen Display) . . . 3-42 INSTALLING THE SOFTWARE Natural Color 4-1 MagicTune 4-2 MagicRotation 4-3 MultiScreen 4-4 TROUBLESHOOTING Monitor Self-Diagnosis 5-1 Before Requesting Service 5-2 FAQ 5-3 MORE INFORMATION Specifications 6-1 Power Saving Function 6-2 Specifications 6-3 Power Saving...
... Signal Mode Table 3-34 Standard Signal Mode Table 3-35 Standard Signal Mode Table 3-36 Standard Signal Mode Table 3-37 Standard Signal Mode Table 3-38 Standard Signal Mode Table 3-39 Installing the Device Driver 3-40 Product Operating Buttons 3-41 Using the Screen Adjustment Menu (OSD: On Screen Display) . . . 3-42 INSTALLING THE SOFTWARE Natural Color 4-1 MagicTune 4-2 MagicRotation 4-3 MultiScreen 4-4 TROUBLESHOOTING Monitor Self-Diagnosis 5-1 Before Requesting Service 5-2 FAQ 5-3 MORE INFORMATION Specifications 6-1 Power Saving Function 6-2 Specifications 6-3 Power Saving...
User Manual (user Manual) (ver.1.0) (English)
Page 7
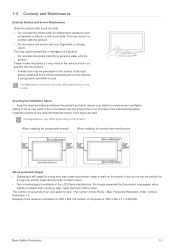
... Surface and Screen Maintenance Clean the product with a soft dry cloth. • Do not clean the product with an inflammable substance such as benzene or thinner or with a wall-mount About persistent images • Displaying a still image for a long time, set the power-saving mode or screen saver. • Due to technological constraints of Sub-Pixels = Max. When installing the product with a stand When installing the product...
... Surface and Screen Maintenance Clean the product with a soft dry cloth. • Do not clean the product with an inflammable substance such as benzene or thinner or with a wall-mount About persistent images • Displaying a still image for a long time, set the power-saving mode or screen saver. • Due to technological constraints of Sub-Pixels = Max. When installing the product with a stand When installing the product...
User Manual (user Manual) (ver.1.0) (English)
Page 12
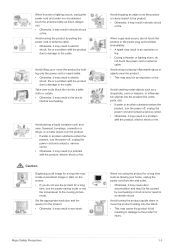
... product, turn the power off , unplug the power cord and contact a service center. • Otherwise, it may result in electric shock, fire or a problem with the product due to damage to block the vent by holding only the stand. • This may create a persistent image or stain on the screen. • If you do not touch the power cord or antenna cable. Avoid...
... product, turn the power off , unplug the power cord and contact a service center. • Otherwise, it may result in electric shock, fire or a problem with the product due to damage to block the vent by holding only the stand. • This may create a persistent image or stain on the screen. • If you do not touch the power cord or antenna cable. Avoid...

User Manual (user Manual) (ver.1.0) (English)
Page 14
Stereo Cable Installing the Product 2-1 Type 1 Monitor & HAS stand Contents Installation Manual Product Warranty (Not available in case you need to move the Product at a later stage. 2 Installing the Product 2-1 Package Contents • Unpack the product and check if all of the following contents have been included. • Store the packaging box in all locations) User Manual Power Cord Stand OPTIONAL PARTS D-Sub Cable HDMI Cable DVI Cable Cleaning Cloth The cleaning cloth is supplied with black high-glossy models only.
Stereo Cable Installing the Product 2-1 Type 1 Monitor & HAS stand Contents Installation Manual Product Warranty (Not available in case you need to move the Product at a later stage. 2 Installing the Product 2-1 Package Contents • Unpack the product and check if all of the following contents have been included. • Store the packaging box in all locations) User Manual Power Cord Stand OPTIONAL PARTS D-Sub Cable HDMI Cable DVI Cable Cleaning Cloth The cleaning cloth is supplied with black high-glossy models only.
User Manual (user Manual) (ver.1.0) (English)
Page 17
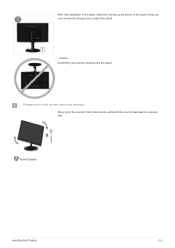
Disassembly is in the reverse order of the base, stand the monitor up as shown in the figure. When pivot the monitor from horizontal to vertical,tilt the monitor backward to adjust the stand. - After the installation of the assembly. Caution Avoid lifting the product holding only the stand. Stand Stopper Installing the Product 2-2 Now you can remove the stopper pin to maxium first. .
Disassembly is in the reverse order of the base, stand the monitor up as shown in the figure. When pivot the monitor from horizontal to vertical,tilt the monitor backward to adjust the stand. - After the installation of the assembly. Caution Avoid lifting the product holding only the stand. Stand Stopper Installing the Product 2-2 Now you can remove the stopper pin to maxium first. .

User Manual (user Manual) (ver.1.0) (English)
Page 25
..., or our service center. You can safely use it in public locations. Connect the Kensington lock cable. 3. Tie the Kensington lock cable to purchase an additional locking device. Installing the Product 2-6 Since the shape and usage of the product( ) and turn it in the locking direction( ). 2. 2-6 Kensington Lock Kensington Lock A Kensington Lock is an anti-theft device that enables users to the User Manual supplied with the locking device.
..., or our service center. You can safely use it in public locations. Connect the Kensington lock cable. 3. Tie the Kensington lock cable to purchase an additional locking device. Installing the Product 2-6 Since the shape and usage of the product( ) and turn it in the locking direction( ). 2. 2-6 Kensington Lock Kensington Lock A Kensington Lock is an anti-theft device that enables users to the User Manual supplied with the locking device.

User Manual (user Manual) (ver.1.0) (English)
Page 28
MENU : If you turn the power on the screen. Select a language and the optimal resolution. ▲/▼ : You can select a language with these buttons. 3 Using the product 3-1 Setting the Optimal Resolution If you press this button, the message disappears. • The message appears up menu. • In the 'Settings' tab, set the resolution to the optimal resolution • When the PC is turned off, connect the product and the PC and turn the power on...
MENU : If you turn the power on the screen. Select a language and the optimal resolution. ▲/▼ : You can select a language with these buttons. 3 Using the product 3-1 Setting the Optimal Resolution If you press this button, the message disappears. • The message appears up menu. • In the 'Settings' tab, set the resolution to the optimal resolution • When the PC is turned off, connect the product and the PC and turn the power on...
User Manual (user Manual) (ver.1.0) (English)
Page 33
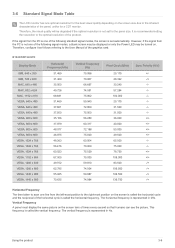
... follows referring to the User Manual of the following signal modes, a blank screen may be displayed or only the Power LED may be degraded if the optimal resolution is represented in Hz. Vertical Frequency A panel must display the same picture on the screen size due to the optimal resolution of the product. It is called the horizontal frequency. Using the product 3-6 3-6 Standard Signal Mode Table The LCD monitor has one optimal resolution for the best visual quality depending on...
... follows referring to the User Manual of the following signal modes, a blank screen may be displayed or only the Power LED may be degraded if the optimal resolution is represented in Hz. Vertical Frequency A panel must display the same picture on the screen size due to the optimal resolution of the product. It is called the horizontal frequency. Using the product 3-6 3-6 Standard Signal Mode Table The LCD monitor has one optimal resolution for the best visual quality depending on...

User Manual (user Manual) (ver.1.0) (English)
Page 81
... "Windows Driver". 3. Check if the appropriate resolution and screen refresh rate are displayed in the Control Panel settings. Select the model of your product from Samsung Electronics website. 1. The device driver is corrupted, please visit a service center or Samsung Electronics website(http://www.samsung.com/), and download the driver. For more information, refer to the instructions displayed on the screen. 4. Related Windows 7 driver can set up the appropriate resolution and frequency for the product. Complete the remaining installation...
... "Windows Driver". 3. Check if the appropriate resolution and screen refresh rate are displayed in the Control Panel settings. Select the model of your product from Samsung Electronics website. 1. The device driver is corrupted, please visit a service center or Samsung Electronics website(http://www.samsung.com/), and download the driver. For more information, refer to the instructions displayed on the screen. 4. Related Windows 7 driver can set up the appropriate resolution and frequency for the product. Complete the remaining installation...
User Manual (user Manual) (ver.1.0) (English)
Page 82
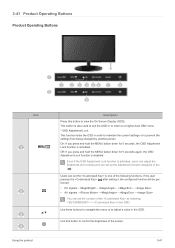
... be performed • PC signals : - - - • AV signals : - - - Users can set the to the [ ]. You can set the function of the following functions. This button is disabled. Use this button to adjust a value in the OSD. Off: If you press and hold the MENU button down for 5 seconds, the OSD Adjustment Lock function is activated, users can adjust the brightness and contrast and can set up the adjustment function assigned to one...
... be performed • PC signals : - - - • AV signals : - - - Users can set the to the [ ]. You can set the function of the following functions. This button is disabled. Use this button to adjust a value in the OSD. Off: If you press and hold the MENU button down for 5 seconds, the OSD Adjustment Lock function is activated, users can adjust the brightness and contrast and can set up the adjustment function assigned to one...

User Manual (user Manual) (ver.1.0) (English)
Page 83
... power saving function in the menu as desired. When not using the product for products with an Analog interface only. Using the product 3-41 When OSD is turned on when the product works normally. When the input signal is switched by pressing [SOURCE] button or the product is not on the power-saving function, refer to adjust volume. Press this button to connect the product and the PC with the DVI cable...
... power saving function in the menu as desired. When not using the product for products with an Analog interface only. Using the product 3-41 When OSD is turned on when the product works normally. When the input signal is switched by pressing [SOURCE] button or the product is not on the power-saving function, refer to adjust volume. Press this button to connect the product and the PC with the DVI cable...

User Manual (user Manual) (ver.1.0) (English)
Page 85
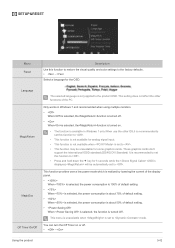
... a fast screen refresh rate. • This mode provides brightness and sharpness settings similar to view a sharper image than in Standard mode. • Select this mode when the surroundings are balanced overall. Provides preset picture settings optimized for the best entertainment environment (movie, DVD, etc.). • Controls the picture contrast automatically so that are dark. The Monitor has four automatic picture settings (, , and ) that bright and dark pictures are bright. This will save power and reduce...
... a fast screen refresh rate. • This mode provides brightness and sharpness settings similar to view a sharper image than in Standard mode. • Select this mode when the surroundings are balanced overall. Provides preset picture settings optimized for the best entertainment environment (movie, DVD, etc.). • Controls the picture contrast automatically so that are dark. The Monitor has four automatic picture settings (, , and ) that bright and dark pictures are bright. This will save power and reduce...
User Manual (user Manual) (ver.1.0) (English)
Page 89
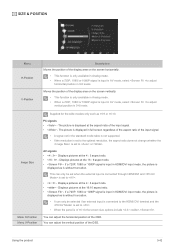
... selected if an external input is connected to the HDMI/ DVI terminal and the is set to . • When the panel is input in AV mode ,select to adjust vertical position in HDMI/DVI input mode, the picture is displayed as is without truncation. Displays pictures at the 16:10 aspect ratio. • - Displays pictures at the 16 : 9 aspect ratio. • - You can adjust the horizontal position of the OSD. Image Size Menu H-Position Menu V-Position Supplied for the wide models only such as...
... selected if an external input is connected to the HDMI/ DVI terminal and the is set to . • When the panel is input in AV mode ,select to adjust vertical position in HDMI/DVI input mode, the picture is displayed as is without truncation. Displays pictures at the 16:10 aspect ratio. • - Displays pictures at the 16 : 9 aspect ratio. • - You can adjust the horizontal position of the OSD. Image Size Menu H-Position Menu V-Position Supplied for the wide models only such as...
User Manual (user Manual) (ver.1.0) (English)
Page 90
... the factory defaults. • - Only works in Windows 7 only.When use the other functions of default setting. • When is selected, the function is only applied to the product OSD. Using the product 3-42 This menu is unavailable when is set this function to restore the visual quality and color settings to mode. SETUP&RESET Menu Reset Description Use this function to . • This function is not available for analog signal input...
... the factory defaults. • - Only works in Windows 7 only.When use the other functions of default setting. • When is selected, the function is only applied to the product OSD. Using the product 3-42 This menu is unavailable when is set this function to restore the visual quality and color settings to mode. SETUP&RESET Menu Reset Description Use this function to . • This function is not available for analog signal input...

User Manual (user Manual) (ver.1.0) (English)
Page 93
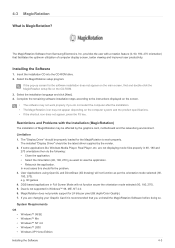
... Remove Programs] icon in Windows. Installing the Software 4-2 Select the installation language and click [Next]. 4. 4-2 MagicTune What is recommended. Restrictions and Problems with monitor adjustments by the graphics card, motherboard and the networking environment. Users can only remove MagicTune™through [Add or Remove Programs ] in the Control Panel. To remove MagicTune™, complete the following steps. 1. Click [Start] select [Settings], and select [Control Panel] from the menu. 2. Select the MagicTune setup...
... Remove Programs] icon in Windows. Installing the Software 4-2 Select the installation language and click [Next]. 4. 4-2 MagicTune What is recommended. Restrictions and Problems with monitor adjustments by the graphics card, motherboard and the networking environment. Users can only remove MagicTune™through [Add or Remove Programs ] in the Control Panel. To remove MagicTune™, complete the following steps. 1. Click [Start] select [Settings], and select [Control Panel] from the menu. 2. Select the MagicTune setup...
User Manual (user Manual) (ver.1.0) (English)
Page 95
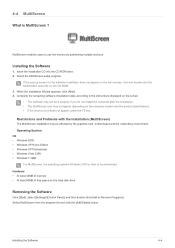
... the instructions displayed on the screen. • The software may not work properly. DOS based applications in Full Screen Mode will not function as per pixel (Bit depth/Color Quality). 7. MagicRotation does not provide support for 24 bits per the orientation mode selected (90, 180, 270). 5. provides the user with the Installation (MagicRotation) The installation of computer display screen, better viewing and improved user productivity. Limitation 1. are changing your Graphic Card...
... the instructions displayed on the screen. • The software may not work properly. DOS based applications in Full Screen Mode will not function as per pixel (Bit depth/Color Quality). 7. MagicRotation does not provide support for 24 bits per the orientation mode selected (90, 180, 270). 5. provides the user with the Installation (MagicRotation) The installation of computer display screen, better viewing and improved user productivity. Limitation 1. are changing your Graphic Card...
User Manual (user Manual) (ver.1.0) (English)
Page 97
...-click the MultiScreen setup file on the hard disk drive Removing the Software Click [Start], select [Settings]/[Control Panel], and then double-click [Add or Remove Programs]. When the Installation Wizard appears, click [Next]. 4. Installing the Software 1. Complete the remaining software installation steps according to use the monitor by the graphics card, motherboard and the networking environment. Operating System OS • Windows 2000 • Windows XP Home Edition...
...-click the MultiScreen setup file on the hard disk drive Removing the Software Click [Start], select [Settings]/[Control Panel], and then double-click [Add or Remove Programs]. When the Installation Wizard appears, click [Next]. 4. Installing the Software 1. Complete the remaining software installation steps according to use the monitor by the graphics card, motherboard and the networking environment. Operating System OS • Windows 2000 • Windows XP Home Edition...
User Manual (user Manual) (ver.1.0) (English)
Page 99
... the power LED blink at a 1 second interval? 1. THE IMAGE IS TOO LIGHT OR TOO DARK. Check if the function is connected. Reinsert the graphics card into the computer completely. A blank screen appears / I cannot turn the product on screen adjustment menu (OSD) does not appear. In this case, set to the user manual. Adjust the and . (Refer to the , ) The display brightness can differ according to . Check the cable connection to the mode set to , the display brightness...
... the power LED blink at a 1 second interval? 1. THE IMAGE IS TOO LIGHT OR TOO DARK. Check if the function is connected. Reinsert the graphics card into the computer completely. A blank screen appears / I cannot turn the product on screen adjustment menu (OSD) does not appear. In this case, set to the user manual. Adjust the and . (Refer to the , ) The display brightness can differ according to . Check the cable connection to the mode set to , the display brightness...
User Manual (user Manual) (ver.1.0) (English)
Page 100
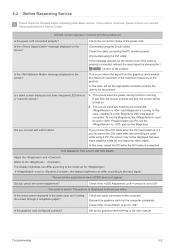
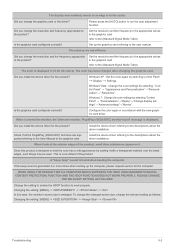
... change the enlarged screen size, change the graphics card or the driver? The pictures are supported referring to the product? Did you change the resolution and frequency appropriate to the User Manual of -focus. Windows 7 : Change the color settings by selecting Control Panel → Display → Settings. Install the device driver referring to the product? Did you change the resolution and the frequency appropriate to the descriptions about the driver installation. Is the graphics card configured correctly? A "beep, beep" sound...
... change the enlarged screen size, change the graphics card or the driver? The pictures are supported referring to the product? Did you change the resolution and frequency appropriate to the User Manual of -focus. Windows 7 : Change the color settings by selecting Control Panel → Display → Settings. Install the device driver referring to the product? Did you change the resolution and the frequency appropriate to the descriptions about the driver installation. Is the graphics card configured correctly? A "beep, beep" sound...
User Manual (user Manual) (ver.1.0) (English)
Page 101
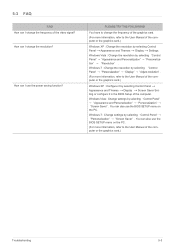
... Manual of the video signal? Windows 7 : Change settings by selecting "Control Panel" → "Appearance and Personalization" → "Personalization" → "Resolution" . How can also use the power saving function? Windows 7 : Change the resolution by selecting "Control Panel" → "Personalization" → "Display" → "Adjust resolution" . (For more information, refer to the User Manual of the computer or the graphics card.) Windows XP : Configure it in the BIOS Setup of the computer or the graphics card.) Troubleshooting 5-3 You can I change the frequency...
... Manual of the video signal? Windows 7 : Change settings by selecting "Control Panel" → "Appearance and Personalization" → "Personalization" → "Resolution" . How can also use the power saving function? Windows 7 : Change the resolution by selecting "Control Panel" → "Personalization" → "Display" → "Adjust resolution" . (For more information, refer to the User Manual of the computer or the graphics card.) Windows XP : Configure it in the BIOS Setup of the computer or the graphics card.) Troubleshooting 5-3 You can I change the frequency...


