User Manual (user Manual) (ver.1.1) (English)
Page 2
... upgrading the camera functions. å It is operating properly before you for buying a Samsung Digital Camera. å Prior to using an image editing program. Setting up the application software To use it on the memory card due to the use the supplied USB cable to connect the camera to your PC, be damaged. Take a picture Take a picture. (p.23) Insert the USB cable Insert the supplied USB cable into the PC's USB port and the camera's USB connection terminal. (p.96) Check the camera's power...
... upgrading the camera functions. å It is operating properly before you for buying a Samsung Digital Camera. å Prior to using an image editing program. Setting up the application software To use it on the memory card due to the use the supplied USB cable to connect the camera to your PC, be damaged. Take a picture Take a picture. (p.23) Insert the USB cable Insert the supplied USB cable into the PC's USB port and the camera's USB connection terminal. (p.96) Check the camera's power...

User Manual (user Manual) (ver.1.1) (English)
Page 5
...;nition) movie clips 028 Recording a movie clip without sound 029 Things to Watch Out for When Taking Pictures 030 Using the camera buttons to set the camera 030 POWER button 030 SHUTTER button 031 Zoom button 032 Info (DISP) / Up button 033 Macro / Down button 034 Focus lock 035 Flash / Left button 037 Self-timer / Right button 038 MENU button 038 OK button 038 Shooting 039 How to Enable Functions Using the MENU Button 040 Photo Size / Movie Size 040 Quality / Frame rate (Image Resolution) 041 Exposure compensation 041 ISO 042 White balance 043...
...;nition) movie clips 028 Recording a movie clip without sound 029 Things to Watch Out for When Taking Pictures 030 Using the camera buttons to set the camera 030 POWER button 030 SHUTTER button 031 Zoom button 032 Info (DISP) / Up button 033 Macro / Down button 034 Focus lock 035 Flash / Left button 037 Self-timer / Right button 038 MENU button 038 OK button 038 Shooting 039 How to Enable Functions Using the MENU Button 040 Photo Size / Movie Size 040 Quality / Frame rate (Image Resolution) 041 Exposure compensation 041 ISO 042 White balance 043...

User Manual (user Manual) (ver.1.1) (English)
Page 7
... LCD screen Indicator 080 File Options 066 Using the camera buttons to set the camera 080 Deleting images 066 Play mode button 080 Protecting images 066 Thumbnail / Enlargement button 081 Face List Edit 066 Smart Album 081 Voice memo 069 Info (DISP) / Up button 082 DPOF 069 Play & Pause / OK button 084 Copy to Card 070 Left / Right / Down / MENU button 070 Delete button 071 Setting the playback functions using the PICTBRIDGE 085 PictBridge 086 PictBridge : Picture Selection LCD Screen 086 PictBridge : Print Setting 072 Setting...
... LCD screen Indicator 080 File Options 066 Using the camera buttons to set the camera 080 Deleting images 066 Play mode button 080 Protecting images 066 Thumbnail / Enlargement button 081 Face List Edit 066 Smart Album 081 Voice memo 069 Info (DISP) / Up button 082 DPOF 069 Play & Pause / OK button 084 Copy to Card 070 Left / Right / Down / MENU button 070 Delete button 071 Setting the playback functions using the PICTBRIDGE 085 PictBridge 086 PictBridge : Picture Selection LCD Screen 086 PictBridge : Print Setting 072 Setting...
User Manual (user Manual) (ver.1.1) (English)
Page 22
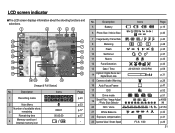
...p.17 - LCD screen indicator ÊThe LCD screen displays information about the shooting functions and selections. [Image & Full Status] No. Description 5 Battery 6 Photo Size / Movie Size 7 Image Quality / Frame Rate 8 Metering 9 Flash 10 Self-timer 11 Macro 12 Face Detection 13 Date / Time 14 Optical / Digital Zoom bar / Digital Zoom rate 15 Camera shake Warning 16 Auto Focus Frame 17 DIS 18 Drive mode 19 Smart Filter / Image Adjust / Photo Style Selector 20 ISO / Voice 21 White Balance 22 Exposure compensation 23 Aperture Value / Shutter Speed Icons 2010...
...p.17 - LCD screen indicator ÊThe LCD screen displays information about the shooting functions and selections. [Image & Full Status] No. Description 5 Battery 6 Photo Size / Movie Size 7 Image Quality / Frame Rate 8 Metering 9 Flash 10 Self-timer 11 Macro 12 Face Detection 13 Date / Time 14 Optical / Digital Zoom bar / Digital Zoom rate 15 Camera shake Warning 16 Auto Focus Frame 17 DIS 18 Drive mode 19 Smart Filter / Image Adjust / Photo Style Selector 20 ISO / Voice 21 White Balance 22 Exposure compensation 23 Aperture Value / Shutter Speed Icons 2010...
User Manual (user Manual) (ver.1.1) (English)
Page 26
... LCD screen. 3. Starting the recording mode How to use the Scene modes ( ) Using Scene modes, you choose. ) : Use for shooting still images at night or in the Scene menu. Press the shutter button to capture an image. Ä You can easily configure the camera so that don't stay still. ) : To take pictures of distant scenery. ) : Close-up shooting of small objects such as plants and insects. ) : Use this mode to take a picture...
... LCD screen. 3. Starting the recording mode How to use the Scene modes ( ) Using Scene modes, you choose. ) : Use for shooting still images at night or in the Scene menu. Press the shutter button to capture an image. Ä You can easily configure the camera so that don't stay still. ) : To take pictures of distant scenery. ) : Close-up shooting of small objects such as plants and insects. ) : Use this mode to take a picture...

User Manual (user Manual) (ver.1.1) (English)
Page 30
... image. å Compose the image by using the LCD screen. 29 Things to confirm focus and flash battery charge. Lightly press the shutter button to Watch Out for When Taking Pictures å Pressing the shutter button down to take the picture. [Lightly press the shutter button] [Press the shutter button] å Under certain conditions, the auto focus system may appear on shooting conditions and camera settings. å When the Flash Off, Slow synchro mode, or DIS mode...
... image. å Compose the image by using the LCD screen. 29 Things to confirm focus and flash battery charge. Lightly press the shutter button to Watch Out for When Taking Pictures å Pressing the shutter button down to take the picture. [Lightly press the shutter button] [Press the shutter button] å Under certain conditions, the auto focus system may appear on shooting conditions and camera settings. å When the Flash Off, Slow synchro mode, or DIS mode...

User Manual (user Manual) (ver.1.1) (English)
Page 37
... prohibited. When a shot with a slow shutter speed to suit the prevailing conditions. Select this mode will appear on the LCD screen. In poor lighting conditions the camera shake warning indicator ( Ã ) will display on the LCD screen. å Smart Auto flash ( ) icon will be automatically controlled to obtain a balanced correct exposure. Slow synchro The flash operates with "red eye" is detected, Red-eye reduction this mode when capturing images in poorly lit...
... prohibited. When a shot with a slow shutter speed to suit the prevailing conditions. Select this mode will appear on the LCD screen. In poor lighting conditions the camera shake warning indicator ( Ã ) will display on the LCD screen. å Smart Auto flash ( ) icon will be automatically controlled to obtain a balanced correct exposure. Slow synchro The flash operates with "red eye" is detected, Red-eye reduction this mode when capturing images in poorly lit...
User Manual (user Manual) (ver.1.1) (English)
Page 57
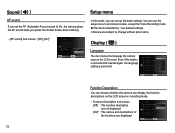
... LCD screen. Function Description sub menus [Off] : The function description are not displayed. [On]* : The names and descriptions of the functions are subject to On, the camera plays the AF sound when you press the shutter button down half way. - [AF sound] sub menus : [Off], [On]* Volume Start Sound Shutter Sound Beep Sound AF Sound Back :Medium :Off :1 :1 Off :On On Set Setup menu In this mode, you set up the basic settings. Language Function Description Start Image Display Brightness Quick View Power Save :English English...
... LCD screen. Function Description sub menus [Off] : The function description are not displayed. [On]* : The names and descriptions of the functions are subject to On, the camera plays the AF sound when you press the shutter button down half way. - [AF sound] sub menus : [Off], [On]* Volume Start Sound Shutter Sound Beep Sound AF Sound Back :Medium :Off :1 :1 Off :On On Set Setup menu In this mode, you set up the basic settings. Language Function Description Start Image Display Brightness Quick View Power Save :English English...

User Manual (user Manual) (ver.1.1) (English)
Page 60
... you 've installed a new memory card, formatted the memory, or deleted all , or inserted a new memory card. [Series]* : New files are assigned sequentially from 100 to à SAM_9999. - The maximum number of files in a folder is SAM_0001. - The files used with the memory card conform to display the local date and time on captured images and set up the Date / Time / Date type You can change the image file...
... you 've installed a new memory card, formatted the memory, or deleted all , or inserted a new memory card. [Series]* : New files are assigned sequentially from 100 to à SAM_9999. - The maximum number of files in a folder is SAM_0001. - The files used with the memory card conform to display the local date and time on captured images and set up the Date / Time / Date type You can change the image file...

User Manual (user Manual) (ver.1.1) (English)
Page 65
... a recorded voice file while Play playing it is saved as the original movie clip (1280x720HQ, 640x480, 320x240). Ä When you want to play back by using the Left/Right button. 2. Starting play mode Movie clip capture function You can capture still images from the movie clip. Ê Capturing a still image from the movie clip is saved under a new file name. Ä The captured movie clip still is the same size as a still image...
... a recorded voice file while Play playing it is saved as the original movie clip (1280x720HQ, 640x480, 320x240). Ä When you want to play back by using the Left/Right button. 2. Starting play mode Movie clip capture function You can capture still images from the movie clip. Ê Capturing a still image from the movie clip is saved under a new file name. Ä The captured movie clip still is the same size as a still image...

User Manual (user Manual) (ver.1.1) (English)
Page 83
... print setup. 4. File Options ( ) DPOF Ê DPOF(Digital Print Order Format) allows you select photos to print. - Press the Up / Down button, select the [DPOF] menu tab, and then press the Right button. 2. You can 0 select the number of prints. If an image carries DPOF instruction, the DPOF indicator ( ) appears on the LCD screen. Images can support the wide angle image when you to print. Zoom button : Select the number of prints for all Quantity Set pictures except movie...
... print setup. 4. File Options ( ) DPOF Ê DPOF(Digital Print Order Format) allows you select photos to print. - Press the Up / Down button, select the [DPOF] menu tab, and then press the Right button. 2. You can 0 select the number of prints. If an image carries DPOF instruction, the DPOF indicator ( ) appears on the LCD screen. Images can support the wide angle image when you to print. Zoom button : Select the number of prints for all Quantity Set pictures except movie...

User Manual (user Manual) (ver.1.1) (English)
Page 87
... OK button. :One Photo Auto Po:sAtcuatord Car:dAuto 4x6 L :Auto 2L :Auto Set Menu Function Sub menu Size Set the size of prints. - Use the Up / Down button to print the date. Auto, Off, On File Name Set whether to Auto, Full, 1, 2, 4, 8, 9, be printed. Press the Up / Down button to Print Images 1. After selecting another picture. Fast Photo Quality Set the quality of Copies to select the number of the printing paper. If not supported, the menus are still displayed on the LCD...
... OK button. :One Photo Auto Po:sAtcuatord Car:dAuto 4x6 L :Auto 2L :Auto Set Menu Function Sub menu Size Set the size of prints. - Use the Up / Down button to print the date. Auto, Off, On File Name Set whether to Auto, Full, 1, 2, 4, 8, 9, be printed. Press the Up / Down button to Print Images 1. After selecting another picture. Fast Photo Quality Set the quality of Copies to select the number of the printing paper. If not supported, the menus are still displayed on the LCD...
User Manual (user Manual) (ver.1.1) (English)
Page 88
... the camera when using it on the printer manufacturer. Keep this camera in the camera case. - Never drop the camera or subject it in places subject to select Date :Auto the [Reset] menu tab, and then press File Name :Auto the Right button. 2. Use the Up / Down button to severe changes in hot weather. - For your printer. Avoid obstructing the lens or the flash when you capture an image. 87...
... the camera when using it on the printer manufacturer. Keep this camera in the camera case. - Never drop the camera or subject it in places subject to select Date :Auto the [Reset] menu tab, and then press File Name :Auto the Right button. 2. Use the Up / Down button to severe changes in hot weather. - For your printer. Avoid obstructing the lens or the flash when you capture an image. 87...
User Manual (user Manual) (ver.1.1) (English)
Page 89
...; If the digital camera is not used for a long period, the date and time may return to the camera and is not a malfunction. å When images are uploaded or downloaded, the data transfer may be used for an extended period of time. å If the camera is not harmful to the default settings because the battery has discharged. If this happens, turn the camera off the camera and remove the memory card. This...
...; If the digital camera is not used for a long period, the date and time may return to the camera and is not a malfunction. å When images are uploaded or downloaded, the data transfer may be used for an extended period of time. å If the camera is not harmful to the default settings because the battery has discharged. If this happens, turn the camera off the camera and remove the memory card. This...

User Manual (user Manual) (ver.1.1) (English)
Page 91
... without setting an appropriate macro mode. Ã Select an appropriate macro mode to take images when you press the Shutter button. åThere is insufficient memory capacity. Ã Delete unnecessary image files. åThe memory card has not been formatted. Ã Format the memory card. (p.58) åThe memory card is exhausted. Ã Insert a new memory card. åThe memory card is locked. Ã Refer to the [Card Locked] error message. åThe camera's power is off. Ã Turn the camera power on. åThe battery...
... without setting an appropriate macro mode. Ã Select an appropriate macro mode to take images when you press the Shutter button. åThere is insufficient memory capacity. Ã Delete unnecessary image files. åThe memory card has not been formatted. Ã Format the memory card. (p.58) åThe memory card is exhausted. Ã Insert a new memory card. åThe memory card is locked. Ã Refer to the [Card Locked] error message. åThe camera's power is off. Ã Turn the camera power on. åThe battery...

User Manual (user Manual) (ver.1.1) (English)
Page 92
... appears on a computer that has correct files. Images are incorrect files on the memory card. Ã Insert a memory card that supports USB. A part of the recorded image. Incorrect date and time is off mode. åThe camera mode can't use the flash . Ã Refer to the camera. Ã Check the connection cables. åThere are too bright. åExposure is excessive. Ã Reset exposure compensation. The camera buttons do not light or red, white, and blue spots appear. ĺ This...
... appears on a computer that has correct files. Images are incorrect files on the memory card. Ã Insert a memory card that supports USB. A part of the recorded image. Incorrect date and time is off mode. åThe camera mode can't use the flash . Ã Refer to the camera. Ã Check the connection cables. åThere are too bright. åExposure is excessive. Ã Reset exposure compensation. The camera buttons do not light or red, white, and blue spots appear. ĺ This...
User Manual (user Manual) (ver.1.1) (English)
Page 93
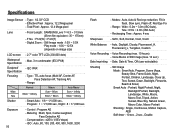
..., Landscape, White, Macro, Macro Text, Tripod, Action, Sunset, Blue Sky, Natural Green, Macro Color, Macro Portrait ·Shooting : Single, Continuous, Motion Capture, AEB ·Self-timer : 10 sec., 2 sec., Double F No. : F3.6(W) ~ F4.8(T) - Digital Zoom : ·Still Image mode :1.0X ~ 5.0X ·Play mode : 1.0X ~ 12.5X (depends on image size) LCD screen - 2.7" color TFT LCD (230,000 dots) Waterproof - Type : TTL auto focus (Multi AF, Center AF, Face Detection AF, Tracking AF) - Exposure 92 - Auto, Daylight...
..., Landscape, White, Macro, Macro Text, Tripod, Action, Sunset, Blue Sky, Natural Green, Macro Color, Macro Portrait ·Shooting : Single, Continuous, Motion Capture, AEB ·Self-timer : 10 sec., 2 sec., Double F No. : F3.6(W) ~ F4.8(T) - Digital Zoom : ·Still Image mode :1.0X ~ 5.0X ·Play mode : 1.0X ~ 12.5X (depends on image size) LCD screen - 2.7" color TFT LCD (230,000 dots) Waterproof - Type : TTL auto focus (Multi AF, Center AF, Face Detection AF, Tracking AF) - Exposure 92 - Auto, Daylight...

User Manual (user Manual) (ver.1.1) (English)
Page 97
... on-screen instructions. 4. When the setup screen is displayed, click Samsung Digital Camera Installer to start installation. Ê Transferring files to your PC Once you connect the camera to your PC, the camera will be recognized as a removable drive. å The battery is be charged while the camera is not responsible for Windows) 1. The manufacturer is connected to complete the installation, and then restart your computer (for any loss of the cable with the USB cable. 3. Click...
... on-screen instructions. 4. When the setup screen is displayed, click Samsung Digital Camera Installer to start installation. Ê Transferring files to your PC Once you connect the camera to your PC, the camera will be recognized as a removable drive. å The battery is be charged while the camera is not responsible for Windows) 1. The manufacturer is connected to complete the installation, and then restart your computer (for any loss of the cable with the USB cable. 3. Click...

User Manual (user Manual) (ver.1.1) (English)
Page 100
... Photo edit mode 4 Change to the Video edit mode 5 Change to the Sharing mode (You can transfer files directly from the camera to a Macintosh computer, the computer will recognize the device automatically. Transferring files to your computer (for Windows) Icon Description 1 Open menus 2 Display files in My Folder, or register faces Transferring files to your computer for Mac For Mac users When you connect the camera to the computer without installing any programs. Ê Installing programs Hardware and software...
... Photo edit mode 4 Change to the Video edit mode 5 Change to the Sharing mode (You can transfer files directly from the camera to a Macintosh computer, the computer will recognize the device automatically. Transferring files to your computer (for Windows) Icon Description 1 Open menus 2 Display files in My Folder, or register faces Transferring files to your computer for Mac For Mac users When you connect the camera to the computer without installing any programs. Ê Installing programs Hardware and software...

User Manual (user Manual) (ver.1.1) (English)
Page 102
Wherever possible, connect the camera to the computer. Transfer the file again. Case 4 When using a USB hub. Ã There may not recognize the camera as another USB device. Case 6 When I open the Device Manager (by your PC. Case 1 USB cable is not connected or it is an unexpected error during file transfer. Ã Turn the camera power off the camera, remove the USB cable, plug in the USB cable again, and then turn on the back...
Wherever possible, connect the camera to the computer. Transfer the file again. Case 4 When using a USB hub. Ã There may not recognize the camera as another USB device. Case 6 When I open the Device Manager (by your PC. Case 1 USB cable is not connected or it is an unexpected error during file transfer. Ã Turn the camera power off the camera, remove the USB cable, plug in the USB cable again, and then turn on the back...


