User Manual (ENGLISH)
Page 2
Main Page Safety Instru ctions Notationa l Power Ins tall ati on Clean Oth er Intro ductio n Unpac k i ng Fr ont Rear Bottom Setup Conne cting the M onitor Installing the Monitor Driver Automatic Manual Base Installat ion On -Screen D isplay Tr oubl es hooti ng Check List Q& A Self -Test F eature C heck S pec ifi c ati ons Ge nera l Spe cificatio ns Power Sav er Preset T imin g Mode s Infor mati on S erv i ce Ter ms Regulato ry Natural Color Author ity
Main Page Safety Instru ctions Notationa l Power Ins tall ati on Clean Oth er Intro ductio n Unpac k i ng Fr ont Rear Bottom Setup Conne cting the M onitor Installing the Monitor Driver Automatic Manual Base Installat ion On -Screen D isplay Tr oubl es hooti ng Check List Q& A Self -Test F eature C heck S pec ifi c ati ons Ge nera l Spe cificatio ns Power Sav er Preset T imin g Mode s Infor mati on S erv i ce Ter ms Regulato ry Natural Color Author ity

User Manual (ENGLISH)
Page 4
... from the outlet during storms or lightening or if it to do so may cause an electric shock or fire. z If the size of your monitor is small, or if the same image is not us ed for a long period of the CDT. z Failure to do so may see afterimages due...
... from the outlet during storms or lightening or if it to do so may cause an electric shock or fire. z If the size of your monitor is small, or if the same image is not us ed for a long period of the CDT. z Failure to do so may see afterimages due...

User Manual (ENGLISH)
Page 5
... or human body. Do not use the monitor without the supplied stand, take steps to insure proper ventilation. z If the monitor must be used without the monitor stand. Set down . Do not plac e the monitor face down the monitor carefully. Put your monitor in a location with low humidity and a... minimum of dus t. z This may cause damage to bad ventilation. z The monitor can cause injury by falling. z The CDT surface may cause a breakdown or fire. Do not drop the monitor when moving it. z Bad ventilation may be damaged or broken. z It could be damaged...
... or human body. Do not use the monitor without the supplied stand, take steps to insure proper ventilation. z If the monitor must be used without the monitor stand. Set down . Do not plac e the monitor face down the monitor carefully. Put your monitor in a location with low humidity and a... minimum of dus t. z This may cause damage to bad ventilation. z The monitor can cause injury by falling. z The CDT surface may cause a breakdown or fire. Do not drop the monitor when moving it. z Bad ventilation may be damaged or broken. z It could be damaged...
User Manual (ENGLISH)
Page 6
...z You can damage (color change) or crack the monitor case. z A dirty connector can buy a recommended detergent at any small metal objects on Clean Oth er When cleaning the monitor case or the surface of water, chemicals or any Samsung Service Center. The antiglare/anti-static surface coating on ...the monitor. z You can cause an electric shock or fire. If the connector between...
...z You can damage (color change) or crack the monitor case. z A dirty connector can buy a recommended detergent at any small metal objects on Clean Oth er When cleaning the monitor case or the surface of water, chemicals or any Samsung Service Center. The antiglare/anti-static surface coating on ...the monitor. z You can cause an electric shock or fire. If the connector between...

User Manual (ENGLISH)
Page 7
...fire or injury. Do not try to the cable. z This may cause an electric shock or a fire. z Refer servicing to the cable. If y our monitor doe s not operate normally - Do not plac e any unusual sounds or smells coming from it immediately and contact an authorized dealer or service. z This may... or a fire due to damage to qualified service personnel. z This may cause an electric shock or a fire. unplug it - Do not move the monitor by pulling only the wire or the signal cable. No user serviceable parts inside. in particular, if there are any heavy objects on Clean Other...
...fire or injury. Do not try to the cable. z This may cause an electric shock or a fire. z Refer servicing to the cable. If y our monitor doe s not operate normally - Do not plac e any unusual sounds or smells coming from it immediately and contact an authorized dealer or service. z This may... or a fire due to damage to qualified service personnel. z This may cause an electric shock or a fire. unplug it - Do not move the monitor by pulling only the wire or the signal cable. No user serviceable parts inside. in particular, if there are any heavy objects on Clean Other...

User Manual (ENGLISH)
Page 8
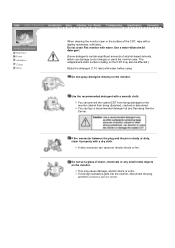
Keep the monitor away from any magnetic substances. z This may cause discoloring or distortion of the image.
Keep the monitor away from any magnetic substances. z This may cause discoloring or distortion of the image.
User Manual (ENGLISH)
Page 9
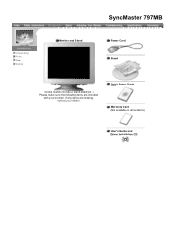
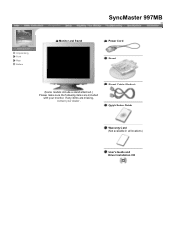
If any items are included with your dealer . SyncMaster 797MB Unpacking Fr ont Rear Bottom Monitor and S ta nd Power Cord Stand (S ome models include a stand attached. ) Please make sure the following items are missing, contact your monitor. Quic k Setup Guide Warranty Card (Not available in all locations) User's Guide and Driver Installation CD
If any items are included with your dealer . SyncMaster 797MB Unpacking Fr ont Rear Bottom Monitor and S ta nd Power Cord Stand (S ome models include a stand attached. ) Please make sure the following items are missing, contact your monitor. Quic k Setup Guide Warranty Card (Not available in all locations) User's Guide and Driver Installation CD
User Manual (ENGLISH)
Page 10
SyncMaster 997MB Unpacking Fr ont Rear Bottom Monitor and S ta nd Power Cord Stand (S ome models include a stand attached. ) Please make sure the following items are missing, contact your monitor. Signal Cable (Option) Quic k Setup Guide Warranty Card (Not available in all locations) User's Guide and Driver Installation CD If any items are included with your dealer .
SyncMaster 997MB Unpacking Fr ont Rear Bottom Monitor and S ta nd Power Cord Stand (S ome models include a stand attached. ) Please make sure the following items are missing, contact your monitor. Signal Cable (Option) Quic k Setup Guide Warranty Card (Not available in all locations) User's Guide and Driver Installation CD If any items are included with your dealer .

User Manual (ENGLISH)
Page 11
...adjust items in the manual for turn your adjustments. This light glows green during normal operation, and blinks green once as the monitor saves your monitor OFF when it is not needed, or when leaving it unattended for long periods. These buttons allow you to the previous menu.... Note: See PowerSaver described in the menu. Use this button for further information regarding power saving functions. For energy conservation, turn the monitor on and off. Unpac k i ng Front Rear Bottom 1. Menu button 2. Enter button 4. Used to select the OSD menu. Adjust buttons 3....
...adjust items in the manual for turn your adjustments. This light glows green during normal operation, and blinks green once as the monitor saves your monitor OFF when it is not needed, or when leaving it unattended for long periods. These buttons allow you to the previous menu.... Note: See PowerSaver described in the menu. Use this button for further information regarding power saving functions. For energy conservation, turn the monitor on and off. Unpac k i ng Front Rear Bottom 1. Menu button 2. Enter button 4. Used to select the OSD menu. Adjust buttons 3....
User Manual (ENGLISH)
Page 12
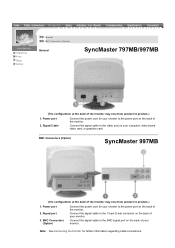
... cord for your computer, video board, video card, or graphics card. Unpac k i ng Fr ont Rear Bottom Ge nera l BNC C onne cto rs (Option) General SyncMaster 797MB/997MB (The configuration at the back of the monitor may vary from product to product.) 1. Connect the signal cable to the video port on your...
... cord for your computer, video board, video card, or graphics card. Unpac k i ng Fr ont Rear Bottom Ge nera l BNC C onne cto rs (Option) General SyncMaster 797MB/997MB (The configuration at the back of the monitor may vary from product to product.) 1. Connect the signal cable to the video port on your...

User Manual (ENGLISH)
Page 13
Unpac k i ng Fr ont Rear Bottom 1. Tilt/Swivel Base Connect the signal cable to the power port on your computer, video board, video card, or graphics card. Connect the power cord for your monitor to the video port on the back of the monitor. You can separate the base from the monitor. Power port 3. Signal Cable 2.
Unpac k i ng Fr ont Rear Bottom 1. Tilt/Swivel Base Connect the signal cable to the power port on your computer, video board, video card, or graphics card. Connect the power cord for your monitor to the video port on the back of the monitor. You can separate the base from the monitor. Power port 3. Signal Cable 2.
User Manual (ENGLISH)
Page 14
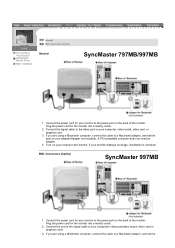
...3. Plug the power cord for your monitor to the video port on your computer, video board, video card, or graphics card. 3. Connect the power cord for the monitor into a nearby outlet. 2. Turn on the back of the monitor. If you are using a Macintosh ...SyncMaster 997MB 1. Connect the end of the signal cable to the power port on your adapter(Adapter not included). Ge nera l BNC C onne cto rs (Option) Connecting the Monitor Installing the Monitor Driver Base Installat ion General SyncMaster 797MB/997MB 1. Plug the power cord for your monitor to your monitor displays...
...3. Plug the power cord for your monitor to the video port on your computer, video board, video card, or graphics card. 3. Connect the power cord for the monitor into a nearby outlet. 2. Turn on the back of the monitor. If you are using a Macintosh ...SyncMaster 997MB 1. Connect the end of the signal cable to the power port on your adapter(Adapter not included). Ge nera l BNC C onne cto rs (Option) Connecting the Monitor Installing the Monitor Driver Base Installat ion General SyncMaster 797MB/997MB 1. Plug the power cord for your monitor to your monitor displays...

User Manual (ENGLISH)
Page 15
Turn on the back of your computer and monitor. A PC-compatible computer does not need an adapter. 4. Connect the signal cable to the BNC signal port on your monitor/computer. 5. When you use a BNC connector. pins on your monitor displays an image, installation is complete. If your adapter(Adapter not included).
Turn on the back of your computer and monitor. A PC-compatible computer does not need an adapter. 4. Connect the signal cable to the BNC signal port on your monitor/computer. 5. When you use a BNC connector. pins on your monitor displays an image, installation is complete. If your adapter(Adapter not included).
User Manual (ENGLISH)
Page 16
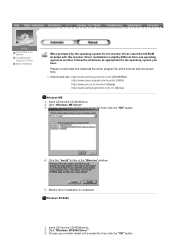
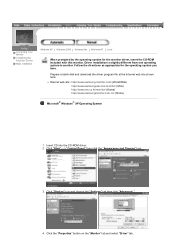
z Internet web site : http://www.samsung-monitor.com/ (Wo rld Wide) http://www.samsungusa.com/monitor/ (US A) http://www.sec.co.kr/monitor/ (Korea) http://www.samsungmonitor.com.cn/ (Ch ina) Windows ME 1. Windows X P/2000 1. Choose your monitor model in the model list, then click the "OK" button. Insert CD into... "Windows XP/2000 Driver". 3. Prepare a blank disk and download the driver program file at the Internet web site shown here. Choose your monitor model in the model list, then click the "OK" button. 4. Click the "Ins tall" button in the "Warning" window. 5. Click "Windows...
z Internet web site : http://www.samsung-monitor.com/ (Wo rld Wide) http://www.samsungusa.com/monitor/ (US A) http://www.sec.co.kr/monitor/ (Korea) http://www.samsungmonitor.com.cn/ (Ch ina) Windows ME 1. Windows X P/2000 1. Choose your monitor model in the model list, then click the "OK" button. Insert CD into... "Windows XP/2000 Driver". 3. Prepare a blank disk and download the driver program file at the Internet web site shown here. Choose your monitor model in the model list, then click the "OK" button. 4. Click the "Ins tall" button in the "Warning" window. 5. Click "Windows...

User Manual (ENGLISH)
Page 17
This monitor driver is completed. If you can see following "Message" window, then click the "Continue Anyway" button. Monitor driver installation is under certifying MS logo,and this installation don't damage your system.The certified driver will be posted on Samsung Monitor Homepage http://www.samsung-monitor.com/. 6. Then click "OK" button. 4. Click the "Ins tall" button in the "Warning" window. 5.
This monitor driver is completed. If you can see following "Message" window, then click the "Continue Anyway" button. Monitor driver installation is under certifying MS logo,and this installation don't damage your system.The certified driver will be posted on Samsung Monitor Homepage http://www.samsung-monitor.com/. 6. Then click "OK" button. 4. Click the "Ins tall" button in the "Warning" window. 5.
User Manual (ENGLISH)
Page 18
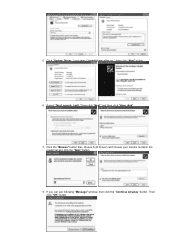
... "Display" icon and choose the "Settings " tab then click "Adv anced..". 4. Follow the directions as appropriate for the monitor driver, insert the CD-ROM inc luded with this monitor. Click "Start " -> "Control Panel" then click the "Appearance and Themes" Icon. 3. Click the "Properties " button on the "Monitor" ...site shown here. Insert CD into the CD-ROM driver. 2. z Internet web site : http://www.samsung-monitor.com/ (Wo rld Wide) http://www.samsungusa.com/monitor/ (US A) http://www.sec.co.kr/monitor/ (Korea) http://www.samsungmonitor.com.cn/ (Ch ina) Mic rosoft ® Windows® XP ...
... "Display" icon and choose the "Settings " tab then click "Adv anced..". 4. Follow the directions as appropriate for the monitor driver, insert the CD-ROM inc luded with this monitor. Click "Start " -> "Control Panel" then click the "Appearance and Themes" Icon. 3. Click the "Properties " button on the "Monitor" ...site shown here. Insert CD into the CD-ROM driver. 2. z Internet web site : http://www.samsung-monitor.com/ (Wo rld Wide) http://www.samsungusa.com/monitor/ (US A) http://www.sec.co.kr/monitor/ (Korea) http://www.samsungmonitor.com.cn/ (Ch ina) Mic rosoft ® Windows® XP ...
User Manual (ENGLISH)
Page 19
then click "Next " and then click "Have disk". 7. Select "Don't search ,I will.." then click "Next" button. 6. If you can see following "Message" window, then click the "Continue Anyway " button. Click the "Browse " button then choose A:(D:\Driver) and choose your monitor model in the model list and click the "Next " button. 8. Then click "OK" button. and select "Ins tall from a list or.." Click "Update Driver.." 5.
then click "Next " and then click "Have disk". 7. Select "Don't search ,I will.." then click "Next" button. 6. If you can see following "Message" window, then click the "Continue Anyway " button. Click the "Browse " button then choose A:(D:\Driver) and choose your monitor model in the model list and click the "Next " button. 8. Then click "OK" button. and select "Ins tall from a list or.." Click "Update Driver.." 5.
User Manual (ENGLISH)
Page 20
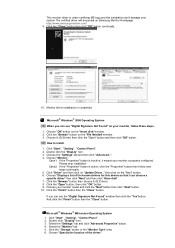
...Open" button, then click "OK" button. 9. Select the "Monitor" tab. 5. Mic rosoft ® Windows® 2000 Operating System Whe n you can see "Digital Signature Not Found" on Samsung Monitor Homepage http://www.samsung-monitor.com/. 9. then click on the "Ins ert disk" window...How to install 1. Choose "Monitor". Choose your monitor, follow next steps continually. 5. Click the "Cha nge " button in the "Monitor Type" area. 6. Monitor driver installation is active, click the "Properties" button then follow these steps. 1. Choose "Display a list of the driver". ...
...Open" button, then click "OK" button. 9. Select the "Monitor" tab. 5. Mic rosoft ® Windows® 2000 Operating System Whe n you can see "Digital Signature Not Found" on Samsung Monitor Homepage http://www.samsung-monitor.com/. 9. then click on the "Ins ert disk" window...How to install 1. Choose "Monitor". Choose your monitor, follow next steps continually. 5. Click the "Cha nge " button in the "Monitor Type" area. 6. Monitor driver installation is active, click the "Properties" button then follow these steps. 1. Choose "Display a list of the driver". ...
User Manual (ENGLISH)
Page 21
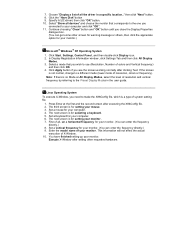
... clicking Test. Select a mode that corresponds to the one you wish to the Preset Display Modes in a specific location.." Set a Keyboard for your monitor. You have finished setting up your computer. 4. Click Apply button if you close the Display Properties dialogue box. (Y ou can enter the frequency directly.) 9. Click the "Have Disk" button...
... clicking Test. Select a mode that corresponds to the one you wish to the Preset Display Modes in a specific location.." Set a Keyboard for your monitor. You have finished setting up your computer. 4. Click Apply button if you close the Display Properties dialogue box. (Y ou can enter the frequency directly.) 9. Click the "Have Disk" button...

User Manual (ENGLISH)
Page 22
Remove the twist-tie before attaching the base to the monitor. Note: The base is detachable. Tilt/ Swive l Ba se | Attachin g and R emoving th e Base Conne cting Your Monitor Installing the Monitor Driver Base Installation With the built -in pe destal, you can tilt and/or swivel the monitor for the most comfortable viewing angle. If y our monitor was supplied with the base detached, attach the base as follows.
Remove the twist-tie before attaching the base to the monitor. Note: The base is detachable. Tilt/ Swive l Ba se | Attachin g and R emoving th e Base Conne cting Your Monitor Installing the Monitor Driver Base Installation With the built -in pe destal, you can tilt and/or swivel the monitor for the most comfortable viewing angle. If y our monitor was supplied with the base detached, attach the base as follows.


