User Manual (ENGLISH)
Page 11
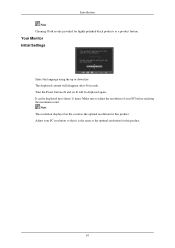
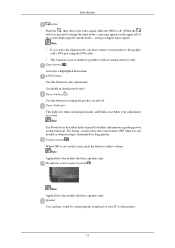
...provided for highly polished black products as the optimal resolution for this product. 10 Adjust your PC before reaching the maximum count. Turn the Power button off and on the screen is the same as a product feature. Make sure to three (1) times. It can be displayed again. Note... The resolution displayed on . The displayed content will be displayed up or down key. Your Monitor Initial Settings Select the language using the up to adjust the resolution of your PC resolution so that it is the optimal resolution for this...
...provided for highly polished black products as the optimal resolution for this product. 10 Adjust your PC before reaching the maximum count. Turn the Power button off and on the screen is the same as a product feature. Make sure to three (1) times. It can be displayed again. Note... The resolution displayed on . The displayed content will be displayed up or down key. Your Monitor Initial Settings Select the language using the up to adjust the resolution of your PC resolution so that it is the optimal resolution for this...

User Manual (ENGLISH)
Page 12
Note You can customize key assignment for a required function via Setup > Customized Key. Adjust buttons [ ] These buttons allow you to adjust brightness. 11 Brightness button [ ] When OSD is not on -screen menu and exits from the menu. Customized Key[ ] You can configure the customized key for the Custom button according to your fingers to use to exit the OSD menu or return to the previous menu. Also use them lightly with your preferences. Front Introduction Note Touch them . MENU button [MENU/ ] Opens the on the screen, push the button to adjust items in the menu.
Note You can customize key assignment for a required function via Setup > Customized Key. Adjust buttons [ ] These buttons allow you to adjust brightness. 11 Brightness button [ ] When OSD is not on -screen menu and exits from the menu. Customized Key[ ] You can configure the customized key for the Custom button according to your fingers to use to exit the OSD menu or return to the previous menu. Also use them lightly with your preferences. Front Introduction Note Touch them . MENU button [MENU/ ] Opens the on the screen, push the button to adjust items in the menu.
User Manual (ENGLISH)
Page 13
...sound output terminal[ ] Note Applicable to the monitor. 12 Speaker You can hear sound by connecting the soundcard of the screen displaying the current mode -- Volume button[ ] When OSD is not on and off . (When the ' ' button is pressed to the models that have speakers... must connect your PC to the models that have speakers only. Enter button [ ] Activates a highlighted menu item. AUTO button Use this button for auto adjustment. (Available in Analog mode only) Power button [ ] Use this button for further information regarding power saving functions. Note Applicable to change the...
...sound output terminal[ ] Note Applicable to the monitor. 12 Speaker You can hear sound by connecting the soundcard of the screen displaying the current mode -- Volume button[ ] When OSD is not on and off . (When the ' ' button is pressed to the models that have speakers... must connect your PC to the models that have speakers only. Enter button [ ] Activates a highlighted menu item. AUTO button Use this button for auto adjustment. (Available in Analog mode only) Power button [ ] Use this button for further information regarding power saving functions. Note Applicable to change the...
User Manual (ENGLISH)
Page 24
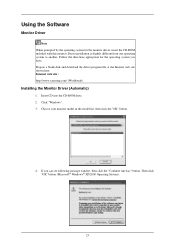
Internet web site : http://www.samsung.com/ (Worldwide) Installing the Monitor Driver (Automatic) 1. Then click "OK" button (Microsoft® Windows® XP/2000 Operating System). 23 Choose your monitor model in the model list, then click the "OK" button. 4. If you have. Driver installation is ...Click "Windows". 3. Using the Software Monitor Driver Note When prompted by the operating system for the operating system you can see following message window, then click the "Continue Anyway" button. Follow the directions appropriate for the monitor driver, insert the CD-ROM included ...
Internet web site : http://www.samsung.com/ (Worldwide) Installing the Monitor Driver (Automatic) 1. Then click "OK" button (Microsoft® Windows® XP/2000 Operating System). 23 Choose your monitor model in the model list, then click the "OK" button. 4. If you have. Driver installation is ...Click "Windows". 3. Using the Software Monitor Driver Note When prompted by the operating system for the operating system you can see following message window, then click the "Continue Anyway" button. Follow the directions appropriate for the monitor driver, insert the CD-ROM included ...
User Manual (ENGLISH)
Page 25
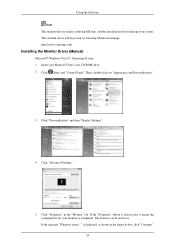
... doesn't damage your CD-ROM drive. 2. Insert your Manual CD into your system. Click (Start) and "Control Panel". The monitor can be posted on "Appearance and Personalization". 3. is completed. Click "Properties" in the figure below, click "Continue". 24 Click... then "Display Settings". 4. If the "Properties" button is deactivated, it means the configuration for your monitor is displayed, as is. Click "Advanced Settings...". 5. If the message "Windows needs..." http://www.samsung.com/ Installing the Monitor Driver (Manual) Microsoft® Windows Vista™, ...
... doesn't damage your CD-ROM drive. 2. Insert your Manual CD into your system. Click (Start) and "Control Panel". The monitor can be posted on "Appearance and Personalization". 3. is completed. Click "Properties" in the figure below, click "Continue". 24 Click... then "Display Settings". 4. If the "Properties" button is deactivated, it means the configuration for your monitor is displayed, as is. Click "Advanced Settings...". 5. If the message "Windows needs..." http://www.samsung.com/ Installing the Monitor Driver (Manual) Microsoft® Windows Vista™, ...
User Manual (ENGLISH)
Page 28
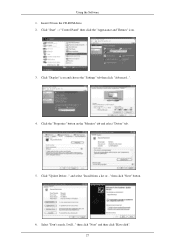
Click the "Properties" button on the "Monitor" tab and select "Driver" tab. 5. and select "Install from a list or..." Insert CD into the CD-ROM drive. 2. Select "Don't search, I will..." then click "Next" button. 6. Click "Display" icon and choose the "Settings" tab then click "Advanced...". 4. Click "Start" → "Control Panel" then click the "Appearance and Themes" icon. 3. Click "Update Driver..." Using the Software 1. then click "Next" and then click "Have disk". 27
Click the "Properties" button on the "Monitor" tab and select "Driver" tab. 5. and select "Install from a list or..." Insert CD into the CD-ROM drive. 2. Select "Don't search, I will..." then click "Next" button. 6. Click "Display" icon and choose the "Settings" tab then click "Advanced...". 4. Click "Start" → "Control Panel" then click the "Appearance and Themes" icon. 3. Click "Update Driver..." Using the Software 1. then click "Next" and then click "Have disk". 27
User Manual (ENGLISH)
Page 29
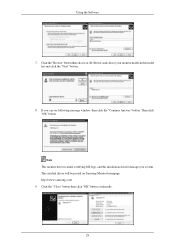
Click the "Browse" button then choose A:(D:\Driver) and choose your system. The certified driver will be posted on Samsung Monitor homepage. Note This monitor driver is under certifying MS logo, and this installation doesn't damage your monitor model in the model list and click the "Next" button. 8. If you can see following message window, then click the "Continue Anyway" button. Click the "Close" button then click "OK" button continually. 28 http://www.samsung.com/ 9. Then click "OK" button. Using the Software 7.
Click the "Browse" button then choose A:(D:\Driver) and choose your system. The certified driver will be posted on Samsung Monitor homepage. Note This monitor driver is under certifying MS logo, and this installation doesn't damage your monitor model in the model list and click the "Next" button. 8. If you can see following message window, then click the "Continue Anyway" button. Click the "Close" button then click "OK" button continually. 28 http://www.samsung.com/ 9. Then click "OK" button. Using the Software 7.
User Manual (ENGLISH)
Page 30
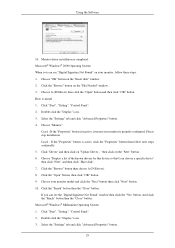
... I can see the "Digital Signature Not Found" window then click the "Yes" button. Click the "Browse" button then choose A:(D:\Driver). 8. Click the "Open" button, then click "OK" button. 9. Choose your monitor is inactive, it means your monitor model and click the "Next" button then click "Next" button. 10. Microsoft® Windows® Millennium Operating System 1. Double click the...
... I can see the "Digital Signature Not Found" window then click the "Yes" button. Click the "Browse" button then choose A:(D:\Driver). 8. Click the "Open" button, then click "OK" button. 9. Choose your monitor is inactive, it means your monitor model and click the "Next" button then click "Next" button. 10. Microsoft® Windows® Millennium Operating System 1. Double click the...
User Manual (ENGLISH)
Page 31
... have finished setting up your computer. 4. The next screen is for your monitor. (You can enter the frequency directly.) 8. Enter the model name of resolution, colors or frequency). Continue choosing "Close" button and "OK" button until you wish to a different mode (lower mode of your mouse. ... screen is no Mode at the first and the second screen after executing the X86Config file. 2. Click the "Change" button in a specific location..." Select the "Monitor" tab. 5. Using the Software 4. Note If there is not normal, change to use (Resolution, Number of system setting file...
... have finished setting up your computer. 4. The next screen is for your monitor. (You can enter the frequency directly.) 8. Enter the model name of resolution, colors or frequency). Continue choosing "Close" button and "OK" button until you wish to a different mode (lower mode of your mouse. ... screen is no Mode at the first and the second screen after executing the X86Config file. 2. Click the "Change" button in a specific location..." Select the "Monitor" tab. 5. Using the Software 4. Note If there is not normal, change to use (Resolution, Number of system setting file...

User Manual (ENGLISH)
Page 33
..., go to [Task Tray] → [Start] → [Settings] and select [Control Panel] in Control Panel. 3. Click "Yes" to find "MagicTune™." Click the "Change/Remove" button to highlight it to remove the program. 5. Uninstall The MagicTune™ program can be removed only by such factors as the video card, motherboard and...
..., go to [Task Tray] → [Start] → [Settings] and select [Control Panel] in Control Panel. 3. Click "Yes" to find "MagicTune™." Click the "Change/Remove" button to highlight it to remove the program. 5. Uninstall The MagicTune™ program can be removed only by such factors as the video card, motherboard and...

User Manual (ENGLISH)
Page 36
..." option of Microsoft Corporation,Inc. If the program runs on it to install Internet Explorer 5.0 and above with Active Desktop component. Click the "Change/Remove" button to find "MagicRotation." Insert the installation CD into the CD-ROM drive. 35 Windows®, is registered trademark of the Windows® Control Panel. Installation...
..." option of Microsoft Corporation,Inc. If the program runs on it to install Internet Explorer 5.0 and above with Active Desktop component. Click the "Change/Remove" button to find "MagicRotation." Insert the installation CD into the CD-ROM drive. 35 Windows®, is registered trademark of the Windows® Control Panel. Installation...

User Manual (ENGLISH)
Page 37
...removed only by such factors as the video card, motherboard and the network environment. Select "I agree to the terms of computer system or monitor. Multiscreen execution icon may not appear depending on your desktop. Select "Setting/Control Panel" on the CD. 3. Installation Problems The installation ...the icon to accept the terms of the Windows® Control Panel. Select Multiscreen from the list and then click the "Add/Delete" button. 36 Choose a folder to install the software for the main screen is recommended using the MultiScreen executable file on the "Start" menu and...
...removed only by such factors as the video card, motherboard and the network environment. Select "I agree to the terms of computer system or monitor. Multiscreen execution icon may not appear depending on your desktop. Select "Setting/Control Panel" on the CD. 3. Installation Problems The installation ...the icon to accept the terms of the Windows® Control Panel. Select Multiscreen from the list and then click the "Add/Delete" button. 36 Choose a folder to install the software for the main screen is recommended using the MultiScreen executable file on the "Start" menu and...
User Manual (ENGLISH)
Page 38
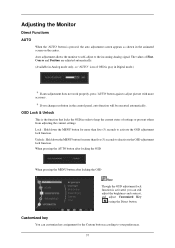
...key assignment for the Custom button according to your preferences. 37 Lock : Hold down the MENU button for more accuracy. Unlock : Hold down the MENU button for more than five (5) seconds to activate the OSD adjustment lock function. Auto adjustment allows the monitor to self-adjust to ...deactivate the OSD adjustment lock function. Adjusting the Monitor Direct Functions AUTO When the 'AUTO' button is pressed, the auto adjustment screen appears as shown in order to keep ...
...key assignment for the Custom button according to your preferences. 37 Lock : Hold down the MENU button for more accuracy. Unlock : Hold down the MENU button for more than five (5) seconds to activate the OSD adjustment lock function. Auto adjustment allows the monitor to self-adjust to ...deactivate the OSD adjustment lock function. Adjusting the Monitor Direct Functions AUTO When the 'AUTO' button is pressed, the auto adjustment screen appears as shown in order to keep ...
User Manual (ENGLISH)
Page 39
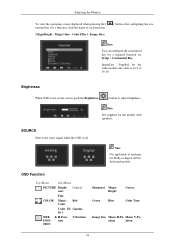
... Gamma fect SIZE & H-PosiPOSI- SOURCE Selects the video signal while the OSD is not on the screen, push the Brightness ( ) button to analogue (D-SUB)-or-digital (DVI)dedicated models. ImageSize : Supplied for the models with speakers. OSD Function Top Menus Sub Menus ... - Brightness When OSD is off. Menu V-Po- Adjusting the Monitor To view the operating screen displayed when pressing the [ tomized key for a required function via Setup > Customized Key. Color Effect - Image Size) ] button after configuring the cus- Contrast ness Fine COLOR Magic- tion TION...
... Gamma fect SIZE & H-PosiPOSI- SOURCE Selects the video signal while the OSD is not on the screen, push the Brightness ( ) button to analogue (D-SUB)-or-digital (DVI)dedicated models. ImageSize : Supplied for the models with speakers. OSD Function Top Menus Sub Menus ... - Brightness When OSD is off. Menu V-Po- Adjusting the Monitor To view the operating screen displayed when pressing the [ tomized key for a required function via Setup > Customized Key. Color Effect - Image Size) ] button after configuring the cus- Contrast ness Fine COLOR Magic- tion TION...
User Manual (ENGLISH)
Page 40
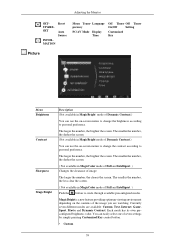
...The smaller the number, the darker the screen. (Not available in MagicBright mode of seven settings by simply pressing Customized Key control button. • Custom 39 Language parency PC/AV Mode Display Time Off Timer Off Timer On/Off Setting Customized Key Picture Menu Brightness... available in MagicColor mode of image. Each mode has its own preconfigured brightness value. Currently seven different modes are watching. Adjusting the Monitor SETUP&RESET Reset Auto Source INFORMATION Menu Trans- You can easily select one of Dynamic Contrast.) You can use the on -screen ...
...The smaller the number, the darker the screen. (Not available in MagicBright mode of seven settings by simply pressing Customized Key control button. • Custom 39 Language parency PC/AV Mode Display Time Off Timer Off Timer On/Off Setting Customized Key Picture Menu Brightness... available in MagicColor mode of image. Each mode has its own preconfigured brightness value. Currently seven different modes are watching. Adjusting the Monitor SETUP&RESET Reset Auto Source INFORMATION Menu Trans- You can easily select one of Dynamic Contrast.) You can use the on -screen ...

User Manual (ENGLISH)
Page 43
... mode ,select "Screen Fit "to a black and white screen. • Sepia - Gamma correction changes the luminance of the monitor's entire display. The default colors of the screen downwards and upwards by pressing the and buttons, respectively. 42 SIZE & POSITION Menu H-Position V-Position Description Changes the horizontal position of Full and Intelligent. ) •...
... mode ,select "Screen Fit "to a black and white screen. • Sepia - Gamma correction changes the luminance of the monitor's entire display. The default colors of the screen downwards and upwards by pressing the and buttons, respectively. 42 SIZE & POSITION Menu H-Position V-Position Description Changes the horizontal position of Full and Intelligent. ) •...
User Manual (ENGLISH)
Page 49
... . Q: If the power is still powered on , reboot the computer to see the initial screen (the login screen), which can cause the monitor to have poor coloring, become noisy, and video mode not supported, etc. Remove all electronic devices such as radios, fans, clocks and telephones that... are any problems yourself. Press ' / ' button to become blank, have the monitor doublecheck the input signal source. If you still see an error message on the screen when the...
... . Q: If the power is still powered on , reboot the computer to see the initial screen (the login screen), which can cause the monitor to have poor coloring, become noisy, and video mode not supported, etc. Remove all electronic devices such as radios, fans, clocks and telephones that... are any problems yourself. Press ' / ' button to become blank, have the monitor doublecheck the input signal source. If you still see an error message on the screen when the...
User Manual (ENGLISH)
Page 50
... during this message when the signal from the video card exceeds the maximum resolution and frequency that the monitor can see this one minute and then disappears. A: The monitor is no image, press the ' / ' button. Q: Connected using the DVI cable? The screen shows strange colors or just black and white. Q: Has the video...
... during this message when the signal from the video card exceeds the maximum resolution and frequency that the monitor can see this one minute and then disappears. A: The monitor is no image, press the ' / ' button. Q: Connected using the DVI cable? The screen shows strange colors or just black and white. Q: Has the video...
User Manual (ENGLISH)
Page 56
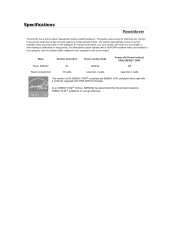
...Blinking Power off (Power button) EPA/ENERGY 2000 Off Power Consumption 20 watts Less than 1 watts Less than 1 watts This monitor is not needed, ...or when leaving it unattended for long periods. This system saves energy by switching your monitor OFF when it... called PowerSaver. Use the software utility installed on the keyboard. The monitor automatically returns to normal operation when you press a key on your ...VESA DPM functionality. For energy conservation, turn your monitor to set up this product meets the ENERGY STAR® guidelines for...
...Blinking Power off (Power button) EPA/ENERGY 2000 Off Power Consumption 20 watts Less than 1 watts Less than 1 watts This monitor is not needed, ...or when leaving it unattended for long periods. This system saves energy by switching your monitor OFF when it... called PowerSaver. Use the software utility installed on the keyboard. The monitor automatically returns to normal operation when you press a key on your ...VESA DPM functionality. For energy conservation, turn your monitor to set up this product meets the ENERGY STAR® guidelines for...

User Manual (ENGLISH)
Page 60
...turn your computer. State Power Indicator Normal Operation On Power saving mode Blinking Power off (Power button) EPA/ENERGY 2000 Off Power Consumption 20 watts Less than 1 watts Less than 1 watts This monitor is not needed, or when leaving it has not been used with a computer equipped with... when you press a key on your monitor to low-power mode when it unattended for a certain amount of time. As an ENERGY STAR® Partner, SAMSUNG has determined that this feature. Specifications PowerSaver This monitor has a built-in your monitor OFF when it is EPA ENERGY STAR®...
...turn your computer. State Power Indicator Normal Operation On Power saving mode Blinking Power off (Power button) EPA/ENERGY 2000 Off Power Consumption 20 watts Less than 1 watts Less than 1 watts This monitor is not needed, or when leaving it has not been used with a computer equipped with... when you press a key on your monitor to low-power mode when it unattended for a certain amount of time. As an ENERGY STAR® Partner, SAMSUNG has determined that this feature. Specifications PowerSaver This monitor has a built-in your monitor OFF when it is EPA ENERGY STAR®...


