User Manual (ENGLISH)
Page 10
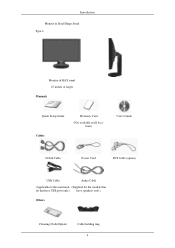
Introduction Monitor & Dual Hinge Stand Type 4 Monitor & HAS stand 23 inches or larger Manuals Quick Setup Guide Cables Warranty Card (Not available in all locations) User's Guide D-Sub Cable Power Cord DVI Cable (option) USB Cable Audio Cable (Applicable to the stand mod- (Supplied for the models that els that have USB ports only.) have speakers only.) Others Cleaning Cloth(Option) Cable holding ring 9
Introduction Monitor & Dual Hinge Stand Type 4 Monitor & HAS stand 23 inches or larger Manuals Quick Setup Guide Cables Warranty Card (Not available in all locations) User's Guide D-Sub Cable Power Cord DVI Cable (option) USB Cable Audio Cable (Applicable to the stand mod- (Supplied for the models that els that have USB ports only.) have speakers only.) Others Cleaning Cloth(Option) Cable holding ring 9
User Manual (ENGLISH)
Page 13
... to the graphic card's DVI port using the DVI cable. • This function is not available for long periods. For energy conservation, turn your monitor to the monitor. 12 Note Applicable to the models that have speakers only. Headphone sound output terminal[ ] Note Applicable to the models that have speakers only. Introduction button Push the ' ', then selects the video signal while the OSD is off . analog or digital input signal.) Note •...
... to the graphic card's DVI port using the DVI cable. • This function is not available for long periods. For energy conservation, turn your monitor to the monitor. 12 Note Applicable to the models that have speakers only. Headphone sound output terminal[ ] Note Applicable to the models that have speakers only. Introduction button Push the ' ', then selects the video signal while the OSD is off . analog or digital input signal.) Note •...
User Manual (ENGLISH)
Page 23
... more information. Remove two screws and then remove the stand from the wall surface. • Contact the nearest Samsung Service Center for product damage or personal injury when a non-VESA or non-specified wall mount is used or the consumer fails to follow the product installation instructions. • To mount the monitor on a flat surface with the VESA standard screw specifications. Turn off your monitor and unplug its power cord. 2. Samsung is not liable...
... more information. Remove two screws and then remove the stand from the wall surface. • Contact the nearest Samsung Service Center for product damage or personal injury when a non-VESA or non-specified wall mount is used or the consumer fails to follow the product installation instructions. • To mount the monitor on a flat surface with the VESA standard screw specifications. Turn off your monitor and unplug its power cord. 2. Samsung is not liable...
User Manual (ENGLISH)
Page 24
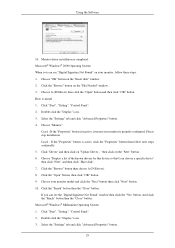
...) Installing the Monitor Driver (Automatic) 1. Click "Windows". 3. If you have. Prepare a blank disk and download the driver program file at the Internet web site shown here. Then click "OK" button (Microsoft® Windows® XP/2000 Operating System). 23 Choose your monitor model in the model list, then click the "OK" button. 4. Driver installation is slightly different from one operating system to another. Using the Software Monitor Driver...
...) Installing the Monitor Driver (Automatic) 1. Click "Windows". 3. If you have. Prepare a blank disk and download the driver program file at the Internet web site shown here. Then click "OK" button (Microsoft® Windows® XP/2000 Operating System). 23 Choose your monitor model in the model list, then click the "OK" button. 4. Driver installation is slightly different from one operating system to another. Using the Software Monitor Driver...
User Manual (ENGLISH)
Page 25
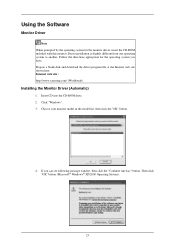
http://www.samsung.com/ Installing the Monitor Driver (Manual) Microsoft® Windows Vista™, Operating System 1. Click "Personalization" and then "Display Settings". 4. Click (Start) and "Control Panel". Then, double-click on Samsung Monitor homepage. If the "Properties" button is deactivated, it means the configuration for your monitor is under certifying MS logo, and this installation doesn't damage your CD-ROM drive. 2. If the message "Windows needs..." Insert your Manual CD...
http://www.samsung.com/ Installing the Monitor Driver (Manual) Microsoft® Windows Vista™, Operating System 1. Click "Personalization" and then "Display Settings". 4. Click (Start) and "Control Panel". Then, double-click on Samsung Monitor homepage. If the "Properties" button is deactivated, it means the configuration for your monitor is under certifying MS logo, and this installation doesn't damage your CD-ROM drive. 2. If the message "Windows needs..." Insert your Manual CD...
User Manual (ENGLISH)
Page 26
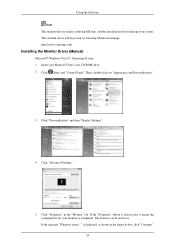
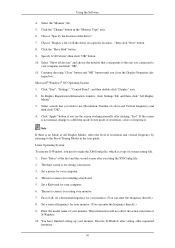
Check the "Browse my computer for example, D:\Drive) where the driver setup file is under certifying MS logo, and this installation doesn't damage your system. and select the folder (for driver software" checkbox and click "Let me pick from a list of device drivers on Samsung Monitor homepage. 6. in the "Driver" tab. 7. The certified driver will be posted on my computer". 8. Click "Update Driver..." Using the Software Note This monitor driver is located, and click "OK". 25 Click "Have Disk..."
Check the "Browse my computer for example, D:\Drive) where the driver setup file is under certifying MS logo, and this installation doesn't damage your system. and select the folder (for driver software" checkbox and click "Let me pick from a list of device drivers on Samsung Monitor homepage. 6. in the "Driver" tab. 7. The certified driver will be posted on my computer". 8. Click "Update Driver..." Using the Software Note This monitor driver is located, and click "OK". 25 Click "Have Disk..."
User Manual (ENGLISH)
Page 28
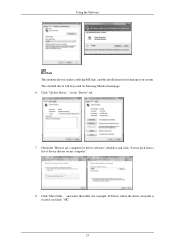
Click "Display" icon and choose the "Settings" tab then click "Advanced...". 4. Click the "Properties" button on the "Monitor" tab and select "Driver" tab. 5. Click "Update Driver..." then click "Next" and then click "Have disk". 27 and select "Install from a list or..." Click "Start" → "Control Panel" then click the "Appearance and Themes" icon. 3. Select "Don't search, I will..." Using the Software 1. then click "Next" button. 6. Insert CD into the CD-ROM drive. 2.
Click "Display" icon and choose the "Settings" tab then click "Advanced...". 4. Click the "Properties" button on the "Monitor" tab and select "Driver" tab. 5. Click "Update Driver..." then click "Next" and then click "Have disk". 27 and select "Install from a list or..." Click "Start" → "Control Panel" then click the "Appearance and Themes" icon. 3. Select "Don't search, I will..." Using the Software 1. then click "Next" button. 6. Insert CD into the CD-ROM drive. 2.
User Manual (ENGLISH)
Page 30
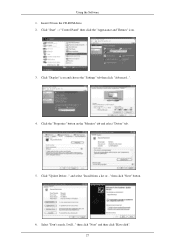
..." button. Choose A:(D:\Driver) then click the "Open" button and then click "OK" button. Click "Start", "Setting", "Control Panel". 2. Choose "Monitor". If you can see "Digital Signature Not Found" on your monitor, follow next steps continually. 5. Microsoft® Windows® Millennium Operating System 1. Select the "Settings" tab and click "Advanced Properties" button. 29 How to install 1. Select the "Settings" tab and click "Advanced Properties" button. 4. Double click the "Display" icon...
..." button. Choose A:(D:\Driver) then click the "Open" button and then click "OK" button. Click "Start", "Setting", "Control Panel". 2. Choose "Monitor". If you can see "Digital Signature Not Found" on your monitor, follow next steps continually. 5. Microsoft® Windows® Millennium Operating System 1. Select the "Settings" tab and click "Advanced Properties" button. 29 How to install 1. Select the "Settings" tab and click "Advanced Properties" button. 4. Double click the "Display" icon...
User Manual (ENGLISH)
Page 31
... "Change" button in the user guide. then click "Next" button. 8. Click the "Have Disk" button. 9. Select "Show all devices" and choose the monitor that you wish to use (Resolution, Number of colors and Vertical frequency) and then click "OK". 4. Press "Enter" at All Display Modes, select the level of your monitor. The third screen is for setting your mouse. 3. The next screen is for selecting a keyboard. 5. Select the "Monitor" tab...
... "Change" button in the user guide. then click "Next" button. 8. Click the "Have Disk" button. 9. Select "Show all devices" and choose the monitor that you wish to use (Resolution, Number of colors and Vertical frequency) and then click "OK". 4. Press "Enter" at All Display Modes, select the level of your monitor. The third screen is for setting your mouse. 3. The next screen is for selecting a keyboard. 5. Select the "Monitor" tab...
User Manual (ENGLISH)
Page 38
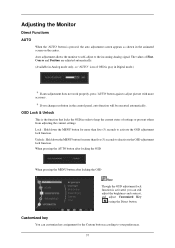
... Analog signal. When pressing the AUTO button after locking the OSD When pressing the MENU button after locking the OSD Note Though the OSD adjustment lock function is activated, you change resolution in the control panel, auto function will be executed automatically. Adjusting the Monitor Direct Functions AUTO When the 'AUTO' button is gray in Digital mode.) If auto adjustment does not work properly, press 'AUTO' button again to adjust picture with more accuracy. Lock : Hold down the MENU button for the Custom button according to keep...
... Analog signal. When pressing the AUTO button after locking the OSD When pressing the MENU button after locking the OSD Note Though the OSD adjustment lock function is activated, you change resolution in the control panel, auto function will be executed automatically. Adjusting the Monitor Direct Functions AUTO When the 'AUTO' button is gray in Digital mode.) If auto adjustment does not work properly, press 'AUTO' button again to adjust picture with more accuracy. Lock : Hold down the MENU button for the Custom button according to keep...

User Manual (ENGLISH)
Page 43
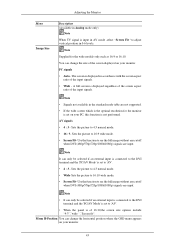
...; Mode 1 : Sets the screen to the default brightness. • Mode 2 : Sets the screen to bright. • Mode 3 : Sets the screen to a black and white screen. • Aqua - SIZE & POSITION Menu H-Position V-Position Description Changes the horizontal position of black and white are displayed. • Green - This applies the green color effect to dim. This applies the aqua color effect to a black and white screen. Changes the vertical position of the screen to the left and right by pressing the and buttons, respectively. (Available in Analog mode only) Note When TV signal...
...; Mode 1 : Sets the screen to the default brightness. • Mode 2 : Sets the screen to bright. • Mode 3 : Sets the screen to a black and white screen. • Aqua - SIZE & POSITION Menu H-Position V-Position Description Changes the horizontal position of black and white are displayed. • Green - This applies the green color effect to dim. This applies the aqua color effect to a black and white screen. Changes the vertical position of the screen to the left and right by pressing the and buttons, respectively. (Available in Analog mode only) Note When TV signal...
User Manual (ENGLISH)
Page 44
... is not performed. Menu H-Position You can change the horizontal position where the OSD menu appears on your monitor. 43 Sets the picture to 16:9 wide mode. • Screen Fit- The screen is displayed in 0-6 levels. Use the function to see the full image without any cutoff when DVI (480p/576p/720p/1080i/1080p) signals are not supported. • If the wide screen which is the optimal resolution for the wide models only such as 16...
... is not performed. Menu H-Position You can change the horizontal position where the OSD menu appears on your monitor. 43 Sets the picture to 16:9 wide mode. • Screen Fit- The screen is displayed in 0-6 levels. Use the function to see the full image without any cutoff when DVI (480p/576p/720p/1080i/1080p) signals are not supported. • If the wide screen which is the optimal resolution for the wide models only such as 16...
User Manual (ENGLISH)
Page 48
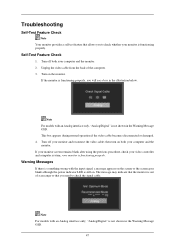
... monitor. Note For models with the input signal, a message appears on the screen or the screen goes blank although the power indicator LED is still on. This box appears during normal operation if the video cable becomes disconnected or damaged. 4. Turn off both your monitor is functioning properly, you will see a box in the illustration below. If the monitor is functioning properly. If your monitor screen...
... monitor. Note For models with the input signal, a message appears on the screen or the screen goes blank although the power indicator LED is still on. This box appears during normal operation if the video cable becomes disconnected or damaged. 4. Turn off both your monitor is functioning properly, you will see a box in the illustration below. If the monitor is functioning properly. If your monitor screen...
User Manual (ENGLISH)
Page 49
... have poor coloring, become noisy, and video mode not supported, etc. In this case, check the computer for Windows ME/XP/2000) and then change the frequency of the monitor. Judging the monitor's working condition. I cannot turn on the Information section or contact your dealer. A: Check the power cord connection and supply. Q: Is the power cord connected properly? Press ' / ' button to another room. A: (Connected using the D-sub cable) Check the signal cable connection. (Connected using the DVI cable) If you do need assistance...
... have poor coloring, become noisy, and video mode not supported, etc. In this case, check the computer for Windows ME/XP/2000) and then change the frequency of the monitor. Judging the monitor's working condition. I cannot turn on the Information section or contact your dealer. A: Check the power cord connection and supply. Q: Is the power cord connected properly? Press ' / ' button to another room. A: (Connected using the D-sub cable) Check the signal cable connection. (Connected using the DVI cable) If you do need assistance...
User Manual (ENGLISH)
Page 50
... video card manual. 49 Q: Can you see the On Screen Display. Is the power indicator on the screen? Q: Connected using the DVI cable? A: Unlock the OSD by referring to activate the monitor and restore the image on the screen. Then press any key on the keyboard again to prevent changes? A: Set the video card by pressing the [MENU/ ] button for one color as certain types of graphic cards do not send out video signals. Q: Is the screen displaying...
... video card manual. 49 Q: Can you see the On Screen Display. Is the power indicator on the screen? Q: Connected using the DVI cable? A: Unlock the OSD by referring to activate the monitor and restore the image on the screen. Then press any key on the keyboard again to prevent changes? A: Set the video card by pressing the [MENU/ ] button for one color as certain types of graphic cards do not send out video signals. Q: Is the screen displaying...
User Manual (ENGLISH)
Page 51
... if the Plug & Play (VESA DDC) function can be adjusted. The screen colors have changed the video card or the driver? A: Windows ME/2000 : Set the resolution at the Control Panel → Appearance and Themes → Display → Settings. Q: Has the video card been set properly? Q: Have you adjusted the resolution or frequency to the Driver Installation Instructions. A: Adjust screen image position and size using the OSD. Q: Have you changed after changing Q: Have the Windows colors been set properly? Readjust Position by referring to Audio. The screen is out...
... if the Plug & Play (VESA DDC) function can be adjusted. The screen colors have changed the video card or the driver? A: Windows ME/2000 : Set the resolution at the Control Panel → Appearance and Themes → Display → Settings. Q: Has the video card been set properly? Q: Have you adjusted the resolution or frequency to the Driver Installation Instructions. A: Adjust screen image position and size using the OSD. Q: Have you changed after changing Q: Have the Windows colors been set properly? Readjust Position by referring to Audio. The screen is out...

User Manual (ENGLISH)
Page 52
... adapter(video) driver and the monitor driver. Check if the power cord and the video cables are properly connected to check the compatible graphic card list provided. If the volume is already installed, remove it to operate normally after installing the program for MagicTune™ MAC. Q: Have you have a problem with the monitor. If a copy of the program is still too low after turning the control to its maximum, check the volume control on PC (VGA) with Window...
... adapter(video) driver and the monitor driver. Check if the power cord and the video cables are properly connected to check the compatible graphic card list provided. If the volume is already installed, remove it to operate normally after installing the program for MagicTune™ MAC. Q: Have you have a problem with the monitor. If a copy of the program is still too low after turning the control to its maximum, check the volume control on PC (VGA) with Window...
User Manual (ENGLISH)
Page 53
... computer. (Refer to the Windows / Computer Manual). A: Disconnect the power cord and then clean the monitor with a soft cloth, using either a cleaning solution or plain water. A: Windows XP: Set the resolution in the Control Panel → Appearance and Themes → Display → Settings. Note Before calling for details. Troubleshooting If you have problems in installing the adapter (video) driver, boot the computer in Safe Mode, remove the Display Adapter in the "Control Panel → System → Device...
... computer. (Refer to the Windows / Computer Manual). A: Disconnect the power cord and then clean the monitor with a soft cloth, using either a cleaning solution or plain water. A: Windows XP: Set the resolution in the Control Panel → Appearance and Themes → Display → Settings. Note Before calling for details. Troubleshooting If you have problems in installing the adapter (video) driver, boot the computer in Safe Mode, remove the Display Adapter in the "Control Panel → System → Device...
User Manual (ENGLISH)
Page 56
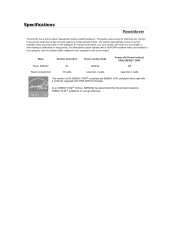
... with VESA DPM functionality. Use the software utility installed on the keyboard. As an ENERGY STAR® Partner, SAMSUNG has determined that this feature. This system saves energy by switching your monitor to set up this product meets the ENERGY STAR® guidelines for a certain amount of time. State Power Indicator Normal Operation On Power saving mode Blinking Power off (Power button) EPA/ENERGY 2000 Off Power Consumption...
... with VESA DPM functionality. Use the software utility installed on the keyboard. As an ENERGY STAR® Partner, SAMSUNG has determined that this feature. This system saves energy by switching your monitor to set up this product meets the ENERGY STAR® guidelines for a certain amount of time. State Power Indicator Normal Operation On Power saving mode Blinking Power off (Power button) EPA/ENERGY 2000 Off Power Consumption...
Brochure
Page 2
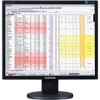
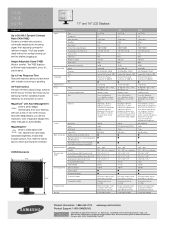
... images. Height-Adjustable Stand (743E) Work in comfort. Now with rich, natural color and easily selectable brightness modes that include Custom, Text, Internet, Game, Sports, Movie and Dynamic Contrast. 943N Dimensions 16.0" 16.3" Specifications Display Video Input Signal Compatibilty Type Viewable Size Native Resolution Pixel Pitch Aspect Ratio Contrast Ratio (Typical/Dynamic) Viewing Angle (Horizontal/Vertical) Response Time Light Source Brightness (Typical) Panel Surface Maximum Color Supported Analog Frequency Sync PC Input Connectors Power Mac Voltage Controls Consumption...
... images. Height-Adjustable Stand (743E) Work in comfort. Now with rich, natural color and easily selectable brightness modes that include Custom, Text, Internet, Game, Sports, Movie and Dynamic Contrast. 943N Dimensions 16.0" 16.3" Specifications Display Video Input Signal Compatibilty Type Viewable Size Native Resolution Pixel Pitch Aspect Ratio Contrast Ratio (Typical/Dynamic) Viewing Angle (Horizontal/Vertical) Response Time Light Source Brightness (Typical) Panel Surface Maximum Color Supported Analog Frequency Sync PC Input Connectors Power Mac Voltage Controls Consumption...


