User Manual (ENGLISH)
Page 2
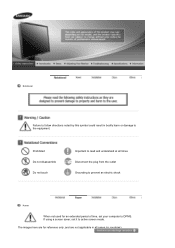
Prohibited Do not disassemble Do not touch Important to read and understand at all cases (or countries). The images here are not applicable in bodily harm or damage to the equipment. Notational Failure to follow directions noted by this symbol could result in all times Disconnect the plug from the outlet Grounding to prevent an electric shock Power When not used for reference only, and are for an extended period of time, set your computer to DPMS. If using a screen saver, set it to active screen mode.
Prohibited Do not disassemble Do not touch Important to read and understand at all cases (or countries). The images here are not applicable in bodily harm or damage to the equipment. Notational Failure to follow directions noted by this symbol could result in all times Disconnect the plug from the outlet Grounding to prevent an electric shock Power When not used for reference only, and are for an extended period of time, set your computer to DPMS. If using a screen saver, set it to active screen mode.
User Manual (ENGLISH)
Page 5
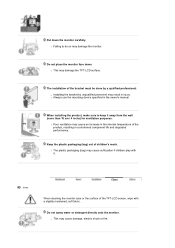
... cause damage, electric shock or fire. The installation of children's reach. z Always use the mounting device specified in the internal temperature of the TFT-LCD screen, wipe with it away from the wall (more than 10 cm / 4 inchs) for ventilation purposes. Keep the plastic packaging (bag) out of the bracket must...
... cause damage, electric shock or fire. The installation of children's reach. z Always use the mounting device specified in the internal temperature of the TFT-LCD screen, wipe with it away from the wall (more than 10 cm / 4 inchs) for ventilation purposes. Keep the plastic packaging (bag) out of the bracket must...

User Manual (ENGLISH)
Page 8
... product on an unstable, uneven surface or a location prone to your eyesight. Place the product out of time, keep the product unplugged. When viewing a fixed screen for an extended period of children's reach, as paper or matches into the vent, headphone port or AV ports. Make sure that all cables, including...
... product on an unstable, uneven surface or a location prone to your eyesight. Place the product out of time, keep the product unplugged. When viewing a fixed screen for an extended period of children's reach, as paper or matches into the vent, headphone port or AV ports. Make sure that all cables, including...
User Manual (ENGLISH)
Page 9
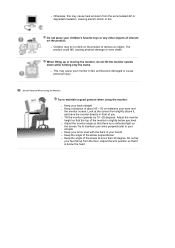
... monitor. z This may cause your arms perpendicular to retrieve an object. z Keep your arms level with the back of your eyes and the monitor screen. z Keep the angle of interest on the product. z Otherwise, this may cause heat emission from the floor. When lifting up from the accumulated... dirt or degraded insulation, causing electric shock or fire. z Keep a distance of the knees at the screen from slightly above it is below eye level. z Adjust the monitor angle so that there is slightly below the heart. z Keep the angle of...
... monitor. z This may cause your arms perpendicular to retrieve an object. z Keep your arms level with the back of your eyes and the monitor screen. z Keep the angle of interest on the product. z Otherwise, this may cause heat emission from the floor. When lifting up from the accumulated... dirt or degraded insulation, causing electric shock or fire. z Keep a distance of the knees at the screen from slightly above it is below eye level. z Adjust the monitor angle so that there is slightly below the heart. z Keep the angle of...

User Manual (ENGLISH)
Page 12
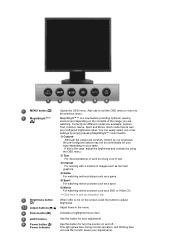
... / Push the ' ', then selects the video signal while the OSD is off. (When the source button is not on the contents of the screen displaying the current mode -- MENU button [ ] MagicBright™™ [] Opens the OSD menu. Currently six different modes are watching. Adjust buttons ... change the input mode, a message appears in the menu. MagicBright™™ is a new feature providing optimum viewing environment depending on the screen, push the button to adjust [] brightness. analog or digital input signal.) Note : If you select the digital mode, you are available: ...
... / Push the ' ', then selects the video signal while the OSD is off. (When the source button is not on the contents of the screen displaying the current mode -- MENU button [ ] MagicBright™™ [] Opens the OSD menu. Currently six different modes are watching. Adjust buttons ... change the input mode, a message appears in the menu. MagicBright™™ is a new feature providing optimum viewing environment depending on the screen, push the button to adjust [] brightness. analog or digital input signal.) Note : If you select the digital mode, you are available: ...

User Manual (ENGLISH)
Page 16
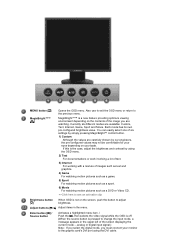
... be comfortable for auto adjustment. analog or digital input signal.) Note : If you select the digital mode, you must connect your eyes depending on the screen, push the button to change the input mode, a message appears in the menu. Rear Use this button for turn your monitor OFF when it unattended... the graphic card's DVI port using the OSD menu. 2) Text For documentations or work involving a lot of text. 3) Internet For working with a mixture of the screen displaying the current mode --
... be comfortable for auto adjustment. analog or digital input signal.) Note : If you select the digital mode, you must connect your eyes depending on the screen, push the button to change the input mode, a message appears in the menu. Rear Use this button for turn your monitor OFF when it unattended... the graphic card's DVI port using the OSD menu. 2) Text For documentations or work involving a lot of text. 3) Internet For working with a mixture of the screen displaying the current mode --
User Manual (ENGLISH)
Page 20
... is the case, adjust the brightness and contrast by our engineers, the pre-configured values may not be comfortable for your eyes depending on the screen, push the button to the previous menu. AUTO button Use this button for auto adjustment. Each mode has its own pre-configured brightness value. Currently...
... is the case, adjust the brightness and contrast by our engineers, the pre-configured values may not be comfortable for your eyes depending on the screen, push the button to the previous menu. AUTO button Use this button for auto adjustment. Each mode has its own pre-configured brightness value. Currently...
User Manual (ENGLISH)
Page 24
... here to see an animation clip Brightness button [] Adjust buttons [ ] Enter button [ ] When OSD is not needed, or when leaving it is not on the screen, push the button to adjust brightness. Activates a highlighted menu item. AUTO button Power button [ ]/ Power indicator Use this button for further information regarding power saving...
... here to see an animation clip Brightness button [] Adjust buttons [ ] Enter button [ ] When OSD is not needed, or when leaving it is not on the screen, push the button to adjust brightness. Activates a highlighted menu item. AUTO button Power button [ ]/ Power indicator Use this button for further information regarding power saving...

User Manual (ENGLISH)
Page 27
Currently six different modes are carefully chosen by our engineers, the pre-configured values may not be comfortable for your eyes depending on the screen, push the button to the previous menu. Each mode has its own pre-configured brightness value. Adjust buttons [ ] Adjust items in the menu. Also use ...
Currently six different modes are carefully chosen by our engineers, the pre-configured values may not be comfortable for your eyes depending on the screen, push the button to the previous menu. Each mode has its own pre-configured brightness value. Adjust buttons [ ] Adjust items in the menu. Also use ...

User Manual (ENGLISH)
Page 28
... unattended for long periods. The Kensington lock is a device used to physically fix the system to the RGB IN port on the back of the screen displaying the current mode -- See PowerSaver described in a public place. (The locking device has to the graphic card's DVI port using a locking device, contact the...
... unattended for long periods. The Kensington lock is a device used to physically fix the system to the RGB IN port on the back of the screen displaying the current mode -- See PowerSaver described in a public place. (The locking device has to the graphic card's DVI port using a locking device, contact the...
User Manual (ENGLISH)
Page 31
... button Activates a highlighted menu item. / Push the ' ', then selects the video signal while the OSD is off. (When the source button is not on the screen, push the button to change the input mode, a message appears in the menu. If this is a new feature providing optimum viewing environment depending on your..., adjust the brightness and contrast by our engineers, the pre-configured values may not be comfortable for your eyes depending on the contents of the screen displaying the current mode --
... button Activates a highlighted menu item. / Push the ' ', then selects the video signal while the OSD is off. (When the source button is not on the screen, push the button to change the input mode, a message appears in the menu. If this is a new feature providing optimum viewing environment depending on your..., adjust the brightness and contrast by our engineers, the pre-configured values may not be comfortable for your eyes depending on the contents of the screen displaying the current mode --
User Manual (ENGLISH)
Page 35
... when it unattended for long periods. Adjust buttons [ ] Adjust items in the upper left of the screen displaying the current mode -- the pre-configured values may not be comfortable for your eyes depending on the screen, push the button to adjust [] brightness. Rear analog or digital input signal.) Note : If you select...
... when it unattended for long periods. Adjust buttons [ ] Adjust items in the upper left of the screen displaying the current mode -- the pre-configured values may not be comfortable for your eyes depending on the screen, push the button to adjust [] brightness. Rear analog or digital input signal.) Note : If you select...
User Manual (ENGLISH)
Page 39
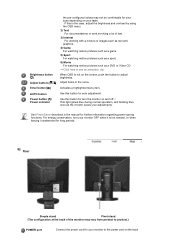
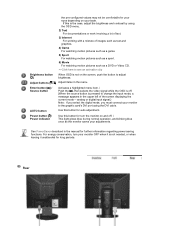
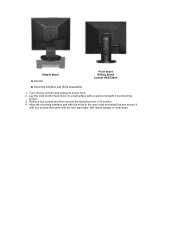
Lay the LCD monitor face-down on a flat surface with the arm-type base, wall mount hanger or other base. Turn off your monitor and unplug its power cord. 2. Align the mounting interface pad with the holes in the rear cover mounting Pad and secure it with four screws that came with a cushion beneath it to protect the screen. 3. Simple stand A. Remove four screws and then remove the stand from the LCD monitor. 4. Monitor Pivot stand Sliding Stand Lowest HAS Stand B. Mounting interface pad (Sold separately) 1.
Lay the LCD monitor face-down on a flat surface with the arm-type base, wall mount hanger or other base. Turn off your monitor and unplug its power cord. 2. Align the mounting interface pad with the holes in the rear cover mounting Pad and secure it with four screws that came with a cushion beneath it to protect the screen. 3. Simple stand A. Remove four screws and then remove the stand from the LCD monitor. 4. Monitor Pivot stand Sliding Stand Lowest HAS Stand B. Mounting interface pad (Sold separately) 1.
User Manual (ENGLISH)
Page 42
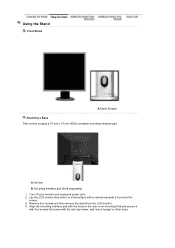
... pad with the holes in the rear cover mounting Pad and secure it with four screws that came with a cushion beneath it to protect the screen. 3. Turn off your monitor and unplug its power cord. 2. Lay the LCD monitor face-down on a flat surface with the arm-type base, wall mount...
... pad with the holes in the rear cover mounting Pad and secure it with four screws that came with a cushion beneath it to protect the screen. 3. Turn off your monitor and unplug its power cord. 2. Lay the LCD monitor face-down on a flat surface with the arm-type base, wall mount...
User Manual (ENGLISH)
Page 44
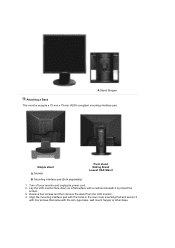
... pad with the holes in the rear cover mounting Pad and secure it with four screws that came with a cushion beneath it to protect the screen. 3. Monitor B. Using the Stand Pivot Stand A.Stand Stopper Attaching a Base This monitor accepts a 75 mm x 75 mm VESA-compliant mounting interface pad. Remove four screws...
... pad with the holes in the rear cover mounting Pad and secure it with four screws that came with a cushion beneath it to protect the screen. 3. Monitor B. Using the Stand Pivot Stand A.Stand Stopper Attaching a Base This monitor accepts a 75 mm x 75 mm VESA-compliant mounting interface pad. Remove four screws...
User Manual (ENGLISH)
Page 47
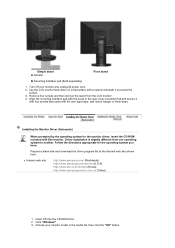
... screws and then remove the stand from one operating system to protect the screen. 3. Prepare a blank disk and download the driver program file at the Internet web site shown here. z Internet web site : http://www.samsung.com/ (Worldwide) http://www.samsung.com/monitor (U.S.A) http://www.sec.co.kr/monitor (Korea) http://www.samsungmonitor...
... screws and then remove the stand from one operating system to protect the screen. 3. Prepare a blank disk and download the driver program file at the Internet web site shown here. z Internet web site : http://www.samsung.com/ (Worldwide) http://www.samsung.com/monitor (U.S.A) http://www.sec.co.kr/monitor (Korea) http://www.samsungmonitor...
User Manual (ENGLISH)
Page 51
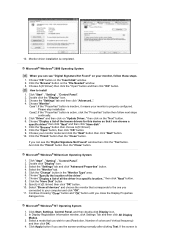
...Type" area. 6. Click Apply button if you can see the "Digital Signature Not Found" window then click the "Yes"button. If the screen is active, click the "Properties" button then follow these steps. 1. Microsoft® Windows® 2000 Operating System When you see "Digital ... "Start" , "Setting" , "Control Panel". 2. Select the "Monitor" tab. 5. Continue choosing "Close" button and "OK" button until you can see the screen working normally after clicking Test. Click the "Browse" button on the "Next" button. 6. Choose "Display a list of the known drivers for this device so that...
...Type" area. 6. Click Apply button if you can see the "Digital Signature Not Found" window then click the "Yes"button. If the screen is active, click the "Properties" button then follow these steps. 1. Microsoft® Windows® 2000 Operating System When you see "Digital ... "Start" , "Setting" , "Control Panel". 2. Select the "Monitor" tab. 5. Continue choosing "Close" button and "OK" button until you can see the screen working normally after clicking Test. Click the "Browse" button on the "Next" button. 6. Choose "Display a list of the known drivers for this device so that...

User Manual (ENGLISH)
Page 52
... not the same as the printed or scanned images. This information will appear. This is no Mode at the first and the second screen after setting other images scanned by referring to the Preset Timing Modes in using a computer is for setting your monitor. Set a mouse for... Samsung monitors and ensures that the color of resolution and vertical frequency by a scanner or a digital camera are the same as those shown on Natural...
... not the same as the printed or scanned images. This information will appear. This is no Mode at the first and the second screen after setting other images scanned by referring to the Preset Timing Modes in using a computer is for setting your monitor. Set a mouse for... Samsung monitors and ensures that the color of resolution and vertical frequency by a scanner or a digital camera are the same as those shown on Natural...
User Manual (ENGLISH)
Page 54
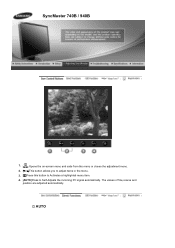
The values of fine,coarse and position are adjusted automatically. AUTO SyncMaster 740B / 940B 1. [ ]Opens the on-screen menu and exits from the menu or closes the adjustment menu. 2. [ ]This button allows you to adjust items in the menu. 3. [ ]Press this button to Activates a highlighted menu item. 4. [AUTO]Press to Self-Adjusts the incoming PC signal automatically.
The values of fine,coarse and position are adjusted automatically. AUTO SyncMaster 740B / 940B 1. [ ]Opens the on-screen menu and exits from the menu or closes the adjustment menu. 2. [ ]This button allows you to adjust items in the menu. 3. [ ]Press this button to Activates a highlighted menu item. 4. [AUTO]Press to Self-Adjusts the incoming PC signal automatically.
User Manual (ENGLISH)
Page 55
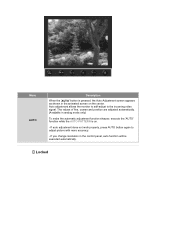
... again to the incoming video signal. Menu AUTO Description When the 'AUTO' button is on the center. Locked If you change resolution in the animated screen on . - The values of fine, coarse and position are adjusted automatically. (Available in analog mode only) To make the automatic adjustment function sharper, execute the...
... again to the incoming video signal. Menu AUTO Description When the 'AUTO' button is on the center. Locked If you change resolution in the animated screen on . - The values of fine, coarse and position are adjusted automatically. (Available in analog mode only) To make the automatic adjustment function sharper, execute the...


