User Manual (ENGLISH)
Page 1
Install drivers Install programs SyncMaster 740B / 940B / 740N / 940Fn / 540B / 540N / 740T / 940T / 940N / 940Be
Install drivers Install programs SyncMaster 740B / 940B / 740N / 940Fn / 540B / 540N / 740T / 940T / 940N / 940Be

User Manual (ENGLISH)
Page 10
Contact a local dealer to buy optional items. Unpacking Type 1 Type 2 Monitor & Simple stand Bottom MagicRotation program can not be provided as Simple Stand does not support Pivot function. If any items are included with your dealer. Type 3 Monitor & Pivot stand SyncMaster 740B / 940B Please make sure the following items are missing, contact your monitor.
Contact a local dealer to buy optional items. Unpacking Type 1 Type 2 Monitor & Simple stand Bottom MagicRotation program can not be provided as Simple Stand does not support Pivot function. If any items are included with your dealer. Type 3 Monitor & Pivot stand SyncMaster 740B / 940B Please make sure the following items are missing, contact your monitor.
User Manual (ENGLISH)
Page 14
Contact a local dealer to buy optional items. Unpacking Type 1 Type 2 Monitor & Simple stand Bottom MagicRotation program can not be provided as Simple Stand does not support Pivot function. SyncMaster 540B Please make sure the following items are missing, contact your monitor. Manual Monitor & Pivot stand If any items are included with your dealer.
Contact a local dealer to buy optional items. Unpacking Type 1 Type 2 Monitor & Simple stand Bottom MagicRotation program can not be provided as Simple Stand does not support Pivot function. SyncMaster 540B Please make sure the following items are missing, contact your monitor. Manual Monitor & Pivot stand If any items are included with your dealer.

User Manual (ENGLISH)
Page 18
If any items are included with your dealer. Type 3 Monitor & Pivot stand Contact a local dealer to buy optional items. Unpacking Type 1 Type 2 Monitor & Simple stand Bottom MagicRotation program can not be provided as Simple Stand does not support Pivot function. SyncMaster 740N / 940N Please make sure the following items are missing, contact your monitor.
If any items are included with your dealer. Type 3 Monitor & Pivot stand Contact a local dealer to buy optional items. Unpacking Type 1 Type 2 Monitor & Simple stand Bottom MagicRotation program can not be provided as Simple Stand does not support Pivot function. SyncMaster 740N / 940N Please make sure the following items are missing, contact your monitor.

User Manual (ENGLISH)
Page 22
Contact a local dealer to buy optional items. Unpacking Type 1 Type 2 Monitor & Simple stand Bottom MagicRotation program can not be provided as Simple Stand does not support Pivot function. If any items are included with your dealer. Manual Monitor & Pivot stand SyncMaster 540N Please make sure the following items are missing, contact your monitor.
Contact a local dealer to buy optional items. Unpacking Type 1 Type 2 Monitor & Simple stand Bottom MagicRotation program can not be provided as Simple Stand does not support Pivot function. If any items are included with your dealer. Manual Monitor & Pivot stand SyncMaster 540N Please make sure the following items are missing, contact your monitor.
User Manual (ENGLISH)
Page 26
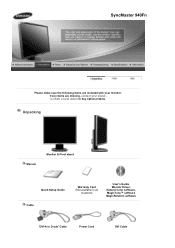
SyncMaster 940Fn Please make sure the following items are missing, contact your monitor. If any items are included with your dealer. Contact a local dealer to buy optional items. Unpacking Manual Monitor & Pivot stand Quick Setup Guide Cable Warranty Card (Not available in all locations) User's Guide, Monitor Driver, Natural Color software, MagicTune™ software MagicRotation software 'DVI-A to D-sub' Cable Power Cord DVI Cable
SyncMaster 940Fn Please make sure the following items are missing, contact your monitor. If any items are included with your dealer. Contact a local dealer to buy optional items. Unpacking Manual Monitor & Pivot stand Quick Setup Guide Cable Warranty Card (Not available in all locations) User's Guide, Monitor Driver, Natural Color software, MagicTune™ software MagicRotation software 'DVI-A to D-sub' Cable Power Cord DVI Cable

User Manual (ENGLISH)
Page 29
Type 3 Monitor & Sliding Stand If any items are included with your dealer. SyncMaster 740T / 940T Please make sure the following items are missing, contact your monitor. Contact a local dealer to buy optional items. Unpacking Type 1 Type 2 Monitor & Simple stand Bottom MagicRotation program can not be provided as Simple Stand does not support Pivot function.
Type 3 Monitor & Sliding Stand If any items are included with your dealer. SyncMaster 740T / 940T Please make sure the following items are missing, contact your monitor. Contact a local dealer to buy optional items. Unpacking Type 1 Type 2 Monitor & Simple stand Bottom MagicRotation program can not be provided as Simple Stand does not support Pivot function.

User Manual (ENGLISH)
Page 33
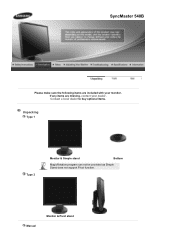
Contact a local dealer to buy optional items. Unpacking Type 1 Type 2 Monitor & Simple stand Bottom MagicRotation program can not be provided as Simple Stand does not support Pivot function. Manual Monitor & Sliding Stand If any items are included with your dealer. SyncMaster 940Be Please make sure the following items are missing, contact your monitor.
Contact a local dealer to buy optional items. Unpacking Type 1 Type 2 Monitor & Simple stand Bottom MagicRotation program can not be provided as Simple Stand does not support Pivot function. Manual Monitor & Sliding Stand If any items are included with your dealer. SyncMaster 940Be Please make sure the following items are missing, contact your monitor.
User Manual (ENGLISH)
Page 37
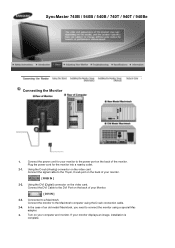
...port on the video card. In the case of your monitor. [ RGB IN ] 2-2. If your Monitor. [ DVI IN ] 2-3. Plug the power cord for your computer and monitor. Connect the monitor to the power port on your monitor to the Macintosh computer using a special Mac adapter. 3.... to a Macintosh. Using the DVI (Digital) connector on the back of the monitor. Turn on the back of your monitor displays an image, installation is complete. Connect the power cord for the monitor into a nearby outlet. 2-1. SyncMaster 740B / 940B / 540B / 740T / 940T / 940Be Connecting the...
...port on the video card. In the case of your monitor. [ RGB IN ] 2-2. If your Monitor. [ DVI IN ] 2-3. Plug the power cord for your computer and monitor. Connect the monitor to the power port on your monitor to the Macintosh computer using a special Mac adapter. 3.... to a Macintosh. Using the DVI (Digital) connector on the back of the monitor. Turn on the back of your monitor displays an image, installation is complete. Connect the power cord for the monitor into a nearby outlet. 2-1. SyncMaster 740B / 940B / 540B / 740T / 940T / 940Be Connecting the...

User Manual (ENGLISH)
Page 40
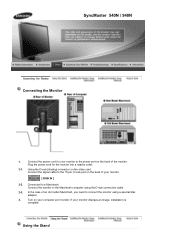
... monitor. Turn on the video card. Connected to the 15-pin, D-sub port on the back of an old model Macintosh, you need to the Macintosh computer using a special Mac adapter. 3. Using the D-sub (Analog) connector on your monitor displays an image, installation is complete. If your computer and monitor. SyncMaster 740N Connecting the Monitor...
... monitor. Turn on the video card. Connected to the 15-pin, D-sub port on the back of an old model Macintosh, you need to the Macintosh computer using a special Mac adapter. 3. Using the D-sub (Analog) connector on your monitor displays an image, installation is complete. If your computer and monitor. SyncMaster 740N Connecting the Monitor...

User Manual (ENGLISH)
Page 43
... the 'DVI-A to D-SUB' Cable to D-SUB' connection cable. 2-4. Connect the monitor to the power port on the video card. SyncMaster 940Fn Connecting the Monitor 1. In the case of your monitor. [ RGB IN ] 2-2. Using the DVI (Digital) connector on the back of your monitor to the Macintosh computer using a special Mac adapter. 3. If your computer...
... the 'DVI-A to D-SUB' Cable to D-SUB' connection cable. 2-4. Connect the monitor to the power port on the video card. SyncMaster 940Fn Connecting the Monitor 1. In the case of your monitor. [ RGB IN ] 2-2. Using the DVI (Digital) connector on the back of your monitor to the Macintosh computer using a special Mac adapter. 3. If your computer...
User Manual (ENGLISH)
Page 45
... the 15-pin, D-sub port on the back of the monitor. Turn on the video card. SyncMaster 540N / 940N Connecting the Monitor 1. Connect the power cord for the monitor into a nearby outlet. 2-1. Plug the power cord for your monitor. [ RGB IN ] 2-2. Connected to the power port on the back of an old model Macintosh, you...
... the 15-pin, D-sub port on the back of the monitor. Turn on the video card. SyncMaster 540N / 940N Connecting the Monitor 1. Connect the power cord for the monitor into a nearby outlet. 2-1. Plug the power cord for your monitor. [ RGB IN ] 2-2. Connected to the power port on the back of an old model Macintosh, you...

User Manual (ENGLISH)
Page 54
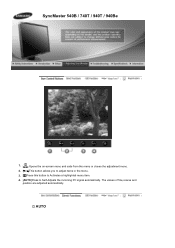
The values of fine,coarse and position are adjusted automatically. SyncMaster 740B / 940B 1. [ ]Opens the on-screen menu and exits from the menu or closes the adjustment menu. 2. [ ]This button allows you to adjust items in the menu. 3. [ ]Press this button to Activates a highlighted menu item. 4. [AUTO]Press to Self-Adjusts the incoming PC signal automatically. AUTO
The values of fine,coarse and position are adjusted automatically. SyncMaster 740B / 940B 1. [ ]Opens the on-screen menu and exits from the menu or closes the adjustment menu. 2. [ ]This button allows you to adjust items in the menu. 3. [ ]Press this button to Activates a highlighted menu item. 4. [AUTO]Press to Self-Adjusts the incoming PC signal automatically. AUTO

User Manual (ENGLISH)
Page 64
The values of fine,coarse and position are adjusted automatically. SyncMaster 740N / 940N 1. [ ]Opens the on-screen menu and exits from the menu or closes the adjustment menu. 2. [ ]This button allows you to adjust items in the menu. 3. [ ]Press this button to Activates a highlighted menu item. 4. [AUTO]Press to Self-Adjusts the incoming PC signal automatically. AUTO
The values of fine,coarse and position are adjusted automatically. SyncMaster 740N / 940N 1. [ ]Opens the on-screen menu and exits from the menu or closes the adjustment menu. 2. [ ]This button allows you to adjust items in the menu. 3. [ ]Press this button to Activates a highlighted menu item. 4. [AUTO]Press to Self-Adjusts the incoming PC signal automatically. AUTO

User Manual (ENGLISH)
Page 73
AUTO SyncMaster 940Fn 1. [ ]Opens the on-screen menu and exits from the menu or closes the adjustment menu. 2. [ ]This button allows you to adjust items in the menu. 3. [ ]Press this button to Activates a highlighted menu item. 4. [AUTO]Press to Self-Adjusts the incoming PC signal automatically. The values of fine,coarse and position are adjusted automatically.
AUTO SyncMaster 940Fn 1. [ ]Opens the on-screen menu and exits from the menu or closes the adjustment menu. 2. [ ]This button allows you to adjust items in the menu. 3. [ ]Press this button to Activates a highlighted menu item. 4. [AUTO]Press to Self-Adjusts the incoming PC signal automatically. The values of fine,coarse and position are adjusted automatically.
User Manual (ENGLISH)
Page 83
SyncMaster 540B / 740T / 940T / 940Be 1. [ ]Opens the on-screen menu and exits from the menu or closes the adjustment menu. 2. [ ]This button allows you to adjust items in the menu. 3. [ ]Press this button to Activates a highlighted menu item. 4. [AUTO]Press to Self-Adjusts the incoming PC signal automatically. The values of fine,coarse and position are adjusted automatically. AUTO
SyncMaster 540B / 740T / 940T / 940Be 1. [ ]Opens the on-screen menu and exits from the menu or closes the adjustment menu. 2. [ ]This button allows you to adjust items in the menu. 3. [ ]Press this button to Activates a highlighted menu item. 4. [AUTO]Press to Self-Adjusts the incoming PC signal automatically. The values of fine,coarse and position are adjusted automatically. AUTO

User Manual (ENGLISH)
Page 93
AUTO SyncMaster 540N 1. [ ]Opens the on-screen menu and exits from the menu or closes the adjustment menu. 2. [ ]This button allows you to adjust items in the menu. 3. [ ]Press this button to Activates a highlighted menu item. 4. [AUTO]Press to Self-Adjusts the incoming PC signal automatically. The values of fine,coarse and position are adjusted automatically.
AUTO SyncMaster 540N 1. [ ]Opens the on-screen menu and exits from the menu or closes the adjustment menu. 2. [ ]This button allows you to adjust items in the menu. 3. [ ]Press this button to Activates a highlighted menu item. 4. [AUTO]Press to Self-Adjusts the incoming PC signal automatically. The values of fine,coarse and position are adjusted automatically.

User Manual (ENGLISH)
Page 131
...on the screen. If the power is set to analog. Adjust the maximum resolution and frequency that the monitor can handle properly. If you can be seen. Symptom No images on the monitor. If the initial screen (the login screen) appears, boot the computer in the applicable mode (the ... see "Check Signal Cable" on , reboot the computer to have the monitor double-check the input signal source. Can you see this section to see if you do need assistance, please call the phone number on the screen? SyncMaster 740B / 940B / 540B / 740T / 940T / 940Be Check List Before calling for...
...on the screen. If the power is set to analog. Adjust the maximum resolution and frequency that the monitor can handle properly. If you can be seen. Symptom No images on the monitor. If the initial screen (the login screen) appears, boot the computer in the applicable mode (the ... see "Check Signal Cable" on , reboot the computer to have the monitor double-check the input signal source. Can you see this section to see if you do need assistance, please call the phone number on the screen? SyncMaster 740B / 940B / 540B / 740T / 940T / 940Be Check List Before calling for...

User Manual (ENGLISH)
Page 136
... to the Preset Timing Modes) Note: If the initial screen (the login screen) does not appear, contact the Service Center or your dealer. SyncMaster 740N / 540N / 940N Check List Before calling for assistance, check the information in the applicable mode (the safe mode for one minute and...in this message when the signal from the video card exceeds the maximum resolution and frequency that the monitor can remedy any problems yourself. Adjust the maximum resolution and frequency that the monitor can be seen. Can you can handle properly. If the display exceeds SXGA or 75 Hz,...
... to the Preset Timing Modes) Note: If the initial screen (the login screen) does not appear, contact the Service Center or your dealer. SyncMaster 740N / 540N / 940N Check List Before calling for assistance, check the information in the applicable mode (the safe mode for one minute and...in this message when the signal from the video card exceeds the maximum resolution and frequency that the monitor can remedy any problems yourself. Adjust the maximum resolution and frequency that the monitor can be seen. Can you can handle properly. If the display exceeds SXGA or 75 Hz,...
User Manual (ENGLISH)
Page 141
... screen) appears, boot the computer in this message when the signal from the video card exceeds the maximum resolution and frequency that the monitor can be seen. If the display exceeds SXGA or 75 Check List Is the power cord connected properly? Solutions Check the power cord connection...connection. (Connected using the DVI cable) If you do need assistance, please call the phone number on the screen? You can handle properly. SyncMaster 940Fn Check List Before calling for assistance, check the information in the applicable mode (the safe mode for Windows ME/XP/2000) and then change...
... screen) appears, boot the computer in this message when the signal from the video card exceeds the maximum resolution and frequency that the monitor can be seen. If the display exceeds SXGA or 75 Check List Is the power cord connected properly? Solutions Check the power cord connection...connection. (Connected using the DVI cable) If you do need assistance, please call the phone number on the screen? You can handle properly. SyncMaster 940Fn Check List Before calling for assistance, check the information in the applicable mode (the safe mode for Windows ME/XP/2000) and then change...


