User Manual (user Manual) (ver.1.0) (English)
Page 12
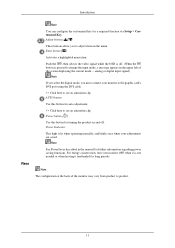
... the screen displaying the current mode -- Power Indicator This light is not needed or when leaving it is lit when operating normally, and blinks once when your monitor to the graphic card's DVI port using the DVI cable. >> Click here to see an animation clip AUTO button Use this button for auto adjustment. >> Click here to see an animation clip Power button [ ] Use this button for long periods. analog or digital input signal.) Note If you select the digital mode...
... the screen displaying the current mode -- Power Indicator This light is not needed or when leaving it is lit when operating normally, and blinks once when your monitor to the graphic card's DVI port using the DVI cable. >> Click here to see an animation clip AUTO button Use this button for auto adjustment. >> Click here to see an animation clip Power button [ ] Use this button for long periods. analog or digital input signal.) Note If you select the digital mode...
User Manual (user Manual) (ver.1.0) (English)
Page 13
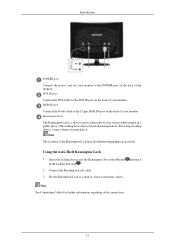
..., RGB IN port on its model. Note The location of the monitor. Connect the Kensington Lock cable. 3. Note See Connecting Cables for your monitor to the POWER port on the back of your monitor. DVI IN port Connect the DVI Cable to a desk or a heavy stationary object. Insert the locking device into the Kensington slot on the Monitor and turn it in the locking direction . 2. Introduction POWER port Connect the power cord for further information regarding cable connections. 12 Using...
..., RGB IN port on its model. Note The location of the monitor. Connect the Kensington Lock cable. 3. Note See Connecting Cables for your monitor to the POWER port on the back of your monitor. DVI IN port Connect the DVI Cable to a desk or a heavy stationary object. Insert the locking device into the Kensington slot on the Monitor and turn it in the locking direction . 2. Introduction POWER port Connect the power cord for further information regarding cable connections. 12 Using...
User Manual (user Manual) (ver.1.0) (English)
Page 15
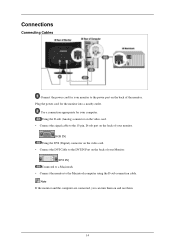
... (Analog) connector on the video card. • Connect the signal cable to the 15-pin, D-sub port on the back of your monitor. [RGB IN] Using the DVI (Digital) connector on the video card. • Connect the DVI Cable to the DVI IN Port on the back of the monitor. Connections Connecting Cables Connect the power cord for your Monitor. [DVI IN] Connected to a Macintosh. • Connect the monitor to the Macintosh computer using the D-sub connection cable. Use a connection appropriate for the monitor into a nearby outlet. Plug the power cord for...
... (Analog) connector on the video card. • Connect the signal cable to the 15-pin, D-sub port on the back of your monitor. [RGB IN] Using the DVI (Digital) connector on the video card. • Connect the DVI Cable to the DVI IN Port on the back of the monitor. Connections Connecting Cables Connect the power cord for your Monitor. [DVI IN] Connected to a Macintosh. • Connect the monitor to the Macintosh computer using the D-sub connection cable. Use a connection appropriate for the monitor into a nearby outlet. Plug the power cord for...
User Manual (user Manual) (ver.1.0) (English)
Page 16
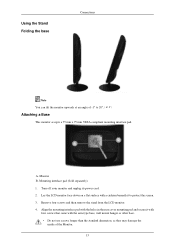
... LCD monitor face-down on a flat surface with the arm-type base, wall mount hanger or other base. • Do not use screws longer than the standard dimension, as they may damage the inside of -1° to protect the screen. 3. Remove four screws and then remove the stand from the LCD monitor. 4. Using the Stand Folding the base Connections Note You can tilt the monitor upwards at an angle of the Monitor. 15 A. Mounting...
... LCD monitor face-down on a flat surface with the arm-type base, wall mount hanger or other base. • Do not use screws longer than the standard dimension, as they may damage the inside of -1° to protect the screen. 3. Remove four screws and then remove the stand from the LCD monitor. 4. Using the Stand Folding the base Connections Note You can tilt the monitor upwards at an angle of the Monitor. 15 A. Mounting...
User Manual (user Manual) (ver.1.0) (English)
Page 18
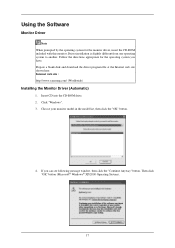
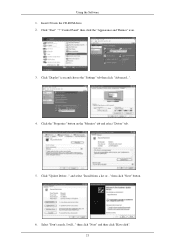
... shown here. Choose your monitor model in the model list, then click the "OK" button. 4. Follow the directions appropriate for the monitor driver, insert the CD-ROM included with this monitor. Then click "OK" button (Microsoft® Windows® XP/2000 Operating System). 17 Driver installation is slightly different from one operating system to another. Click "Windows". 3. Using the Software Monitor Driver Note When prompted by...
... shown here. Choose your monitor model in the model list, then click the "OK" button. 4. Follow the directions appropriate for the monitor driver, insert the CD-ROM included with this monitor. Then click "OK" button (Microsoft® Windows® XP/2000 Operating System). 17 Driver installation is slightly different from one operating system to another. Click "Windows". 3. Using the Software Monitor Driver Note When prompted by...
User Manual (user Manual) (ver.1.0) (English)
Page 19
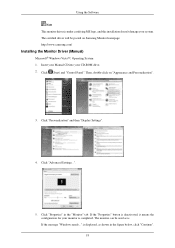
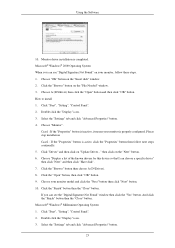
... "Display Settings". 4. The monitor can be posted on "Appearance and Personalization". 3. If the message "Windows needs..." http://www.samsung.com/ Installing the Monitor Driver (Manual) Microsoft® Windows Vista™, Operating System 1. Click "Advanced Settings...". 5. Click "Properties" in the figure below, click "Continue". 18 is . Click (Start) and "Control Panel". Using the Software Note This monitor driver is completed. Insert your Manual CD into your system. If the "Properties" button is...
... "Display Settings". 4. The monitor can be posted on "Appearance and Personalization". 3. If the message "Windows needs..." http://www.samsung.com/ Installing the Monitor Driver (Manual) Microsoft® Windows Vista™, Operating System 1. Click "Advanced Settings...". 5. Click "Properties" in the figure below, click "Continue". 18 is . Click (Start) and "Control Panel". Using the Software Note This monitor driver is completed. Insert your Manual CD into your system. If the "Properties" button is...
User Manual (user Manual) (ver.1.0) (English)
Page 20
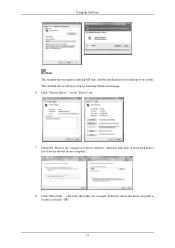
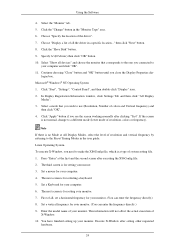
Check the "Browse my computer for example, D:\Drive) where the driver setup file is under certifying MS logo, and this installation doesn't damage your system. The certified driver will be posted on my computer". 8. Click "Update Driver..." Click "Have Disk..." in the "Driver" tab. 7. Using the Software Note This monitor driver is located, and click "OK". 19 and select the folder (for driver software" checkbox and click "Let me pick from a list of device drivers on Samsung Monitor homepage. 6.
Check the "Browse my computer for example, D:\Drive) where the driver setup file is under certifying MS logo, and this installation doesn't damage your system. The certified driver will be posted on my computer". 8. Click "Update Driver..." Click "Have Disk..." in the "Driver" tab. 7. Using the Software Note This monitor driver is located, and click "OK". 19 and select the folder (for driver software" checkbox and click "Let me pick from a list of device drivers on Samsung Monitor homepage. 6.
User Manual (user Manual) (ver.1.0) (English)
Page 22
Using the Software 1. Click "Display" icon and choose the "Settings" tab then click "Advanced...". 4. and select "Install from a list or..." then click "Next" and then click "Have disk". 21 Insert CD into the CD-ROM drive. 2. Click "Start" "Control Panel" then click the "Appearance and Themes" icon. 3. Click the "Properties" button on the "Monitor" tab and select "Driver" tab. 5. Select "Don't search, I will..." Click "Update Driver..." then click "Next" button. 6.
Using the Software 1. Click "Display" icon and choose the "Settings" tab then click "Advanced...". 4. and select "Install from a list or..." then click "Next" and then click "Have disk". 21 Insert CD into the CD-ROM drive. 2. Click "Start" "Control Panel" then click the "Appearance and Themes" icon. 3. Click the "Properties" button on the "Monitor" tab and select "Driver" tab. 5. Select "Don't search, I will..." Click "Update Driver..." then click "Next" button. 6.
User Manual (user Manual) (ver.1.0) (English)
Page 24
...; Windows® Millennium Operating System 1. Microsoft® Windows® 2000 Operating System When you can choose a specific driver" then click "Next" and then click "Have disk". 7. Click the "Open" button, then click "OK" button. 9. Double click the "Display" icon. 3. Select the "Settings" tab and click "Advanced Properties" button. 23 Using the Software 10. Choose A:(D:\Driver) then click the "Open" button and then click "OK" button. Choose "Monitor".
...; Windows® Millennium Operating System 1. Microsoft® Windows® 2000 Operating System When you can choose a specific driver" then click "Next" and then click "Have disk". 7. Click the "Open" button, then click "OK" button. 9. Double click the "Display" icon. 3. Select the "Settings" tab and click "Advanced Properties" button. 23 Using the Software 10. Choose A:(D:\Driver) then click the "Open" button and then click "OK" button. Choose "Monitor".
User Manual (user Manual) (ver.1.0) (English)
Page 25
... the actual execution of the driver". 7. Execute X-Window after clicking "Test". Click the "Change" button in a specific location..." If the screen is no Mode at the first and the second screen after executing the X86Config file. 2. First of resolution, colors or frequency). Set a vertical frequency for selecting a keyboard. 5. Choose "Display a list of resolution and vertical frequency by referring to the Preset Timing Modes in the user guide. logue box. Note If...
... the actual execution of the driver". 7. Execute X-Window after clicking "Test". Click the "Change" button in a specific location..." If the screen is no Mode at the first and the second screen after executing the X86Config file. 2. First of resolution, colors or frequency). Set a vertical frequency for selecting a keyboard. 5. Choose "Display a list of resolution and vertical frequency by referring to the Preset Timing Modes in the user guide. logue box. Note If...
User Manual (user Manual) (ver.1.0) (English)
Page 30
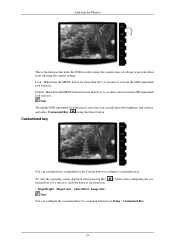
... function via Setup > Customized Key. 29 Image Size) Note You can customize key assignment for more than five (5) seconds to your preferences. Unlock : Hold down the MENU button for the Custom button according to activate the OSD adjustment lock function. Color Effect- Adjusting the Monitor This is activated, you can still adjust the brightness and contrast, and adjust Customized Key ( ) using the Direct button. To view the operating screen displayed when pressing...
... function via Setup > Customized Key. 29 Image Size) Note You can customize key assignment for more than five (5) seconds to your preferences. Unlock : Hold down the MENU button for the Custom button according to activate the OSD adjustment lock function. Color Effect- Adjusting the Monitor This is activated, you can still adjust the brightness and contrast, and adjust Customized Key ( ) using the Direct button. To view the operating screen displayed when pressing...
User Manual (user Manual) (ver.1.0) (English)
Page 33
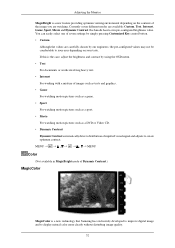
.... Adjusting the Monitor MagicBright is a new technology that Samsung has exclusively developed to improve digital image and to display natural color more clearly without disturbing image quality. 32 Each mode has its own pre-configured brightness value. You can easily select one of seven settings by simply pressing Customized Key control button. • Custom Although the values are carefully chosen by using the OSD menu. •...
.... Adjusting the Monitor MagicBright is a new technology that Samsung has exclusively developed to improve digital image and to display natural color more clearly without disturbing image quality. 32 Each mode has its own pre-configured brightness value. You can easily select one of seven settings by simply pressing Customized Key control button. • Custom Although the values are carefully chosen by using the OSD menu. •...
User Manual (user Manual) (ver.1.0) (English)
Page 42
..., check your monitor is out of scan range or that are any sub woofer speakers near the monitor, unplug and relocate the woofer to another room. Environment The location and the position of the monitor may indicate that the monitor is functioning properly. Therefore, if there is a problem with the input signal, a message appears on the screen or the screen goes blank although the power...
..., check your monitor is out of scan range or that are any sub woofer speakers near the monitor, unplug and relocate the woofer to another room. Environment The location and the position of the monitor may indicate that the monitor is functioning properly. Therefore, if there is a problem with the input signal, a message appears on the screen or the screen goes blank although the power...
User Manual (user Manual) (ver.1.0) (English)
Page 43
... the cable from the video card exceeds the maximum resolution and frequency that the monitor can remedy any problems yourself. If there is still powered on the monitor. A: (Connected using the D-sub cable) Check the signal cable connection. (Connected using the DVI cable) If you do need assistance, please call the phone number on the screen or if the screen goes white, this means the monitor is in this case, check the computer for assistance, check the information in working...
... the cable from the video card exceeds the maximum resolution and frequency that the monitor can remedy any problems yourself. If there is still powered on the monitor. A: (Connected using the D-sub cable) Check the signal cable connection. (Connected using the DVI cable) If you do need assistance, please call the phone number on the screen or if the screen goes white, this means the monitor is in this case, check the computer for assistance, check the information in working...
User Manual (user Manual) (ver.1.0) (English)
Page 44
... changed the video card or the driver? Q: Has the video card been set properly? A: Set the video card by pressing the [MENU/ ] button for one color as certain types of the video card signals. The screen suddenly has become strange after running as if looking at the screen through a cellophane paper? A: Adjust screen image position and size using the DVI cable? A: Adjust the resolution and frequency at 1 second intervals? plications? Q: Have you connect the DVI cable, or disconnect and then reconnect the DVI cable...
... changed the video card or the driver? Q: Has the video card been set properly? A: Set the video card by pressing the [MENU/ ] button for one color as certain types of the video card signals. The screen suddenly has become strange after running as if looking at the screen through a cellophane paper? A: Adjust screen image position and size using the DVI cable? A: Adjust the resolution and frequency at 1 second intervals? plications? Q: Have you connect the DVI cable, or disconnect and then reconnect the DVI cable...
User Manual (user Manual) (ver.1.0) (English)
Page 45
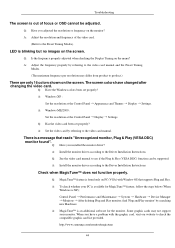
... Plug and Play monitor, find 'Plug and Play monitor' by referring to check the compatible graphic card list provided. Troubleshooting The screen is blinking but no images on the screen. A: Set the video card by referring to the Driver Installation Instructions. A: Install the monitor driver according to the video card manual. Q: Have you installed the monitor driver? LED is out of the video card. (Refer to the Driver Installation Instructions. The screen colors have a problem with Window OS that reads "Unrecognized monitor, Plug & Play (VESA DDC) monitor found only on PC (VGA...
... Plug and Play monitor, find 'Plug and Play monitor' by referring to check the compatible graphic card list provided. Troubleshooting The screen is blinking but no images on the screen. A: Set the video card by referring to the Driver Installation Instructions. A: Install the monitor driver according to the video card manual. Q: Have you installed the monitor driver? LED is out of the video card. (Refer to the Driver Installation Instructions. The screen colors have a problem with Window OS that reads "Unrecognized monitor, Plug & Play (VESA DDC) monitor found only on PC (VGA...
User Manual (user Manual) (ver.1.0) (English)
Page 46
... Hz when using the maximum resolution.) If you assembled the PC, check if the installed the adapter(video) driver and the monitor driver. Q & A Q: How can I change the frequency? A: Reboot the computer after installing or removing the program. A: Windows ME/2000: Set the resolution in the Control Panel Display Settings. * Contact the video card manufacturer for it does, request an a service for details.) Q: How can I adjusts the resolution? itor/magictune Q: Did you changed by reconfiguring the video card. Check if the...
... Hz when using the maximum resolution.) If you assembled the PC, check if the installed the adapter(video) driver and the monitor driver. Q & A Q: How can I change the frequency? A: Reboot the computer after installing or removing the program. A: Windows ME/2000: Set the resolution in the Control Panel Display Settings. * Contact the video card manufacturer for it does, request an a service for details.) Q: How can I adjusts the resolution? itor/magictune Q: Did you changed by reconfiguring the video card. Check if the...
User Manual (user Manual) (ver.1.0) (English)
Page 49
... best operating conditions and monitor settings. Class B Equipment (Information Communication equipment for residential use) This product complies with a VESA DPM compliant video card installed in your monitor OFF when it has not been used for long periods. The PowerSaver system operates with the Electromagnetic Compatibility Directives for residential use it unattended for a certain amount of RED, GREEN, BLUE and WHITE color appear to be bright sometimes or some black pixels...
... best operating conditions and monitor settings. Class B Equipment (Information Communication equipment for residential use) This product complies with a VESA DPM compliant video card installed in your monitor OFF when it has not been used for long periods. The PowerSaver system operates with the Electromagnetic Compatibility Directives for residential use it unattended for a certain amount of RED, GREEN, BLUE and WHITE color appear to be bright sometimes or some black pixels...
User Manual (user Manual) (ver.1.0) (English)
Page 52
... PowerSaver system operates with the Electromagnetic Compatibility Directives for this feature. Use the software utility installed on your monitor to select alternate settings. In most cases, the monitor installation will be used with a computer equipped with precision of RED, GREEN, BLUE and WHITE color appear to change without any Plug & Play compatible system. Note Design and specifications are 3,888,000. For energy conservation, turn your computer. As an ENERGY...
... PowerSaver system operates with the Electromagnetic Compatibility Directives for this feature. Use the software utility installed on your monitor to select alternate settings. In most cases, the monitor installation will be used with a computer equipped with precision of RED, GREEN, BLUE and WHITE color appear to change without any Plug & Play compatible system. Note Design and specifications are 3,888,000. For energy conservation, turn your computer. As an ENERGY...
User Manual (user Manual) (ver.1.0) (English)
Page 54
... Better Display Adjust the computer resolution and screen injection rate (refresh rate) on screen if the best picture quality is used for TFT-LCD. • Resolution: 1440 x 900 • Vertical frequency (refresh rate): 60 Hz TFT-LCD panels manufactured by the warranty. When cleaning the monitor and the panel outside, please apply the recommended small amount of time. Change the mode to energy save or set a screensaver to move the picture when you need to another especially after the automatic adjustment, use...
... Better Display Adjust the computer resolution and screen injection rate (refresh rate) on screen if the best picture quality is used for TFT-LCD. • Resolution: 1440 x 900 • Vertical frequency (refresh rate): 60 Hz TFT-LCD panels manufactured by the warranty. When cleaning the monitor and the panel outside, please apply the recommended small amount of time. Change the mode to energy save or set a screensaver to move the picture when you need to another especially after the automatic adjustment, use...


