Service Manual
Page 1
LCD-Monitor Model 920NW SERVICE Manual LCD Monitor Fashion Feature - 19" LCD Monitor (1440x 900 ) - Simple Stand - Silver / Black ColorVariation Response Time (5ms) -
LCD-Monitor Model 920NW SERVICE Manual LCD Monitor Fashion Feature - 19" LCD Monitor (1440x 900 ) - Simple Stand - Silver / Black ColorVariation Response Time (5ms) -

Service Manual
Page 4
Contents 9. Reference Infomation ...14-1 14-1 Technical Terms ...14-1 14-2 Connecting the monitor ...14-3 14-3 Pin Assignments ...14-4 14-4 Timing Chart ...14-5 14-5 Preset Timing Modes ...14-6 14-6 Panel Description ...14-7 Disassembly and Reassembly ...11-1 11-1 Disassembly Block ... Part) ...13-4 14. Schematic Diagrams ...9-1 9-1 INPUT ...9-1 9-2 DCINPUT ...9-2 9-3 SCALER ...9-3 9-4 POWER ...9-4 9-5 POWER ...9-5 9-6 KEYPAD ...9-6 10. Operating Instructions and Installation ...10-1 10-1 Front ...10-1 10-2 Rear ...10-2 10-3 Monitor Assembly ...10-3 10-4 Attaching a Base ...10-4 11.
Contents 9. Reference Infomation ...14-1 14-1 Technical Terms ...14-1 14-2 Connecting the monitor ...14-3 14-3 Pin Assignments ...14-4 14-4 Timing Chart ...14-5 14-5 Preset Timing Modes ...14-6 14-6 Panel Description ...14-7 Disassembly and Reassembly ...11-1 11-1 Disassembly Block ... Part) ...13-4 14. Schematic Diagrams ...9-1 9-1 INPUT ...9-1 9-2 DCINPUT ...9-2 9-3 SCALER ...9-3 9-4 POWER ...9-4 9-5 POWER ...9-5 9-6 KEYPAD ...9-6 10. Operating Instructions and Installation ...10-1 10-1 Front ...10-1 10-2 Rear ...10-2 10-3 Monitor Assembly ...10-3 10-4 Attaching a Base ...10-4 11.
Service Manual
Page 6
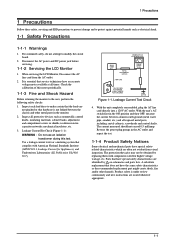
...1-1-2 Servicing the LCD Monitor 1. When servicing the LCD Monitor, Disconnect the AC line cord from visual inspection. Product safety is not lodged between a known earth ground (metal water pipe, conduit, etc.) and all times. With the unit's AC switch first in the monitor. 2. A...Figure 1-1): WARNING : Do not use an isolation transformer during this meter periodically. 1-1-3 Fire and Shock Hazard Before returning the monitor to make certain that the leads are identified by replacing them with American National Standards Institute (ANSI C101.1, Leakage Current for ...
...1-1-2 Servicing the LCD Monitor 1. When servicing the LCD Monitor, Disconnect the AC line cord from visual inspection. Product safety is not lodged between a known earth ground (metal water pipe, conduit, etc.) and all times. With the unit's AC switch first in the monitor. 2. A...Figure 1-1): WARNING : Do not use an isolation transformer during this meter periodically. 1-1-3 Fire and Shock Hazard Before returning the monitor to make certain that the leads are identified by replacing them with American National Standards Institute (ANSI C101.1, Leakage Current for ...
Service Manual
Page 7
... electricity. These can be sure to remove the wrist strap before attempting to damage an ESD. 1-2 Caution: Be sure no power is applied to the monitor. 2. Motions such as brushing clothes together, or lifting your body by conductive foam, aluminum foil or other safety precautions. 8. If unforeseen circumstances create conflict between...
... electricity. These can be sure to remove the wrist strap before attempting to damage an ESD. 1-2 Caution: Be sure no power is applied to the monitor. 2. Motions such as brushing clothes together, or lifting your body by conductive foam, aluminum foil or other safety precautions. 8. If unforeseen circumstances create conflict between...
Service Manual
Page 10
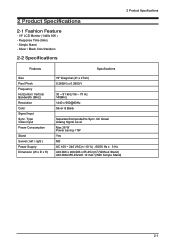
... x 900@60Hz Sliver & Black Separate/Composite/No Sync. Simple Stand - On Green Analog Signal Level Max 36 W Power saving 2 Product Specifications 2 Product Specifications 2-1 Fashion Feature - 19" LCD Monitor (1440x 900 ) - Response Time (5ms) - Silver / Black ColorVariation 2-2 Specifications Features Size Pixel Pinch Frequency Horizontal / Vertical Bandwidth (MHz) Resolution Color Signal Input Sync.
... x 900@60Hz Sliver & Black Separate/Composite/No Sync. Simple Stand - On Green Analog Signal Level Max 36 W Power saving 2 Product Specifications 2 Product Specifications 2-1 Fashion Feature - 19" LCD Monitor (1440x 900 ) - Response Time (5ms) - Silver / Black ColorVariation 2-2 Specifications Features Size Pixel Pinch Frequency Horizontal / Vertical Bandwidth (MHz) Resolution Color Signal Input Sync.
Service Manual
Page 12
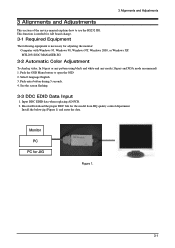
... 16gray or any pattern using black and white and any mode.(16gray and XGA mode recommend) 1. Receive/Download the proper DDC file for adjusting the monitor: Computer with Windows 95, Windows 98, Windows NT, Windows 2000, or Windows XP...
... 16gray or any pattern using black and white and any mode.(16gray and XGA mode recommend) 1. Receive/Download the proper DDC file for adjusting the monitor: Computer with Windows 95, Windows 98, Windows NT, Windows 2000, or Windows XP...
Service Manual
Page 14
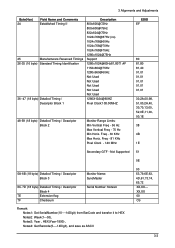
...,13,00, 52,0E,11,00, 00,1E 38 4B 1E Secondary GTF - Not Supported 51 0E 5A-6B (18 byte) Detailed Timing / Descriptor Block 3 Monitor Name: SyncMaster 6C-7D (18 byte) Detailed Timing / Descriptor Block 4 7E Extension flag 7F Checksum Serial Number: Notes4 Remark: Notes1: Get SerialNumber(10----14Digit) from BarCode...@60Hz Not Used Not Used Not Used Not Used Not Used 1280X1024@60HZ Pixel Clock:108.00MHZ 48-59 (18 byte) Detailed Timing / Descriptor Block 2 Monitor Range Limits: Min Vertical Freq - 56 Hz Max Vertical Freq - 75 Hz Min Horiz.
...,13,00, 52,0E,11,00, 00,1E 38 4B 1E Secondary GTF - Not Supported 51 0E 5A-6B (18 byte) Detailed Timing / Descriptor Block 3 Monitor Name: SyncMaster 6C-7D (18 byte) Detailed Timing / Descriptor Block 4 7E Extension flag 7F Checksum Serial Number: Notes4 Remark: Notes1: Get SerialNumber(10----14Digit) from BarCode...@60Hz Not Used Not Used Not Used Not Used Not Used 1280X1024@60HZ Pixel Clock:108.00MHZ 48-59 (18 byte) Detailed Timing / Descriptor Block 2 Monitor Range Limits: Min Vertical Freq - 56 Hz Max Vertical Freq - 75 Hz Min Horiz.
Service Manual
Page 42
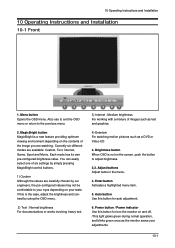
... For working with a mixture of images such as text and graphics. 4) Entertain For watching motion pictures such as the monitor saves your taste. Currently six different modes are watching. If this button for turn the monitor on the screen, push the button to the previous menu. 2. Enter button Activates a highlighted menu item. 5.
... For working with a mixture of images such as text and graphics. 4) Entertain For watching motion pictures such as the monitor saves your taste. Currently six different modes are watching. If this button for turn the monitor on the screen, push the button to the previous menu. 2. Enter button Activates a highlighted menu item. 5.
Service Manual
Page 43
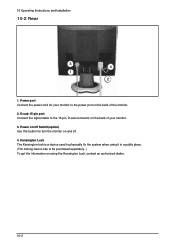
... device has to be purchased separately. ) To get the information on the back of the monitor. 2. 10 Operating Instructions and Installation 10-2 Rear 3 4 1 2 1. Power port Connect the power cord for turn the monitor on the back of your monitor to the 15-pin, D-sub connector on using the Kensington Lock, contact an aurhorized...
... device has to be purchased separately. ) To get the information on the back of the monitor. 2. 10 Operating Instructions and Installation 10-2 Rear 3 4 1 2 1. Power port Connect the power cord for turn the monitor on the back of your monitor to the 15-pin, D-sub connector on using the Kensington Lock, contact an aurhorized...
Service Manual
Page 44
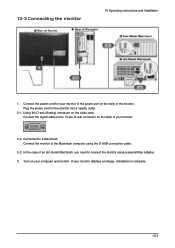
... the power cord for your monitor to the power port on your computer and monitor. Connect the monitor to connect the monitor using the D-SUB connection cable. 2-3. If your monitor. 2-2. Connected to the 15-pin, D-sub connector on the video card. Connect the power cord for the monitor into a nearby outlet. ...2-1. Turn on the back of the monitor. Using the D-sub (Analog) connector on the back of an old model Macintosh, you need to the Macintosh computer using a ...
... the power cord for your monitor to the power port on your computer and monitor. Connect the monitor to connect the monitor using the D-SUB connection cable. 2-3. If your monitor. 2-2. Connected to the 15-pin, D-sub connector on the video card. Connect the power cord for the monitor into a nearby outlet. ...2-1. Turn on the back of the monitor. Using the D-sub (Analog) connector on the back of an old model Macintosh, you need to the Macintosh computer using a ...
Service Manual
Page 45
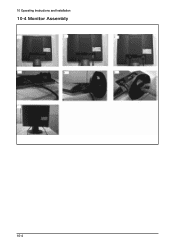
10 Operating Instructions and Installation 10-4 Monitor Assembly 10-4
10 Operating Instructions and Installation 10-4 Monitor Assembly 10-4
Service Manual
Page 46
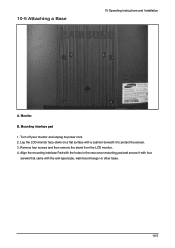
Monitor B. Mounting interface pad 1. 10-5 Attaching a Base 10 Operating Instructions and Installation A. Remove four screws and then remove the stand from the LCD monitor. 4. Turn off your monitor and unplug its power cord. 2. Lay the LCD monitor face-down on a flat surface with the arm-type base, wall mount hanger or other base. 10-5 Align the mounting interface Pad with the holes in the rear cover mounting pad and secure it with four screws that came with a cushion beneath it to protect the screen. 3.
Monitor B. Mounting interface pad 1. 10-5 Attaching a Base 10 Operating Instructions and Installation A. Remove four screws and then remove the stand from the LCD monitor. 4. Turn off your monitor and unplug its power cord. 2. Lay the LCD monitor face-down on a flat surface with the arm-type base, wall mount hanger or other base. 10-5 Align the mounting interface Pad with the holes in the rear cover mounting pad and secure it with four screws that came with a cushion beneath it to protect the screen. 3.
Service Manual
Page 48
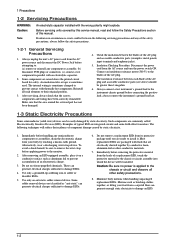
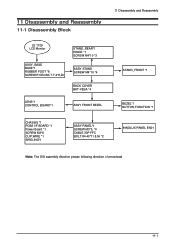
11 Disassembly and Reassembly 11-1 Disassembly Block 11 Disassembly and Reassembly LE 1729 LCD Monitor ASSY, BASE BASE*1 RUBBER FOOT *6 SCREW.P.CROSS,T.T-4*8,Zn STAND_REAR*1 HINGE *1 SCREW M4*10 *3 ASSY STAND SCREW M4*10 *4 BACK COVER BKT-VESA *4 LENS*1 CONTROL BOARD*1 ASSY FRONT BEZEL STAND_FRONT *1 BEZEL*1 BUTTON,FUNCTION *1 CHASSIS *1 PCBA I/F BOARD *1 Power Board *1 SCREW M3*6 CLIP,WIRE *1 SHIELING*1 ASSY PANEL*1 SCREW M3*5, *4 CABLE 30P FFC BOLT,#4-40*11.8,Ni *2 INNOLUX PANEL EN01 Note: The DIS assembly direction please following direction of arrowhead 11-1
11 Disassembly and Reassembly 11-1 Disassembly Block 11 Disassembly and Reassembly LE 1729 LCD Monitor ASSY, BASE BASE*1 RUBBER FOOT *6 SCREW.P.CROSS,T.T-4*8,Zn STAND_REAR*1 HINGE *1 SCREW M4*10 *3 ASSY STAND SCREW M4*10 *4 BACK COVER BKT-VESA *4 LENS*1 CONTROL BOARD*1 ASSY FRONT BEZEL STAND_FRONT *1 BEZEL*1 BUTTON,FUNCTION *1 CHASSIS *1 PCBA I/F BOARD *1 Power Board *1 SCREW M3*6 CLIP,WIRE *1 SHIELING*1 ASSY PANEL*1 SCREW M3*5, *4 CABLE 30P FFC BOLT,#4-40*11.8,Ni *2 INNOLUX PANEL EN01 Note: The DIS assembly direction please following direction of arrowhead 11-1
Service Manual
Page 58
...clock and PLL clock. -L.V.D.S.(Low Voltage Differential Signaling) A kind of transmission method for the user. ogy is called the 'Dot Pitch'. nize monitor information, such as 60 Hz. -Horizontal Frequency The time to the left edge of the Horizontal Cycle is used to step up/down the...resolution. This technology is called Vertical Frequency or Refresh Rate. The inverse number of the screen horizontally is needed to convert input image to LCD panel lamp. Data is called Horizontal Cycle. played on /off -FINE The "Fine" adjustment is used from analog signal to optimum ...
...clock and PLL clock. -L.V.D.S.(Low Voltage Differential Signaling) A kind of transmission method for the user. ogy is called the 'Dot Pitch'. nize monitor information, such as 60 Hz. -Horizontal Frequency The time to the left edge of the Horizontal Cycle is used to step up/down the...resolution. This technology is called Vertical Frequency or Refresh Rate. The inverse number of the screen horizontally is needed to convert input image to LCD panel lamp. Data is called Horizontal Cycle. played on /off -FINE The "Fine" adjustment is used from analog signal to optimum ...
Service Manual
Page 59
This monitor follows the international standard VESA DDC for the Plug & Play function. -Resolution The number of...is good for performing multiple tasks as that provides the best quality screen for the majority of monitors to exchange information automatically. High resolution is a function that used for the user by allowing the computer and the... monitor to ensure a clear image. 14 Reference Infomation -Interlace and Non-Interlace Methods Showing the horizontal lines ...
This monitor follows the international standard VESA DDC for the Plug & Play function. -Resolution The number of...is good for performing multiple tasks as that provides the best quality screen for the majority of monitors to exchange information automatically. High resolution is a function that used for the user by allowing the computer and the... monitor to ensure a clear image. 14 Reference Infomation -Interlace and Non-Interlace Methods Showing the horizontal lines ...
User Guide
Page 3
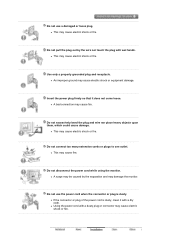
Do not pull the plug out by the separation and may damage the monitor. z If the connector or plug of the power cord is dusty. z Using the power cord with a dusty plug or connector may cause electric shock or ... or plugs to one outlet. Insert the power plug firmly so that it with a dry cloth. Do not disconnect the power cord while using the monitor. z This may cause electric shock or equipment damage. Use only a properly grounded plug and receptacle. Do not excessively bend the plug and wire nor place...
Do not pull the plug out by the separation and may damage the monitor. z If the connector or plug of the power cord is dusty. z Using the power cord with a dusty plug or connector may cause electric shock or ... or plugs to one outlet. Insert the power plug firmly so that it with a dry cloth. Do not disconnect the power cord while using the monitor. z This may cause electric shock or equipment damage. Use only a properly grounded plug and receptacle. Do not excessively bend the plug and wire nor place...
User Guide
Page 4
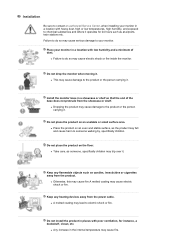
...may cause electric shock or fire. Do not install the product in a showcase or shelf so that the end of dust. Install the monitor base in places with poor ventilation, for 24 hours such as someone walking by, specifically children. Do not place the product on an ...it . Installation Be sure to contact an authorized Service Center, when installing your monitor in the internal temperature may cause fire. Do not drop the monitor when moving it . z A melted coating may trip over it . Place your monitor in a location with heavy dust, high or low temperatures, high humidity, ...
...may cause electric shock or fire. Do not install the product in a showcase or shelf so that the end of dust. Install the monitor base in places with poor ventilation, for 24 hours such as someone walking by, specifically children. Do not place the product on an ...it . Installation Be sure to contact an authorized Service Center, when installing your monitor in the internal temperature may cause fire. Do not drop the monitor when moving it . z A melted coating may trip over it . Place your monitor in a location with heavy dust, high or low temperatures, high humidity, ...
User Guide
Page 5
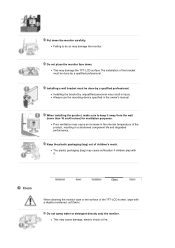
... bracket by a qualified professional. Clean When cleaning the monitor case or the surface of the bracket must be done by a qualified professional. z This may damage the monitor. Put down . Do not place the monitor face down the monitor carefully. Installing a wall bracket must be done by ...unqualified personnel may damage the TFT-LCD surface.The installation of the TFT-LCD screen, wipe with it away from the wall...
... bracket by a qualified professional. Clean When cleaning the monitor case or the surface of the bracket must be done by a qualified professional. z This may damage the monitor. Put down . Do not place the monitor face down the monitor carefully. Installing a wall bracket must be done by ...unqualified personnel may damage the TFT-LCD surface.The installation of the TFT-LCD screen, wipe with it away from the wall...
User Guide
Page 6
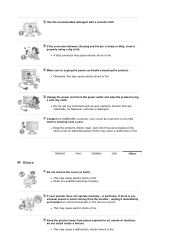
... and wipe the product using a dry cloth. z Refer to a qualified servicing company. If your monitor does not operate normally - in the interior over an extended period of time may cause electric shock or fire. Contact the SAMSUNG customer care center or Customer Center for interior cleaning once a year. Use the recommended detergent...
... and wipe the product using a dry cloth. z Refer to a qualified servicing company. If your monitor does not operate normally - in the interior over an extended period of time may cause electric shock or fire. Contact the SAMSUNG customer care center or Customer Center for interior cleaning once a year. Use the recommended detergent...
User Guide
Page 7
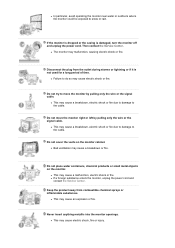
...due to damage to the cable. Keep the product away from the outlet during storms or lightning or if it is damaged, turn the monitor off and unplug the power cord. Disconnect the plug from combustible chemical sprays or inflammable substances. z This may cause a malfunction, electric ..., chemical products or small metal objects on the monitor cabinet. z This may malfunction, causing electric shock or fire. z In particular, avoid operating the monitor near water or outdoors where the monitor could be exposed to move the monitor right or left by pulling only the wire or...
...due to damage to the cable. Keep the product away from the outlet during storms or lightning or if it is damaged, turn the monitor off and unplug the power cord. Disconnect the plug from combustible chemical sprays or inflammable substances. z This may cause a malfunction, electric ..., chemical products or small metal objects on the monitor cabinet. z This may malfunction, causing electric shock or fire. z In particular, avoid operating the monitor near water or outdoors where the monitor could be exposed to move the monitor right or left by pulling only the wire or...


