User Manual (ENGLISH)
Page 5
..., turn the monitor off and unplug the power cord. in the interior over an extended period of time may cause malfunction or fire. z This may cause an electric shock or fire. Do not spray water or detergent directly on the monitor. Contact the Service Center or Customer Center for interior cleaning once a year. Others Do not remove cover (or...
..., turn the monitor off and unplug the power cord. in the interior over an extended period of time may cause malfunction or fire. z This may cause an electric shock or fire. Do not spray water or detergent directly on the monitor. Contact the Service Center or Customer Center for interior cleaning once a year. Others Do not remove cover (or...
User Manual (ENGLISH)
Page 7
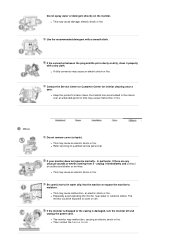
... undesirable picture quality. 19 inch - 1280 X 1024 Keep the volume at least a five-minute break after every hour of children. Adjust the resolution and frequency to the levels appropriate for recycling purposes. When replacing batteries, place the batteries in eyesight damage. Make sure that they are not ordinary refuse and must be careful that all cables, including the antenna cable and cables connected to...
... undesirable picture quality. 19 inch - 1280 X 1024 Keep the volume at least a five-minute break after every hour of children. Adjust the resolution and frequency to the levels appropriate for recycling purposes. When replacing batteries, place the batteries in eyesight damage. Make sure that they are not ordinary refuse and must be careful that all cables, including the antenna cable and cables connected to...
User Manual (ENGLISH)
Page 11
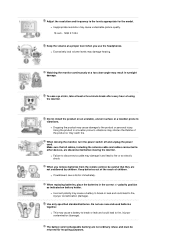
... one menu item to another vertically or adjusts selected menu values. MENU Use this button to open the on the Monitor. ENTER Activates a highlighted menu item. 7. To switch Screen modes: [PC] [TV] [Ext.] [AV] [S-Video] >>Click here to see an animation clip 6. Remote Control Sensor Aim the remote control towards this button to turn your monitor OFF when it is not needed or when leaving it unattended for further information regarding power saving functions...
... one menu item to another vertically or adjusts selected menu values. MENU Use this button to open the on the Monitor. ENTER Activates a highlighted menu item. 7. To switch Screen modes: [PC] [TV] [Ext.] [AV] [S-Video] >>Click here to see an animation clip 6. Remote Control Sensor Aim the remote control towards this button to turn your monitor OFF when it is not needed or when leaving it unattended for further information regarding power saving functions...
User Manual (ENGLISH)
Page 15
... ) 20. POSITION Changing the Position of the screen. PRE-CH This button is available only in high fidelity stereo amplifier. MAGIC-CH MagicCHANNEL enables you press this button, current mode is Displays on the remote control while watching TV. 19. SOURCE Select the PIP video source. 23. The Monitor has a built-in Korea. SIZE You can be operated depending on broadcasting type by using DUAL button on the...
... ) 20. POSITION Changing the Position of the screen. PRE-CH This button is available only in high fidelity stereo amplifier. MAGIC-CH MagicCHANNEL enables you press this button, current mode is Displays on the remote control while watching TV. 19. SOURCE Select the PIP video source. 23. The Monitor has a built-in Korea. SIZE You can be operated depending on broadcasting type by using DUAL button on the...
User Manual (ENGLISH)
Page 17
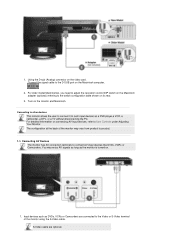
... from product to product. 1-1. Using the D-sub (Analog) connector on the Macintosh computer. 2. Connect the signal cable to User Controls under Adjusting Your Monitor. 1. Connecting AV Devices The monitor has AV connection terminals to such input devices as DVDs, VCRs or Camcorders are optional. For detailed information on its rear. 3. For older model Macintoshes, you need to adjust the resolution control DIP switch on the Macintosh adapter (optional) referring to the...
... from product to product. 1-1. Using the D-sub (Analog) connector on the Macintosh computer. 2. Connect the signal cable to User Controls under Adjusting Your Monitor. 1. Connecting AV Devices The monitor has AV connection terminals to such input devices as DVDs, VCRs or Camcorders are optional. For detailed information on its rear. 3. For older model Macintoshes, you need to adjust the resolution control DIP switch on the Macintosh adapter (optional) referring to the...
User Manual (ENGLISH)
Page 18
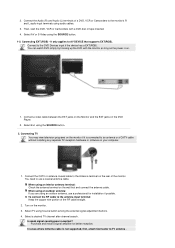
... . Turn on the DVD Player. 2. Connecting TV You may view television programs on the monitor if it is not supported, first, attach Connector to the monitor's R and L audio input terminals using Source button among the external signal adjustment buttons. 4. To connect the RF cable to use a professional for better reception. Is weak signal causing poor reception? Purchase and install a signal amplifier for installation if possible. Select Ext. You need to the antenna input terminal: Keep...
... . Turn on the DVD Player. 2. Connecting TV You may view television programs on the monitor if it is not supported, first, attach Connector to the monitor's R and L audio input terminals using Source button among the external signal adjustment buttons. 4. To connect the RF cable to use a professional for better reception. Is weak signal causing poor reception? Purchase and install a signal amplifier for installation if possible. Select Ext. You need to the antenna input terminal: Keep...
User Manual (ENGLISH)
Page 20
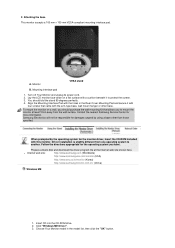
Monitor VESA stand B. You should purchase the wall mounting kit that came with four screws that allows you to mount the monitor at the Internet web site shown here. Driver installation is slightly different from the wall surface. Turn off Your Monitor and unplug its power cord. 2. Align the Mounting Interface Pad with the holes in the model list, then click the "OK" button. z Internet web site : http://www...
Monitor VESA stand B. You should purchase the wall mounting kit that came with four screws that allows you to mount the monitor at the Internet web site shown here. Driver installation is slightly different from the wall surface. Turn off Your Monitor and unplug its power cord. 2. Align the Mounting Interface Pad with the holes in the model list, then click the "OK" button. z Internet web site : http://www...
User Manual (ENGLISH)
Page 22
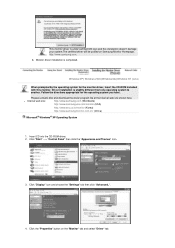
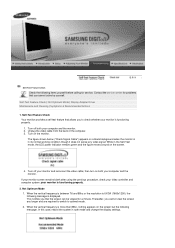
...) http://www.samsungmonitor.com.cn/ (China) Microsoft® Windows® XP Operating System 1. Click the "Properties" button on Samsung Monitor Homepage. Windows XP | Windows 2000 |Windows Me |Windows NT | Linux When prompted by the operating system for the operating system you have. Insert CD into the CD-ROM driver. 2. Click "Start" -> "Control Panel" then click the "Appearance and Themes" Icon. 3. http://www...
...) http://www.samsungmonitor.com.cn/ (China) Microsoft® Windows® XP Operating System 1. Click the "Properties" button on Samsung Monitor Homepage. Windows XP | Windows 2000 |Windows Me |Windows NT | Linux When prompted by the operating system for the operating system you have. Insert CD into the CD-ROM driver. 2. Click "Start" -> "Control Panel" then click the "Appearance and Themes" Icon. 3. http://www...
User Manual (ENGLISH)
Page 23
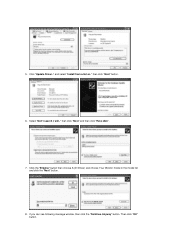
Click "Update Driver.." then click "Next" button. 6. then click "Next" and then click "Have disk". 7. Then click "OK" button. If you can see following message window, then click the "Continue Anyway" button. Select "Don't search ,I will.." 5. Click the "Browse" button then choose A:(D:\Driver) and choose Your Monitor model in the model list and click the "Next" button. 8. and select "Install from a list or.."
Click "Update Driver.." then click "Next" button. 6. then click "Next" and then click "Have disk". 7. Then click "OK" button. If you can see following message window, then click the "Continue Anyway" button. Select "Don't search ,I will.." 5. Click the "Browse" button then choose A:(D:\Driver) and choose Your Monitor model in the model list and click the "Next" button. 8. and select "Install from a list or.."
User Manual (ENGLISH)
Page 24
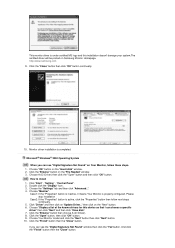
... "File Needed" window. 3. Click the "Finish" button then the "Close" button. Click "Start" , "Setting" , "Control Panel". 2. Click the "Browse" button then choose A:(D:\Driver). 8. Click the "Open" button, then click "OK" button. 9. If you can see the "Digital Signature Not Found" window then click the "Yes"button. And click the "Finish" button then the "Close" button. This monitor driver is under certified MS logo and this device so that I can choose a specific driver...
... "File Needed" window. 3. Click the "Finish" button then the "Close" button. Click "Start" , "Setting" , "Control Panel". 2. Click the "Browse" button then choose A:(D:\Driver). 8. Click the "Open" button, then click "OK" button. 9. If you can see the "Digital Signature Not Found" window then click the "Yes"button. And click the "Finish" button then the "Close" button. This monitor driver is under certified MS logo and this device so that I can choose a specific driver...
User Manual (ENGLISH)
Page 25
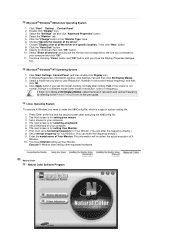
... user guide. Press Enter at All Display Modes, select the level of colors and Vertical frequency) and then click OK. 4. Set a Keyboard for your computer. 6. The next screen is for setting your computer and click "OK". 11. Click Start, Settings, Control Panel, and then double-click Display icon. 2. If the screen is for selecting a keyboard. 5. Linux Operating System To execute X-Window, you connected to a different mode (lower mode of Your Monitor...
... user guide. Press Enter at All Display Modes, select the level of colors and Vertical frequency) and then click OK. 4. Set a Keyboard for your computer. 6. The next screen is for setting your computer and click "OK". 11. Click Start, Settings, Control Panel, and then double-click Display icon. 2. If the screen is for selecting a keyboard. 5. Linux Operating System To execute X-Window, you connected to a different mode (lower mode of Your Monitor...
User Manual (ENGLISH)
Page 29
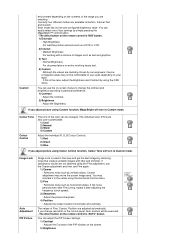
... using the OSD menu. You can adjust the PIP Screen Settings. 1) Contrast : Adjusts the Contrast of images such as text and graphics. 3) Text : Normal Brightness For documentations or works involving heavy text. 4) Custom Although the values are also user customizable. 1) Cool 2) Normal 3) Warm 4) Custom Adjust the individual R, G, B Colour Controls. 1) Red 2) Green 3) Blue If you adjust picture using Colour Control function, Colour Tone will turn to fine-tune and get the best image by using the Horizontal Control menu. 2) Fine : Removes...
... using the OSD menu. You can adjust the PIP Screen Settings. 1) Contrast : Adjusts the Contrast of images such as text and graphics. 3) Text : Normal Brightness For documentations or works involving heavy text. 4) Custom Although the values are also user customizable. 1) Cool 2) Normal 3) Warm 4) Custom Adjust the individual R, G, B Colour Controls. 1) Red 2) Green 3) Blue If you adjust picture using Colour Control function, Colour Tone will turn to fine-tune and get the best image by using the Horizontal Control menu. 2) Fine : Removes...
User Manual (ENGLISH)
Page 35
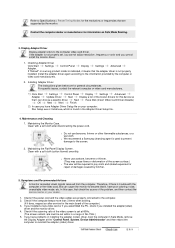
... optimal mode. 2. Turn on both your monitor is functioning properly. 2. then turn on the monitor. Self-Test Feature Check | Not Optimum Mode | Display Adapter Driver Maintenance and Cleaning | Symptoms & Recommended Actions 1. Thereafter, you cannot solve by yourself. Turn off your video controller and computer system; Unplug the video cable from the back of the computer. 3. If your monitor screen remains blank after using the previous procedure, check your monitor and reconnect the video cable...
... optimal mode. 2. Turn on both your monitor is functioning properly. 2. then turn on the monitor. Self-Test Feature Check | Not Optimum Mode | Display Adapter Driver Maintenance and Cleaning | Symptoms & Recommended Actions 1. Thereafter, you cannot solve by yourself. Turn off your video controller and computer system; Unplug the video cable from the back of the computer. 3. If your monitor screen remains blank after using the previous procedure, check your monitor and reconnect the video cable...
User Manual (ENGLISH)
Page 36
... Mode, remove the Display Adapter at 60Hz. (The screen refresh rate must be required to pay costs and related expenses for repair of the problem, and then contact the service center or your computer: Run Setup.exe or Install.exe, which is set , you cannot adjust resolution, frequency or color and you installed the adapter(video) driver and the monitor driver. 4. Clean with a soft cloth after -service for the main board of 56~75hz.) 5. Check if the power cord...
... Mode, remove the Display Adapter at 60Hz. (The screen refresh rate must be required to pay costs and related expenses for repair of the problem, and then contact the service center or your computer: Run Setup.exe or Install.exe, which is set , you cannot adjust resolution, frequency or color and you installed the adapter(video) driver and the monitor driver. 4. Clean with a soft cloth after -service for the main board of 56~75hz.) 5. Check if the power cord...
User Manual (ENGLISH)
Page 37
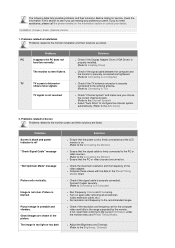
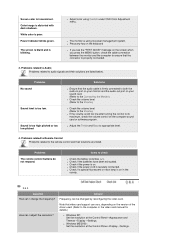
... "Check Signal Cable" message "Not Optimum Mode" message Picture rolls vertically. z Check if the signal cable is unstable and vibrates. If you do need assistance, please call the phone number on . Picture image is securely connected. z Adjust the Brightness and Contrast. (Refer to the monitor screen and their solutions. Installation | Screen | Audio | Remote Control 1. The image is too light or too dark Solutions z Ensure that the power cord is firmly connected and the LCD monitor is blurred. z Check if the resolution and frequency set for service, check...
... "Check Signal Cable" message "Not Optimum Mode" message Picture rolls vertically. z Check if the signal cable is unstable and vibrates. If you do need assistance, please call the phone number on . Picture image is securely connected. z Adjust the Brightness and Contrast. (Refer to the monitor screen and their solutions. Installation | Screen | Audio | Remote Control 1. The image is too light or too dark Solutions z Ensure that the power cord is firmly connected and the LCD monitor is blurred. z Check if the resolution and frequency set for service, check...
User Manual (ENGLISH)
Page 38
... remote control buttons do not respond. Answer Frequency can I adjust the resolution? How can vary, depending on your sound card. (Refer to the Connecting the Monitor) z Check the volume level. (Refer to the Volume) z Check the volume level. (Refer to check z Check the battery polarities (+/-). The screen is blank and is poor. Problems related to Remote Control Problems related to ensure that the connector is too low. z Windows ME/2000 : Set the resolution at the Control Panel Themes Display Settings. White color...
... remote control buttons do not respond. Answer Frequency can I adjust the resolution? How can vary, depending on your sound card. (Refer to the Connecting the Monitor) z Check the volume level. (Refer to the Volume) z Check the volume level. (Refer to check z Check the battery polarities (+/-). The screen is blank and is poor. Problems related to Remote Control Problems related to ensure that the connector is too low. z Windows ME/2000 : Set the resolution at the Control Panel Themes Display Settings. White color...
User Manual (ENGLISH)
Page 41
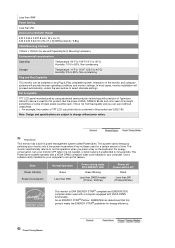
... black pixels could be seen. The PowerSaver system operates with a VESA DPMS compliant video card installed in your monitor OFF when it is not needed, or when leaving it unattended for energy efficiency. Dot Acceptable TFT LCD panel manufactured by switching your computer to select alternate settings. Use a software utility installed on your monitor into a low-power mode when it without prior notice. In most cases, monitor installation will provide the best...
... black pixels could be seen. The PowerSaver system operates with a VESA DPMS compliant video card installed in your monitor OFF when it is not needed, or when leaving it unattended for energy efficiency. Dot Acceptable TFT LCD panel manufactured by switching your computer to select alternate settings. Use a software utility installed on your monitor into a low-power mode when it without prior notice. In most cases, monitor installation will provide the best...
User Manual (ENGLISH)
Page 48
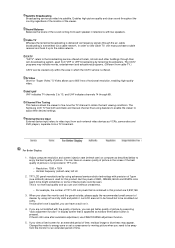
... lines of picture. For Better Display 1. Adjust computer resolution and screen injection rate (refresh rate) on it without uneasiness. { For example, the number of RED, GREEN, BLUE and WHITE color seem to obtain the best viewing conditions. You can be seen. But the pixels of TFT LCD sub pixels that is contained in display screen that is appeared as window termination button is offered. TFT LCD panel manufactured by terrestrial broadcasters. This is not from cable TV.) CATV...
... lines of picture. For Better Display 1. Adjust computer resolution and screen injection rate (refresh rate) on it without uneasiness. { For example, the number of RED, GREEN, BLUE and WHITE color seem to obtain the best viewing conditions. You can be seen. But the pixels of TFT LCD sub pixels that is contained in display screen that is appeared as window termination button is offered. TFT LCD panel manufactured by terrestrial broadcasters. This is not from cable TV.) CATV...
User Manual (ENGLISH)
Page 50
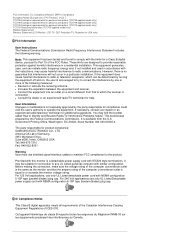
... Information User Instructions The Federal Communications Commission Radio Frequency Interference Statement includes the following measures: z Reorient or relocate the receiving antenna. User Information Changes or modifications not expressly approved by the party responsible for connection to which can radiate radio frequency energy and, if not installed and used in a residential installation. For 120 Volt applications, use only UL Listed Detachable power supply cord with...
... Information User Instructions The Federal Communications Commission Radio Frequency Interference Statement includes the following measures: z Reorient or relocate the receiving antenna. User Information Changes or modifications not expressly approved by the party responsible for connection to which can radiate radio frequency energy and, if not installed and used in a residential installation. For 120 Volt applications, use only UL Listed Detachable power supply cord with...
User Manual (ENGLISH)
Page 57
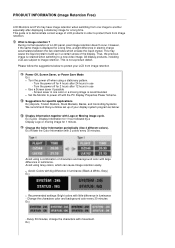
... demonstrate correct usage of LCD products in a certain areas of a LCD panel, pixel image retention doesn't occur. Please follow set up in order to a new video image. z Avoid: Colors with big difference in luminance (Black & White, Grey) Ex) z Recommended settings: Bright colors with little difference in use z Use a Screen saver if possible - What is not a product defect. Turn the power off for 4 hours after displaying a stationary image for a long time, a slight...
... demonstrate correct usage of LCD products in a certain areas of a LCD panel, pixel image retention doesn't occur. Please follow set up in order to a new video image. z Avoid: Colors with big difference in luminance (Black & White, Grey) Ex) z Recommended settings: Bright colors with little difference in use z Use a Screen saver if possible - What is not a product defect. Turn the power off for 4 hours after displaying a stationary image for a long time, a slight...


