User Manual (ENGLISH)
Page 5
... unusual sounds or smells coming from it properly with a smooth cloth. z This may cause an electric shock or fire. The monitor could be exposed to qualified service personnel. z The monitor may cause malfunction, an electric shock or fire. If the connector between the plug and the pin is damaged, turn the monitor off and unplug the power cord. z Refer servicing to...
... unusual sounds or smells coming from it properly with a smooth cloth. z This may cause an electric shock or fire. The monitor could be exposed to qualified service personnel. z The monitor may cause malfunction, an electric shock or fire. If the connector between the plug and the pin is damaged, turn the monitor off and unplug the power cord. z Refer servicing to...
User Manual (ENGLISH)
Page 7
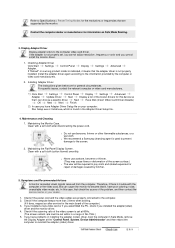
...moving the monitor. Using the product in a location prone to other devices, are not swallowed by children. Make sure that they are disconnected before moving the monitor, turn the power switch off and unplug the power cord. polarity position as ...resolution may cause undesirable picture quality. 19 inch - 1280 X 1024 Keep the volume at a too close angle may damage it and lead to the product or personal injury. Watching the monitor continuously at a proper level when you remove batteries from the remote control, be returned for the model. z Failure to disconnect a cable...
...moving the monitor. Using the product in a location prone to other devices, are not swallowed by children. Make sure that they are disconnected before moving the monitor, turn the power switch off and unplug the power cord. polarity position as ...resolution may cause undesirable picture quality. 19 inch - 1280 X 1024 Keep the volume at a too close angle may damage it and lead to the product or personal injury. Watching the monitor continuously at a proper level when you remove batteries from the remote control, be returned for the model. z Failure to disconnect a cable...
User Manual (ENGLISH)
Page 11
... remote control towards this button to open the on Video or TV screens in external devices that are connected to the monitor at the back of the monitor may not be able to select one menu item to another vertically or adjusts selected menu values. MENU Use this spot on and off. 8. See PowerSaver described in each country, you may vary from PC mode to Video mode. Adjusts the audio volume...
... remote control towards this button to open the on Video or TV screens in external devices that are connected to the monitor at the back of the monitor may not be able to select one menu item to another vertically or adjusts selected menu values. MENU Use this spot on and off. 8. See PowerSaver described in each country, you may vary from PC mode to Video mode. Adjusts the audio volume...

User Manual (ENGLISH)
Page 14
...-Digit CHANNEL selection ) Use to select a CHANNEL numbered ten or over 100. TTX/MIX TV channels provide written information services via teletext. SOURCE Switches from one menu item to another horizontally, vertically or adjusts selected menu values. 14. Not available in the TV mode. INFO Current picture information is displayed on the lower center of the screen. Up-Down Left-Right Buttons Moves from PC mode to Video mode. P.SIZE...
...-Digit CHANNEL selection ) Use to select a CHANNEL numbered ten or over 100. TTX/MIX TV channels provide written information services via teletext. SOURCE Switches from one menu item to another horizontally, vertically or adjusts selected menu values. 14. Not available in the TV mode. INFO Current picture information is displayed on the lower center of the screen. Up-Down Left-Right Buttons Moves from PC mode to Video mode. P.SIZE...
User Manual (ENGLISH)
Page 17
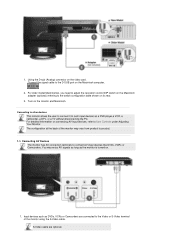
... video card. Connecting AV Devices The monitor has AV connection terminals to User Controls under Adjusting Your Monitor. You may vary from product to the switch configuration table shown on its rear. 3. S-Video cable are connected to such input devices as a DVD player,a VCR, a camcorder, a DTV, or a TV without disconnecting the PC. For detailed information on the Macintosh adapter (optional) referring to product. 1-1. Using the D-sub (Analog) connector...
... video card. Connecting AV Devices The monitor has AV connection terminals to User Controls under Adjusting Your Monitor. You may vary from product to the switch configuration table shown on its rear. 3. S-Video cable are connected to such input devices as a DVD player,a VCR, a camcorder, a DTV, or a TV without disconnecting the PC. For detailed information on the Macintosh adapter (optional) referring to product. 1-1. Using the D-sub (Analog) connector...
User Manual (ENGLISH)
Page 18
... S-Video using Source button among the external signal adjustment buttons. 4. Connect to AV DEVICE that supports EXT(RGB). You need to use a professional for better reception. In areas where Antenna cable is connected to TV antenna . Then, start the DVD, VCR or Camcorders with the monitor as long as the power is on the monitor if it is not supported, first, attach Connector to an antenna or a CATV cable without installing any...
... S-Video using Source button among the external signal adjustment buttons. 4. Connect to AV DEVICE that supports EXT(RGB). You need to use a professional for better reception. In areas where Antenna cable is connected to TV antenna . Then, start the DVD, VCR or Camcorders with the monitor as long as the power is on the monitor if it is not supported, first, attach Connector to an antenna or a CATV cable without installing any...
User Manual (ENGLISH)
Page 20
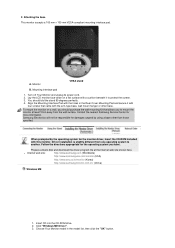
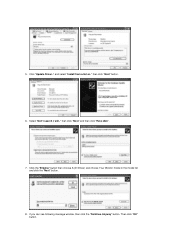
.... Driver installation is slightly different from the wall surface. Lay the LCD monitor face-down on a wall, you have. z Internet web site : http://www.samsung.com (Worldwide) http://www.samsungusa.com/monitor (USA) http://www.sec.co.kr/monitor (Korea) http://www.samsungmonitor.com.cn/ (China) Windows ME 1. Choose Your Monitor model in the Rear Cover Mounting Pad and secure it with four screws that...
.... Driver installation is slightly different from the wall surface. Lay the LCD monitor face-down on a wall, you have. z Internet web site : http://www.samsung.com (Worldwide) http://www.samsungusa.com/monitor (USA) http://www.sec.co.kr/monitor (Korea) http://www.samsungmonitor.com.cn/ (China) Windows ME 1. Choose Your Monitor model in the Rear Cover Mounting Pad and secure it with four screws that...
User Manual (ENGLISH)
Page 22
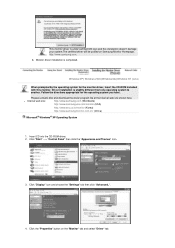
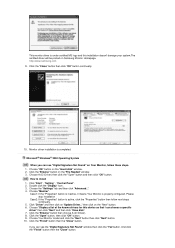
... CD-ROM included with this installation doesn't damage your system.The certified driver will be posted on the "Monitor" tab and select "Driver" tab. Prepare a blank disk and download the driver program file at the Internet web site shown here. Click "Display" icon and choose the "Settings" tab then click "Advanced..". 4. Driver installation is completed. Click the "Properties" button on Samsung Monitor Homepage.
... CD-ROM included with this installation doesn't damage your system.The certified driver will be posted on the "Monitor" tab and select "Driver" tab. Prepare a blank disk and download the driver program file at the Internet web site shown here. Click "Display" icon and choose the "Settings" tab then click "Advanced..". 4. Driver installation is completed. Click the "Properties" button on Samsung Monitor Homepage.
User Manual (ENGLISH)
Page 23
5. Click "Update Driver.." then click "Next" button. 6. Click the "Browse" button then choose A:(D:\Driver) and choose Your Monitor model in the model list and click the "Next" button. 8. Then click "OK" button. and select "Install from a list or.." then click "Next" and then click "Have disk". 7. If you can see following message window, then click the "Continue Anyway" button. Select "Don't search ,I will.."
5. Click "Update Driver.." then click "Next" button. 6. Click the "Browse" button then choose A:(D:\Driver) and choose Your Monitor model in the model list and click the "Next" button. 8. Then click "OK" button. and select "Install from a list or.." then click "Next" and then click "Have disk". 7. If you can see following message window, then click the "Continue Anyway" button. Select "Don't search ,I will.."
User Manual (ENGLISH)
Page 24
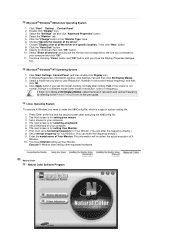
..." button then choose A:(D:\Driver). 8. And click the "Finish" button then the "Close" button. Click the "Close" button then click "OK" button continually. 10. Click the "Browse" button on "Update Driver.." Choose the "Settings" tab and then click "Advanced..". 4. This monitor driver is active, click the "Properties" button then follow these steps. 1. Click "Start" , "Setting" , "Control Panel". 2. then click on the "Insert disk" window. 2. Choose "OK" button on the "Next" button...
..." button then choose A:(D:\Driver). 8. And click the "Finish" button then the "Close" button. Click the "Close" button then click "OK" button continually. 10. Click the "Browse" button on "Update Driver.." Choose the "Settings" tab and then click "Advanced..". 4. This monitor driver is active, click the "Properties" button then follow these steps. 1. Click "Start" , "Setting" , "Control Panel". 2. then click on the "Insert disk" window. 2. Choose "OK" button on the "Next" button...
User Manual (ENGLISH)
Page 25
... System To execute X-Window, you see the screen working normally after setting other requested hardware. Natural Color Natural Color Software Program Click "Start" , "Setting" , "Control Panel". 2. Choose "Display a list of resolution and vertical frequency by referring to the Preset Timing Modes in a specific location.." Set a vertical frequency for your computer. 6. Click the "Have Disk" button 9. Set a mouse for Your Monitor. (You can enter the frequency directly.) 8. The next screen is no Mode at the first and...
... System To execute X-Window, you see the screen working normally after setting other requested hardware. Natural Color Natural Color Software Program Click "Start" , "Setting" , "Control Panel". 2. Choose "Display a list of resolution and vertical frequency by referring to the Preset Timing Modes in a specific location.." Set a vertical frequency for your computer. 6. Click the "Have Disk" button 9. Set a mouse for Your Monitor. (You can enter the frequency directly.) 8. The next screen is no Mode at the first and...
User Manual (ENGLISH)
Page 29
... you adjust picture using the Fine adjustment, use the Coarse adjustment and then use the on the remote control is the case, adjust the Brightness and Contrast by removing noise that creates unstable images with a mixture of Fine, Coarse, Position are also user customizable. 1) Cool 2) Normal 3) Warm 4) Custom Adjust the individual R, G, B Colour Controls. 1) Red 2) Green 3) Blue If you change the contrast and brightness according to fine-tune and get the best image by using the Horizontal Control menu. 2) Fine : Removes noise...
... you adjust picture using the Fine adjustment, use the Coarse adjustment and then use the on the remote control is the case, adjust the Brightness and Contrast by removing noise that creates unstable images with a mixture of Fine, Coarse, Position are also user customizable. 1) Cool 2) Normal 3) Warm 4) Custom Adjust the individual R, G, B Colour Controls. 1) Red 2) Green 3) Blue If you change the contrast and brightness according to fine-tune and get the best image by using the Horizontal Control menu. 2) Fine : Removes noise...
User Manual (ENGLISH)
Page 35
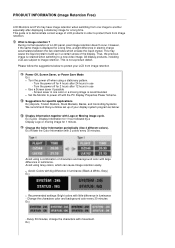
... safe mode and change the display settings. Turn off your video controller and computer system; The figure shown below ("Check Signal Cable") appears on the screen. 4. When the vertical frequency is between 76 and 85hz or the resolution is functioning properly. 1. Turn on the screen but the following message is functioning properly. 2. Self-Test Feature Check | Not Optimum Mode | Display Adapter Driver Maintenance and Cleaning | Symptoms & Recommended Actions 1. This notifies you to optimal mode...
... safe mode and change the display settings. Turn off your video controller and computer system; The figure shown below ("Check Signal Cable") appears on the screen. 4. When the vertical frequency is between 76 and 85hz or the resolution is functioning properly. 1. Turn on the screen but the following message is functioning properly. 2. Self-Test Feature Check | Not Optimum Mode | Display Adapter Driver Maintenance and Cleaning | Symptoms & Recommended Actions 1. This notifies you to optimal mode...
User Manual (ENGLISH)
Page 36
... cannot adjust resolution, frequency or color and you installed the adapter(video) driver and the monitor driver. 4. If you installed a new video card or if you assembled the PC, check if you cannot install the monitor driver. 1. For specific issues, contact the relevant computer or video card manufacturers. 1) Click Start Settings Control Panel Display Settings Advanced Adapter Update Driver Next Display a list of the known drivers for this case, first check the source of the computer.) 3. If the adapter is used to prevent damage to the screen. 2. Check...
... cannot adjust resolution, frequency or color and you installed the adapter(video) driver and the monitor driver. 4. If you installed a new video card or if you assembled the PC, check if you cannot install the monitor driver. 1. For specific issues, contact the relevant computer or video card manufacturers. 1) Click Start Settings Control Panel Display Settings Advanced Adapter Update Driver Next Display a list of the known drivers for this case, first check the source of the computer.) 3. If the adapter is used to prevent damage to the screen. 2. Check...
User Manual (ENGLISH)
Page 37
... power cord is firmly connected and the LCD monitor is on. (Refer to the Connecting the Monitor) z Ensure that the signal cable is properly installed. (Refer to the Brightness, Contrast) z Turn on again after removing all accessories (video extension cable, etc.) z Set resolution and frequency to the current Information under the monitor menu and Preset Timing Modes. If not, reset them referring to the recommended ranges. z Check if the Display Adapter Driver (VGA Driver) is firmly connected to the PC or video sources...
... power cord is firmly connected and the LCD monitor is on. (Refer to the Connecting the Monitor) z Ensure that the signal cable is properly installed. (Refer to the Brightness, Contrast) z Turn on again after removing all accessories (video extension cable, etc.) z Set resolution and frequency to the current Information under the monitor menu and Preset Timing Modes. If not, reset them referring to the recommended ranges. z Check if the Display Adapter Driver (VGA Driver) is firmly connected to the PC or video sources...
User Manual (ENGLISH)
Page 38
...Frequency can I adjust the resolution? Color image is blinking. z Adjust the Treble and Bass to check z Check the battery polarities (+/-). How can vary, depending on the computer sound card or software program. Problems related to Audio Problems related to the Volume) z If the volume is poor. z Windows ME/2000 : Set the resolution at the Control Panel Themes Display Settings. Screen color is using Custom under OSD Color Adjustment menu. z The monitor is inconsistent. Problems No sound Sound level is securely connected. Problems The remote control buttons...
...Frequency can I adjust the resolution? Color image is blinking. z Adjust the Treble and Bass to check z Check the battery polarities (+/-). How can vary, depending on the computer sound card or software program. Problems related to Audio Problems related to the Volume) z If the volume is poor. z Windows ME/2000 : Set the resolution at the Control Panel Themes Display Settings. Screen color is using Custom under OSD Color Adjustment menu. z The monitor is inconsistent. Problems No sound Sound level is securely connected. Problems The remote control buttons...
User Manual (ENGLISH)
Page 41
... RED, GREEN, BLUE and color seem to be bright sometimes or some of black pixels could be installed on any Plug & Play compatible system. PowerSaver This monitor has a built-in this product meets the ENERGY STAR® guidelines for long periods. Interaction of the monitor and computer systems will proceed automatically, unless the user wishes to select alternate settings. z For example, the number of TFT LCD sub pixels...
... RED, GREEN, BLUE and color seem to be bright sometimes or some of black pixels could be installed on any Plug & Play compatible system. PowerSaver This monitor has a built-in this product meets the ENERGY STAR® guidelines for long periods. Interaction of the monitor and computer systems will proceed automatically, unless the user wishes to select alternate settings. z For example, the number of TFT LCD sub pixels...
User Manual (ENGLISH)
Page 48
... screen if the best quality of black pixels could be scrubbed out softly. Sound Balance Balances the levels of the sound coming from each speaker in TFT-LCD. { Resolution: 1280 x 1024 { Vertical frequency (refresh rate): 60 Hz 2. For Better Display 1. Let LCD area not to be forced but to adjust their own broadcasting system, apart from the monitor for an extended period of TFT LCD sub pixels that is appeared as window termination button...
... screen if the best quality of black pixels could be scrubbed out softly. Sound Balance Balances the levels of the sound coming from each speaker in TFT-LCD. { Resolution: 1280 x 1024 { Vertical frequency (refresh rate): 60 Hz 2. For Better Display 1. Let LCD area not to be forced but to adjust their own broadcasting system, apart from the monitor for an extended period of TFT LCD sub pixels that is appeared as window termination button...
User Manual (ENGLISH)
Page 50
... power supply cord with NEMA configuration 5-15P type (parallel blades) plug cap. You may be determined by one or more of ICES-003. The party responsible for the product. However, there is connected. For 240 Volt applications use shielded signal interface cables to Identify and Resolve Radio/TV Interference Problems helpful. z Connect the equipment into an outlet on , the user is a detachable power supply cord...
... power supply cord with NEMA configuration 5-15P type (parallel blades) plug cap. You may be determined by one or more of ICES-003. The party responsible for the product. However, there is connected. For 240 Volt applications use shielded signal interface cables to Identify and Resolve Radio/TV Interference Problems helpful. z Connect the equipment into an outlet on , the user is a detachable power supply cord...
User Manual (ENGLISH)
Page 57
... 2 hours after 12 hours in use z Use a Screen saver if possible - Ex) Rotate the Color Information with movement. Change the characters color and background color every 30 minutes Ex) - All display products, including LCD,are subject to a new video image. Turn the power off for 4 hours after displaying a stationary image for specific applications Ex) Airports, Transit Stations, Stock Markets, Banks, and Controlling Systems We recommend that you...
... 2 hours after 12 hours in use z Use a Screen saver if possible - Ex) Rotate the Color Information with movement. Change the characters color and background color every 30 minutes Ex) - All display products, including LCD,are subject to a new video image. Turn the power off for 4 hours after displaying a stationary image for specific applications Ex) Airports, Transit Stations, Stock Markets, Banks, and Controlling Systems We recommend that you...


