Quick Guide (easy Manual) (ver.1.0) (English)
Page 5
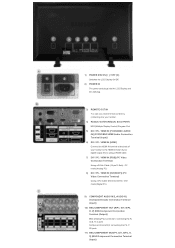
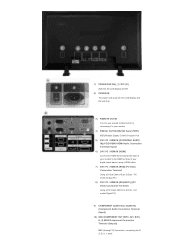
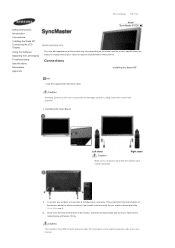
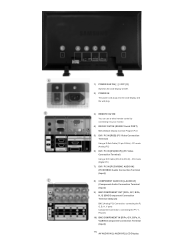
... pin D-Sub) - 1) POWER S/W ON [ | ] / OFF [O] Switches the LCD Display On/Off. 2) POWER IN The power cord plugs into the LCD Display and the wall plug. 3) REMOTE OUT/IN You can use a wired remote control by connecting it to your monitor. 4) RS232C OUT/IN (RS232C Serial PORT) MDC(Multiple Display Control) Program Port 5) DVI / PC / HDMI IN...
... pin D-Sub) - 1) POWER S/W ON [ | ] / OFF [O] Switches the LCD Display On/Off. 2) POWER IN The power cord plugs into the LCD Display and the wall plug. 3) REMOTE OUT/IN You can use a wired remote control by connecting it to your monitor. 4) RS232C OUT/IN (RS232C Serial PORT) MDC(Multiple Display Control) Program Port 5) DVI / PC / HDMI IN...
Quick Guide (easy Manual) (ver.1.0) (English)
Page 7
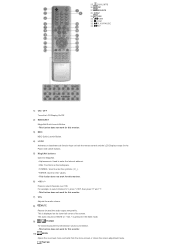
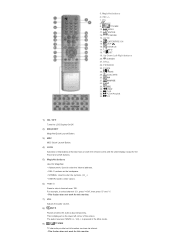
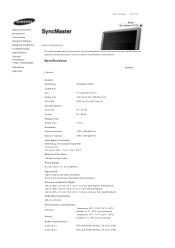
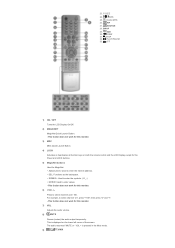
..., to select channels over 100. This fuction does not work for this monitor. 3) MDC MDC Quick Launch Button. 4) LOCK Activates or deactivates all function keys on both the remote control and the LCD Display except for the Power and LOCK buttons. 5) MagicNet buttons Used for this... monitor. 7) VOL Adjusts the audio volume. 8) MUTE Pauses (mutes) the audio output temporarily. This fuction does not work for this monitor. 6) +100 -/-- ENTER PIP 27...
..., to select channels over 100. This fuction does not work for this monitor. 3) MDC MDC Quick Launch Button. 4) LOCK Activates or deactivates all function keys on both the remote control and the LCD Display except for the Power and LOCK buttons. 5) MagicNet buttons Used for this... monitor. 7) VOL Adjusts the audio volume. 8) MUTE Pauses (mutes) the audio output temporarily. This fuction does not work for this monitor. 6) +100 -/-- ENTER PIP 27...
Quick Guide (easy Manual) (ver.1.0) (English)
Page 8
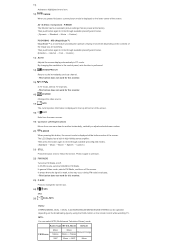
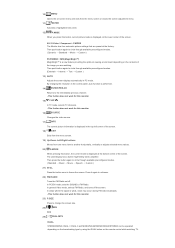
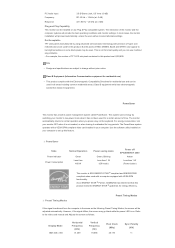
...work for this monitor. 16) SOURCE Changes the video source. 17) INFO The current picture information is displayed in PC mode. You can be operated depending on the broadcasting type by using the DUAL button on /off the screen. The LCD Display has a built-in the control panel, auto function ...is performed. 14) ENTER/PRE-CH Returns to FM Radio. AV / S-Video / Component : P.MODE The Monitor has four automatic picture settings that are watching. In PC/DVI mode...
...work for this monitor. 16) SOURCE Changes the video source. 17) INFO The current picture information is displayed in PC mode. You can be operated depending on the broadcasting type by using the DUAL button on /off the screen. The LCD Display has a built-in the control panel, auto function ...is performed. 14) ENTER/PRE-CH Returns to FM Radio. AV / S-Video / Component : P.MODE The Monitor has four automatic picture settings that are watching. In PC/DVI mode...

Quick Guide (easy Manual) (ver.1.0) (English)
Page 10
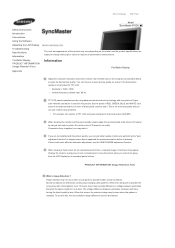
... the Software Adjusting the LCD Display Troubleshooting Specifications Information Appendix Model SyncMaster 570DX The color and appearance of the product may differ for your product, a Cover Hole is inserted. This protects the hole at the bottom of the monitor. For information on the model, and the product... specifications are subject to install the stand with the Cover Hole into the marked place and fasten it into the hole at the bottom of performance enhancement. Caution Samsung Electronics will not ...
... the Software Adjusting the LCD Display Troubleshooting Specifications Information Appendix Model SyncMaster 570DX The color and appearance of the product may differ for your product, a Cover Hole is inserted. This protects the hole at the bottom of the monitor. For information on the model, and the product... specifications are subject to install the stand with the Cover Hole into the marked place and fasten it into the hole at the bottom of performance enhancement. Caution Samsung Electronics will not ...

User Manual (user Manual) (ver.1.0) (English)
Page 34
... set the Home Theatre PC function to the floor. Wall Mount Kit Specifications (VESA) Install your nearest dealer. Product Family LCD-TV inches 23 ~ 26 32 ~ 40 46 ~ 52 57 PDP-TV/MONITOR 57 ~ 70 80 ~ 42 ~ 58 70 63 80 ~ VESA Spec. (A * B) 200 * 100 200 * 200 600 * 400 700 * ... Blue Screen : Off Melody : Off PC Home Theatre PC : Off More 1 Press the MENU button to display the menu. 2 Press the ▲ or ▼ button to select Setup, then press the Move Enter Return ENTER button. 3 Press the ▲ or ▼ button...
... set the Home Theatre PC function to the floor. Wall Mount Kit Specifications (VESA) Install your nearest dealer. Product Family LCD-TV inches 23 ~ 26 32 ~ 40 46 ~ 52 57 PDP-TV/MONITOR 57 ~ 70 80 ~ 42 ~ 58 70 63 80 ~ VESA Spec. (A * B) 200 * 100 200 * 200 600 * 400 700 * ... Blue Screen : Off Melody : Off PC Home Theatre PC : Off More 1 Press the MENU button to display the menu. 2 Press the ▲ or ▼ button to select Setup, then press the Move Enter Return ENTER button. 3 Press the ▲ or ▼ button...
User Manual (user Manual) (ver.1.0) (English)
Page 14
... pin D-Sub) - 1) POWER S/W ON [ | ] / OFF [O] Switches the LCD Display On/Off. 2) POWER IN The power cord plugs into the LCD Display and the wall plug. 3) REMOTE OUT/IN You can use a wired remote control by connecting it to your monitor. 4) RS232C OUT/IN (RS232C Serial PORT) MDC(Multiple Display Control) Program Port 5) DVI / PC / HDMI IN...
... pin D-Sub) - 1) POWER S/W ON [ | ] / OFF [O] Switches the LCD Display On/Off. 2) POWER IN The power cord plugs into the LCD Display and the wall plug. 3) REMOTE OUT/IN You can use a wired remote control by connecting it to your monitor. 4) RS232C OUT/IN (RS232C Serial PORT) MDC(Multiple Display Control) Program Port 5) DVI / PC / HDMI IN...
User Manual (user Manual) (ver.1.0) (English)
Page 16
...TTX/MIX TV channels provide text information services via teletext. - VOL + is displayed on both the remote control and the LCD Display except for the Power and LOCK buttons. 5) MagicNet buttons Used for this monitor. REW 31. For example, to select channels over 100. MUTE 9. ENTER ...the audio output temporarily. MENU 11. Up-Down Left-Right buttons 20. SOURCE 17. PIP 27. FF 1) ON / OFF Turns the LCD Display On/Off. 2) MAGICNET MagicNet Quick Launch Button. 3) MDC MDC Quick Launch Button. 4) LOCK Activates or deactivates all function keys on the ...
...TTX/MIX TV channels provide text information services via teletext. - VOL + is displayed on both the remote control and the LCD Display except for the Power and LOCK buttons. 5) MagicNet buttons Used for this monitor. REW 31. For example, to select channels over 100. MUTE 9. ENTER ...the audio output temporarily. MENU 11. Up-Down Left-Right buttons 20. SOURCE 17. PIP 27. FF 1) ON / OFF Turns the LCD Display On/Off. 2) MAGICNET MagicNet Quick Launch Button. 3) MDC MDC Quick Launch Button. 4) LOCK Activates or deactivates all function keys on the ...
User Manual (user Manual) (ver.1.0) (English)
Page 17
... Internet → Text → Custom ) 13) AUTO Adjusts the screen display automatically in the control panel, auto function is a new feature providing the optimum viewing environment depending on the contents of the image you press this monitor. 15) CH/P In TV mode, selects TV channels. - In areas... → Custom ) PC/DVI/BNC : M/B (MagicBright™) MagicBright™ is performed. 14) ENTER/PRE-CH Returns to FM Radio. The LCD Display has a built-in the top left corner of the screen. 18) EXIT Exits from the menu screen. 19) Up-Down Left-Right buttons Moves from...
... Internet → Text → Custom ) 13) AUTO Adjusts the screen display automatically in the control panel, auto function is a new feature providing the optimum viewing environment depending on the contents of the image you press this monitor. 15) CH/P In TV mode, selects TV channels. - In areas... → Custom ) PC/DVI/BNC : M/B (MagicBright™) MagicBright™ is performed. 14) ENTER/PRE-CH Returns to FM Radio. The LCD Display has a built-in the top left corner of the screen. 18) EXIT Exits from the menu screen. 19) Up-Down Left-Right buttons Moves from...
User Manual (user Manual) (ver.1.0) (English)
Page 20
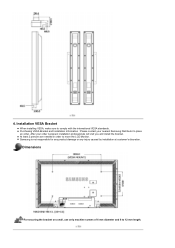
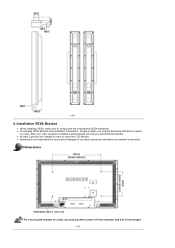
After your nearest Samsung Distributor to 12 mm length. Installation VESA Bracket z When installing VESA, make sure to move the LCD Monitor. z At least 2 persons are needed in order to comply with the international VESA standards. Dimensions For securing the bracket on a ...wall, use only machine screws of 6 mm diameter and 8 to place an order. z Samsung is placed, installation professionals will visit ...
After your nearest Samsung Distributor to 12 mm length. Installation VESA Bracket z When installing VESA, make sure to move the LCD Monitor. z At least 2 persons are needed in order to comply with the international VESA standards. Dimensions For securing the bracket on a ...wall, use only machine screws of 6 mm diameter and 8 to place an order. z Samsung is placed, installation professionals will visit ...
User Manual (user Manual) (ver.1.0) (English)
Page 24
...Connections Installing the Stand KIT Connecting the LCD Display Using the Software Adjusting the LCD Display Troubleshooting Specifications Information Appendix Model SyncMaster 570DX The color and appearance of the product may differ for each product model. This protects the hole at the bottom of the monitor. For information on the model, and... enhancement. Connections Installing the Stand KIT Note • Only the supplied bolts should be responsible for reasons of the monitor where the stand is included as an accessory. Caution Samsung Electronics will not be used.
...Connections Installing the Stand KIT Connecting the LCD Display Using the Software Adjusting the LCD Display Troubleshooting Specifications Information Appendix Model SyncMaster 570DX The color and appearance of the product may differ for each product model. This protects the hole at the bottom of the monitor. For information on the model, and... enhancement. Connections Installing the Stand KIT Note • Only the supplied bolts should be responsible for reasons of the monitor where the stand is included as an accessory. Caution Samsung Electronics will not be used.
User Manual (user Manual) (ver.1.0) (English)
Page 68
Safety Instructions Introduction Connections Using the Software Adjusting the Monitor Troubleshooting Specifications General PowerSaver Preset Timing Modes Information Appendix Select Language Main Page Model SyncMaster 570DX The color and appearance of the product may vary depending ... 0.5 Vrms (-9 dB) Audio Input 2 RCA Jack Red(R) White(L), 0.5 Vrms (-9 dB) Specifications General General General Model Name SyncMaster 570DX LCD Panel Size 57 " Diagonal (143 cm) Display area 1251.36 mm (H) x 703.89 mm (V) Pixel Pitch 0.651 mm (H) x 0.651 mm (V) Synchronization Horizontal 30 ...
Safety Instructions Introduction Connections Using the Software Adjusting the Monitor Troubleshooting Specifications General PowerSaver Preset Timing Modes Information Appendix Select Language Main Page Model SyncMaster 570DX The color and appearance of the product may vary depending ... 0.5 Vrms (-9 dB) Audio Input 2 RCA Jack Red(R) White(L), 0.5 Vrms (-9 dB) Specifications General General General Model Name SyncMaster 570DX LCD Panel Size 57 " Diagonal (143 cm) Display area 1251.36 mm (H) x 703.89 mm (V) Pixel Pitch 0.651 mm (H) x 0.651 mm (V) Synchronization Horizontal 30 ...
User Manual (user Manual) (ver.1.0) (English)
Page 69
...be installed on your computer to set up this feature. Dot Acceptable TFT LCD panels manufactured by switching your monitor OFF when it is on the keyboard. For energy conservation, turn your monitor to low-power mode when it unattended for this product. Use the software ... This monitor has a built-in this product meets the ENERGY STAR ® guidelines for a certain amount of TFT LCD sub pixels contained in power management system called PowerSaver. As an ENERGY STAR ® Partner, SAMSUNG has determined that this product are used for energy efficiency. Display Mode ...
...be installed on your computer to set up this feature. Dot Acceptable TFT LCD panels manufactured by switching your monitor OFF when it is on the keyboard. For energy conservation, turn your monitor to low-power mode when it unattended for this product. Use the software ... This monitor has a built-in this product meets the ENERGY STAR ® guidelines for a certain amount of TFT LCD sub pixels contained in power management system called PowerSaver. As an ENERGY STAR ® Partner, SAMSUNG has determined that this product are used for energy efficiency. Display Mode ...
User Manual (user Manual) (ver.1.0) (English)
Page 71
...LCD panels manufactured by using a soft cloth to be decreased. But the pixels of RED, GREEN, BLUE and WHITE color seem to polish. Select Language Main Page Safety Instructions Introduction Connections Using the Software Adjusting the LCD Display Troubleshooting Specifications Information For Better Display PRODUCT INFORMATION (Image Retention Free) Appendix Model SyncMaster 570DX...Image Retention ? When cleaning the monitor and the panel outside, please apply the recommended small amount of cleaner by performing the "auto adjustment function" in display screen that work the liquid ...
...LCD panels manufactured by using a soft cloth to be decreased. But the pixels of RED, GREEN, BLUE and WHITE color seem to polish. Select Language Main Page Safety Instructions Introduction Connections Using the Software Adjusting the LCD Display Troubleshooting Specifications Information For Better Display PRODUCT INFORMATION (Image Retention Free) Appendix Model SyncMaster 570DX...Image Retention ? When cleaning the monitor and the panel outside, please apply the recommended small amount of cleaner by performing the "auto adjustment function" in display screen that work the liquid ...
User Manual (user Manual) (ver.1.0) (English)
Page 14
... mode (Analog PC) 6) DVI / PC IN [DVI(HDCP)] (PC Video Connection Terminal) Using a DVI Cable (DVI-D to your monitor. 4) RS232C OUT/IN (RS232C Serial PORT) MDC(Multiple Display Control) Program Port 5) DVI / PC IN [RGB] (PC Video Connection Terminal) Using a D-Sub Cable (15 pin D-Sub) -... G/Y, B/PB, H, V] (BNC/Component Connection Terminal (Input)) 11) AV AUDIO IN [L-AUDIO-R] (LCD Display 1) POWER S/W ON [ | ] / OFF [O] Switches the LCD Display On/Off. 2) POWER IN The power cord plugs into the LCD Display and the wall plug. 3) REMOTE OUT/IN You can use a wired remote control by connecting it to...
... mode (Analog PC) 6) DVI / PC IN [DVI(HDCP)] (PC Video Connection Terminal) Using a DVI Cable (DVI-D to your monitor. 4) RS232C OUT/IN (RS232C Serial PORT) MDC(Multiple Display Control) Program Port 5) DVI / PC IN [RGB] (PC Video Connection Terminal) Using a D-Sub Cable (15 pin D-Sub) -... G/Y, B/PB, H, V] (BNC/Component Connection Terminal (Input)) 11) AV AUDIO IN [L-AUDIO-R] (LCD Display 1) POWER S/W ON [ | ] / OFF [O] Switches the LCD Display On/Off. 2) POWER IN The power cord plugs into the LCD Display and the wall plug. 3) REMOTE OUT/IN You can use a wired remote control by connecting it to...
User Manual (user Manual) (ver.1.0) (English)
Page 16
... values. - 23. STOP 32. This is pressed in the Mute mode. 9) TTX/MIX VOL + is displayed on both the remote control and the LCD Display except for the Power and LOCK buttons. 5) MagicNet buttons Used for this monitor. 3) MDC MDC Quick Launch Button. 4) LOCK Activates or deactivates all function keys on the lower left...
... values. - 23. STOP 32. This is pressed in the Mute mode. 9) TTX/MIX VOL + is displayed on both the remote control and the LCD Display except for the Power and LOCK buttons. 5) MagicNet buttons Used for this monitor. 3) MDC MDC Quick Launch Button. 4) LOCK Activates or deactivates all function keys on the lower left...

User Manual (user Manual) (ver.1.0) (English)
Page 17
TV channels provide text information services via teletext. - AV / S-Video / Component : P.MODE The Monitor has four automatic picture settings that are watching. The LCD Display has a built-in the control panel, auto function is displayed at the factory. In PC/DVI mode, sets the SOUND to circle through available preconfigured modes. (Entertain → Internet → Text...
TV channels provide text information services via teletext. - AV / S-Video / Component : P.MODE The Monitor has four automatic picture settings that are watching. The LCD Display has a built-in the control panel, auto function is displayed at the factory. In PC/DVI mode, sets the SOUND to circle through available preconfigured modes. (Entertain → Internet → Text...
User Manual (user Manual) (ver.1.0) (English)
Page 20
z At least 2 persons are needed in order to comply with the international VESA standards. After your nearest Samsung Distributor to 12 mm length. Installation VESA Bracket z When installing VESA, make sure to move the LCD Monitor. z Samsung is placed, installation professionals will visit you and install the bracket. Dimensions For securing the bracket on a wall...
z At least 2 persons are needed in order to comply with the international VESA standards. After your nearest Samsung Distributor to 12 mm length. Installation VESA Bracket z When installing VESA, make sure to move the LCD Monitor. z Samsung is placed, installation professionals will visit you and install the bracket. Dimensions For securing the bracket on a wall...

User Manual (user Manual) (ver.1.0) (English)
Page 24
... are subject to the user manual. Insert the screw provided with the Caution label folded backwards. 1) To protect your monitor, please place the Cover Hole over it. 2) Insert it into the marked place and fasten it firmly. Connections Installing... Safety Instructions Introduction Connections Installing the Stand KIT Connecting the LCD Display Using the Software Adjusting the LCD Display Troubleshooting Specifications Information Appendix Model SyncMaster 570DX The color and appearance of the product may differ for each product model. Caution Samsung Electronics will not be used.
... are subject to the user manual. Insert the screw provided with the Caution label folded backwards. 1) To protect your monitor, please place the Cover Hole over it. 2) Insert it into the marked place and fasten it firmly. Connections Installing... Safety Instructions Introduction Connections Installing the Stand KIT Connecting the LCD Display Using the Software Adjusting the LCD Display Troubleshooting Specifications Information Appendix Model SyncMaster 570DX The color and appearance of the product may differ for each product model. Caution Samsung Electronics will not be used.
User Manual (user Manual) (ver.1.0) (English)
Page 26
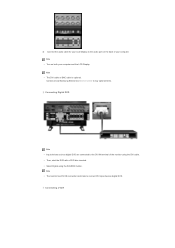
... with a DVD disc inserted. • Select Digital using the SOURCE button. Connecting a VCR Note • The monitor has DVI IN connection terminals to the DVI IN terminal of your computer and the LCD Display. Contact a local Samsung Electronics Service Center to buy optional items. Connecting Digital DVD Note • Input devices such as digital...
... with a DVD disc inserted. • Select Digital using the SOURCE button. Connecting a VCR Note • The monitor has DVI IN connection terminals to the DVI IN terminal of your computer and the LCD Display. Contact a local Samsung Electronics Service Center to buy optional items. Connecting Digital DVD Note • Input devices such as digital...
User Manual (user Manual) (ver.1.0) (English)
Page 30
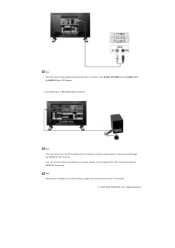
Connecting to a Wired Remote Control Note • You can control your monitor by allowing it to receive remote control signals from other devices through the REMOTE IN terminal. Note • Connect a set of other devices through the ... allowing it to receive the remote control signals of audio cables between the AUX L, R jacks on the AUDIO SYSTEM and the AUDIO OUT [L-AUDIO-R] on LCD Display. ALL Rights Reserved Note • Restrictions: Available only if other devices support the wired remote control I/O terminals. © 1995~2007...
Connecting to a Wired Remote Control Note • You can control your monitor by allowing it to receive remote control signals from other devices through the REMOTE IN terminal. Note • Connect a set of other devices through the ... allowing it to receive the remote control signals of audio cables between the AUX L, R jacks on the AUDIO SYSTEM and the AUDIO OUT [L-AUDIO-R] on LCD Display. ALL Rights Reserved Note • Restrictions: Available only if other devices support the wired remote control I/O terminals. © 1995~2007...


