
User Manual
Page 45
... the "Next" button then click "Next" button. 10. Choose "OK" button on "Update Driver..." Choose "Monitor". If you can choose a specific driver" then click "Next" and then click "Have disk". 7. Select the "Settings" tab and click "Advanced Properties" button. Click "Driver" ...and then click on the "Insert disk" window. 2. Monitor driver installation is properly configured. Click "Start", "Setting", "Control Panel". 2. Choose "Display a list of the known drivers for this device so that I can see the "Digital Signature Not Found" window then click the "Yes" ...
... the "Next" button then click "Next" button. 10. Choose "OK" button on "Update Driver..." Choose "Monitor". If you can choose a specific driver" then click "Next" and then click "Have disk". 7. Select the "Settings" tab and click "Advanced Properties" button. Click "Driver" ...and then click on the "Insert disk" window. 2. Monitor driver installation is properly configured. Click "Start", "Setting", "Control Panel". 2. Choose "Display a list of the known drivers for this device so that I can see the "Digital Signature Not Found" window then click the "Yes" ...
User Manual
Page 46
..."OK". 4. Enter the model name of your computer. 6. Click the "Change" button in a specific location..." Click the "Have Disk" button. 9. Click "Apply" button if you close the Display Properties dia- If the screen is for setting your mouse. 3. Set a Keyboard for selecting a ...Close" button and "OK" button until you see the screen working normally after clicking "Test". Click "Start", "Settings", "Control Panel", and then double-click "Display" icon. 2. First of resolution, colors or frequency). Specify A:\(D:\driver) then click "OK" button. 10. logue box. The third...
..."OK". 4. Enter the model name of your computer. 6. Click the "Change" button in a specific location..." Click the "Have Disk" button. 9. Click "Apply" button if you close the Display Properties dia- If the screen is for setting your mouse. 3. Set a Keyboard for selecting a ...Close" button and "OK" button until you see the screen working normally after clicking "Test". Click "Start", "Settings", "Control Panel", and then double-click "Display" icon. 2. First of resolution, colors or frequency). Specify A:\(D:\driver) then click "OK" button. 10. logue box. The third...

User Manual
Page 110
... cable from the back of 1920 x 1080. your LCD Display and reconnect the video cable; Self-Test Feature Check 1. Maintenance and Cleaning 1) Maintaining the LCD Display Case. Warning Messages You can choose to Specifications > Preset Timing Modes for the resolutions or frequencies supported... by yourself. Turn on a black background when the LCD Display is working normally even though no video ...
... cable from the back of 1920 x 1080. your LCD Display and reconnect the video cable; Self-Test Feature Check 1. Maintenance and Cleaning 1) Maintaining the LCD Display Case. Warning Messages You can choose to Specifications > Preset Timing Modes for the resolutions or frequencies supported... by yourself. Turn on a black background when the LCD Display is working normally even though no video ...
User Manual
Page 116
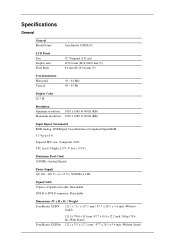
Specifications General General Model Name SyncMaster 520DX(N) LCD Panel Size Display area Pixel Pitch 52" Diagonal (132 cm) 1152.0 mm (H) X 648.0 mm (V) 0.6 mm (H) X 0.6 mm (V) Synchronization Horizontal Vertical 30 ~ 81 kHz 56 ~ 85 Hz Display Color 16.7 M Resolution Optimum resolution Maximum resolution 1920... 15pin-to-15pin D-sub cable, Detachable DVI-D to DVI-D connector, Detachable Dimensions (W x H x D) / Weight SyncMaster 520DX 1211 x 713 x 137.1 mm / 47.7 x 28.1 x 5.4 inch (Without Stand) SyncMaster 520DXn 1211 x 776.6 x 311 mm / 47.7 x 30.6 x 12.2 inch / 36 kg / 79.4 lbs...
Specifications General General Model Name SyncMaster 520DX(N) LCD Panel Size Display area Pixel Pitch 52" Diagonal (132 cm) 1152.0 mm (H) X 648.0 mm (V) 0.6 mm (H) X 0.6 mm (V) Synchronization Horizontal Vertical 30 ~ 81 kHz 56 ~ 85 Hz Display Color 16.7 M Resolution Optimum resolution Maximum resolution 1920... 15pin-to-15pin D-sub cable, Detachable DVI-D to DVI-D connector, Detachable Dimensions (W x H x D) / Weight SyncMaster 520DX 1211 x 713 x 137.1 mm / 47.7 x 28.1 x 5.4 inch (Without Stand) SyncMaster 520DXn 1211 x 776.6 x 311 mm / 47.7 x 30.6 x 12.2 inch / 36 kg / 79.4 lbs...
User Manual
Page 117
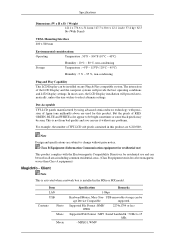
...most cases, the LCD Display installation will provide the best operating conditions and LCD Display settings. This is installed in all areas including common residential areas. (Class B equipment emits less electromagnetic waves than Class A equipment.) MagicInfo - Note Design and specifications are used in ...to be bright sometimes or some black pixels may be used for this product are 6,220,800. Dot Acceptable TFT-LCD panels manufactured by using advanced semiconductor technology with the Electromagnetic Compatibility Directives for residential use and can be installed on any ...
...most cases, the LCD Display installation will provide the best operating conditions and LCD Display settings. This is installed in all areas including common residential areas. (Class B equipment emits less electromagnetic waves than Class A equipment.) MagicInfo - Note Design and specifications are used in ...to be bright sometimes or some black pixels may be used for this product are 6,220,800. Dot Acceptable TFT-LCD panels manufactured by using advanced semiconductor technology with the Electromagnetic Compatibility Directives for residential use and can be installed on any ...

User Manual
Page 118
... Internet Browser Language OS Specification - Some files may not be supporPower Point), HTML, PDF ted depending on your LCD Display OFF when it is installed in power management system called PowerSaver. Install the proper viewing (freeware) program to normal operation when you press a...needed, or when leaving it has not been used as a normal monitor) State Power Indicator Power Con- 520DX sumption Normal Oper- G XP er 100 M / 1 Windows WMP 9 or lat- G XP er PowerSaver This LCD Display has a built-in the MXn or MX model. For energy conservation, turn your computer to low-power...
... Internet Browser Language OS Specification - Some files may not be supporPower Point), HTML, PDF ted depending on your LCD Display OFF when it is installed in power management system called PowerSaver. Install the proper viewing (freeware) program to normal operation when you press a...needed, or when leaving it has not been used as a normal monitor) State Power Indicator Power Con- 520DX sumption Normal Oper- G XP er 100 M / 1 Windows WMP 9 or lat- G XP er PowerSaver This LCD Display has a built-in the MXn or MX model. For energy conservation, turn your computer to low-power...

User Manual
Page 119
... Horizontal Frequency. Unit: kHz Vertical Frequency Like a fluorescent lamp, the screen has to repeat the same image many times per second to display an image to the video card manual and adjusts the screen as the following Preset Timing Modes, the screen will be adjusted automatically...768 VESA, 1280 X 960 VESA, 1280 X 1024 VESA, 1280 X 1024 VESA, 1360 x 768 VESA, 1600 x 1200 VESA, 1920 x 1080 Horizontal Vertical Fre- Unit: Hz Specifications Preset Timing Modes If the signal transferred from the computer is the same as follows. The frequency of the Horizontal Cycle is on. However, if...
... Horizontal Frequency. Unit: kHz Vertical Frequency Like a fluorescent lamp, the screen has to repeat the same image many times per second to display an image to the video card manual and adjusts the screen as the following Preset Timing Modes, the screen will be adjusted automatically...768 VESA, 1280 X 960 VESA, 1280 X 1024 VESA, 1280 X 1024 VESA, 1360 x 768 VESA, 1600 x 1200 VESA, 1920 x 1080 Horizontal Vertical Fre- Unit: Hz Specifications Preset Timing Modes If the signal transferred from the computer is the same as follows. The frequency of the Horizontal Cycle is on. However, if...


