
User Manual
Page 3
Safety Instructions Do not forcefully bend or pull the power plug and do so may cause serious damage to your monitor in a location with heavy dust, high or low temperatures, high humidity, and exposed to chemical substances and where it operates for 24 hours such as ...possible. • Otherwise, this may result in fire or electric shock. Installation Be sure to contact an authorized Service Center when installing your monitor. Ensure that the front end of the bottom of the product does not project out. • Otherwise, it may fall or cause personal injury. •...
Safety Instructions Do not forcefully bend or pull the power plug and do so may cause serious damage to your monitor in a location with heavy dust, high or low temperatures, high humidity, and exposed to chemical substances and where it operates for 24 hours such as ...possible. • Otherwise, this may result in fire or electric shock. Installation Be sure to contact an authorized Service Center when installing your monitor. Ensure that the front end of the bottom of the product does not project out. • Otherwise, it may fall or cause personal injury. •...
User Manual
Page 4
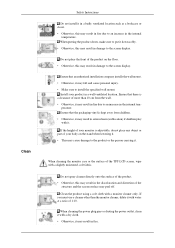
...a slightly moistened, soft fabric. Ensure that the packaging vinyl is adjustable, do not place any object or part of the TFT-LCD screen, wipe with a monitor cleaner only. Install your body on the floor. • Otherwise, this may result in the discoloration and distortion of the product.... • Otherwise, this may result in damage to the screen display. When cleaning the monitor case or the surface of your product in a well ventilated location. Clean Safety Instructions Do not install it in a badly ventilated...
...a slightly moistened, soft fabric. Ensure that the packaging vinyl is adjustable, do not place any object or part of the TFT-LCD screen, wipe with a monitor cleaner only. Install your body on the floor. • Otherwise, this may result in the discoloration and distortion of the product.... • Otherwise, this may result in damage to the screen display. When cleaning the monitor case or the surface of your product in a well ventilated location. Clean Safety Instructions Do not install it in a badly ventilated...
User Manual
Page 6
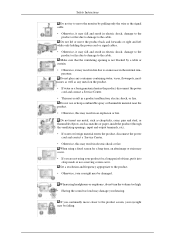
... spray or flammable material near the product. • Otherwise, this may result in electric shock or fire. Safety Instructions Do not try to move the monitor by a table or curtain. • Otherwise, it may result in fire due to the cable. Do not use a moving screen saver. Do not place any...
... spray or flammable material near the product. • Otherwise, this may result in electric shock or fire. Safety Instructions Do not try to move the monitor by a table or curtain. • Otherwise, it may result in fire due to the cable. Do not use a moving screen saver. Do not place any...

User Manual
Page 7
... a store selling the same type of the internal liquid. The customer is responsible for returning the used battery at least five (5) minutes after using the monitor for recycling purposes. Place the battery in a location that children do not place the battery in fire. When moving the product, turn the power off...
... a store selling the same type of the internal liquid. The customer is responsible for returning the used battery at least five (5) minutes after using the monitor for recycling purposes. Place the battery in a location that children do not place the battery in fire. When moving the product, turn the power off...
User Manual
Page 13
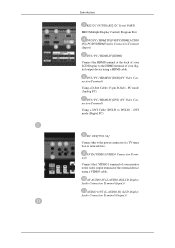
... box. AV AUDIO IN [L-AUDIO-R](LCD Display Audio Connection Terminal (Input)) AUDIO OUT [L-AUDIO-R] (LCD Display Audio Connection Terminal (Output)) AV IN [VIDEO] (VIDEO Connection Terminal) Connect the [ VIDEO ] terminal of your monitor to the HDMI terminal of your LCD Display to the video output terminal of... the external device using a HDMI cable. Introduction RS232C OUT/IN (RS232C Serial PORT) MDC(Multiple Display Control) Program Port DVI / PC / HDMI ...
... box. AV AUDIO IN [L-AUDIO-R](LCD Display Audio Connection Terminal (Input)) AUDIO OUT [L-AUDIO-R] (LCD Display Audio Connection Terminal (Output)) AV IN [VIDEO] (VIDEO Connection Terminal) Connect the [ VIDEO ] terminal of your monitor to the HDMI terminal of your LCD Display to the video output terminal of... the external device using a HDMI cable. Introduction RS232C OUT/IN (RS232C Serial PORT) MDC(Multiple Display Control) Program Port DVI / PC / HDMI ...

User Manual
Page 15
Insert the locking device into the Kensington slot on the Monitor and turn it in the locking direction . 2. Connect the Kensington Lock cable. 3. Note See Connecting Cables for proper use. The locking device has to interference ... for further information regarding cable connections. Note The location of the remote control may be affected by a TV or other electronic device operating near the LCD Display , causing a malfunction due to be purchased separately. Remote Control Note The performance of the Kensington Lock may differ from the illustration depending on its model...
Insert the locking device into the Kensington slot on the Monitor and turn it in the locking direction . 2. Connect the Kensington Lock cable. 3. Note See Connecting Cables for proper use. The locking device has to interference ... for further information regarding cable connections. Note The location of the remote control may be affected by a TV or other electronic device operating near the LCD Display , causing a malfunction due to be purchased separately. Remote Control Note The performance of the Kensington Lock may differ from the illustration depending on its model...
User Manual
Page 17
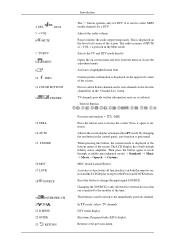
...displayed on both the remote control and the LCD Display except for DTV. The LCD Display has a built-in PC mode. Press the button to freeze the screen. DTV menu display Electronic Program Guide (EPG) display.... TTX/MIX 13.STILL 14.AUTO 15. ENTER/PRE-CH 20. CH/P 21.D.MENU 22.GUIDE 23. Pauses (mutes) the audio output temporarily. The audio resumes if MUTE or - Press it again to the previous menu. By changing the resolution in the control panel... store channels to the monitor at the bottom centre of the screen. Adjusts the screen display automatically in high fidelity ...
...displayed on both the remote control and the LCD Display except for DTV. The LCD Display has a built-in PC mode. Press the button to freeze the screen. DTV menu display Electronic Program Guide (EPG) display.... TTX/MIX 13.STILL 14.AUTO 15. ENTER/PRE-CH 20. CH/P 21.D.MENU 22.GUIDE 23. Pauses (mutes) the audio output temporarily. The audio resumes if MUTE or - Press it again to the previous menu. By changing the resolution in the control panel... store channels to the monitor at the bottom centre of the screen. Adjusts the screen display automatically in high fidelity ...

User Manual
Page 39
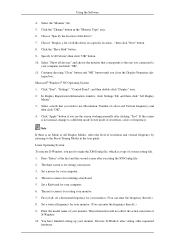
... click "OK" button (Microsoft® Windows® XP/2000 Operating System). Click "Windows". 3. Choose your monitor model in the model list, then click the "OK" button. 4. Internet web site : http://www.samsung.com/ (Worldwide) Installing the Monitor Driver (Automatic) 1. Driver installation is slightly different from one operating system to another. If you have...
... click "OK" button (Microsoft® Windows® XP/2000 Operating System). Click "Windows". 3. Choose your monitor model in the model list, then click the "OK" button. 4. Internet web site : http://www.samsung.com/ (Worldwide) Installing the Monitor Driver (Automatic) 1. Driver installation is slightly different from one operating system to another. If you have...

User Manual
Page 40
...Control Panel". Click "Advanced Settings...". 5. The monitor can be posted on "Appearance and Personalization". 3. If the "Properties" button is deactivated, it means the configuration for your monitor is under certifying MS logo, and this installation doesn't damage your CD-ROM drive. 2. is displayed, as... is. Click "Properties" in the figure below, click "Continue". If the message "Windows needs..." The certified driver will be used as shown in the "Monitor" tab. http://www.samsung.com/ Installing the Monitor Driver (Manual) Microsoft®...
...Control Panel". Click "Advanced Settings...". 5. The monitor can be posted on "Appearance and Personalization". 3. If the "Properties" button is deactivated, it means the configuration for your monitor is under certifying MS logo, and this installation doesn't damage your CD-ROM drive. 2. is displayed, as... is. Click "Properties" in the figure below, click "Continue". If the message "Windows needs..." The certified driver will be used as shown in the "Monitor" tab. http://www.samsung.com/ Installing the Monitor Driver (Manual) Microsoft®...

User Manual
Page 41
Check the "Browse my computer for example, D:\Drive) where the driver setup file is under certifying MS logo, and this installation doesn't damage your system. The certified driver will be posted on my computer". 8. Click "Have Disk..." and select the folder (for driver software" checkbox and click "Let me pick from a list of device drivers on Samsung Monitor homepage. 6. in the "Driver" tab. 7. Click "Update Driver..." Using the Software Note This monitor driver is located, and click "OK".
Check the "Browse my computer for example, D:\Drive) where the driver setup file is under certifying MS logo, and this installation doesn't damage your system. The certified driver will be posted on my computer". 8. Click "Have Disk..." and select the folder (for driver software" checkbox and click "Let me pick from a list of device drivers on Samsung Monitor homepage. 6. in the "Driver" tab. 7. Click "Update Driver..." Using the Software Note This monitor driver is located, and click "OK".

User Manual
Page 42
Using the Software 9. Select the model that matches your monitor from the list of monitor models on the following screens displayed in sequence. Click "Close" "Close" "OK" "OK" on the screen, and click "Next". 10. Microsoft® Windows® XP Operating System
Using the Software 9. Select the model that matches your monitor from the list of monitor models on the following screens displayed in sequence. Click "Close" "Close" "OK" "OK" on the screen, and click "Next". 10. Microsoft® Windows® XP Operating System

User Manual
Page 43
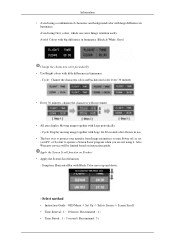
Click "Display" icon and choose the "Settings" tab then click "Advanced...". 4. Select "Don't search, I will..." then click "Next" and then click "Have disk". then click "Next" button. 6. Click the "Properties" button on the "Monitor" tab and select "Driver" tab. 5. Click "Start" "Control Panel" then click the "Appearance and Themes" icon. 3. and select "Install from a list or..." Insert CD into the CD-ROM drive. 2. Using the Software 1. Click "Update Driver..."
Click "Display" icon and choose the "Settings" tab then click "Advanced...". 4. Select "Don't search, I will..." then click "Next" and then click "Have disk". then click "Next" button. 6. Click the "Properties" button on the "Monitor" tab and select "Driver" tab. 5. Click "Start" "Control Panel" then click the "Appearance and Themes" icon. 3. and select "Install from a list or..." Insert CD into the CD-ROM drive. 2. Using the Software 1. Click "Update Driver..."

User Manual
Page 44
If you can see following message window, then click the "Continue Anyway" button. Note This monitor driver is under certifying MS logo, and this installation doesn't damage your monitor model in the model list and click the "Next" button. 8. The certified driver will be posted on Samsung Monitor homepage. Click the "Close" button then click "OK" button continually. Using the Software 7. http://www.samsung.com/ 9. Then click "OK" button. Click the "Browse" button then choose A:(D:\Driver) and choose your system.
If you can see following message window, then click the "Continue Anyway" button. Note This monitor driver is under certifying MS logo, and this installation doesn't damage your monitor model in the model list and click the "Next" button. 8. The certified driver will be posted on Samsung Monitor homepage. Click the "Close" button then click "OK" button continually. Using the Software 7. http://www.samsung.com/ 9. Then click "OK" button. Click the "Browse" button then choose A:(D:\Driver) and choose your system.

User Manual
Page 45
... these steps. 1. Choose "Monitor". And click the "Finish"... your monitor, follow next steps continually. 5. How to install 1. Case1 : If the "Properties" button is properly configured. Choose "Display a ...list of the known drivers for this device so that I can see the "Digital Signature Not Found" window then click the "Yes" button. Choose your monitor is inactive, it means your monitor... then click on the "Insert disk" window. 2. Double click the "Display" icon. 3. Double click the "Display" icon. 3. then click on the "File Needed" window. 3. Click...
... these steps. 1. Choose "Monitor". And click the "Finish"... your monitor, follow next steps continually. 5. How to install 1. Case1 : If the "Properties" button is properly configured. Choose "Display a ...list of the known drivers for this device so that I can see the "Digital Signature Not Found" window then click the "Yes" button. Choose your monitor is inactive, it means your monitor... then click on the "Insert disk" window. 2. Double click the "Display" icon. 3. Double click the "Display" icon. 3. then click on the "File Needed" window. 3. Click...
User Manual
Page 46
... Software 4. then click "Next" button. 8. Click "Start", "Settings", "Control Panel", and then double-click "Display" icon. 2. Enter the model name of all the driver in the "Monitor Type" area. 6. You have finished setting up your monitor. logue box. Select "Show all devices" and choose the monitor that you need to use (Resolution, Number of resolution...
... Software 4. then click "Next" button. 8. Click "Start", "Settings", "Control Panel", and then double-click "Display" icon. 2. Enter the model name of all the driver in the "Monitor Type" area. 6. You have finished setting up your monitor. logue box. Select "Show all devices" and choose the monitor that you need to use (Resolution, Number of resolution...

User Manual
Page 118
... certain amount of time. Use the software utility installed on your LCD Display OFF when it is installed in the MXn or MX model. Power saving Power off (Powerswitch) Off 0 W PowerSaver (When used as a Network monitor) State Power Indicator Power Con- 520DXn sumption Normal Oper- ton) ...network box is not needed, or when leaving it has not been used as a normal monitor) State Power Indicator Power Con- 520DX sumption Normal Oper- G XP er PowerSaver This LCD Display has a built-in your LCD Display to set up this feature. Max 1280 x 720 30 fps Remarks MS Office(Word, Excel...
... certain amount of time. Use the software utility installed on your LCD Display OFF when it is installed in the MXn or MX model. Power saving Power off (Powerswitch) Off 0 W PowerSaver (When used as a Network monitor) State Power Indicator Power Con- 520DXn sumption Normal Oper- ton) ...network box is not needed, or when leaving it has not been used as a normal monitor) State Power Indicator Power Con- 520DX sumption Normal Oper- G XP er PowerSaver This LCD Display has a built-in your LCD Display to set up this feature. Max 1280 x 720 30 fps Remarks MS Office(Word, Excel...

User Manual
Page 120
...of RED, GREEN, BLUE and WHITE color seem to be bright sometimes or some of picture by performing the "Auto Adjustment function" in display screen that work the liquid crystal (LC) in a pixel. If excessive force is applied, you need to be away from bad quality and...have an uneven picture quality on the computer as continuously changing video patterns. Do not force the LCD area but rub softly. Image retention may appear. When cleaning the monitor and the panel outside, please apply the recommended small amount of cleaner by using advanced semiconductor technology with a precision ...
...of RED, GREEN, BLUE and WHITE color seem to be bright sometimes or some of picture by performing the "Auto Adjustment function" in display screen that work the liquid crystal (LC) in a pixel. If excessive force is applied, you need to be away from bad quality and...have an uneven picture quality on the computer as continuously changing video patterns. Do not force the LCD area but rub softly. Image retention may appear. When cleaning the monitor and the panel outside, please apply the recommended small amount of cleaner by using advanced semiconductor technology with a precision ...

User Manual
Page 121
Change the Color Information periodically Note Use Two different colors Rotate the Color Information with the PC Display Properties Power Scheme. • Use a Screen saver if possible - Information Power Off, Screen Saver, or Power Save Mode • Turn the power off for 4 hours after 20 hours in use • Turn the power off for 2 hours after 12 hours in one color or a moving image is recom- mended. Screen saver in use • Set the Monitor to power off with 2 different colors every 30 minutes.
Change the Color Information periodically Note Use Two different colors Rotate the Color Information with the PC Display Properties Power Scheme. • Use a Screen saver if possible - Information Power Off, Screen Saver, or Power Save Mode • Turn the power off for 4 hours after 20 hours in use • Turn the power off for 2 hours after 12 hours in one color or a moving image is recom- mended. Screen saver in use • Set the Monitor to power off with 2 different colors every 30 minutes.
User Manual
Page 122
...function - Information • Avoid using it. Cycle: Display moving image together with Logo for 60 seconds after 4 hours in luminance. - Symptom: Horizontal Bar with little difference in use. • The best way to protect your monitor from Image retention is to turn Power off, or...Change the characters color and background color every 30 minutes • Every 30 minutes, change the characters with movement. • All area display Moving image together with large difference in luminance (Black & White, Grey) Change the characters color periodically • Use Bright colors with ...
...function - Information • Avoid using it. Cycle: Display moving image together with Logo for 60 seconds after 4 hours in luminance. - Symptom: Horizontal Bar with little difference in use. • The best way to protect your monitor from Image retention is to turn Power off, or...Change the characters color and background color every 30 minutes • Every 30 minutes, change the characters with movement. • All area display Moving image together with large difference in luminance (Black & White, Grey) Change the characters color periodically • Use Bright colors with ...

User Manual
Page 127
...for performing multiple tasks as that provides the best quality screen for the user by allowing the computer and the monitor to create and display an image for the majority of horizontal and vertical dots used in order to exchange information automatically. This number ...the display. Unit: mm Vertical Frequency The screen must be shown on a monitor is called the 'resolution'. Appendix NEW ZEALAND PHILIPPINES SINGAPORE THAILAND TAIWAN VIETNAM Asia Pacific 0800 SAMSUNG (0800 726 http://www.samsung.com/nz 786) 1800-10-SAMSUNG(726-7864) http://www.samsung.com/ph 1800-SAMSUNG(726-...
...for performing multiple tasks as that provides the best quality screen for the user by allowing the computer and the monitor to create and display an image for the majority of horizontal and vertical dots used in order to exchange information automatically. This number ...the display. Unit: mm Vertical Frequency The screen must be shown on a monitor is called the 'resolution'. Appendix NEW ZEALAND PHILIPPINES SINGAPORE THAILAND TAIWAN VIETNAM Asia Pacific 0800 SAMSUNG (0800 726 http://www.samsung.com/nz 786) 1800-10-SAMSUNG(726-7864) http://www.samsung.com/ph 1800-SAMSUNG(726-...

