
User Manual
Page 11
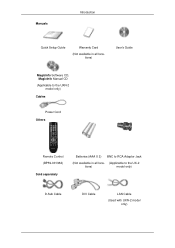
Manuals Introduction Quick Setup Guide Warranty Card (Not available in all locations) User's Guide MagicInfo Software CD, MagicInfo Manual CD (Applicable to the UXN-2 model only) Cables Power Cord Others Remote Control (BP59-00138A) Sold separately Batteries (AAA X 2) BNC to RCA Adaptor Jack (Not available in all loca- (Applicable to the UX-2 tions) model only) D-Sub Cable DVI Cable LAN Cable (Used with UXN-2 model only)
Manuals Introduction Quick Setup Guide Warranty Card (Not available in all locations) User's Guide MagicInfo Software CD, MagicInfo Manual CD (Applicable to the UXN-2 model only) Cables Power Cord Others Remote Control (BP59-00138A) Sold separately Batteries (AAA X 2) BNC to RCA Adaptor Jack (Not available in all loca- (Applicable to the UX-2 tions) model only) D-Sub Cable DVI Cable LAN Cable (Used with UXN-2 model only)
User Manual
Page 13
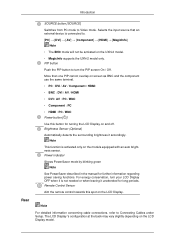
... information concerning cable connections, refer to Video mode. For energy conservation, turn the PIP screen On / Off. More than one PIP cannot overlap on screen as BNC and the component use the same terminal. • PC : DVI / AV / Component / HDMI • BNC : DVI / AV / HDMI • DVI / AV : PC / BNC • Component : PC • HDMI : PC / BNC Power button [ ] Use this spot on the LCD Display model. Introduction Rear SOURCE button [SOURCE] Switches from PC mode to Connecting Cables under Setup.
... information concerning cable connections, refer to Video mode. For energy conservation, turn the PIP screen On / Off. More than one PIP cannot overlap on screen as BNC and the component use the same terminal. • PC : DVI / AV / Component / HDMI • BNC : DVI / AV / HDMI • DVI / AV : PC / BNC • Component : PC • HDMI : PC / BNC Power button [ ] Use this spot on the LCD Display model. Introduction Rear SOURCE button [SOURCE] Switches from PC mode to Connecting Cables under Setup.
User Manual
Page 14
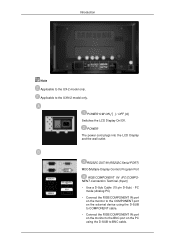
... to COMPONENT cable. • Connect the RGB/COMPONENT IN port on the monitor to the BNC port on the PC using the D-SUB to the UX-2 model only. POWER S/W ON [ │ ] / OFF [O] Switches the LCD Display On/Off. RS232C OUT/IN (RS232C Serial PORT) MDC(Multiple Display Control) Program Port RGB/COMPONENT IN (PC/COMPONENT Connection Terminal (Input)) • Use a D-Sub Cable (15 pin D-Sub) - Introduction Note Applicable to BNC cable. POWER The power cord plugs into the LCD Display and the wall...
... to COMPONENT cable. • Connect the RGB/COMPONENT IN port on the monitor to the BNC port on the PC using the D-SUB to the UX-2 model only. POWER S/W ON [ │ ] / OFF [O] Switches the LCD Display On/Off. RS232C OUT/IN (RS232C Serial PORT) MDC(Multiple Display Control) Program Port RGB/COMPONENT IN (PC/COMPONENT Connection Terminal (Input)) • Use a D-Sub Cable (15 pin D-Sub) - Introduction Note Applicable to BNC cable. POWER The power cord plugs into the LCD Display and the wall...
User Manual
Page 23
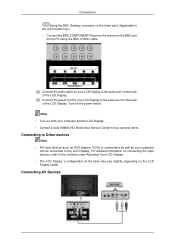
... SAMSUNG Electronics Service Center to buy optional items. Connecting to Other devices Note • AV input devices such as DVD players, VCRs or camcorders as well as your LCD Display to the power port on connecting AV input devices, refer to BNC cable. Connecting AV Devices Connect the power cord for your LCD Display to the LCD Display. Turn on the back of the LCD Display. Connect the audio cable for your computer can be connected to the audio port...
... SAMSUNG Electronics Service Center to buy optional items. Connecting to Other devices Note • AV input devices such as DVD players, VCRs or camcorders as well as your LCD Display to the power port on connecting AV input devices, refer to BNC cable. Connecting AV Devices Connect the power cord for your LCD Display to the LCD Display. Turn on the back of the LCD Display. Connect the audio cable for your computer can be connected to the audio port...
User Manual
Page 26
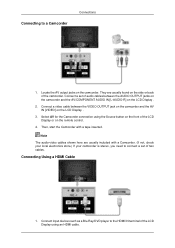
... need to connect a set of audio cables between the VIDEO OUTPUT jack on the camcorder and the AV IN [VIDEO] on the side or back of the camcorder. Select AV for the Camcorder connection using an HDMI cable. Note The audio-video cables shown here are usually found on the LCD Display . 3. Connect input devices such as a Blu-Ray/DVD player to a Camcorder Connections 1. Connecting to the HDMI IN terminal of the LCD Display using the Source button on...
... need to connect a set of audio cables between the VIDEO OUTPUT jack on the camcorder and the AV IN [VIDEO] on the side or back of the camcorder. Select AV for the Camcorder connection using an HDMI cable. Note The audio-video cables shown here are usually found on the LCD Display . 3. Connect input devices such as a Blu-Ray/DVD player to a Camcorder Connections 1. Connecting to the HDMI IN terminal of the LCD Display using the Source button on...

User Manual
Page 28
... colored audio output terminals of the digital output device, and connect the opposite jack to HDMI cable. 2. Connect a set of the LCD Display using the SOURCE button on the front of the LCD Display or on the remote control. • For an explanation of the LCD Display. Connect the red and white jacks of an RCA to stereo (for the connection to a DTV Set Top Box using a DVI to the DVI / RGB /HDMI AUDIO IN terminal of Component video, see your Set Top Box owner's manual. Connections 1. Connect...
... colored audio output terminals of the digital output device, and connect the opposite jack to HDMI cable. 2. Connect a set of the LCD Display using the SOURCE button on the front of the LCD Display or on the remote control. • For an explanation of the LCD Display. Connect the red and white jacks of an RCA to stereo (for the connection to a DTV Set Top Box using a DVI to the DVI / RGB /HDMI AUDIO IN terminal of Component video, see your Set Top Box owner's manual. Connections 1. Connect...

User Manual
Page 31
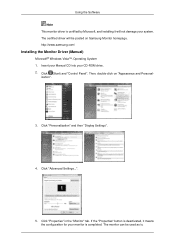
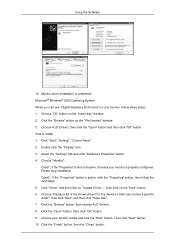
...://www.samsung.com/ Installing the Monitor Driver (Automatic) 1. Prepare a blank disk and download the driver program file at the Internet web site shown here. Follow the directions appropriate for the monitor driver, insert the CDROM included with this monitor. Click "Windows". 3. Then click "OK" button (Microsoft® Windows® XP/2000 Operating System). Insert CD into the CD-ROM drive. 2. Using the Software Monitor Driver Note When...
...://www.samsung.com/ Installing the Monitor Driver (Automatic) 1. Prepare a blank disk and download the driver program file at the Internet web site shown here. Follow the directions appropriate for the monitor driver, insert the CDROM included with this monitor. Click "Windows". 3. Then click "OK" button (Microsoft® Windows® XP/2000 Operating System). Insert CD into the CD-ROM drive. 2. Using the Software Monitor Driver Note When...
User Manual
Page 32
... by Microsoft, and installing it will be used as is. Using the Software Note This monitor driver is completed. Click "Advanced Settings...". 5. The monitor can be posted on "Appearance and Personal- The certified driver will not damage your CD-ROM drive. 2. http://www.samsung.com/ Installing the Monitor Driver (Manual) Microsoft® Windows Vista™, Operating System 1. Click (Start) and "Control Panel". Insert your Manual CD into your...
... by Microsoft, and installing it will be used as is. Using the Software Note This monitor driver is completed. Click "Advanced Settings...". 5. The monitor can be posted on "Appearance and Personal- The certified driver will not damage your CD-ROM drive. 2. http://www.samsung.com/ Installing the Monitor Driver (Manual) Microsoft® Windows Vista™, Operating System 1. Click (Start) and "Control Panel". Insert your Manual CD into your...
User Manual
Page 33
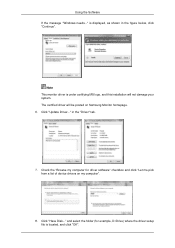
...". 8. Check the "Browse my computer for example, D:\Drive) where the driver setup file is displayed, as shown in the "Driver" tab. 7. and select the folder (for driver software" checkbox and click "Let me pick from a list of device drivers on Samsung Monitor homepage. 6. is located, and click "OK". The certified driver will not damage your system. Click "Update Driver..." Using the Software If the message "Windows needs..."
...". 8. Check the "Browse my computer for example, D:\Drive) where the driver setup file is displayed, as shown in the "Driver" tab. 7. and select the folder (for driver software" checkbox and click "Let me pick from a list of device drivers on Samsung Monitor homepage. 6. is located, and click "OK". The certified driver will not damage your system. Click "Update Driver..." Using the Software If the message "Windows needs..."
User Manual
Page 35
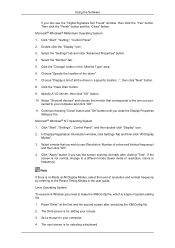
Click "Start" → "Control Panel", then click the "Appearance and Themes" icon. 3. and select "Install from a list or..." Select "Don't search, I will...", then click "Next" and then click "Have disk". then click "Next" button. 6. Click "Display" icon and choose the "Settings" tab then click "Advanced...". 4. Click the "Properties" button on the "Monitor" tab and select "Driver" tab. 5. Click "Update Driver..." Using the Software 1. Insert CD into the CD-ROM drive. 2.
Click "Start" → "Control Panel", then click the "Appearance and Themes" icon. 3. and select "Install from a list or..." Select "Don't search, I will...", then click "Next" and then click "Have disk". then click "Next" button. 6. Click "Display" icon and choose the "Settings" tab then click "Advanced...". 4. Click the "Properties" button on the "Monitor" tab and select "Driver" tab. 5. Click "Update Driver..." Using the Software 1. Insert CD into the CD-ROM drive. 2.
User Manual
Page 37
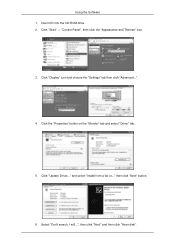
... Properties" button. 4. Using the Software 10. Microsoft® Windows® 2000 Operating System When you can choose a specific driver", then click "Next" and then click "Have disk". 7. Choose "OK" button on your monitor, follow the next steps. 5. Choose A:(D:\Driver), then click the "Open" button and then click "OK" button. Click "Start", "Setting", "Control Panel". 2. Please stop installation Case2 : If the "Properties" button is completed. Choose "Display a list of...
... Properties" button. 4. Using the Software 10. Microsoft® Windows® 2000 Operating System When you can choose a specific driver", then click "Next" and then click "Have disk". 7. Choose "OK" button on your monitor, follow the next steps. 5. Choose A:(D:\Driver), then click the "Open" button and then click "OK" button. Click "Start", "Setting", "Control Panel". 2. Please stop installation Case2 : If the "Properties" button is completed. Choose "Display a list of...
User Manual
Page 38
..., click Settings Tab and then click "All Display Modes". 3. Click the "Change" button in a specific location...", then click "Next" button. 8. Choose "Display a list of resolution and vertical frequency by referring to use (Resolution, Number of the driver". 7. Linux Operating System To execute X-Window, you connected to your computer. 4. The third screen is for your computer and click "OK". 11. Select the "Monitor" tab. 5. Select "Show all the driver in the "Monitor Type...
..., click Settings Tab and then click "All Display Modes". 3. Click the "Change" button in a specific location...", then click "Next" button. 8. Choose "Display a list of resolution and vertical frequency by referring to use (Resolution, Number of the driver". 7. Linux Operating System To execute X-Window, you connected to your computer. 4. The third screen is for your computer and click "OK". 11. Select the "Monitor" tab. 5. Select "Show all the driver in the "Monitor Type...
User Manual
Page 40
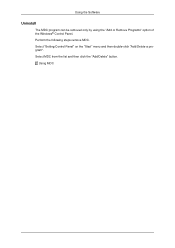
Using the Software Uninstall The MDC program can be removed only by using the "Add or Remove Programs" option of the Windows® Control Panel. Select MDC from the list and then click the "Add/Delete" button. Using MDC Perform the following steps remove MDC. Select "Setting/Control Panel" on the "Start" menu and then double-click "Add/Delete a program".
Using the Software Uninstall The MDC program can be removed only by using the "Add or Remove Programs" option of the Windows® Control Panel. Select MDC from the list and then click the "Add/Delete" button. Using MDC Perform the following steps remove MDC. Select "Setting/Control Panel" on the "Start" menu and then double-click "Add/Delete a program".
User Manual
Page 54
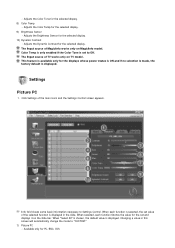
... display. 8) Color Temp - Color Temp is only enabled if the Color Tone is displayed. Changing a value in the slide. Adjusts the Color Tone for the displays whose power status is ON and if no selection is made, the factory default is displayed in this screen will automatically change the mode to Settings Control. Settings Picture PC 1. Click Settings of the selected function is displayed. When "Select All" is chosen, the default value is set...
... display. 8) Color Temp - Color Temp is only enabled if the Color Tone is displayed. Changing a value in the slide. Adjusts the Color Tone for the displays whose power status is ON and if no selection is made, the factory default is displayed in this screen will automatically change the mode to Settings Control. Settings Picture PC 1. Click Settings of the selected function is displayed. When "Select All" is chosen, the default value is set...

User Manual
Page 61
... TV model. No selection: Displays the Factory Default Value. The remote may malfunction due to the Com1 port) - Check the connection of TV works only on the Power Control Info Grid - Apply current time to data conflict. - The Input source of RS232C. (Check if it is a number between 0 and 25. (Adjust using the Display menu) Note : A Display Set ID must be a value between 0 and 25 . 2. Both On Timer and Off Timer have...
... TV model. No selection: Displays the Factory Default Value. The remote may malfunction due to the Com1 port) - Check the connection of TV works only on the Power Control Info Grid - Apply current time to data conflict. - The Input source of RS232C. (Check if it is a number between 0 and 25. (Adjust using the Display menu) Note : A Display Set ID must be a value between 0 and 25 . 2. Both On Timer and Off Timer have...
User Manual
Page 66
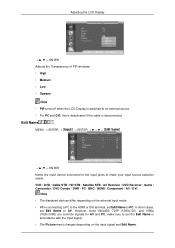
... sure to AV. VCR / DVD / Cable STB / HD STB / Satellite STB / AV Receiver / DVD Receiver / Game / Camcorder / DVD Combo / DHR / PC / BNC / HDMI / Component / AV / DVI Note • The displayed devices differ depending on the external input mode. • When connecting a PC to the HDMI or DVI terminal, set the Edit Name in accordance with the input signal. • The Picture menu changes depending on the input signal and Edit Name. Edit Name...
... sure to AV. VCR / DVD / Cable STB / HD STB / Satellite STB / AV Receiver / DVD Receiver / Game / Camcorder / DVD Combo / DHR / PC / BNC / HDMI / Component / AV / DVI Note • The displayed devices differ depending on the external input mode. • When connecting a PC to the HDMI or DVI terminal, set the Edit Name in accordance with the input signal. • The Picture menu changes depending on the input signal and Edit Name. Edit Name...
User Manual
Page 103
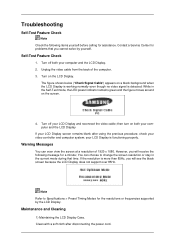
... black screen because the LCD Display does not support over 85Hz. Turn off your computer and the LCD Display. 2. Turn on the screen. 4. Turn off both your computer and the LCD Display If your LCD Display screen remains blank after disconnecting the power cord. Warning Messages You can choose to Specifications > Preset Timing Modes for problems that time. Self-Test Feature Check 1. Note Refer to change the screen resolution or stay in the Self-Test mode, the LED power...
... black screen because the LCD Display does not support over 85Hz. Turn off your computer and the LCD Display. 2. Turn on the screen. 4. Turn off both your computer and the LCD Display If your LCD Display screen remains blank after disconnecting the power cord. Warning Messages You can choose to Specifications > Preset Timing Modes for problems that time. Self-Test Feature Check 1. Note Refer to change the screen resolution or stay in the Self-Test mode, the LED power...
User Manual
Page 110
....2 inch (Without 460UX-2, 460UXN-2 Stand) / 22.2 kg / 48.9 lbs(UXn-2), 21.2 kg / 46.7 lbs(UX-2) 1049 x 603 x 118 mm / 41.3 x 23.7 x 4.6 inch (With Stand) VESA Mounting Interface 600 x 400 mm Environmental considerations SyncMas- The interaction of RED, GREEN, BLUE and WHITE color appear to country, please check the label on any Plug & Play compatible system. In most cases, the LCD Display installation will provide the best operating conditions and LCD Display settings. Operating...
....2 inch (Without 460UX-2, 460UXN-2 Stand) / 22.2 kg / 48.9 lbs(UXn-2), 21.2 kg / 46.7 lbs(UX-2) 1049 x 603 x 118 mm / 41.3 x 23.7 x 4.6 inch (With Stand) VESA Mounting Interface 600 x 400 mm Environmental considerations SyncMas- The interaction of RED, GREEN, BLUE and WHITE color appear to country, please check the label on any Plug & Play compatible system. In most cases, the LCD Display installation will provide the best operating conditions and LCD Display settings. Operating...
User Manual
Page 115
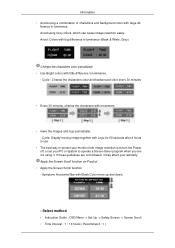
... with Black Color move up and down. - Cycle: Display moving image together with large dif- Information • Avoid using a combination of characters and background color with Logo for 60 seconds after 4 hours in use. • The best way to protect your monitor from Image retention is to operate a Screen Saver program when you are not followed, it . Select method • Instruction Guide : OSD Menu -> Set...
... with Black Color move up and down. - Cycle: Display moving image together with large dif- Information • Avoid using a combination of characters and background color with Logo for 60 seconds after 4 hours in use. • The best way to protect your monitor from Image retention is to operate a Screen Saver program when you are not followed, it . Select method • Instruction Guide : OSD Menu -> Set...

User Manual
Page 116
... / Vertical Bar with Black Color move up and down . - Symptom: Dot with Black Color move while erasing the display Select method • Instruction Guide : OSD Menu -> Set Up -> Safety Screen -> Bar • Time Interval : 1 ~ 10 hours ( Recommend : 1 ) • Time Period : 10 ~ 50 seconds ( Recommend : 50 ) Note ( Please check CD's User Guide at "OSD Function", some model's will not available ) Apply the Screen Pixel function on Product...
... / Vertical Bar with Black Color move up and down . - Symptom: Dot with Black Color move while erasing the display Select method • Instruction Guide : OSD Menu -> Set Up -> Safety Screen -> Bar • Time Interval : 1 ~ 10 hours ( Recommend : 1 ) • Time Period : 10 ~ 50 seconds ( Recommend : 50 ) Note ( Please check CD's User Guide at "OSD Function", some model's will not available ) Apply the Screen Pixel function on Product...


