

User Manual
Page 1
SyncMaster 400EX(n), 460EX(n), 550EX(n) LCD Display User Manual The color and the appearance may differ depending on the product, and the specifications are subject to change without prior notice to improve the performance.
SyncMaster 400EX(n), 460EX(n), 550EX(n) LCD Display User Manual The color and the appearance may differ depending on the product, and the specifications are subject to change without prior notice to improve the performance.

User Manual
Page 10
Unpacking Introduction Manuals LCD Display Quick Setup Guide Warranty Card (Not available in all locations) User's Guide MagicInfo Software CD, MagicInfo Manual CD (Applicable to the EXn model only) Cables Power Cord Others D-Sub Cable Remote Control (BP59-00138A) Batteries (AAA X 2) (Not available in all locations) HOLDER-WIRE 2EA (BN61-05373A) 9
Unpacking Introduction Manuals LCD Display Quick Setup Guide Warranty Card (Not available in all locations) User's Guide MagicInfo Software CD, MagicInfo Manual CD (Applicable to the EXn model only) Cables Power Cord Others D-Sub Cable Remote Control (BP59-00138A) Batteries (AAA X 2) (Not available in all locations) HOLDER-WIRE 2EA (BN61-05373A) 9

User Manual
Page 12
... when leaving it unattended for further information regarding power saving functions. Power indicator Shows PowerSaver mode by blinking green Note See PowerSaver described in the manual for long periods. Remote Control Sensor Aim the remote control towards this button for turning the LCD Display on and off. The LCD Display's configuration...
... when leaving it unattended for further information regarding power saving functions. Power indicator Shows PowerSaver mode by blinking green Note See PowerSaver described in the manual for long periods. Remote Control Sensor Aim the remote control towards this button for turning the LCD Display on and off. The LCD Display's configuration...

User Manual
Page 15
... To lock the product, follow these steps: 1. Slide the end of the cable with the locking device. 14 For exact instructions, see the User Manual supplied with the lock attached through the looped end of the locking device may differ depending on the Monitor ( ). 4. Note The [AUDIO OUT] port...Kensington lock cable. 3. Insert the locking device into the Kensington slot on the model and the manufacturer, refer to the User Manual supplied with the locking device for 460EX(n) and 550EX(n) models. Introduction AUDIO IN Connect the [AUDIO IN] port on the monitor to lock the product so that they...
... To lock the product, follow these steps: 1. Slide the end of the cable with the locking device. 14 For exact instructions, see the User Manual supplied with the lock attached through the looped end of the locking device may differ depending on the Monitor ( ). 4. Note The [AUDIO OUT] port...Kensington lock cable. 3. Insert the locking device into the Kensington slot on the model and the manufacturer, refer to the User Manual supplied with the locking device for 460EX(n) and 550EX(n) models. Introduction AUDIO IN Connect the [AUDIO IN] port on the monitor to lock the product so that they...
User Manual
Page 17
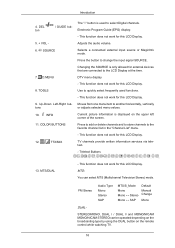
... button to the LCD Display at the time. FM Stereo Audio Type Mono Stereo SAP MTS/S_Mode Mono Mono ↔ Stereo Mono ↔ SAP Default Manual Change Mono DUAL- DEL ton / GUIDE but- 5. + VOL 6. Up-Down Left-Right buttons 10. This function does not work for this LCD Display. Selects a connected...
... button to the LCD Display at the time. FM Stereo Audio Type Mono Stereo SAP MTS/S_Mode Mono Mono ↔ Stereo Mono ↔ SAP Default Manual Change Mono DUAL- DEL ton / GUIDE but- 5. + VOL 6. Up-Down Left-Right buttons 10. This function does not work for this LCD Display. Selects a connected...
User Manual
Page 40
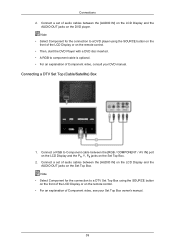
... on the front of the LCD Display or on the remote control. • For an explanation of Component video, consult your Set Top Box owner's manual. 39 Note • Select Component for the connection to a DVD player using the SOURCE button on the front of the LCD Display or on the..., Y, PB jacks on the Set Top Box. 2. Connections 2. Connect a RGB to component cable is optional. • For an explanation of Component video, see your DVD manual.
... on the front of the LCD Display or on the remote control. • For an explanation of Component video, consult your Set Top Box owner's manual. 39 Note • Select Component for the connection to a DVD player using the SOURCE button on the front of the LCD Display or on the..., Y, PB jacks on the Set Top Box. 2. Connections 2. Connect a RGB to component cable is optional. • For an explanation of Component video, see your DVD manual.
User Manual
Page 44
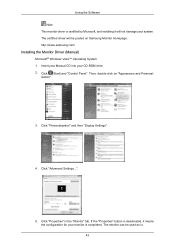
...system. Click (Start) and "Control Panel". Click "Personalization" and then "Display Settings". 4. Then, double-click on Samsung Monitor homepage. ization". 3. Insert your Manual CD into your monitor is completed. Click "Advanced Settings...". 5. The monitor can be posted on "Appearance and Personal-... http://www.samsung.com/ Installing the Monitor Driver (Manual) Microsoft® Windows Vista™, Operating System 1. Using the Software Note This monitor driver is . 43 ...
...system. Click (Start) and "Control Panel". Click "Personalization" and then "Display Settings". 4. Then, double-click on Samsung Monitor homepage. ization". 3. Insert your Manual CD into your monitor is completed. Click "Advanced Settings...". 5. The monitor can be posted on "Appearance and Personal-... http://www.samsung.com/ Installing the Monitor Driver (Manual) Microsoft® Windows Vista™, Operating System 1. Using the Software Note This monitor driver is . 43 ...
User Manual
Page 62
.... 6) Repeat - The Input source of TV works only on . 5) Holiday - - Available selections include Once, EveryDay, Mon~Fri, Mon~Sat, Sat~Sun, and Manual. z EveryDay : EveryDay: The Timer repeats daily. z Manual : Select a day of the holidays. 3) Add - Applies the Holiday Management function to go off only once. z Mon~Fri : The Timer repeats from...
.... 6) Repeat - The Input source of TV works only on . 5) Holiday - - Available selections include Once, EveryDay, Mon~Fri, Mon~Sat, Sat~Sun, and Manual. z EveryDay : EveryDay: The Timer repeats daily. z Manual : Select a day of the holidays. 3) Add - Applies the Holiday Management function to go off only once. z Mon~Fri : The Timer repeats from...

User Manual
Page 69
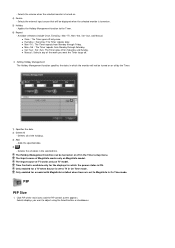
... determine Lamp Value (the light intensity from the lamp), based on the "Maintenance" icon in the Lamp Control menu. The Manual Lamp Control automatically turns off if you adjust using the Manual Lamp Control. 3) Ambient Light - Click on the ambient light intensity. The Input source of MagicInfo works only on TV model... items appears. 1) Maintenance - Allows the Maintenance Control function for the displays whose power status is selected in the Lamp Control menu. Auto Lamp Control and Manual Lamp Control are only enabled when User Control Mode is ON.
... determine Lamp Value (the light intensity from the lamp), based on the "Maintenance" icon in the Lamp Control menu. The Manual Lamp Control automatically turns off if you adjust using the Manual Lamp Control. 3) Ambient Light - Click on the ambient light intensity. The Input source of MagicInfo works only on TV model... items appears. 1) Maintenance - Allows the Maintenance Control function for the displays whose power status is selected in the Lamp Control menu. Auto Lamp Control and Manual Lamp Control are only enabled when User Control Mode is ON.

User Manual
Page 78
... adjust using the MDC. Selects displays you want to indicate when the Source is set and then set the IP address. 4) It can automatically or manually set and then apply the IP Address, Subnet and Gateway of the selected monitor. or refresh or delete selected devices. 2) The IP Address, ID (Ethernet...
... adjust using the MDC. Selects displays you want to indicate when the Source is set and then set the IP address. 4) It can automatically or manually set and then apply the IP Address, Subnet and Gateway of the selected monitor. or refresh or delete selected devices. 2) The IP Address, ID (Ethernet...

User Manual
Page 83
z Mon~Fri : The Timer repeats from Monday through Friday. z Manual : Select a day of the week you want the Timer to TV in the selected line. Setting Holiday Management The Holiday Management function specifies the dates ... the Holiday Management function to adjust using the Select All button or checkboxes. Available selections include Once, EveryDay, Mon~Fri, Mon~Sat, Sat~Sun, and Manual. z Once : The Timer goes off on or off in On Time mode. z Sat~Sun : Sat~Sun: The Timer goes off only once. Only enabled for...
z Mon~Fri : The Timer repeats from Monday through Friday. z Manual : Select a day of the week you want the Timer to TV in the selected line. Setting Holiday Management The Holiday Management function specifies the dates ... the Holiday Management function to adjust using the Select All button or checkboxes. Available selections include Once, EveryDay, Mon~Fri, Mon~Sat, Sat~Sun, and Manual. z Once : The Timer goes off on or off in On Time mode. z Sat~Sun : Sat~Sun: The Timer goes off only once. Only enabled for...

User Manual
Page 90
The Auto Lamp Control automatically turns off if you adjust using the Manual Lamp Control. 3) Ambient Light - The Maintenance Control feature is available only for models that will automatically determine Lamp Value (the light intensity from the ... 1) Maintenance - Allows you adjust using the Auto Lamp Control. - The Input source of the time. The Manual Lamp Control automatically turns off if you to display the Maintenance screen. Auto Lamp Control and Manual Lamp Control are only enabled when User Control Mode is ON. Maintenance Scroll 1. You can specify a Reference...
The Auto Lamp Control automatically turns off if you adjust using the Manual Lamp Control. 3) Ambient Light - The Maintenance Control feature is available only for models that will automatically determine Lamp Value (the light intensity from the ... 1) Maintenance - Allows you adjust using the Auto Lamp Control. - The Input source of the time. The Manual Lamp Control automatically turns off if you to display the Maintenance screen. Auto Lamp Control and Manual Lamp Control are only enabled when User Control Mode is ON. Maintenance Scroll 1. You can specify a Reference...

User Manual
Page 122
... → → → ENTER → → ENTER→ [Holiday Management] → ENTER → [Add] ENTER You can set using the Clock Set menu. • The Manual option allows you to automatically turn on or off at a specified time. Note • Only enabled when the clock is set the LCD display to...
... → → → ENTER → → ENTER→ [Holiday Management] → ENTER → [Add] ENTER You can set using the Clock Set menu. • The Manual option allows you to automatically turn on or off at a specified time. Note • Only enabled when the clock is set the LCD display to...

User Manual
Page 135
... • Network Setting • IP Setting : Manual, Auto • IP Address : Manually enter the IP Address if IP Setting is set to Manual. • Subnet Mask : Manually enter the Subnet Mask if IP Setting is set to Manual. • Gateway : Manually enter the Gateway if IP Setting is recommended to use... a separate USB keyboard to Manual. Note • The remote control can only...
... • Network Setting • IP Setting : Manual, Auto • IP Address : Manually enter the IP Address if IP Setting is set to Manual. • Subnet Mask : Manually enter the Subnet Mask if IP Setting is set to Manual. • Gateway : Manually enter the Gateway if IP Setting is recommended to use... a separate USB keyboard to Manual. Note • The remote control can only...
User Manual
Page 144
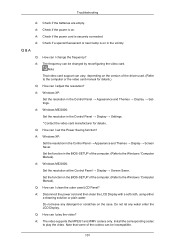
... be changed by reconfiguring the video card. Do not leave any water enter the LCD Display. Install the corresponding codec to the Windows / Computer Manual). Troubleshooting A: Check if the batteries are empty. A: Windows XP: Set the resolution in the Control Panel → Appearance and Themes →.... (Refer to play the video? Set the function in the BIOS-SETUP of the computer. (Refer to the computer or the video card manual for details. A: Windows ME/2000: Set the resolution in the vicinity. Q: How can I set the Power Saving function? A: Check if...
... be changed by reconfiguring the video card. Do not leave any water enter the LCD Display. Install the corresponding codec to the Windows / Computer Manual). Troubleshooting A: Check if the batteries are empty. A: Windows XP: Set the resolution in the Control Panel → Appearance and Themes →.... (Refer to play the video? Set the function in the BIOS-SETUP of the computer. (Refer to the computer or the video card manual for details. A: Windows ME/2000: Set the resolution in the vicinity. Q: How can I set the Power Saving function? A: Check if...
User Manual
Page 148
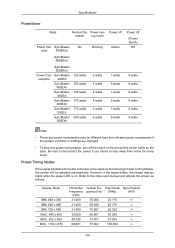
...284 100.000 Sync Polarity (H/V) 105 However, if the signal differs, the screen may be adjusted automatically. SyncMaster On cator 400EX(n) SyncMaster 460EX(n) SyncMaster 550EX(n) Power Con- Specifications PowerSaver State Normal Op- Preset Timing Modes If the signal transferred from home for many hours. Be ...sure to disconnect the power if you intend to the video card manual and adjusts the screen as the following Preset Timing Modes, the screen will be different from the indicated power consumption if the ...
...284 100.000 Sync Polarity (H/V) 105 However, if the signal differs, the screen may be adjusted automatically. SyncMaster On cator 400EX(n) SyncMaster 460EX(n) SyncMaster 550EX(n) Power Con- Specifications PowerSaver State Normal Op- Preset Timing Modes If the signal transferred from home for many hours. Be ...sure to disconnect the power if you intend to the video card manual and adjusts the screen as the following Preset Timing Modes, the screen will be different from the indicated power consumption if the ...

User Manual
Page 159
... Corporation; Note The rechargeable battery incorporated in this product should not be the trademarks or registered trademarks of their working life. Samsung Electronics Co., Ltd. VESA, DPM and DDC are registered trademarks of Video Electronics Standard Association; the ENERGY STAR® name... harm to change without the written permission of waste and recycle them through your service provider. For information on the battery, manual or packaging indicates that the battery contains mercury, cadmium or lead above the reference levels in this product is strictly forbidden....
... Corporation; Note The rechargeable battery incorporated in this product should not be the trademarks or registered trademarks of their working life. Samsung Electronics Co., Ltd. VESA, DPM and DDC are registered trademarks of Video Electronics Standard Association; the ENERGY STAR® name... harm to change without the written permission of waste and recycle them through your service provider. For information on the battery, manual or packaging indicates that the battery contains mercury, cadmium or lead above the reference levels in this product is strictly forbidden....


