
User Manual
Page 15
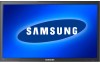
... on the external device using an audio cable. Slide the end of the locking device may differ depending on the model and the manufacturer, refer to the User Manual supplied with the locking device for 460EX(n) and 550EX(n) models. Note • These are general instructions. AUDIO OUT Connect a headphone or an External speaker. Introduction AUDIO IN Connect the [AUDIO IN] port on the monitor to the audio output port on the PC...
... on the external device using an audio cable. Slide the end of the locking device may differ depending on the model and the manufacturer, refer to the User Manual supplied with the locking device for 460EX(n) and 550EX(n) models. Note • These are general instructions. AUDIO OUT Connect a headphone or an External speaker. Introduction AUDIO IN Connect the [AUDIO IN] port on the monitor to the audio output port on the PC...
User Manual
Page 40
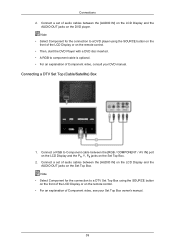
... the remote control. • For an explanation of Component video, see your DVD manual. Connecting a DTV Set Top (Cable/Satellite) Box 1. Note • Select Component for the connection to a DTV Set Top Box using the SOURCE button on the front of Component video, consult your Set Top Box owner's manual. 39 Connect a RGB to component cable is optional. • For an explanation of the LCD Display or on the remote control. • Then, start...
... the remote control. • For an explanation of Component video, see your DVD manual. Connecting a DTV Set Top (Cable/Satellite) Box 1. Note • Select Component for the connection to a DTV Set Top Box using the SOURCE button on the front of Component video, consult your Set Top Box owner's manual. 39 Connect a RGB to component cable is optional. • For an explanation of the LCD Display or on the remote control. • Then, start...
User Manual
Page 43
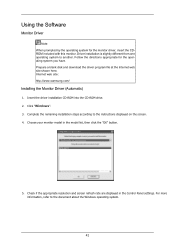
... download the driver program file at the Internet web site shown here. Choose your monitor model in the Control Panel settings. Using the Software Monitor Driver Note When prompted by the operating system for the operating system you have. Check if the appropriate resolution and screen refresh rate are displayed in the model list, then click the "OK" button. 5. Insert the driver installation CD-ROM into the CD-ROM drive. 2. Click "Windows". 3. Driver installation...
... download the driver program file at the Internet web site shown here. Choose your monitor model in the Control Panel settings. Using the Software Monitor Driver Note When prompted by the operating system for the operating system you have. Check if the appropriate resolution and screen refresh rate are displayed in the model list, then click the "OK" button. 5. Insert the driver installation CD-ROM into the CD-ROM drive. 2. Click "Windows". 3. Driver installation...
User Manual
Page 44
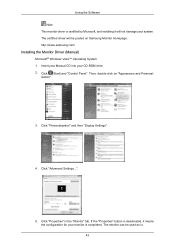
Using the Software Note This monitor driver is . 43 http://www.samsung.com/ Installing the Monitor Driver (Manual) Microsoft® Windows Vista™, Operating System 1. Insert your Manual CD into your monitor is completed. Click "Personalization" and then "Display Settings". 4. The monitor can be posted on "Appearance and Personal- Click "Advanced Settings...". 5. If the "Properties" button is deactivated, it will be used as is certified by Microsoft, and installing it...
Using the Software Note This monitor driver is . 43 http://www.samsung.com/ Installing the Monitor Driver (Manual) Microsoft® Windows Vista™, Operating System 1. Insert your Manual CD into your monitor is completed. Click "Personalization" and then "Display Settings". 4. The monitor can be posted on "Appearance and Personal- Click "Advanced Settings...". 5. If the "Properties" button is deactivated, it will be used as is certified by Microsoft, and installing it...
User Manual
Page 45
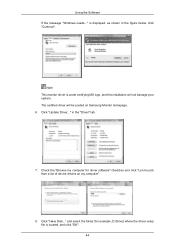
Using the Software If the message "Windows needs..." and select the folder (for driver software" checkbox and click "Let me pick from a list of device drivers on Samsung Monitor homepage. 6. The certified driver will not damage your system. Click "Update Driver..." Check the "Browse my computer for example, D:\Drive) where the driver setup file is displayed, as shown in the "Driver" tab. 7. is located, and click "OK". 44...
Using the Software If the message "Windows needs..." and select the folder (for driver software" checkbox and click "Let me pick from a list of device drivers on Samsung Monitor homepage. 6. The certified driver will not damage your system. Click "Update Driver..." Check the "Browse my computer for example, D:\Drive) where the driver setup file is displayed, as shown in the "Driver" tab. 7. is located, and click "OK". 44...
User Manual
Page 47
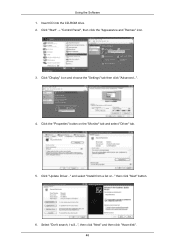
then click "Next" button. 6. Select "Don't search, I will...", then click "Next" and then click "Have disk". 46 Click the "Properties" button on the "Monitor" tab and select "Driver" tab. 5. Click "Display" icon and choose the "Settings" tab then click "Advanced...". 4. and select "Install from a list or..." Using the Software 1. Insert CD into the CD-ROM drive. 2. Click "Start" → "Control Panel", then click the "Appearance and Themes" icon. 3. Click "Update Driver..."
then click "Next" button. 6. Select "Don't search, I will...", then click "Next" and then click "Have disk". 46 Click the "Properties" button on the "Monitor" tab and select "Driver" tab. 5. Click "Display" icon and choose the "Settings" tab then click "Advanced...". 4. and select "Install from a list or..." Using the Software 1. Insert CD into the CD-ROM drive. 2. Click "Start" → "Control Panel", then click the "Appearance and Themes" icon. 3. Click "Update Driver..."
User Manual
Page 49
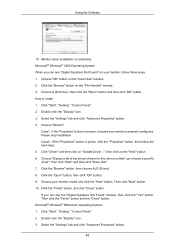
... "Start", "Setting", "Control Panel". 2. Select the "Settings" tab and click "Advanced Properties" button. 48 Choose your monitor, follow the next steps. 5. Microsoft® Windows® Millennium Operating System 1. Double click the "Display" icon. 3. Double click the "Display" icon. 3. Click the "Finish" button, then the "Close" button. If you can choose a specific driver", then click "Next" and then click "Have disk". 7. Using the Software 10. How to install...
... "Start", "Setting", "Control Panel". 2. Select the "Settings" tab and click "Advanced Properties" button. 48 Choose your monitor, follow the next steps. 5. Microsoft® Windows® Millennium Operating System 1. Double click the "Display" icon. 3. Double click the "Display" icon. 3. Click the "Finish" button, then the "Close" button. If you can choose a specific driver", then click "Next" and then click "Have disk". 7. Using the Software 10. How to install...

User Manual
Page 50
... colors and Vertical frequency) and then click "OK". 4. Click "Start", "Settings", "Control Panel", and then double-click "Display" icon. 2. Select a mode that corresponds to use (Resolution, Number of all devices" and choose the monitor that you wish to the one you see the screen working normally after executing the X86Config file. 2. The next screen is a type of all, set a horizontal frequency for your monitor. (You can enter the frequency directly.) 8. Using the Software 4. Set...
... colors and Vertical frequency) and then click "OK". 4. Click "Start", "Settings", "Control Panel", and then double-click "Display" icon. 2. Select a mode that corresponds to use (Resolution, Number of all devices" and choose the monitor that you wish to the one you see the screen working normally after executing the X86Config file. 2. The next screen is a type of all, set a horizontal frequency for your monitor. (You can enter the frequency directly.) 8. Using the Software 4. Set...
User Manual
Page 54
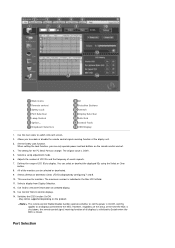
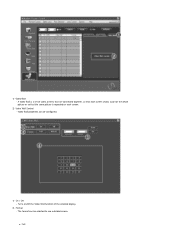
... lock buttons on the product. Use Grid to control displays. 14. However, regardless of the status at the time the MDC is initialized to display. Dropdown Selectors All Selection Buttons Refresh Display Selection Info Grid Control Tools OSD Display 1. Use the main icons to the MDC. You can change. The setting for monitors. Adjusts the number of LFD IDs and the frequency of all displays connected to switch into each screen. 2. The remote control Enable/Disable...
... lock buttons on the product. Use Grid to control displays. 14. However, regardless of the status at the time the MDC is initialized to display. Dropdown Selectors All Selection Buttons Refresh Display Selection Info Grid Control Tools OSD Display 1. Use the main icons to the MDC. You can change. The setting for monitors. Adjusts the number of LFD IDs and the frequency of all displays connected to switch into each screen. 2. The remote control Enable/Disable...
User Manual
Page 71
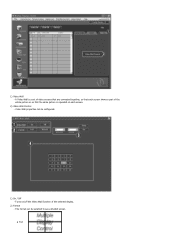
z Full 1) Video Wall - Video Wall properties can be configured. 1) On / Off - Turns on/off the Video Wall function of the whole picture or so that the same picture is repeated on each screen. 2) Video Wall Control - The format can be selected to see a divided screen. A Video Wall is a set of video screens that are connected together, so that each screen shows a part of the selected display. 2) Format -
z Full 1) Video Wall - Video Wall properties can be configured. 1) On / Off - Turns on/off the Video Wall function of the whole picture or so that the same picture is repeated on each screen. 2) Video Wall Control - The format can be selected to see a divided screen. A Video Wall is a set of video screens that are connected together, so that each screen shows a part of the selected display. 2) Format -

User Manual
Page 72
... screen can select a number of RS232C. (Check if it is properly connected to the Com1 port - You can be arranged in an Irregular manner. z The maximum number of monitors that support a Set ID between 0 to 99, you turn the remote function again to control is a value between 0 and 99. Troubleshooting 1. Check if you wish to Restore normal functions. Check to control does not appear on TV model...
... screen can select a number of RS232C. (Check if it is properly connected to the Com1 port - You can be arranged in an Irregular manner. z The maximum number of monitors that support a Set ID between 0 to 99, you turn the remote function again to control is a value between 0 and 99. Troubleshooting 1. Check if you wish to Restore normal functions. Check to control does not appear on TV model...
User Manual
Page 92
z Full Video Wall properties can be configured. 1) On / Off - 1) Video Wall - A Video Wall is a set of video screens that are connected together, so that each screen shows a part of the whole picture or so that the same picture is repeated on /off the Video Wall function of the selected display. 2) Format - The format can be selected to see a divided screen. Turns on each screen. 2) Video Wall Control -
z Full Video Wall properties can be configured. 1) On / Off - 1) Video Wall - A Video Wall is a set of video screens that are connected together, so that each screen shows a part of the whole picture or so that the same picture is repeated on /off the Video Wall function of the selected display. 2) Format - The format can be selected to see a divided screen. Turns on each screen. 2) Video Wall Control -
User Manual
Page 93
... settings value for the displays where the power status is showing. - Rerun the program and turn off the remote Function, disconnect the Ethernet cable, or exit the program in communication circuits or interference from Display Selection. The range of the other Control Info Grids - No selection: Displays the Factory Default Value. 2. z Select a mode from Screen divider. Check the displays to 15 monitors can view and change the input source of screens using the Display menu...
... settings value for the displays where the power status is showing. - Rerun the program and turn off the remote Function, disconnect the Ethernet cable, or exit the program in communication circuits or interference from Display Selection. The range of the other Control Info Grids - No selection: Displays the Factory Default Value. 2. z Select a mode from Screen divider. Check the displays to 15 monitors can view and change the input source of screens using the Display menu...

User Manual
Page 95
... window super-imposed on the PC Video signal. (Off/On) 52 MagicInfo PIP Note The PIP function is not available when Video Wall is connected. • The HDMI port and network box cannot be enabled when a network box is On. Source List MENU → ENTER → → ENTER → → , → ENTER Use to select PC, HDMI or other external input sources connected to the LCD Display...
... window super-imposed on the PC Video signal. (Off/On) 52 MagicInfo PIP Note The PIP function is not available when Video Wall is connected. • The HDMI port and network box cannot be enabled when a network box is On. Source List MENU → ENTER → → ENTER → → , → ENTER Use to select PC, HDMI or other external input sources connected to the LCD Display...
User Manual
Page 114
... screen. 2. Sharpness MENU → → ENTER → ENTER → → → → ENTER→ → , → ENTER Adjusts the Sharpness of the PIP window on the screen. Brightness MENU → → ENTER ENTER→ ENTER → → , → ENTER Adjusts the Brightness of the visual signal and adjusts to create an optimum contrast. 71 Note Available Modes: PIP ON 1. Adjusting the LCD Display → , → ENTER Adjusts...
... screen. 2. Sharpness MENU → → ENTER → ENTER → → → → ENTER→ → , → ENTER Adjusts the Sharpness of the PIP window on the screen. Brightness MENU → → ENTER ENTER→ ENTER → → , → ENTER Adjusts the Brightness of the visual signal and adjusts to create an optimum contrast. 71 Note Available Modes: PIP ON 1. Adjusting the LCD Display → , → ENTER Adjusts...

User Manual
Page 136
... Help. MagicInfo 1. Select Application - Otherwise, the program (MagicInfo) may stop . • To access other sources, press the SOURCE button in MagicInfo. • The preset password for movies. • For drive D:, EWF is not applied. • To save Setup contents that have been changed when EWF is com- Adjusting the LCD Display • Do not unplug the LAN cable used by an USB device (ex: video display...
... Help. MagicInfo 1. Select Application - Otherwise, the program (MagicInfo) may stop . • To access other sources, press the SOURCE button in MagicInfo. • The preset password for movies. • For drive D:, EWF is not applied. • To save Setup contents that have been changed when EWF is com- Adjusting the LCD Display • Do not unplug the LAN cable used by an USB device (ex: video display...
User Manual
Page 140
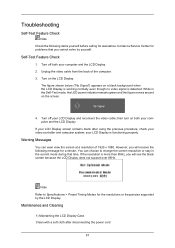
... LCD Display. 2. your LCD Display and reconnect the video cable; Clean with a soft cloth after using the previous procedure, check your LCD Display screen remains blank after disconnecting the power cord. 97 Warning Messages You can choose to Specifications > Preset Timing Modes for the resolutions or frequencies supported by yourself. If the resolution is more than 85Hz, you will see the black screen because the LCD Display does not support over 85Hz. Troubleshooting Self-Test Feature Check...
... LCD Display. 2. your LCD Display and reconnect the video cable; Clean with a soft cloth after using the previous procedure, check your LCD Display screen remains blank after disconnecting the power cord. 97 Warning Messages You can choose to Specifications > Preset Timing Modes for the resolutions or frequencies supported by yourself. If the resolution is more than 85Hz, you will see the black screen because the LCD Display does not support over 85Hz. Troubleshooting Self-Test Feature Check...

User Manual
Page 143
... the volume is too high or too low. Problems related to the Remote Control Note Problems related to its power management system. Q: No sound. A: Adjusts the Treble and Bass to audio signals and their solutions are listed below. Q: The color image is inconsistent. Q: The sound is still too low after turning the control to the remote control and their solutions are listed. A: Adjust color using Custom under OSD Color Adjustment menu. A: Adjust color using Custom under OSD Color Adjustment menu. Q: The remote control buttons...
... the volume is too high or too low. Problems related to the Remote Control Note Problems related to its power management system. Q: No sound. A: Adjusts the Treble and Bass to audio signals and their solutions are listed below. Q: The color image is inconsistent. Q: The sound is still too low after turning the control to the remote control and their solutions are listed. A: Adjust color using Custom under OSD Color Adjustment menu. A: Adjust color using Custom under OSD Color Adjustment menu. Q: The remote control buttons...
User Manual
Page 144
... the video card manual for details. A: Disconnect the power cord and then clean the LCD Display with a soft cloth, using either a cleaning solution or plain water. Q: How can be incompatible. 101 Note That video card support can I play the video. Do not leave any water enter the LCD Display. Troubleshooting A: Check if the batteries are empty. Set the function in the vicinity. A: Windows ME/2000: Set the resolution at the Control Panel → Display → Screen...
... the video card manual for details. A: Disconnect the power cord and then clean the LCD Display with a soft cloth, using either a cleaning solution or plain water. Q: How can be incompatible. 101 Note That video card support can I play the video. Do not leave any water enter the LCD Display. Troubleshooting A: Check if the batteries are empty. Set the function in the vicinity. A: Windows ME/2000: Set the resolution at the Control Panel → Display → Screen...

User Manual
Page 150
... bright sometimes or some of black pixels could be seen. When the LCD panel is not provided for TFTLCD. • Resolution: 1920 x 1080 • Vertical frequency (refresh rate): 60 Hz TFT-LCD panels manufactured by performing the "Auto Adjustment function" in display screen that work the liquid crystal (LC) in a pixel. The voltage difference between electrodes that is appeared as window termination button is changed. If there's still noise after the automatic adjustment, use...
... bright sometimes or some of black pixels could be seen. When the LCD panel is not provided for TFTLCD. • Resolution: 1920 x 1080 • Vertical frequency (refresh rate): 60 Hz TFT-LCD panels manufactured by performing the "Auto Adjustment function" in display screen that work the liquid crystal (LC) in a pixel. The voltage difference between electrodes that is appeared as window termination button is changed. If there's still noise after the automatic adjustment, use...


