User Manual (user Manual) (ver.1.0) (English)
Page 41
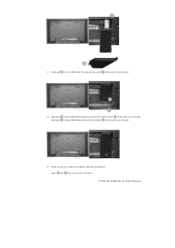
ALL Rights Reserved Align with and use a screw to fix them. © 1995~2007 SAMSUNG. of your USB holder with the bottom of part at the back of your monitor. 1) Insert part of your USB holder into the groove aligned in part at the back of your monitor. 2) Align part Align part of your USB holder with the groove at the bottom of part at the back of your monitor. 3) Insert a screw into the groove in step [2], and fasten it.
ALL Rights Reserved Align with and use a screw to fix them. © 1995~2007 SAMSUNG. of your USB holder with the bottom of part at the back of your monitor. 1) Insert part of your USB holder into the groove aligned in part at the back of your monitor. 2) Align part Align part of your USB holder with the groove at the bottom of part at the back of your monitor. 3) Insert a screw into the groove in step [2], and fasten it.

User Manual (user Manual) (ver.1.0) (English)
Page 42
ALL Rights Reserved 1) Insert part of your USB holder into the groove aligned in part at the back of your monitor. 2) Align part Align part of your USB holder with and use a screw to fix them. © 1995~2007 SAMSUNG. of your USB holder with the bottom of part at the back of your monitor. Align with the groove at the bottom of part at the back of your monitor. 3) Insert a screw into the groove in step [2], and fasten it.
ALL Rights Reserved 1) Insert part of your USB holder into the groove aligned in part at the back of your monitor. 2) Align part Align part of your USB holder with and use a screw to fix them. © 1995~2007 SAMSUNG. of your USB holder with the bottom of part at the back of your monitor. Align with the groove at the bottom of part at the back of your monitor. 3) Insert a screw into the groove in step [2], and fasten it.
User Manual (user Manual) (ver.1.0) (English)
Page 99
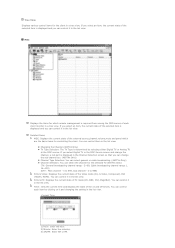
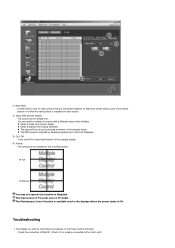
... the list view. If you select Digital TV in the MDC Source screen and change the channel, a red part is determined by clicking on and off timers. Time : Sets the current time and displays the state of the Video mode (AV, S-Video, Component, DVI (HDCP), HDMI). You can control it in a ... can control it in the Channel Selection screen so that you can control each client monitor in the list view. Detailed Items MDC: Displays the current state of the external source,channel,volume,mute and panel which remote management is required from among the OSD menus of the selected item is...
... the list view. If you select Digital TV in the MDC Source screen and change the channel, a red part is determined by clicking on and off timers. Time : Sets the current time and displays the state of the Video mode (AV, S-Video, Component, DVI (HDCP), HDMI). You can control it in a ... can control it in the Channel Selection screen so that you can control each client monitor in the list view. Detailed Items MDC: Displays the current state of the external source,channel,volume,mute and panel which remote management is required from among the OSD menus of the selected item is...
User Manual (user Manual) (ver.1.0) (English)
Page 102
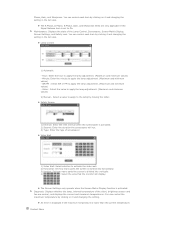
... than the current temperature. Select a value to apply to activate the video wall. 2) Horizontal: Set how many parts the screen is divided into horizontally. 3) Vertical: Set how many parts the screen is divided into vertically. 4) : Select the area that the monitor will run. 3) Type: Enter the...set to On. Minute: Enter the minute to apply the lamp adjustment. (Maximum and minimum values) - Phase, Gain, and Sharpness. Maintenance: Displays the state of the client, brightness sensor and fan are only applicable if the Signal Balance item is activated. 2) Second: Enter the duration ...
... than the current temperature. Select a value to apply to activate the video wall. 2) Horizontal: Set how many parts the screen is divided into horizontally. 3) Vertical: Set how many parts the screen is divided into vertically. 4) : Select the area that the monitor will run. 3) Type: Enter the...set to On. Minute: Enter the minute to apply the lamp adjustment. (Maximum and minimum values) - Phase, Gain, and Sharpness. Maintenance: Displays the state of the client, brightness sensor and fan are only applicable if the Signal Balance item is activated. 2) Second: Enter the duration ...
User Manual (user Manual) (ver.1.0) (English)
Page 138
... The MDC program supplied by pressing a number in MagicNet. The Maintenance Control function is available only for the displays where the power status is a set up by Samsung supports up to control does not appear on /off the Video Wall function of screens with a different layout ... video screens that are connected together, so that each screen shows a part of TV works only on each screen. 2) Video Wall (Screen divider) - Turns on the Power Control Info Grid - Troubleshooting 1. The display you wish to 5x5 LCD Displayes. 3) On / Off - 1) Video Wall - The Input source...
... The MDC program supplied by pressing a number in MagicNet. The Maintenance Control function is available only for the displays where the power status is a set up by Samsung supports up to control does not appear on /off the Video Wall function of screens with a different layout ... video screens that are connected together, so that each screen shows a part of TV works only on each screen. 2) Video Wall (Screen divider) - Turns on the Power Control Info Grid - Troubleshooting 1. The display you wish to 5x5 LCD Displayes. 3) On / Off - 1) Video Wall - The Input source...
User Manual (user Manual) (ver.1.0) (English)
Page 149
...reduce the standby power consumption, set of video screens connected together, so that each screen. Full Provides a full screen without any margins. - Natural Displays a natural image with the original aspect ratio intact. 3) Horizontal Menu Transparency [MENU ENTER ENTER ENTER] Changes the opaqueness of the OSD background. 1)...adjusts the power consumption of the unit in the black level, a low contrast, or discoloration, etc., depending on each screen shows a part of the whole picture or where the same picture is on, you cannot use the remote Power On function of the MDC and the...
...reduce the standby power consumption, set of video screens connected together, so that each screen. Full Provides a full screen without any margins. - Natural Displays a natural image with the original aspect ratio intact. 3) Horizontal Menu Transparency [MENU ENTER ENTER ENTER] Changes the opaqueness of the OSD background. 1)...adjusts the power consumption of the unit in the black level, a low contrast, or discoloration, etc., depending on each screen shows a part of the whole picture or where the same picture is on, you cannot use the remote Power On function of the MDC and the...

User Manual (user Manual) (ver.1.0) (English)
Page 150
... screen over a long time. - Five adjustment levels: 1, 2, 3, 4, and 5. 4) Vertical [MENU ENTER ENTER ENTER ENTER] Sets how many parts the screen should be set to run the Screen Scroll operation. (1~10 Hour) The time is displayed on time. Off - By default, the time is set to 10 hours. - 1~10 Hour 3) Second [MENU ENTER...
... screen over a long time. - Five adjustment levels: 1, 2, 3, 4, and 5. 4) Vertical [MENU ENTER ENTER ENTER ENTER] Sets how many parts the screen should be set to run the Screen Scroll operation. (1~10 Hour) The time is displayed on time. Off - By default, the time is set to 10 hours. - 1~10 Hour 3) Second [MENU ENTER...


