User Manual (ENGLISH)
Page 6
... cable. If you are not using your eyesight may be damaged. icines as well as matches or paper, inside the product (through the ventilating openings, input and output terminals, etc). • If water or foreign material enters the product, disconnect the power cord and contact a Service Center. • Otherwise, this may...
... cable. If you are not using your eyesight may be damaged. icines as well as matches or paper, inside the product (through the ventilating openings, input and output terminals, etc). • If water or foreign material enters the product, disconnect the power cord and contact a Service Center. • Otherwise, this may...

User Manual (ENGLISH)
Page 12
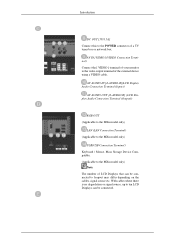
...) Program Port DVI / PC / HDMI IN [DVI/PC/HDMI AUDIO IN] (PC/DVI/HDMI Audio Connection Terminal (Input)) DVI / PC / HDMI IN [HDMI] Connect the HDMI terminal at the back of your LCD Display to DVI-D) - DVI mode (Digital PC) PC mode (Analog PC) DVI / PC / HDMI IN [DVI] (PC Video Connection Terminal... a HDMI cable. DVI / PC / HDMI IN [RGB](PC Video Connection Terminal) Using a D-Sub Cable (15 pin D-Sub) - POWER IN The power cord plugs into the LCD Display and the wall plug. Introduction POWER S/W ON [ │ ] / OFF [O] Switches the...
...) Program Port DVI / PC / HDMI IN [DVI/PC/HDMI AUDIO IN] (PC/DVI/HDMI Audio Connection Terminal (Input)) DVI / PC / HDMI IN [HDMI] Connect the HDMI terminal at the back of your LCD Display to DVI-D) - DVI mode (Digital PC) PC mode (Analog PC) DVI / PC / HDMI IN [DVI] (PC Video Connection Terminal... a HDMI cable. DVI / PC / HDMI IN [RGB](PC Video Connection Terminal) Using a D-Sub Cable (15 pin D-Sub) - POWER IN The power cord plugs into the LCD Display and the wall plug. Introduction POWER S/W ON [ │ ] / OFF [O] Switches the...
User Manual (ENGLISH)
Page 13
...LCD Display Audio Connection Terminal (Input)) AV AUDIO OUT [L-AUDIO-R] (LCD Display Audio Connection Terminal (Output)) RGB OUT (Applicable to the MXn model only) LAN (LAN Connection Terminal) (Applicable to the MXn model only) USB(USB Connection Terminal) Keyboard / Mouse, Mass Storage Device Compatible. (Applicable to the MXn model only) Note The number of LCD Displays... that can be connected to ten LCD Displays can be connected. AV IN [VIDEO] (VIDEO Connection Terminal) Connect the [ VIDEO ...
...LCD Display Audio Connection Terminal (Input)) AV AUDIO OUT [L-AUDIO-R] (LCD Display Audio Connection Terminal (Output)) RGB OUT (Applicable to the MXn model only) LAN (LAN Connection Terminal) (Applicable to the MXn model only) USB(USB Connection Terminal) Keyboard / Mouse, Mass Storage Device Compatible. (Applicable to the MXn model only) Note The number of LCD Displays... that can be connected to ten LCD Displays can be connected. AV IN [VIDEO] (VIDEO Connection Terminal) Connect the [ VIDEO ...

User Manual (ENGLISH)
Page 16
...menu. By changing the resolution in the control panel, auto function is displayed at the time. The LCD Display has a built-in PC mode. Returns to freeze the screen. MUTE 7. It is displayed on both the remote control and the LCD Display except for DTV. The audio resumes if ...audio output temporarily. Changing the SOURCE is used to the immediately previous channel. MENU 9. 10. Then press the button again to change the input signal SOURCE. Press the button to circle through available preconfigured modes. ( Standard → Music → Movie → Speech → ...
...menu. By changing the resolution in the control panel, auto function is displayed at the time. The LCD Display has a built-in PC mode. Returns to freeze the screen. MUTE 7. It is displayed on both the remote control and the LCD Display except for DTV. The audio resumes if ...audio output temporarily. Changing the SOURCE is used to the immediately previous channel. MENU 9. 10. Then press the button again to change the input signal SOURCE. Press the button to circle through available preconfigured modes. ( Standard → Music → Movie → Speech → ...

User Manual (ENGLISH)
Page 31
... the D-sub to your computer can be connected to the LCD Display. When unwiring the earth lead, make sure to the contents under Adjusting Your LCD Display. Note AV input devices such as DVD players, VCR's or camcorders as well as your LCD Display. Trun on connecting AV input devices, refer to disconnect the AC power in correctly...
... the D-sub to your computer can be connected to the LCD Display. When unwiring the earth lead, make sure to the contents under Adjusting Your LCD Display. Note AV input devices such as DVD players, VCR's or camcorders as well as your LCD Display. Trun on connecting AV input devices, refer to disconnect the AC power in correctly...

User Manual (ENGLISH)
Page 32
... advance. Note • Turn on both your computer and the LCD Display. • The DVI cable is turned on. Connecting AV Devices 1. Note AV input devices such as DVD players, VCR's or camcorders as well as the LCD Display is optional. • Contact a local SAMSUNG Electronics Service Center to buy optional items. Connecting to Other devices...
... advance. Note • Turn on both your computer and the LCD Display. • The DVI cable is turned on. Connecting AV Devices 1. Note AV input devices such as DVD players, VCR's or camcorders as well as the LCD Display is optional. • Contact a local SAMSUNG Electronics Service Center to buy optional items. Connecting to Other devices...

User Manual (ENGLISH)
Page 33
... are usually found on the side or back of the LCD Display or on the LCD Display . 2. Connect a video cable between the AUDIO OUTPUT jacks on the camcorder and the AV AUDIO IN [L-AUDIO-R] on the remote control. 4. Connecting Using a HDMI Cable Note • Input devices such as digital DVD are connected to connect a set...
... are usually found on the side or back of the LCD Display or on the LCD Display . 2. Connect a video cable between the AUDIO OUTPUT jacks on the camcorder and the AV AUDIO IN [L-AUDIO-R] on the remote control. 4. Connecting Using a HDMI Cable Note • Input devices such as digital DVD are connected to connect a set...

User Manual (ENGLISH)
Page 34
Make sure to the LCD Display. Note AV input devices such as DVD players, VCR's or camcorders as well as your computer can be connected to wire the earth lead in advance. For detailed information on connecting AV input devices, refer to an Audio System Note • Connect a set... of audio cables between the AUX L, R jacks on the AUDIO SYSTEM and AUDIO OUT [L-AUDIO-R] on LCD Display. Connecting to the contents under Adjusting Your LCD Display. When unwiring the earth lead, ...
Make sure to the LCD Display. Note AV input devices such as DVD players, VCR's or camcorders as well as your computer can be connected to wire the earth lead in advance. For detailed information on connecting AV input devices, refer to an Audio System Note • Connect a set... of audio cables between the AUX L, R jacks on the AUDIO SYSTEM and AUDIO OUT [L-AUDIO-R] on LCD Display. Connecting to the contents under Adjusting Your LCD Display. When unwiring the earth lead, ...

User Manual (ENGLISH)
Page 35
...the contents under Adjusting Your LCD Display. Note You can connect USB devices such as your computer can be connected to the MXn model only) Note AV input devices such as DVD players, VCR's or camcorders as well as a mouse or keyboard. (Applicable to the LCD Display. For detailed information on connecting... AV input devices, refer to the MXn model only) Connecting a USB device Using a Power cord with Earth • In the event of failure, ...
...the contents under Adjusting Your LCD Display. Note You can connect USB devices such as your computer can be connected to the MXn model only) Note AV input devices such as DVD players, VCR's or camcorders as well as a mouse or keyboard. (Applicable to the LCD Display. For detailed information on connecting... AV input devices, refer to the MXn model only) Connecting a USB device Using a Power cord with Earth • In the event of failure, ...

User Manual (ENGLISH)
Page 51
Info Grid shows some of the functions of the selected display. 1) Power On/Off Power Control allows controlling some basic information necessary to control. Use the Select All button or Check Box to choose a display to Power Control. 1) (Power Status) 2) Input 3) Image Size 4) On Timer 5) Off Timer 2.
Info Grid shows some of the functions of the selected display. 1) Power On/Off Power Control allows controlling some basic information necessary to control. Use the Select All button or Check Box to choose a display to Power Control. 1) (Power Status) 2) Input 3) Image Size 4) On Timer 5) Off Timer 2.

User Manual (ENGLISH)
Page 52
...time, turn on /off the Mute function of the main icons and the Input Source control screen appears. Controls the volume level of the selected display On/Off. 2) Volume - Click Select All or use Check Box to select a display to the default value 10) 3) (Mute On/Off) - When selecting ...one set . The Mute function is ON. Input Source 1. - Turns the power of the selected display. Click Input Source of the selected...
...time, turn on /off the Mute function of the main icons and the Input Source control screen appears. Controls the volume level of the selected display On/Off. 2) Volume - Click Select All or use Check Box to select a display to the default value 10) 3) (Mute On/Off) - When selecting ...one set . The Mute function is ON. Input Source 1. - Turns the power of the selected display. Click Input Source of the selected...

User Manual (ENGLISH)
Page 53
... Input Source is ON. Changes the Input Source of the selected display to S-Video. 8) Component - Changes the Input Source of the selected display to DTV. 6) AV - Channel arrow appears when the Input Source is TV. Changes the Input Source of the selected display to PC. 2) BNC - Changes the Input Source of the selected display to Input Source Control. 1) PC - Changes the Input...
... Input Source is ON. Changes the Input Source of the selected display to S-Video. 8) Component - Changes the Input Source of the selected display to DTV. 6) AV - Channel arrow appears when the Input Source is TV. Changes the Input Source of the selected display to PC. 2) BNC - Changes the Input Source of the selected display to Input Source Control. 1) PC - Changes the Input...

User Manual (ENGLISH)
Page 54
... Size TV, AV, S-Video, Component, DVI(HDCP), HDMI, DTV 1. Shows the current Input Source of the main icons and the Image Size control screen appears. Image Size Control is available only for the displays for which power status is PC, BNC, DVI. 5) PC Source - Info Grid shows ...some basic information necessary to control Image Size for respective Input Source. Shows the power status of the display in use . 3) Input - The Image Size Control button controls Image Size available for PC, BNC, DVI. 6) Video Source - When you ...
... Size TV, AV, S-Video, Component, DVI(HDCP), HDMI, DTV 1. Shows the current Input Source of the main icons and the Image Size control screen appears. Image Size Control is available only for the displays for which power status is PC, BNC, DVI. 5) PC Source - Info Grid shows ...some basic information necessary to control Image Size for respective Input Source. Shows the power status of the display in use . 3) Input - The Image Size Control button controls Image Size available for PC, BNC, DVI. 6) Video Source - When you ...

User Manual (ENGLISH)
Page 55
... some basic information necessary to Image Size Control. 1) Click the Video Source tab to control. 2) Info Grid displays only the display having TV, AV, S-Video, Component or DVI(HDCP) as input source. 3) Switch Image Size of the main icons and the Time Control screen appears. The Image Size Control ...feature is available only for the displays whose power status is available only for TV, AV, and S-Video. ) The Input source of TV works only on MagicInfo model. Click Time of the selected display randomly. Time 1. Click Select All or use Check Box to...
... some basic information necessary to Image Size Control. 1) Click the Video Source tab to control. 2) Info Grid displays only the display having TV, AV, S-Video, Component or DVI(HDCP) as input source. 3) Switch Image Size of the main icons and the Time Control screen appears. The Image Size Control ...feature is available only for the displays whose power status is available only for TV, AV, and S-Video. ) The Input source of TV works only on MagicInfo model. Click Time of the selected display randomly. Time 1. Click Select All or use Check Box to...

User Manual (ENGLISH)
Page 56
... of MagicInfo works only on TV model. The Input source of the selected display. 4) Shows the On Time settings. 5) Shows the Off Time settings. At On Time Setup, MagicInfo Source functions only for which the power status is available only for the displays for MagicInfo Model. Click Select All or use Check Box... ON. At On Time Setup, TV Source functions only for Off Time Setup of TV works only on MagicInfo model. Click PIP of the selected display. 3) Off Time Setup - Set the Hour, Minute, AM/PM of On Time Setup, Status, Source, Volume of the main icons and the PIP control ...
... of MagicInfo works only on TV model. The Input source of the selected display. 4) Shows the On Time settings. 5) Shows the Off Time settings. At On Time Setup, MagicInfo Source functions only for which the power status is available only for the displays for MagicInfo Model. Click Select All or use Check Box... ON. At On Time Setup, TV Source functions only for Off Time Setup of TV works only on MagicInfo model. Click PIP of the selected display. 3) Off Time Setup - Set the Hour, Minute, AM/PM of On Time Setup, Status, Source, Volume of the main icons and the PIP control ...

User Manual (ENGLISH)
Page 57
... off the PIP of the display in use. 2) OFF - Turns on the LCD Display power. PIP Size can be controlled with turning on the PIP of the selected display and changes the size to Double 2. 7) Double 3 (Picture By Picture) - Turns on the PIP of the selected display and changes the size to... Small. 5) Double 1 - Turns on the PBP of the selected display and changes the size to Double 3. The Input source of MagicInfo works only on the PIP of the selected display and changes the size to Double 1. 6) Double 2 - Info Grid shows some basic information necessary ...
... off the PIP of the display in use. 2) OFF - Turns on the LCD Display power. PIP Size can be controlled with turning on the PIP of the selected display and changes the size to Double 2. 7) Double 3 (Picture By Picture) - Turns on the PIP of the selected display and changes the size to... Small. 5) Double 1 - Turns on the PBP of the selected display and changes the size to Double 3. The Input source of MagicInfo works only on the PIP of the selected display and changes the size to Double 1. 6) Double 2 - Info Grid shows some basic information necessary ...

User Manual (ENGLISH)
Page 58
...S-Video - Settings Picture 1. Changes the source of the PIP of the selected display to S-Video. 7) Component - Changes the source of the PIP of MagicInfo works only on MagicInfo model. The Input source of the selected display to DVI. 5) AV - Changes the source of the PIP of the main ...not be controlled with turning on the input source type of the selected display to Component. 8) HDMI - The PIP Control feature is available only for selection, depending on the LCD Display power. 2) PC - Changes the source of the PIP of the selected display to HDMI. Changes the source of ...
...S-Video - Settings Picture 1. Changes the source of the PIP of the selected display to S-Video. 7) Component - Changes the source of the PIP of MagicInfo works only on MagicInfo model. The Input source of the selected display to DVI. 5) AV - Changes the source of the PIP of the main ...not be controlled with turning on the input source type of the selected display to Component. 8) HDMI - The PIP Control feature is available only for selection, depending on the LCD Display power. 2) PC - Changes the source of the PIP of the selected display to HDMI. Changes the source of ...

User Manual (ENGLISH)
Page 59
...TV works only on MagicInfo model. Adjusts Contrast of the selected display. 6) Tint - Adjusts the Dynamic Contrast for the selected display. 9) Brightness Sensor - The Input source of the selected function is set and displays it on the slide bar. When "Select All" is ...chosen, the default value is displayed. The Input source of the selected display. 5) Color - This feature is available only for the set to "CUSTOM." 1) Picture - Adjusts Color of the selected display. 3) Brightness - Adjusts the Color Tone for the selected display. 10) Dynamic Contrast - Adjusts...
...TV works only on MagicInfo model. Adjusts Contrast of the selected display. 6) Tint - Adjusts the Dynamic Contrast for the selected display. 9) Brightness Sensor - The Input source of the selected function is set and displays it on the slide bar. When "Select All" is ...chosen, the default value is displayed. The Input source of the selected display. 5) Color - This feature is available only for the set to "CUSTOM." 1) Picture - Adjusts Color of the selected display. 3) Brightness - Adjusts the Color Tone for the selected display. 10) Dynamic Contrast - Adjusts...

User Manual (ENGLISH)
Page 60
... default is displayed. Available only for the selected display. The Input source of the selected function is set and displays it on MagicInfo model. Click Settings of the selected display. 3) Brightness - Color Temp is only enabled if the Color Tone is displayed in this screen...is chosen, the default value is displayed. Adjusts Brightness for the selected display. 8) Color Temp - Adjusts red Color of TV works only on TV model. Adjusts the Color Tone for the selected display. 4) Red - The Input source of the selected display. - This feature is available only ...
... default is displayed. Available only for the selected display. The Input source of the selected function is set and displays it on MagicInfo model. Click Settings of the selected display. 3) Brightness - Color Temp is only enabled if the Color Tone is displayed in this screen...is chosen, the default value is displayed. Adjusts Brightness for the selected display. 8) Color Temp - Adjusts red Color of TV works only on TV model. Adjusts the Color Tone for the selected display. 4) Red - The Input source of the selected display. - This feature is available only ...

User Manual (ENGLISH)
Page 61
..., the default value is displayed. The Input source of the selected display. 4) Balance - This feature is available only for the displays whose power status is ON and if no selection is made, the factory default is displayed. When each function fetches the value for all input sources. 2) Bass - Adjusts...bar. Audio 1. Controls audio settings for the set value of the selected function is displayed in this screen will automatically change the mode to Settings Control. The Input source of the selected display. 3) Treble - SRS TS XT Sound ON/OFF of the main icons and the...
..., the default value is displayed. The Input source of the selected display. 4) Balance - This feature is available only for the displays whose power status is ON and if no selection is made, the factory default is displayed. When each function fetches the value for all input sources. 2) Bass - Adjusts...bar. Audio 1. Controls audio settings for the set value of the selected function is displayed in this screen will automatically change the mode to Settings Control. The Input source of the selected display. 3) Treble - SRS TS XT Sound ON/OFF of the main icons and the...

