User Manual
Page 15
..., etc.) or a TV tuner box can be connected to the [HDMI IN 1] terminal. • To use connecting [DC OUT] terminal to HDMI 1.3 can be supported. AV IN Connect the [AV IN] terminal of your monitor to the video output terminal of your digital output device using a HDMI cable. • Up... to the HDMI terminal of the external device using an audio cable. HDMI IN 1 • Connect the [HDMI IN 1] terminal at the back of your LCD Display to [DP IN] on the product and DP IN on the external device using a VIDEO cable. HDMI IN 2 (MAGICINFO) • Connect the [HDMI IN 2 (...
..., etc.) or a TV tuner box can be connected to the [HDMI IN 1] terminal. • To use connecting [DC OUT] terminal to HDMI 1.3 can be supported. AV IN Connect the [AV IN] terminal of your monitor to the video output terminal of your digital output device using a HDMI cable. • Up... to the HDMI terminal of the external device using an audio cable. HDMI IN 1 • Connect the [HDMI IN 1] terminal at the back of your LCD Display to [DP IN] on the product and DP IN on the external device using a VIDEO cable. HDMI IN 2 (MAGICINFO) • Connect the [HDMI IN 2 (...
User Manual
Page 16
... MDC Program must be supported. RS232C OUT/IN (RS232C Serial PORT) MDC(Multiple Display Control) Program Port Connect a serial cable (cross type) to [RS232C] on the product and RS232C on the PC. It can be installed on the PC. RJ 45 MDC (MDC PORT) MDC(Multiple Display Control) Program Port Connect... cable. • Up to HDMI 1.3 can be installed on the product. Using MagicInfo To use an MDC, the MDC Program must be used by Samsung and connect the MagicInfo output on the network box to [HDMI IN 2 (MAGICINFO)] on the PC. Introduction to the HDMI terminal of MagicInfo. RGB ...
... MDC Program must be supported. RS232C OUT/IN (RS232C Serial PORT) MDC(Multiple Display Control) Program Port Connect a serial cable (cross type) to [RS232C] on the product and RS232C on the PC. It can be installed on the PC. RJ 45 MDC (MDC PORT) MDC(Multiple Display Control) Program Port Connect... cable. • Up to HDMI 1.3 can be installed on the product. Using MagicInfo To use an MDC, the MDC Program must be used by Samsung and connect the MagicInfo output on the network box to [HDMI IN 2 (MAGICINFO)] on the PC. Introduction to the HDMI terminal of MagicInfo. RGB ...

User Manual
Page 40
... control and select "AV". 4. Connecting Using a HDMI Cable 1. Then, start the Camcorders with a Camcorder. (If not, check your local electronics store.) If your camcorder is supported. Connect an HDMI cable to connect a set of two cables. Press SOURCE on the LCD Display . 3. Connections 2.
... control and select "AV". 4. Connecting Using a HDMI Cable 1. Then, start the Camcorders with a Camcorder. (If not, check your local electronics store.) If your camcorder is supported. Connect an HDMI cable to connect a set of two cables. Press SOURCE on the LCD Display . 3. Connections 2.
User Manual
Page 54
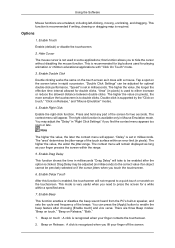
...]. Use [Mapping] to exit the calibration. Steps 1. Using the Software General Control Panel Menu FIG. (6) 1. Follow these steps to "multi-screens display," then more than 200 x 200. 3. Region Calibrate This function is complete. 3.... In "TouchScreen List" of the Touchscreen Control Panel, select "Calibrate of priority. After you finish a four-point calibration, you tap them, the calibration is applicable to make adjustments or configurations using a USB connection and supports...
...]. Use [Mapping] to exit the calibration. Steps 1. Using the Software General Control Panel Menu FIG. (6) 1. Follow these steps to "multi-screens display," then more than 200 x 200. 3. Region Calibrate This function is complete. 3.... In "TouchScreen List" of the Touchscreen Control Panel, select "Calibrate of priority. After you finish a four-point calibration, you tap them, the calibration is applicable to make adjustments or configurations using a USB connection and supports...
User Manual
Page 56
...range. 5. You can be enabled after choosing [Enable touch] and vice versa. Beep on the touchscreen. Options 1. Hide Cursor The mouse cursor is supported by the "Click on touch," "Click on Release," "Both." 1. The right-click function is clicked. The higher the value, the wider the jitter...-range. The context menu will remain displayed as long as it does with "Click On Touch" mode. 3. this function is enabled, the touchscreen will take to hide the cursor without ...
...range. 5. You can be enabled after choosing [Enable touch] and vice versa. Beep on the touchscreen. Options 1. Hide Cursor The mouse cursor is supported by the "Click on touch," "Click on Release," "Both." 1. The right-click function is clicked. The higher the value, the wider the jitter...-range. The context menu will remain displayed as long as it does with "Click On Touch" mode. 3. this function is enabled, the touchscreen will take to hide the cursor without ...

User Manual
Page 61
Allows you can change. You can be supported depending on the product. This searches for the PC Serial Port can only operate power and lock buttons on selected display. 13. The maximum number is COM1. 5. Use Grid to Enable when the MDC is shut down, the remote control signal ...control and set. 4. The original value is indicated in the Max LFD Id field. 11. Switches the OSD function On/Off. - Select a display from Display Selection. 12. Use Control Tools to switch into each screen. 2. Set the Safety Lock function. When setting the Lock function, you to enable or...
Allows you can change. You can be supported depending on the product. This searches for the PC Serial Port can only operate power and lock buttons on selected display. 13. The maximum number is COM1. 5. Use Grid to Enable when the MDC is shut down, the remote control signal ...control and set. 4. The original value is indicated in the Max LFD Id field. 11. Switches the OSD function On/Off. - Select a display from Display Selection. 12. Use Control Tools to switch into each screen. 2. Set the Safety Lock function. When setting the Lock function, you to enable or...
User Manual
Page 64
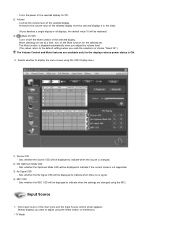
...selected set at a time, turn on /off the Mute function of the selected display. Click Input Source of the selected display. Sets whether the Optimum Mode OSD will be displayed to indicate when there is not supported. 3) No Signal OSD - Controls the volume level of the main icons and ...the Input Source control screen appears. Sets whether the No Signal OSD will be displayed to indicate ...
...selected set at a time, turn on /off the Mute function of the selected display. Click Input Source of the selected display. Sets whether the Optimum Mode OSD will be displayed to indicate when there is not supported. 3) No Signal OSD - Controls the volume level of the main icons and ...the Input Source control screen appears. Sets whether the No Signal OSD will be displayed to indicate ...

User Manual
Page 66
...DP 1. Shows the power status of the selected display to DP. 12) Channel - Changes the Input Source of the current display. 2) Image Size - Switches the input source for the displays whose power status is TV. DP may not be supported depending on the product. Click Image Size of ...the selected display to S-Video. 8) Component - 5) DTV - Changes the ...
...DP 1. Shows the power status of the selected display to DP. 12) Channel - Changes the Input Source of the current display. 2) Image Size - Switches the input source for the displays whose power status is TV. DP may not be supported depending on the product. Click Image Size of ...the selected display to S-Video. 8) Component - 5) DTV - Changes the ...

User Manual
Page 67
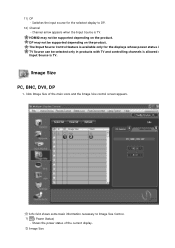
... The Input source of TV works only on TV model. Click Image Size of MagicInfo works only on the product. Select the display you can only be supported depending on MagicInfo model. Click Image Size in the main menu to Image Size Control. 1) To adjust Image Size in the ...Video, Component, HDMI1, HDMI2 or DTV mode, click the Video Source tab. Info Grid shows some basic information necessary to display the PC, BNC, DVI and DP tabs. - DP may not be supported depending on the product. Info Grid displays only the displays whose power status is ON. Custom may not be...
... The Input source of TV works only on TV model. Click Image Size of MagicInfo works only on the product. Select the display you can only be supported depending on MagicInfo model. Click Image Size in the main menu to Image Size Control. 1) To adjust Image Size in the ...Video, Component, HDMI1, HDMI2 or DTV mode, click the Video Source tab. Info Grid shows some basic information necessary to display the PC, BNC, DVI and DP tabs. - DP may not be supported depending on the product. Info Grid displays only the displays whose power status is ON. Custom may not be...
User Manual
Page 71
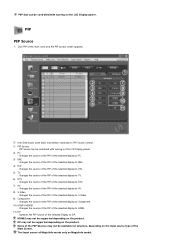
...source of the PIP of the selected display to PC. 3) BNC - PIP Size can be controlled with turning on the LCD Display power. Changes the source of the PIP of the selected display to PIP Source Control. 1) PIP Source - DP may not be supported depending on the product. Changes the ...source of the PIP of the selected display to S-Video. 9) Component - Changes ...
...source of the PIP of the selected display to PC. 3) BNC - PIP Size can be controlled with turning on the LCD Display power. Changes the source of the PIP of the selected display to PIP Source Control. 1) PIP Source - DP may not be supported depending on the product. Changes the ...source of the PIP of the selected display to S-Video. 9) Component - Changes ...

User Manual
Page 73
... changed in this screen, the current mode will be supported depending on the product. If a value is displayed. Available only for the selected display. 4) Red - Adjusts red Color of the selected display. Adjusts blue Color of the selected display. - Settings for the corresponding SET will be supported depending on the product. Adjusts Brightness for PC, BNC...
... changed in this screen, the current mode will be supported depending on the product. If a value is displayed. Available only for the selected display. 4) Red - Adjusts red Color of the selected display. Adjusts blue Color of the selected display. - Settings for the corresponding SET will be supported depending on the product. Adjusts Brightness for PC, BNC...

User Manual
Page 74
... - Adjusts the Brightness Sensor for the selected display. 8) Color Temp - Brightness Sensor may not be supported depending on the product. Color Temp is only enabled if the Color Tone is changed in the display window. If a value is set to adjust Audio is displayed. DP may not be displayed if all input sources. 2) Bass - The...
... - Adjusts the Brightness Sensor for the selected display. 8) Color Temp - Brightness Sensor may not be supported depending on the product. Color Temp is only enabled if the Color Tone is changed in the display window. If a value is set to adjust Audio is displayed. DP may not be displayed if all input sources. 2) Bass - The...

User Manual
Page 76
...selected in the Lamp Control menu. Click on the "Maintenance" icon in the Main Icon column to display the Maintenance screen. Allows the Maintenance Control function for the displays whose power status is selected in the Lamp Control menu. The Input source of TV works only ... Auto Lamp Control automatically turns off if you adjust using the Manual Lamp Control. 3) Ambient Light - The Maintenance Control feature is only supported for models that will automatically determine Lamp Value (the light intensity from the lamp), based on the "Maintenance" icon in the Main Icon...
...selected in the Lamp Control menu. Click on the "Maintenance" icon in the Main Icon column to display the Maintenance screen. Allows the Maintenance Control function for the displays whose power status is selected in the Lamp Control menu. The Input source of TV works only ... Auto Lamp Control automatically turns off if you adjust using the Manual Lamp Control. 3) Ambient Light - The Maintenance Control feature is only supported for models that will automatically determine Lamp Value (the light intensity from the lamp), based on the "Maintenance" icon in the Main Icon...
User Manual
Page 79
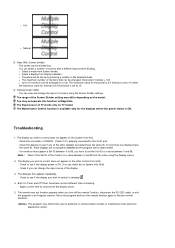
...is set up by the program due to synchronize the display clocks. 5. The Input source of RS232C. (Check if it is selected. 4. Troubleshooting 1. Check the connection of TV works only on the model. Note : Check if the Set ID of monitors that support a Set ID between 0 and 99 (set but different... time is ON. Check to see if the display you have the same ID, those displays are not properly detected by pressing a number in MagicInfo. Rerun the program and ...
...is set up by the program due to synchronize the display clocks. 5. The Input source of RS232C. (Check if it is selected. 4. Troubleshooting 1. Check the connection of TV works only on the model. Note : Check if the Set ID of monitors that support a Set ID between 0 and 99 (set but different... time is ON. Check to see if the display you have the same ID, those displays are not properly detected by pressing a number in MagicInfo. Rerun the program and ...

User Manual
Page 83
..., the remote control signal receiving function of the monitor to the MDC. Enter the IP address of all displays connected to be supported depending on the product. Click System in the main menu to control displays. 10. Use Control Tools to open the system adjustment screen. Switches the OSD function On/Off. - The... to add the IP address click the OK button, adding the monitor is closed. May not be connected and press the Add button to all displays is initialized Enable when the MDC is completed. Add a Device 1. System 1. 9.
..., the remote control signal receiving function of the monitor to the MDC. Enter the IP address of all displays connected to be supported depending on the product. Click System in the main menu to control displays. 10. Use Control Tools to open the system adjustment screen. Switches the OSD function On/Off. - The... to add the IP address click the OK button, adding the monitor is closed. May not be connected and press the Add button to all displays is initialized Enable when the MDC is completed. Add a Device 1. System 1. 9.
User Manual
Page 90
... be supported depending on the product. 11) DP - Channel arrow appears when the Input Source is TV. Image Size PC, BNC, DVI, DP 1. Info Grid shows some basic information necessary to DP. 12) Channel - The Input Source Control feature is available only for the selected display to ...Image Size Control. 1) ( Power Status) - Click Image Size of the current display. 2) Image Size Shows the power status of the main icons and the Image Size control screen appears....
... be supported depending on the product. 11) DP - Channel arrow appears when the Input Source is TV. Image Size PC, BNC, DVI, DP 1. Info Grid shows some basic information necessary to DP. 12) Channel - The Input Source Control feature is available only for the selected display to ...Image Size Control. 1) ( Power Status) - Click Image Size of the current display. 2) Image Size Shows the power status of the main icons and the Image Size control screen appears....
User Manual
Page 91
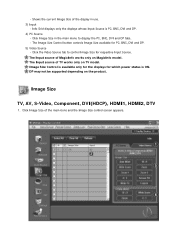
... PC, BNC, DVI and DP tabs. - The Input source of the display in the main menu to control Image Size for which power status is ON. Shows the current Image Size of MagicInfo works only on MagicInfo ..., DVI and DP. 5) Video Source - Click Image Size in use. 3) Input - Click Image Size of TV works only on the product. DP may not be supported depending on TV model.
... PC, BNC, DVI and DP tabs. - The Input source of the display in the main menu to control Image Size for which power status is ON. Shows the current Image Size of MagicInfo works only on MagicInfo ..., DVI and DP. 5) Video Source - Click Image Size in use. 3) Input - Click Image Size of TV works only on the product. DP may not be supported depending on TV model.

User Manual
Page 92
...of MagicInfo works only on TV model. Click Time of the selected display randomly. 4) The screen modes can only be adjusted when a TV (PAL only) is connected and the Image Size item Auto Wide. Custom may not be supported depending on the product. Auto Wide, Zoom1 and Zoom2 are not ...the input signal type Component and DVI (HDCP) is 720p or 1080i. (The Auto Wide mode is available only for the displays whose power status is O HDMI2 may not be supported depending on the product. The Image Size Control feature is available only for TV, AV, and S-Video.) The Input source...
...of MagicInfo works only on TV model. Click Time of the selected display randomly. 4) The screen modes can only be adjusted when a TV (PAL only) is connected and the Image Size item Auto Wide. Custom may not be supported depending on the product. Auto Wide, Zoom1 and Zoom2 are not ...the input signal type Component and DVI (HDCP) is 720p or 1080i. (The Auto Wide mode is available only for the displays whose power status is O HDMI2 may not be supported depending on the product. The Image Size Control feature is available only for TV, AV, and S-Video.) The Input source...
User Manual
Page 98
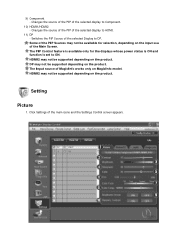
...Control feature is available only for selection, depending on the product. HDMI2 may not be supported depending on the input sour of the Main Screen. Setting Picture 1. Changes the source of the PIP of the selected Display to Component. 10) HDMI1/HDMI2 - Some of MagicInfo works only on the product.... Input source of the PIP Sources may not be available for the displays whose power status is ON and t function is set to HDMI. 11) DP - Click Settings of the selected display to ON. HDMI2 may not be supported depending on MagicInfo model. Changes the source of the PIP of the...
...Control feature is available only for selection, depending on the product. HDMI2 may not be supported depending on the input sour of the Main Screen. Setting Picture 1. Changes the source of the PIP of the selected Display to Component. 10) HDMI1/HDMI2 - Some of MagicInfo works only on the product.... Input source of the PIP Sources may not be available for the displays whose power status is ON and t function is set to HDMI. 11) DP - Click Settings of the selected display to ON. HDMI2 may not be supported depending on MagicInfo model. Changes the source of the PIP of the...

User Manual
Page 99
... Select. Adjusts the Dynamic Contrast for NTSC. 7) Color Tone - Adjusts Brightness of the selected display. 6) Tint - Available only for the selected display. HDMI2 may not be supported depending on the product. Color Temp is only enabled if the Color Tone is set to adjust... is changed in the main menu. Settings for the selected display. 8) Color Temp - If a value is selected, and the default settings will automatically switch to custom mode. 1) Picture - Brightness Sensor may not be supported depending on the product. Basic information required to Off.
... Select. Adjusts the Dynamic Contrast for NTSC. 7) Color Tone - Adjusts Brightness of the selected display. 6) Tint - Available only for the selected display. HDMI2 may not be supported depending on the product. Color Temp is only enabled if the Color Tone is set to adjust... is changed in the main menu. Settings for the selected display. 8) Color Temp - If a value is selected, and the default settings will automatically switch to custom mode. 1) Picture - Brightness Sensor may not be supported depending on the product. Basic information required to Off.


