
Open Source Guide (ENGLISH)
Page 2
...it free software that everyone can do so by permitting redistribution under these terms, attach the following notices to the public, we recommend making it to be of the greatest possible use to the library. and each source file to where the full notice is safest to attach them to the start of... each file should have at least the "copyright" line and a pointer to most effectively convey the exclusion of the ordinary General Public License). You can redistribute and change....
...it free software that everyone can do so by permitting redistribution under these terms, attach the following notices to the public, we recommend making it to be of the greatest possible use to the library. and each source file to where the full notice is safest to attach them to the start of... each file should have at least the "copyright" line and a pointer to most effectively convey the exclusion of the ordinary General Public License). You can redistribute and change....

Quick Guide (ENGLISH)
Page 10
... not work for this LCD Display. 16 P.MODE When you are preset at the factory. Then push button again to another horizontally, vertically or tons adjusts selected menu values. 25. You can be operated depending on the broadcasting type by using the DUAL button on the main screen, and the main screen image will appear on the remote control while watching TV. The image in the PIP window will...
... not work for this LCD Display. 16 P.MODE When you are preset at the factory. Then push button again to another horizontally, vertically or tons adjusts selected menu values. 25. You can be operated depending on the broadcasting type by using the DUAL button on the main screen, and the main screen image will appear on the remote control while watching TV. The image in the PIP window will...
Quick Guide (ENGLISH)
Page 16
... Specifications > Preset Timing Modes for problems that time. Unplug the video cable from the back of 1360 x 768. Maintenance and Cleaning 1) Maintaining the LCD Display Case. Contact a Service Center for the resolutions or frequencies supported by yourself. Turn off both your computer and the LCD Display If your LCD Display screen remains blank after disconnecting the power cord. 84 Clean with a soft cloth after using the previous procedure, check your LCD Display is functioning properly. Turn...
... Specifications > Preset Timing Modes for problems that time. Unplug the video cable from the back of 1360 x 768. Maintenance and Cleaning 1) Maintaining the LCD Display Case. Contact a Service Center for the resolutions or frequencies supported by yourself. Turn off both your computer and the LCD Display If your LCD Display screen remains blank after disconnecting the power cord. 84 Clean with a soft cloth after using the previous procedure, check your LCD Display is functioning properly. Turn...

Quick Guide (ENGLISH)
Page 17
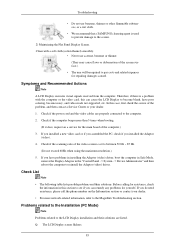
..., refer to the MagicInfo Troubleshooting section. Q: The LCD Display screen flickers. 85 In this can remedy any problems for yourself. If you installed a new video card or if you assembled the PC, check if you do need assistance, please call the phone number on the Information section or contact your dealer. 1. Before calling for assistance, check the information in the "Control Panel −> System −> Device...
..., refer to the MagicInfo Troubleshooting section. Q: The LCD Display screen flickers. 85 In this can remedy any problems for yourself. If you installed a new video card or if you assembled the PC, check if you do need assistance, please call the phone number on the Information section or contact your dealer. 1. Before calling for assistance, check the information in the "Control Panel −> System −> Device...

Quick Guide (ENGLISH)
Page 18
... the LCD Display menu and Preset Timing Modes. A: Ensure that the power cord is firmly connected and the LCD Display is on. (Refer to the Brightness, Contrast) Q: The screen color is inconsistent. 86 Q: Ghost images are turned on again after removing all accessories (video extension cable, etc.) A: Set the resolution and frequency to Connecting a Computer) Q: The image is not clear; A: Check if the resolution and frequency set for the computer video card falls in the range supported by the LCD Display. A: Adjusts the brightness and contrast...
... the LCD Display menu and Preset Timing Modes. A: Ensure that the power cord is firmly connected and the LCD Display is on. (Refer to the Brightness, Contrast) Q: The screen color is inconsistent. 86 Q: Ghost images are turned on again after removing all accessories (video extension cable, etc.) A: Set the resolution and frequency to Connecting a Computer) Q: The image is not clear; A: Check if the resolution and frequency set for the computer video card falls in the range supported by the LCD Display. A: Adjusts the brightness and contrast...

Quick Guide (ENGLISH)
Page 19
... MENU button, check the cable connection between the LCD Display and the computer to ensure that the audio cable is currently saving the changes made in port on your sound card. (Refer to the remote control and their solutions are listed. Problems related to Audio Note Problems related to the OSD memory. A: If the volume is still too low after turning the control to the appropriate levels. Q: The color image is blinking. Q: The Power Indicator blinks. A: Adjust color using Custom under OSD Color Adjustment menu. A: Adjusts...
... MENU button, check the cable connection between the LCD Display and the computer to ensure that the audio cable is currently saving the changes made in port on your sound card. (Refer to the remote control and their solutions are listed. Problems related to Audio Note Problems related to the OSD memory. A: If the volume is still too low after turning the control to the appropriate levels. Q: The color image is blinking. Q: The Power Indicator blinks. A: Adjust color using Custom under OSD Color Adjustment menu. A: Adjusts...

Quick Guide (ENGLISH)
Page 20
... video card manual for details. Problems related to update your USB disk. A: Windows ME/2000: Set the resolution in DOS mode. A: Windows XP: Set the resolution in the Boot menu. A: Windows ME/2000: 88 Then, enable the USB Boot First option by selecting that option and pressing the Enter key in the Control Panel → Appearance and Themes → Display → Screen Saver. A: 6) When the ghost image update finishes, the set the Power Saving function? Q: Making...
... video card manual for details. Problems related to update your USB disk. A: Windows ME/2000: Set the resolution in DOS mode. A: Windows XP: Set the resolution in the Boot menu. A: Windows ME/2000: 88 Then, enable the USB Boot First option by selecting that option and pressing the Enter key in the Control Panel → Appearance and Themes → Display → Screen Saver. A: 6) When the ghost image update finishes, the set the Power Saving function? Q: Making...

User Manual (SPANISH)
Page 43
... list show the amount of error (unit: pixel). "area" is used for a time in both the name of IR touch device installed and the number of industrial equipment and used for banking and industrial control applications, such as a simple output device, the function may choose [Install] when some serial ports are available or choose [Remove] to uninstall the driver if you click that...
... list show the amount of error (unit: pixel). "area" is used for a time in both the name of IR touch device installed and the number of industrial equipment and used for banking and industrial control applications, such as a simple output device, the function may choose [Install] when some serial ports are available or choose [Remove] to uninstall the driver if you click that...

User Manual (ENGLISH)
Page 17
... horizontally, vertically or tons adjusts selected menu values. 25. STEREO/MONO, DUAL l / DUAL ll and MONO/NICAM MONO/NICAM STEREO can select MTS (Multichannel Television Stereo) mode. FM Stereo Audio Type Mono Stereo SAP MTS/S_Mode Mono Mono ↔ Stereo Mono ↔ SAP Default Manual Change Mono Every time you are preset at the factory. Introduction 24. AV / HDMI / TV : P.MODE The LCD Display...
... horizontally, vertically or tons adjusts selected menu values. 25. STEREO/MONO, DUAL l / DUAL ll and MONO/NICAM MONO/NICAM STEREO can select MTS (Multichannel Television Stereo) mode. FM Stereo Audio Type Mono Stereo SAP MTS/S_Mode Mono Mono ↔ Stereo Mono ↔ SAP Default Manual Change Mono Every time you are preset at the factory. Introduction 24. AV / HDMI / TV : P.MODE The LCD Display...

User Manual (ENGLISH)
Page 29
....samsung.com/ (Worldwide) Installing the Monitor Driver (Automatic) 1. Insert CD into the CD-ROM drive. 2. Click "Windows". 3. If you have. Prepare a blank disk and download the driver program file at the Internet web site shown here. Then click "OK" button (Microsoft® Windows® XP/2000 Operating System). 28 Choose your monitor model in the model list, then click the "OK" button. 4. Using the Software Monitor Driver...
....samsung.com/ (Worldwide) Installing the Monitor Driver (Automatic) 1. Insert CD into the CD-ROM drive. 2. Click "Windows". 3. If you have. Prepare a blank disk and download the driver program file at the Internet web site shown here. Then click "OK" button (Microsoft® Windows® XP/2000 Operating System). 28 Choose your monitor model in the model list, then click the "OK" button. 4. Using the Software Monitor Driver...

User Manual (ENGLISH)
Page 30
... this installation doesn't damage your CD-ROM drive. 2. Using the Software Note This monitor driver is completed. Then, double-click on Samsung Monitor homepage. The monitor can be posted on "Appearance and Personalization". 3. If the message "Windows needs..." Click "Properties" in the figure below, click "Continue". 29 The certified driver will be used as is displayed, as shown in the "Monitor" tab. Click (Start) and "Control Panel...
... this installation doesn't damage your CD-ROM drive. 2. Using the Software Note This monitor driver is completed. Then, double-click on Samsung Monitor homepage. The monitor can be posted on "Appearance and Personalization". 3. If the message "Windows needs..." Click "Properties" in the figure below, click "Continue". 29 The certified driver will be used as is displayed, as shown in the "Monitor" tab. Click (Start) and "Control Panel...

User Manual (ENGLISH)
Page 31
Click "Update Driver..." Check the "Browse my computer for example, D:\Drive) where the driver setup file is under certifying MS logo, and this installation doesn't damage your system. The certified driver will be posted on my computer". 8. and select the folder (for driver software" checkbox and click "Let me pick from a list of device drivers on Samsung Monitor homepage. 6. Using the Software Note This monitor driver is located, and click "OK". 30 Click "Have Disk..." in the "Driver" tab. 7.
Click "Update Driver..." Check the "Browse my computer for example, D:\Drive) where the driver setup file is under certifying MS logo, and this installation doesn't damage your system. The certified driver will be posted on my computer". 8. and select the folder (for driver software" checkbox and click "Let me pick from a list of device drivers on Samsung Monitor homepage. 6. Using the Software Note This monitor driver is located, and click "OK". 30 Click "Have Disk..." in the "Driver" tab. 7.

User Manual (ENGLISH)
Page 33
Select "Don't search, I will..." then click "Next" and then click "Have disk". 32 Click "Update Driver..." then click "Next" button. 6. Click the "Properties" button on the "Monitor" tab and select "Driver" tab. 5. and select "Install from a list or..." Insert CD into the CD-ROM drive. 2. Click "Display" icon and choose the "Settings" tab then click "Advanced...". 4. Using the Software 1. Click "Start" → "Control Panel" then click the "Appearance and Themes" icon. 3.
Select "Don't search, I will..." then click "Next" and then click "Have disk". 32 Click "Update Driver..." then click "Next" button. 6. Click the "Properties" button on the "Monitor" tab and select "Driver" tab. 5. and select "Install from a list or..." Insert CD into the CD-ROM drive. 2. Click "Display" icon and choose the "Settings" tab then click "Advanced...". 4. Using the Software 1. Click "Start" → "Control Panel" then click the "Appearance and Themes" icon. 3.

User Manual (ENGLISH)
Page 35
Click "Start", "Setting", "Control Panel". 2. Click "Driver" and then click on the "Next" button. 6. then click on "Update Driver..." Click the "Browse" button then choose A:(D:\Driver). 8. Choose "OK" button on the "File Needed" window. 3. Choose "Monitor". Click the "Open" button, then click "OK" button. 9. Choose your monitor is completed. Monitor driver installation is properly configured. Choose A:(D:\Driver) then click the "Open" button and then click "OK" button. Double click the "Display" icon. 3. Please stop installation Case2 : If the...
Click "Start", "Setting", "Control Panel". 2. Click "Driver" and then click on the "Next" button. 6. then click on "Update Driver..." Click the "Browse" button then choose A:(D:\Driver). 8. Choose "OK" button on the "File Needed" window. 3. Choose "Monitor". Click the "Open" button, then click "OK" button. 9. Choose your monitor is completed. Monitor driver installation is properly configured. Choose A:(D:\Driver) then click the "Open" button and then click "OK" button. Double click the "Display" icon. 3. Please stop installation Case2 : If the...

User Manual (ENGLISH)
Page 36
... Software 4. Choose "Display a list of resolution, colors or frequency). Continue choosing "Close" button and "OK" button until you wish to a different mode (lower mode of all the driver in a specific location..." logue box. If the screen is no Mode at the first and the second screen after executing the X86Config file. 2. Note If there is not normal, change to use (Resolution, Number of X-Window. 10. Click the "Change" button in the user guide...
... Software 4. Choose "Display a list of resolution, colors or frequency). Continue choosing "Close" button and "OK" button until you wish to a different mode (lower mode of all the driver in a specific location..." logue box. If the screen is no Mode at the first and the second screen after executing the X86Config file. 2. Note If there is not normal, change to use (Resolution, Number of X-Window. 10. Click the "Change" button in the user guide...
User Manual (ENGLISH)
Page 40
... IR touch device installed and the number of touchscreen in driver to maintain steadily for touch to avoid the above error without the normal manipulation. Notice: the higher the value, the slower the pop-up so long as a simple output device, the function may choose [Install] when some serial ports are available or choose [Remove] to Standby Unable (default); Using the Software either...
... IR touch device installed and the number of touchscreen in driver to maintain steadily for touch to avoid the above error without the normal manipulation. Notice: the higher the value, the slower the pop-up so long as a simple output device, the function may choose [Install] when some serial ports are available or choose [Remove] to Standby Unable (default); Using the Software either...

User Manual (ENGLISH)
Page 92
...; For pivoted LCD Displays, a screen resolution of Setup have been changed when EWF is highly recommended not to turn off . Otherwise, the program (MagicInfo) may stop . • To access other sources, press the SOURCE button in the Enable state, to the MagicInfo Server Help. Otherwise, the program (MagicInfo) may stop . Adjusting the LCD Display • Do not unplug the LAN cable used by an USB device (ex: video display).
...; For pivoted LCD Displays, a screen resolution of Setup have been changed when EWF is highly recommended not to turn off . Otherwise, the program (MagicInfo) may stop . • To access other sources, press the SOURCE button in the Enable state, to the MagicInfo Server Help. Otherwise, the program (MagicInfo) may stop . Adjusting the LCD Display • Do not unplug the LAN cable used by an USB device (ex: video display).

User Manual (ENGLISH)
Page 104
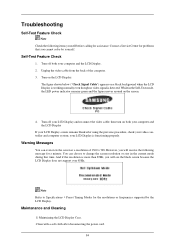
... LCD Display and reconnect the video cable; You can even view the screen at a resolution of the computer. 3. Warning Messages You can choose to Specifications > Preset Timing Modes for the resolutions or frequencies supported by yourself. Troubleshooting Self-Test Feature Check Note Check the following message for a minute; Self-Test Feature Check 1. Note Refer to change the screen resolution or stay in the Self-Test mode, the LED power indicator remains green and...
... LCD Display and reconnect the video cable; You can even view the screen at a resolution of the computer. 3. Warning Messages You can choose to Specifications > Preset Timing Modes for the resolutions or frequencies supported by yourself. Troubleshooting Self-Test Feature Check Note Check the following message for a minute; Self-Test Feature Check 1. Note Refer to change the screen resolution or stay in the Self-Test mode, the LED power indicator remains green and...
User Manual (ENGLISH)
Page 105
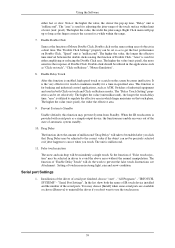
... exceed 60Hz when using the maximum resolution.) 5. Check if the power cord and the video cables are listed. If you can remedy any problems for assistance, check the information in the "Control Panel −> System −> Device Administrator" and then reboot the computer to the computer. 2. Problems related to the Installation (PC Mode) Note Problems related to the screen. 2) Maintaining the Flat Panel Display Screen. Q: The LCD Display screen flickers. 85 Clean with a soft cloth...
... exceed 60Hz when using the maximum resolution.) 5. Check if the power cord and the video cables are listed. If you can remedy any problems for assistance, check the information in the "Control Panel −> System −> Device Administrator" and then reboot the computer to the computer. 2. Problems related to the Installation (PC Mode) Note Problems related to the screen. 2) Maintaining the Flat Panel Display Screen. Q: The LCD Display screen flickers. 85 Clean with a soft cloth...

User Manual (KOREAN)
Page 41
... not be set so as ATM, Switches of industrial equipment and used in specified area. "Delay" unit is enabled, high speed touch or scratch on Double Click. Enable Double Click Same as a simple output device, the function may choose [Install] when some serial ports are available or choose [Remove] to maintain steadily for banking and industrial control applications, such...
... not be set so as ATM, Switches of industrial equipment and used in specified area. "Delay" unit is enabled, high speed touch or scratch on Double Click. Enable Double Click Same as a simple output device, the function may choose [Install] when some serial ports are available or choose [Remove] to maintain steadily for banking and industrial control applications, such...


