
User Manual
Page 11
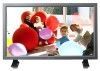
... Introduction Package Contents Your LCD Display Machanical Layout Connections Using the Software Adjusting the LCD Display Troubleshooting Specifications Information Appendix Model SyncMaster 320PX The color and appearance of the product may vary depending on the model, and the product specifications are missing, contact your LCD... Setup Guide Warranty Card User's Guide, MDC Software (Not available in all locations) Cables D-Sub Cable Other Power Cord Speaker Wire Cable Introduction Package Contents Note • Please make sure the following items are included with your dealer.
... Introduction Package Contents Your LCD Display Machanical Layout Connections Using the Software Adjusting the LCD Display Troubleshooting Specifications Information Appendix Model SyncMaster 320PX The color and appearance of the product may vary depending on the model, and the product specifications are missing, contact your LCD... Setup Guide Warranty Card User's Guide, MDC Software (Not available in all locations) Cables D-Sub Cable Other Power Cord Speaker Wire Cable Introduction Package Contents Note • Please make sure the following items are included with your dealer.
User Manual
Page 12
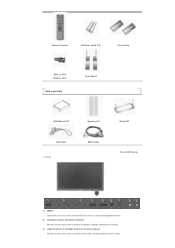
Remote Control Batteries (AAA X 2) Cover-Hole BNC to RCA Adaptor Jack Sold separately Semi Stand Wall Mount KIT Speaker Set DVI Cable Front BNC Cable Stand KIT Your LCD Display 1) MENU Opens the on-screen menu and exits from the menu or closes the adjustment menu. 2) Navigate buttons (Up-Down buttons) Moves from one menu item to another vertically or adjusts selected menu values. 3) Adjust buttons (Left-Right buttons)/ Volume buttons Moves from one menu item to another horizontally or adjusts selected menu values.
Remote Control Batteries (AAA X 2) Cover-Hole BNC to RCA Adaptor Jack Sold separately Semi Stand Wall Mount KIT Speaker Set DVI Cable Front BNC Cable Stand KIT Your LCD Display 1) MENU Opens the on-screen menu and exits from the menu or closes the adjustment menu. 2) Navigate buttons (Up-Down buttons) Moves from one menu item to another vertically or adjusts selected menu values. 3) Adjust buttons (Left-Right buttons)/ Volume buttons Moves from one menu item to another horizontally or adjusts selected menu values.
User Manual
Page 15
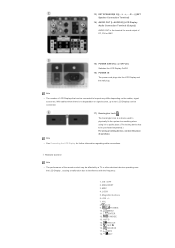
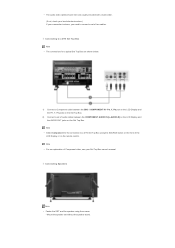
... LCD Displays that can be connected. 17) Kensington Lock Note The Kensington lock is the terminal for further information regarding cable connections. VOL 8. EXIT R - +] (EXT Speaker Connection Terminal) 14) AUDIO OUT [L -AUDIO-R] (LCD Display Audio Connection Terminal (Output)) AUDIO OUT is a device used to physically fix the system to something when... locking device has to loopout may differ depending on the cables, signal source etc. P.MO DE 13. AUTO 14. CH/P 16. ENTER 12. 13) EXT SPEAKER(8 Ω)[- - MAGICNET 3.
... LCD Displays that can be connected. 17) Kensington Lock Note The Kensington lock is the terminal for further information regarding cable connections. VOL 8. EXIT R - +] (EXT Speaker Connection Terminal) 14) AUDIO OUT [L -AUDIO-R] (LCD Display Audio Connection Terminal (Output)) AUDIO OUT is a device used to physically fix the system to something when... locking device has to loopout may differ depending on the cables, signal source etc. P.MO DE 13. AUTO 14. CH/P 16. ENTER 12. 13) EXT SPEAKER(8 Ω)[- - MAGICNET 3.

User Manual
Page 19
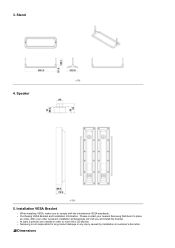
Mechanical Layout 2. Monitor Head Mechanical Layout | Monitor Head | Stand | Speaker | Installation VESA Bracket | Wall Bracket Installation 1.
Mechanical Layout 2. Monitor Head Mechanical Layout | Monitor Head | Stand | Speaker | Installation VESA Bracket | Wall Bracket Installation 1.
User Manual
Page 20
After your nearest Samsung Distributor to place an order. z At least 2 persons are needed in order to comply with the international VESA standards. Dimensions z Purchasing VESA Bracket and Installation Information : Please contact your order is not responsible for any product damage or any injury caused by installation at customer's discretion. z Samsung is placed, installation professionals will visit you and install the bracket. Installation VESA Bracket z When installing VESA, make sure to move the LCD Monitor. Stand 4. 3. Speaker 5.
After your nearest Samsung Distributor to place an order. z At least 2 persons are needed in order to comply with the international VESA standards. Dimensions z Purchasing VESA Bracket and Installation Information : Please contact your order is not responsible for any product damage or any injury caused by installation at customer's discretion. z Samsung is placed, installation professionals will visit you and install the bracket. Installation VESA Bracket z When installing VESA, make sure to move the LCD Monitor. Stand 4. 3. Speaker 5.
User Manual
Page 28
... • Fasten the SET and the speaker using the SOURCE button on the front of audio cables between the BNC / COMP ONENT IN - Connecting to a DTV Set Top Box Note • The ... Set Top Box. 2) Connect a set of Component video, see your camcorder is stereo, you need to a DTV Set Top Box using the screws. * Mount the speaker set without the...
... • Fasten the SET and the speaker using the SOURCE button on the front of audio cables between the BNC / COMP ONENT IN - Connecting to a DTV Set Top Box Note • The ... Set Top Box. 2) Connect a set of Component video, see your camcorder is stereo, you need to a DTV Set Top Box using the screws. * Mount the speaker set without the...

User Manual
Page 29
Connecting to the speakers. Note • Connect the speaker connection cable between the AUX L, R jacks on the AUDIO SYSTEM and the AUDIO OUT [L-AUDIO-R] on the back of the speaker. ALL Rights Reserved The speaker-bracket for connecting the SET speaker my become damaged. Note • Do not move the SET while the SET is connected to an Audio System Note • Connect a set of audio cables between the speaker connection jack on the back of the SET and the speaker connection jack on LCD Display. © 1995~2007 SAMSUNG.
Connecting to the speakers. Note • Connect the speaker connection cable between the AUX L, R jacks on the AUDIO SYSTEM and the AUDIO OUT [L-AUDIO-R] on the back of the speaker. ALL Rights Reserved The speaker-bracket for connecting the SET speaker my become damaged. Note • Do not move the SET while the SET is connected to an Audio System Note • Connect a set of audio cables between the speaker connection jack on the back of the SET and the speaker connection jack on LCD Display. © 1995~2007 SAMSUNG.

User Manual
Page 57
... personal preferences. 1) Bass Emphasizes low frequency audio. 2) Treble Emphasizes high frequency audio. 3) Balance Allows you to Adjusts the sound balance between the left and right speakers. [You can hear the sound even when sound value is set to 0.] Note • If you adjust picture using Sound Custom function, Sound Mode will...
... personal preferences. 1) Bass Emphasizes low frequency audio. 2) Treble Emphasizes high frequency audio. 3) Balance Allows you to Adjusts the sound balance between the left and right speakers. [You can hear the sound even when sound value is set to 0.] Note • If you adjust picture using Sound Custom function, Sound Mode will...

User Manual
Page 58
... NU ENTER ENTER ENTER] Selects either Main or Sub when PIP is a patented SRS technology that solves the problem of playing 5.1 multichannel content over two speakers. TruSurround delivers a compelling, virtual surround sound experience through any two...
... NU ENTER ENTER ENTER] Selects either Main or Sub when PIP is a patented SRS technology that solves the problem of playing 5.1 multichannel content over two speakers. TruSurround delivers a compelling, virtual surround sound experience through any two...


