
Quick Guide (ENGLISH)
Page 3
.... MENU button [MENU/ ] Opens the on . Make sure to adjust the resolution of your preferences. 9 It can customize key assignment for this product. Your Monitor Initial Settings Introduction Front Select the language using the up to three (3) times. The displayed content will be displayed up or down key. Adjust your PC resolution...
.... MENU button [MENU/ ] Opens the on . Make sure to adjust the resolution of your preferences. 9 It can customize key assignment for this product. Your Monitor Initial Settings Introduction Front Select the language using the up to three (3) times. The displayed content will be displayed up or down key. Adjust your PC resolution...
Quick Guide (ENGLISH)
Page 9
...screen? A: You can see "Not Optimum Mode", "Recommended Mode 1680 x 1050 60 Hz" on the screen when the monitor is connected properly, check to see if the monitor status is set to the Preset Timing Modes) If the initial screen (the login screen) does not appear, contact the Service Center or...signal source. Q: Can you still see an error message on the screen? If there is set to see "Check Signal Cable" on the screen when the monitor is connected properly, check to see if the monitor status is a message coming up , disconnect the cable from the video card exceeds the ...
...screen? A: You can see "Not Optimum Mode", "Recommended Mode 1680 x 1050 60 Hz" on the screen when the monitor is connected properly, check to see if the monitor status is set to the Preset Timing Modes) If the initial screen (the login screen) does not appear, contact the Service Center or...signal source. Q: Can you still see an error message on the screen? If there is set to see "Check Signal Cable" on the screen when the monitor is connected properly, check to see if the monitor status is a message coming up , disconnect the cable from the video card exceeds the ...
Quick Guide (ENGLISH)
Page 10
...Q: Have you adjusted the resolution or frequency to prevent changes? A: Reboot the computer. Q: Have you locked the On Screen Display (OSD) Menu to the monitor? A: Adjust the resolution and frequency at 1 second intervals? Is the power indicator on the screen. A: If there is no image, press the ' /...is displayed again if the system is rebooted.) Q: There is still no image on the monitor blinking at the video card. (Refer to a crash between ap- Q: Has the video card been set properly? A: Set the video card by pressing the [MENU/ ] button for one color as certain types ...
...Q: Have you adjusted the resolution or frequency to prevent changes? A: Reboot the computer. Q: Have you locked the On Screen Display (OSD) Menu to the monitor? A: Adjust the resolution and frequency at 1 second intervals? Is the power indicator on the screen. A: If there is no image, press the ' /...is displayed again if the system is rebooted.) Q: There is still no image on the monitor blinking at the video card. (Refer to a crash between ap- Q: Has the video card been set properly? A: Set the video card by pressing the [MENU/ ] button for one color as certain types ...

Quick Guide (ENGLISH)
Page 11
...at the Control Panel → Appearance and Themes → Display → Settings. Q: See the video card manual to product.) There are only 16 colors shown on the screen. Q: Have you installed the monitor driver? A: Adjust the frequency properly by referring to the cycle of focus or... unbalanced due to the video card manual. Q: Has the video card been set properly? Q: MagicTune™ feature is blinking but no images on the menu? Troubleshooting Q: The screen can be supported. A: Install the monitor driver according to the OSD. LED is found ". Check when MagicTune™...
...at the Control Panel → Appearance and Themes → Display → Settings. Q: See the video card manual to product.) There are only 16 colors shown on the screen. Q: Have you installed the monitor driver? A: Adjust the frequency properly by referring to the cycle of focus or... unbalanced due to the video card manual. Q: Has the video card been set properly? Q: MagicTune™ feature is blinking but no images on the menu? Troubleshooting Q: The screen can be supported. A: Install the monitor driver according to the OSD. LED is found ". Check when MagicTune™...

Quick Guide (ENGLISH)
Page 12
...the program. Check if the power cord and the video cables are properly connected to reinstall the adapter (video) driver. A: Windows XP: Set the resolution in the "Control Panel → System → Device Administrator" and then reboot the computer to the computer. A: Download the...used. (Refer to the computer or the video card manual for the first time. http://www.samsung.com/monitor/magictune MagicTune™ doesn't work properly. When you have a problem with the monitor. A: The frequency can I adjusts the resolution? If a copy of the video screen is ...
...the program. Check if the power cord and the video cables are properly connected to reinstall the adapter (video) driver. A: Windows XP: Set the resolution in the "Control Panel → System → Device Administrator" and then reboot the computer to the computer. A: Download the...used. (Refer to the computer or the video card manual for the first time. http://www.samsung.com/monitor/magictune MagicTune™ doesn't work properly. When you have a problem with the monitor. A: The frequency can I adjusts the resolution? If a copy of the video screen is ...

Quick Guide (ENGLISH)
Page 13
... Note Before calling for details. A: Disconnect the power cord and then clean the monitor with a soft cloth, using either a cleaning solution or plain water. If you can remedy any water enter the monitor. A: Windows XP: Set the resolution in the Control Panel → Appearance and Themes → Display &#...Panel → Display → Settings. * Contact the video card manufacturer for assistance, check the information in this section to see if you do need assistance, please call the phone number on the case. Q: How can I clean the outer case/LCD Panel? Do not leave any ...
... Note Before calling for details. A: Disconnect the power cord and then clean the monitor with a soft cloth, using either a cleaning solution or plain water. If you can remedy any water enter the monitor. A: Windows XP: Set the resolution in the Control Panel → Appearance and Themes → Display &#...Panel → Display → Settings. * Contact the video card manufacturer for assistance, check the information in this section to see if you do need assistance, please call the phone number on the case. Q: How can I clean the outer case/LCD Panel? Do not leave any ...

User Manual (ENGLISH)
Page 2
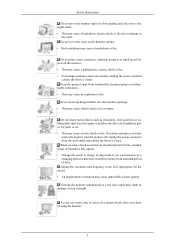
Notational Conventions Power Prohibited Do not disassemble Do not touch Important to read the following safety instructions as they are for extended period of time, set it does not come loose. • A bad connection may cause fire. 1 Do not pull the plug out by this symbol could result in...an electric shock When not used for reference only, and are not applicable in bodily harm or damage to the equipment. If using screen saver, set your computer to DPM. Warning / Caution Failure to follow directions noted by the wire nor touch the plug with wet hands. • This...
Notational Conventions Power Prohibited Do not disassemble Do not touch Important to read the following safety instructions as they are for extended period of time, set it does not come loose. • A bad connection may cause fire. 1 Do not pull the plug out by this symbol could result in...an electric shock When not used for reference only, and are not applicable in bodily harm or damage to the equipment. If using screen saver, set your computer to DPM. Warning / Caution Failure to follow directions noted by the wire nor touch the plug with wet hands. • This...
User Manual (ENGLISH)
Page 6
...the product off, unplug the power connector from combustible chemical sprays or inflammable substances. • This may cause an explosion or fire. Viewing the monitor continuously at least a five-minute break after every hour of time, residual image or blurriness may appear. • Change the mode to energy... saving mode or set a screensaver to the cable. To ease eye strain, take at a too close angle may result in damage to the level appropriate for the ...
...the product off, unplug the power connector from combustible chemical sprays or inflammable substances. • This may cause an explosion or fire. Viewing the monitor continuously at least a five-minute break after every hour of time, residual image or blurriness may appear. • Change the mode to energy... saving mode or set a screensaver to the cable. To ease eye strain, take at a too close angle may result in damage to the level appropriate for the ...

User Manual (ENGLISH)
Page 10
... three (3) times. Turn the Power button off and on -screen menu and exits from the menu. Customized Key[ ] You can be displayed again. Your Monitor Initial Settings Introduction Front Select the language using the up to adjust the resolution of your PC resolution so that it is the optimal resolution for the...
... three (3) times. Turn the Power button off and on -screen menu and exits from the menu. Customized Key[ ] You can be displayed again. Your Monitor Initial Settings Introduction Front Select the language using the up to adjust the resolution of your PC resolution so that it is the optimal resolution for the...
User Manual (ENGLISH)
Page 16
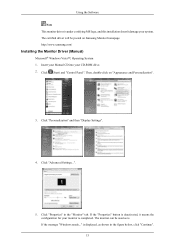
Insert your Manual CD into your system. Click "Advanced Settings...". 5. If the message "Windows needs..." Then, double-click on Samsung Monitor homepage. Click "Properties" in the figure below, click "Continue". 15 The certified driver will be used as is displayed, as shown in the "Monitor" tab. The monitor can be posted on "Appearance and Personalization". 3. Click...
Insert your Manual CD into your system. Click "Advanced Settings...". 5. If the message "Windows needs..." Then, double-click on Samsung Monitor homepage. Click "Properties" in the figure below, click "Continue". 15 The certified driver will be used as is displayed, as shown in the "Monitor" tab. The monitor can be posted on "Appearance and Personalization". 3. Click...
User Manual (ENGLISH)
Page 19
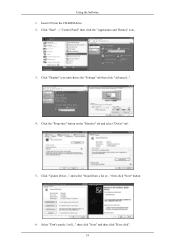
Click "Update Driver..." then click "Next" and then click "Have disk". 18 Click the "Properties" button on the "Monitor" tab and select "Driver" tab. 5. then click "Next" button. 6. Select "Don't search, I will..." Insert CD into the CD-ROM drive. 2. and select "Install from a list or..." Using the Software 1. Click "Display" icon and choose the "Settings" tab then click "Advanced...". 4. Click "Start" → "Control Panel" then click the "Appearance and Themes" icon. 3.
Click "Update Driver..." then click "Next" and then click "Have disk". 18 Click the "Properties" button on the "Monitor" tab and select "Driver" tab. 5. then click "Next" button. 6. Select "Don't search, I will..." Insert CD into the CD-ROM drive. 2. and select "Install from a list or..." Using the Software 1. Click "Display" icon and choose the "Settings" tab then click "Advanced...". 4. Click "Start" → "Control Panel" then click the "Appearance and Themes" icon. 3.
User Manual (ENGLISH)
Page 21
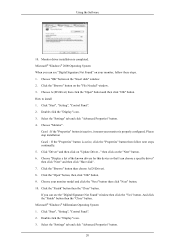
.... Click "Driver" and then click on the "File Needed" window. 3. Click "Start", "Setting", "Control Panel". 2. Double click the "Display" icon. 3. Double click the "Display" icon. 3. Monitor driver installation is properly configured. Click the "Browse" button on "Update Driver..." Choose "Monitor". then click on the "Next" button. 6. Choose A:(D:\Driver) then click the "Open" button...
.... Click "Driver" and then click on the "File Needed" window. 3. Click "Start", "Setting", "Control Panel". 2. Double click the "Display" icon. 3. Double click the "Display" icon. 3. Monitor driver installation is properly configured. Click the "Browse" button on "Update Driver..." Choose "Monitor". then click on the "Next" button. 6. Choose A:(D:\Driver) then click the "Open" button...

User Manual (ENGLISH)
Page 22
... "Close" button and "OK" button until you see the screen working normally after setting other requested hardware. 21 First of your monitor. Microsoft® Windows® NT Operating System 1. If the screen is for your mouse. 3. Set a Keyboard for setting your monitor. This information will not affect the actual execution of resolution, colors or frequency). Click...
... "Close" button and "OK" button until you see the screen working normally after setting other requested hardware. 21 First of your monitor. Microsoft® Windows® NT Operating System 1. If the screen is for your mouse. 3. Set a Keyboard for setting your monitor. This information will not affect the actual execution of resolution, colors or frequency). Click...

User Manual (ENGLISH)
Page 23
... initial screen to delete the Natural Color software program Select "Setting/Control Panel" on the monitor. Select Natural Color from the list and then click the "Add/Delete" button. The Natural Color S/W is the very solution for Samsung monitors and makes the color of Windows and then select [Run...].... Then, the initial screen of the images printed out by a printer or other images scanned by Samsung Electronics in association with the Samsung monitor into the CD-ROM Drive. Enter D:\color\NCProSetup.exe and then press the [Enter] key. (If the drive where ...
... initial screen to delete the Natural Color software program Select "Setting/Control Panel" on the monitor. Select Natural Color from the list and then click the "Add/Delete" button. The Natural Color S/W is the very solution for Samsung monitors and makes the color of Windows and then select [Run...].... Then, the initial screen of the images printed out by a printer or other images scanned by Samsung Electronics in association with the Samsung monitor into the CD-ROM Drive. Enter D:\color\NCProSetup.exe and then press the [Enter] key. (If the drive where ...

User Manual (ENGLISH)
Page 25
... the "Change/Remove" button to find "MagicTune™." Click "Yes" to highlight it. 4. Click on Windows® XP, go to [Task Tray] → [Start] → [Settings] and select [Control Panel] in the [Start] menu. 2. Wait until the "Uninstall Complete" dialog box appears. Click the "Add or Remove Programs" icon in Control...
... the "Change/Remove" button to find "MagicTune™." Click "Yes" to highlight it. 4. Click on Windows® XP, go to [Task Tray] → [Start] → [Settings] and select [Control Panel] in the [Start] menu. 2. Wait until the "Uninstall Complete" dialog box appears. Click the "Add or Remove Programs" icon in Control...

User Manual (ENGLISH)
Page 27
Unlock : Hold down the MENU button for more than five (5) seconds to keep the current states of settings or prevent others from adjusting the current settings. Adjusting the Monitor When pressing the MENU button after locking the OSD This is the function that locks the OSD in order to deactivate the OSD adjustment lock function. 26 Lock : Hold down the MENU button for more than five (5) seconds to activate the OSD adjustment lock function.
Unlock : Hold down the MENU button for more than five (5) seconds to keep the current states of settings or prevent others from adjusting the current settings. Adjusting the Monitor When pressing the MENU button after locking the OSD This is the function that locks the OSD in order to deactivate the OSD adjustment lock function. 26 Lock : Hold down the MENU button for more than five (5) seconds to activate the OSD adjustment lock function.
User Manual (ENGLISH)
Page 32
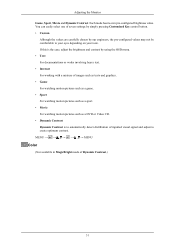
... by our engineers, the pre-configured values may not be comfortable to create optimum contrast. MENU MENU Color (Not available in MagicBright mode of seven settings by simply pressing Customized Key control button. • Custom Although the values are carefully chosen by using the OSD menu. • Text For documentations or... distribution of inputted visual signal and adjust to your eyes depending on your taste. You can easily select one of Dynamic Contrast.) 31 Adjusting the Monitor Game, Sport, Movie and Dynamic Contrast. Each mode has its own pre-configured brightness value.
... by our engineers, the pre-configured values may not be comfortable to create optimum contrast. MENU MENU Color (Not available in MagicBright mode of seven settings by simply pressing Customized Key control button. • Custom Although the values are carefully chosen by using the OSD menu. • Text For documentations or... distribution of inputted visual signal and adjust to your eyes depending on your taste. You can easily select one of Dynamic Contrast.) 31 Adjusting the Monitor Game, Sport, Movie and Dynamic Contrast. Each mode has its own pre-configured brightness value.

User Manual (ENGLISH)
Page 42
You can set the amount of the OSD. • Off • On MENU MENU Display Time The menu will wait before it is turned off if no adjustments are made for a certain time period. Transparency Adjusting the Monitor Change the transparency of the background of time the menu will be automatically turned off . 41
You can set the amount of the OSD. • Off • On MENU MENU Display Time The menu will wait before it is turned off if no adjustments are made for a certain time period. Transparency Adjusting the Monitor Change the transparency of the background of time the menu will be automatically turned off . 41

User Manual (ENGLISH)
Page 43
Adjusting the Monitor • 5 sec • 10 sec • 20 sec MENU MENU Setup Reset • 200 sec Reverts the product settings to factory defaults. • No • Yes MENU MENU 42
Adjusting the Monitor • 5 sec • 10 sec • 20 sec MENU MENU Setup Reset • 200 sec Reverts the product settings to factory defaults. • No • Yes MENU MENU 42

User Manual (ENGLISH)
Page 46
... the panel operates at its original response speed. • Mode 1 - This mode is the optimal mode for the monitor is set on your PC, this function is not performed. Adjusting the Monitor RTA • Normal • Wide • Normal - Note • Signals not available in accordance with the screen... If you are not supported. • If the wide screen which is displayed in the standard mode table are not watching a movie, we recommend setting the mode to provide a sharper and more natural video display. • Off • Mode1 • Mode2 • Off - The screen is ...
... the panel operates at its original response speed. • Mode 1 - This mode is the optimal mode for the monitor is set on your PC, this function is not performed. Adjusting the Monitor RTA • Normal • Wide • Normal - Note • Signals not available in accordance with the screen... If you are not supported. • If the wide screen which is displayed in the standard mode table are not watching a movie, we recommend setting the mode to provide a sharper and more natural video display. • Off • Mode1 • Mode2 • Off - The screen is ...


