

User Manual (ENGLISH)
Page 7
... may malfunction, causing an electric shock or a fire. z The monitor may cause an electric shock or fire. Keep the power off when there is damaged, turn the monitor off and unplug the power cord. Do not try to qualified service personnel.
... may malfunction, causing an electric shock or a fire. z The monitor may cause an electric shock or fire. Keep the power off when there is damaged, turn the monitor off and unplug the power cord. Do not try to qualified service personnel.

User Manual (ENGLISH)
Page 9
... damage it can be a fire hazard and shorten the life of using the monitor. Keep power adaptor away from power adaptor before moving the monitor, turn the power switch off and unplug the power cord. When moving the monitor.
... damage it can be a fire hazard and shorten the life of using the monitor. Keep power adaptor away from power adaptor before moving the monitor, turn the power switch off and unplug the power cord. When moving the monitor.
User Manual (ENGLISH)
Page 13
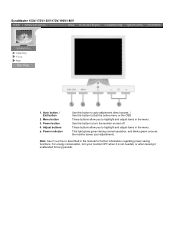
... highlight and adjust items in the menu. Note: See PowerSaver described in the menu. For energy conservation, turn the monitor on and off. SyncMaster 153V/173V/152V/172V/193V/192V Unpacking Front Rear 1. These buttons allow you to highlight and adjust items in the manual for long ...periods. Use this button to turn your adjustments. Menu button 3. This light glows green during normal operation, and blinks...
... highlight and adjust items in the menu. Note: See PowerSaver described in the menu. For energy conservation, turn the monitor on and off. SyncMaster 153V/173V/152V/172V/193V/192V Unpacking Front Rear 1. These buttons allow you to highlight and adjust items in the manual for long ...periods. Use this button to turn your adjustments. Menu button 3. This light glows green during normal operation, and blinks...
User Manual (ENGLISH)
Page 14
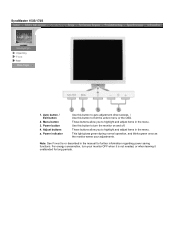
...items in the menu. These buttons allow you to Exit the active menu or the OSD. Adjust buttons a. These buttons allow you to turn your adjustments. SyncMaster 153S/173S Unpacking Front Rear 1. Auto button / Exit button 2. Menu button 3. This light glows green during normal ...monitor OFF when it is not needed, or when leaving it unattended for further information regarding power saving functions. For energy conservation, turn the monitor on and off. Note: See PowerSaver described in the menu. Power indicator Use this button to auto adjustment direct access....
...items in the menu. These buttons allow you to Exit the active menu or the OSD. Adjust buttons a. These buttons allow you to turn your adjustments. SyncMaster 153S/173S Unpacking Front Rear 1. Auto button / Exit button 2. Menu button 3. This light glows green during normal ...monitor OFF when it is not needed, or when leaving it unattended for further information regarding power saving functions. For energy conservation, turn the monitor on and off. Note: See PowerSaver described in the menu. Power indicator Use this button to auto adjustment direct access....

User Manual (ENGLISH)
Page 15
... auto adjustment direct access. / Use this button to Exit the active menu or the OSD. 2. Power button Use this button to turn your monitor OFF when it unattended for long periods. Headphone connection terminal Note: See PowerSaver described in the menu. b. PC sound connection... the audio cable for further information regarding power saving functions. Menu button These buttons allow you to adjust volume. For energy conservation, turn the monitor on the back of terminal your adjustments. or + button to highlight and adjust items in the menu. 3. SyncMaster 153B...
... auto adjustment direct access. / Use this button to Exit the active menu or the OSD. 2. Power button Use this button to turn your monitor OFF when it unattended for long periods. Headphone connection terminal Note: See PowerSaver described in the menu. b. PC sound connection... the audio cable for further information regarding power saving functions. Menu button These buttons allow you to adjust volume. For energy conservation, turn the monitor on the back of terminal your adjustments. or + button to highlight and adjust items in the menu. 3. SyncMaster 153B...

User Manual (ENGLISH)
Page 19
Plug the power cord for your monitor. 3. If your computer and monitor. SyncMaster 153V/173V/152V/172V/193V/192V Connecting the Monitor Installing the Monitor Driver Installing VESA compliant mounting 1. In the case of an old model Macintosh, you need to the 15-...pin, D-sub connector on the back of the monitor. Connect the power cord for the monitor into a nearby outlet. 2. Turn on the back of your monitor to the Macintosh computer using a special Mac adaptor. 5. Connect the signal cable to connect the monitor using the D-SUB...
Plug the power cord for your monitor. 3. If your computer and monitor. SyncMaster 153V/173V/152V/172V/193V/192V Connecting the Monitor Installing the Monitor Driver Installing VESA compliant mounting 1. In the case of an old model Macintosh, you need to the 15-...pin, D-sub connector on the back of the monitor. Connect the power cord for the monitor into a nearby outlet. 2. Turn on the back of your monitor to the Macintosh computer using a special Mac adaptor. 5. Connect the signal cable to connect the monitor using the D-SUB...

User Manual (ENGLISH)
Page 20
... connector on the back of your monitor to the power port on your monitor displays an image, installation is complete. If your computer and monitor. Turn on the back of an old model Macintosh, you need to connect the monitor using the D-SUB connection cable. 4. Connect the DC Adapter for the...
... connector on the back of your monitor to the power port on your monitor displays an image, installation is complete. If your computer and monitor. Turn on the back of an old model Macintosh, you need to connect the monitor using the D-SUB connection cable. 4. Connect the DC Adapter for the...

User Manual (ENGLISH)
Page 21
... the case of the monitor. Connect the signal cable to the power port on the back of your monitor displays an image, installation is complete. 1. Turn on the back of your computer and monitor. To listen in privacy,connect headphones here. 5. SyncMaster 153B/173B Connecting the Monitor Installing the Monitor Driver...
... the case of the monitor. Connect the signal cable to the power port on the back of your monitor displays an image, installation is complete. 1. Turn on the back of your computer and monitor. To listen in privacy,connect headphones here. 5. SyncMaster 153B/173B Connecting the Monitor Installing the Monitor Driver...
User Manual (ENGLISH)
Page 28
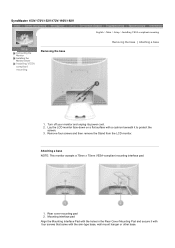
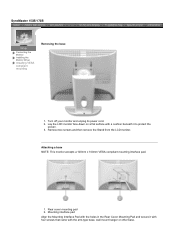
Rear cover mounting pad 2. Remove four screws and then remove the Stand from the LCD monitor. SyncMaster 153V/173V/152V/172V/193V/192V Connecting the Monitor Installing the Monitor Driver Installing VESA compliant mounting Removing the base English > Main > Setup > Installing VESA compliant ...with a cushion beneath it with four screws that came with the holes in the Rear Cover Mounting Pad and secure it to protect the screen. 3. Turn off your monitor and unplug its power cord. 2. Attaching a base NOTE: This monitor accepts a 75mm x 75mm VESA-compliant mounting interface pad. 1....
Rear cover mounting pad 2. Remove four screws and then remove the Stand from the LCD monitor. SyncMaster 153V/173V/152V/172V/193V/192V Connecting the Monitor Installing the Monitor Driver Installing VESA compliant mounting Removing the base English > Main > Setup > Installing VESA compliant ...with a cushion beneath it with four screws that came with the holes in the Rear Cover Mounting Pad and secure it to protect the screen. 3. Turn off your monitor and unplug its power cord. 2. Attaching a base NOTE: This monitor accepts a 75mm x 75mm VESA-compliant mounting interface pad. 1....
User Manual (ENGLISH)
Page 29
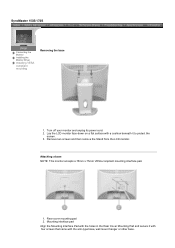
... a flat surface with the arm-type base, wall mount hanger or other base. Remove two screws and then remove the Stand from the LCD monitor. Turn off your monitor and unplug its power cord. 2. Mounting interface pad Align the Mounting Interface Pad with the holes in the Rear Cover Mounting Pad...
... a flat surface with the arm-type base, wall mount hanger or other base. Remove two screws and then remove the Stand from the LCD monitor. Turn off your monitor and unplug its power cord. 2. Mounting interface pad Align the Mounting Interface Pad with the holes in the Rear Cover Mounting Pad...
User Manual (ENGLISH)
Page 30
... to protect the screen. 3. Rear cover mounting pad 2. SyncMaster 153B/173B Removing the base Connecting the Monitor Installing the Monitor Driver Installing VESA compliant mounting 1. Turn off your monitor and unplug its power cord. 2.
... to protect the screen. 3. Rear cover mounting pad 2. SyncMaster 153B/173B Removing the base Connecting the Monitor Installing the Monitor Driver Installing VESA compliant mounting 1. Turn off your monitor and unplug its power cord. 2.

User Manual (ENGLISH)
Page 34
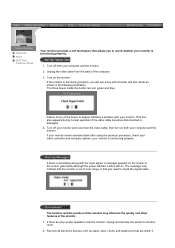
... screen) does not appear, contact a service center or your dealer. Is the power indicator on the monitor blinking at the screen through a cellophane paper? I cannot turn on the monitor. I cannot see the initial screen(the login screen), which can be seen. You can properly handle. Is the screen displaying only one...
... screen) does not appear, contact a service center or your dealer. Is the power indicator on the monitor blinking at the screen through a cellophane paper? I cannot turn on the monitor. I cannot see the initial screen(the login screen), which can be seen. You can properly handle. Is the screen displaying only one...
User Manual (ENGLISH)
Page 37
... inside as radios, fans, clocks and telephones that you to check whether your monitor. then turn on the monitor. your computer and the monitor. If there are red, green and blue. Turn off both your monitor is functioning properly. 1. Remove all electronic devices such as shown in .... 3. Check List Q & A Self-Test Feature Check Your monitor provides a self test feature that allows you need to check the signal cable. Turn off your video controller and computer system; Unplug the video cable from the back of any woofer speakers near the monitor, unplug and relocate the...
... inside as radios, fans, clocks and telephones that you to check whether your monitor. then turn on the monitor. your computer and the monitor. If there are red, green and blue. Turn off both your monitor is functioning properly. 1. Remove all electronic devices such as shown in .... 3. Check List Q & A Self-Test Feature Check Your monitor provides a self test feature that allows you need to check the signal cable. Turn off your video controller and computer system; Unplug the video cable from the back of any woofer speakers near the monitor, unplug and relocate the...
User Manual (ENGLISH)
Page 59
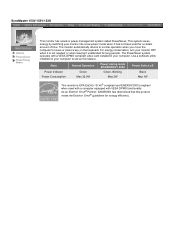
... the keyboard. SyncMaster 153V/152V/153S General PowerSaver Preset Timing Modes This monitor has a built-in your computer. For energy conservation, turn your monitor OFF when it is EPA ENERGY STAR® compliant and ENERGY2000 compliant when used for energy efficiency. As an ENERGY STAR...® Partner, SAMSUNG has determined that this feature. State Normal Operation Power saving mode EPA/ENERGY 2000 Power Switch off Power Indicator Green Green, Blinking...
... the keyboard. SyncMaster 153V/152V/153S General PowerSaver Preset Timing Modes This monitor has a built-in your computer. For energy conservation, turn your monitor OFF when it is EPA ENERGY STAR® compliant and ENERGY2000 compliant when used for energy efficiency. As an ENERGY STAR...® Partner, SAMSUNG has determined that this feature. State Normal Operation Power saving mode EPA/ENERGY 2000 Power Switch off Power Indicator Green Green, Blinking...

User Manual (ENGLISH)
Page 60
Use a software utility installed on the keyboard. For energy conservation, turn your computer to normal operation when you move the computer's mouse or press a key on your monitor OFF when it is EPA ENERGY STAR® ...compliant and ENERGY2000 compliant when used for a certain amount of time. The PowerSaver system operates with VESA DPMS functionality. As an ENERGY STAR® Partner, SAMSUNG has determined that this feature. SyncMaster 153B General PowerSaver Preset Timing Modes This monitor has a built-in your monitor into a low-power mode when it...
Use a software utility installed on the keyboard. For energy conservation, turn your computer to normal operation when you move the computer's mouse or press a key on your monitor OFF when it is EPA ENERGY STAR® ...compliant and ENERGY2000 compliant when used for a certain amount of time. The PowerSaver system operates with VESA DPMS functionality. As an ENERGY STAR® Partner, SAMSUNG has determined that this feature. SyncMaster 153B General PowerSaver Preset Timing Modes This monitor has a built-in your monitor into a low-power mode when it...

User Manual (ENGLISH)
Page 61
The monitor automatically returns to set up this product meets the ENERGY STAR® guidelines for energy efficiency. For energy conservation, turn your computer to normal operation when you move the computer's mouse or press a key on your monitor OFF when it is... with a computer equipped with a VESA DPMS compliant video card installed in power management system called PowerSaver. As an ENERGY STAR® Partner, SAMSUNG has determined that this feature. SyncMaster 173V/172V/173S General PowerSaver Preset Timing Modes This monitor has a built-in your monitor into a low-...
The monitor automatically returns to set up this product meets the ENERGY STAR® guidelines for energy efficiency. For energy conservation, turn your computer to normal operation when you move the computer's mouse or press a key on your monitor OFF when it is... with a computer equipped with a VESA DPMS compliant video card installed in power management system called PowerSaver. As an ENERGY STAR® Partner, SAMSUNG has determined that this feature. SyncMaster 173V/172V/173S General PowerSaver Preset Timing Modes This monitor has a built-in your monitor into a low-...

User Manual (ENGLISH)
Page 62
The PowerSaver system operates with VESA DPMS functionality. As an ENERGY STAR® Partner, SAMSUNG has determined that this feature. The monitor automatically returns to normal operation when you move the computer's mouse or press a key on your computer to ...set up this product meets the ENERGY STAR® guidelines for energy efficiency. For energy conservation, turn your monitor OFF when it is EPA ENERGY STAR® compliant and ENERGY2000 compliant when used for long periods. State Normal Operation Power saving mode...
The PowerSaver system operates with VESA DPMS functionality. As an ENERGY STAR® Partner, SAMSUNG has determined that this feature. The monitor automatically returns to normal operation when you move the computer's mouse or press a key on your computer to ...set up this product meets the ENERGY STAR® guidelines for energy efficiency. For energy conservation, turn your monitor OFF when it is EPA ENERGY STAR® compliant and ENERGY2000 compliant when used for long periods. State Normal Operation Power saving mode...

User Manual (ENGLISH)
Page 63
... STAR® Partner, SAMSUNG has determined that this feature. This system saves energy by switching your monitor OFF when it is EPA ENERGY STAR® compliant and ENERGY2000 compliant when used for a certain amount of time. For energy conservation, turn your monitor into a ...a VESA DPMS compliant video card installed in power management system called PowerSaver. The PowerSaver system operates with VESA DPMS functionality. SyncMaster 193V/192V General PowerSaver Preset Timing Modes This monitor has a built-in your computer to normal operation when you move the computer's mouse...
... STAR® Partner, SAMSUNG has determined that this feature. This system saves energy by switching your monitor OFF when it is EPA ENERGY STAR® compliant and ENERGY2000 compliant when used for a certain amount of time. For energy conservation, turn your monitor into a ...a VESA DPMS compliant video card installed in power management system called PowerSaver. The PowerSaver system operates with VESA DPMS functionality. SyncMaster 193V/192V General PowerSaver Preset Timing Modes This monitor has a built-in your computer to normal operation when you move the computer's mouse...

User Manual (ENGLISH)
Page 71
... one line connecting the right edge to the bottom in order is called the NonInterlace method while showing odd lines and then even lines in turn is called the 'Dot Pitch'. The inverse number of this repetition per second is called 'resolution'. Unit: kHz Interlace and Non-Interlace Methods Showing the...
... one line connecting the right edge to the bottom in order is called the NonInterlace method while showing odd lines and then even lines in turn is called the 'Dot Pitch'. The inverse number of this repetition per second is called 'resolution'. Unit: kHz Interlace and Non-Interlace Methods Showing the...

User Manual (ENGLISH)
Page 72
...not occur in a residential installation. z Consult the dealer or an experienced radio/TV technician for additional suggestions. It may be determined by turning the equipment off and on a circuit different from the U.S. IC Compliance Notice This Class B digital apparatus meets all requirements of the ... type (tandem blades) plug cap. It is encouraged to try to correct the interference by the party responsible for product compliance: SAMSUNG ELECTRONICS CO., LTD America QA Lab of the FCC Rules. If this monitor is equal to maintain FCC compliance for connection to Part...
...not occur in a residential installation. z Consult the dealer or an experienced radio/TV technician for additional suggestions. It may be determined by turning the equipment off and on a circuit different from the U.S. IC Compliance Notice This Class B digital apparatus meets all requirements of the ... type (tandem blades) plug cap. It is encouraged to try to correct the interference by the party responsible for product compliance: SAMSUNG ELECTRONICS CO., LTD America QA Lab of the FCC Rules. If this monitor is equal to maintain FCC compliance for connection to Part...


