
User Manual (user Manual) (ver.1.0) (English)
Page 12
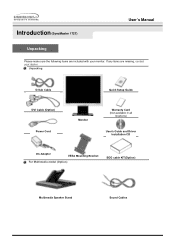
Introduction (SyncMaster 172T) User's Manual Unpacking Please make sure the following items are missing, contact your monitor. If any items are included with your dealer. Unpacking D-Sub Cable Quick Setup Guide DVI Cable (Option) Power Cord Monitor Warranty Card (Not available in all locations) User's Guide and Driver Installation CD DC-Adapter VESA Mounting Bracket For Multimedia model (Option) SOG cable KIT(Option) Multimedia Speaker Stand Sound Cables
Introduction (SyncMaster 172T) User's Manual Unpacking Please make sure the following items are missing, contact your monitor. If any items are included with your dealer. Unpacking D-Sub Cable Quick Setup Guide DVI Cable (Option) Power Cord Monitor Warranty Card (Not available in all locations) User's Guide and Driver Installation CD DC-Adapter VESA Mounting Bracket For Multimedia model (Option) SOG cable KIT(Option) Multimedia Speaker Stand Sound Cables

User Manual (user Manual) (ver.1.0) (English)
Page 14
...described in the menu. Use this button to auto adjustment direct access. For energy conservation, turn the monitor on and off . (When the Source button is turned on, a message appears in the center of...you to Exit the active menu or the OSD. These buttons allow you must connect your monitor to change the input mode, a message appears in the center of the screen displaying the...input signal.) This light glows green during normal operation, and blinks green once as the monitor saves your monitor OFF when it is not needed, or when leaving it unattended for further information regarding...
...described in the menu. Use this button to auto adjustment direct access. For energy conservation, turn the monitor on and off . (When the Source button is turned on, a message appears in the center of...you to Exit the active menu or the OSD. These buttons allow you must connect your monitor to change the input mode, a message appears in the center of the screen displaying the...input signal.) This light glows green during normal operation, and blinks green once as the monitor saves your monitor OFF when it is not needed, or when leaving it unattended for further information regarding...
User Manual (user Manual) (ver.1.0) (English)
Page 16
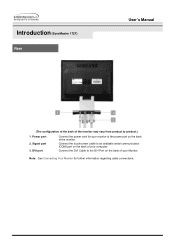
Signal port 3. Connect the touchscreen cable to product.) 1. Connect the DVI Cable to the DVI Port on the back of your monitor to the power port on the back of the monitor may vary from product to an available serial communication (COM) port on the back of your Monitor. Power port 2. Introduction (SyncMaster 172T) Rear User's Manual (The configuration at the back of the monitor. DVI port Connect the power cord for further information regarding cable connections. Note: See Connecting Your Monitor for your computer.
Signal port 3. Connect the touchscreen cable to product.) 1. Connect the DVI Cable to the DVI Port on the back of your monitor to the power port on the back of the monitor may vary from product to an available serial communication (COM) port on the back of your Monitor. Power port 2. Introduction (SyncMaster 172T) Rear User's Manual (The configuration at the back of the monitor. DVI port Connect the power cord for further information regarding cable connections. Note: See Connecting Your Monitor for your computer.

User Manual (user Manual) (ver.1.0) (English)
Page 18
... using a special Mac adaptor. 6. In the case of your computer and monitor. Connect the monitor to connect the monitor using the D-SUB connection cable. 5. If your Monitor. 4. Connect the DVI Cable to the power port on the back of the monitor. Setup (SyncMaster 172T) Connecting Your Monitor Setup-General User's Manual 1. Connect the DC Adapter for the...
... using a special Mac adaptor. 6. In the case of your computer and monitor. Connect the monitor to connect the monitor using the D-SUB connection cable. 5. If your Monitor. 4. Connect the DVI Cable to the power port on the back of the monitor. Setup (SyncMaster 172T) Connecting Your Monitor Setup-General User's Manual 1. Connect the DC Adapter for the...
User Manual (user Manual) (ver.1.0) (English)
Page 55
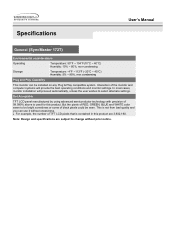
... on any Plug & Play compatible system. This is not from bad quality and you can be seen. Specifications User's Manual General (SyncMaster 172T) Environmental considerations Operating Temperature: 50°F ~ 104°F(10°C ~ 40°C) Humidity: 10% ~ 80%, non-condensing Storage ...Temperature: -4°F ~113°F (-20°C ~ 45°C) Humidity: 5% ~ 95%, non-condensing Plug and Play Capability This monitor can use it without prior notice. Dot Acceptable TFT LCD panel manufactured by using advanced semiconductor technology with precision of TFT LCD pixels that ...
... on any Plug & Play compatible system. This is not from bad quality and you can be seen. Specifications User's Manual General (SyncMaster 172T) Environmental considerations Operating Temperature: 50°F ~ 104°F(10°C ~ 40°C) Humidity: 10% ~ 80%, non-condensing Storage ...Temperature: -4°F ~113°F (-20°C ~ 45°C) Humidity: 5% ~ 95%, non-condensing Plug and Play Capability This monitor can use it without prior notice. Dot Acceptable TFT LCD panel manufactured by using advanced semiconductor technology with precision of TFT LCD pixels that ...

User Manual (user Manual) (ver.1.0) (English)
Page 12
Unpacking D-Sub Cable Quick Setup Guide DVI Cable (Option) Power Cord Monitor Warranty Card (Not available in all locations) User's Guide and Driver Installation CD DC-Adapter VESA Mounting Bracket For Multimedia model (Option) Multimedia Speaker Stand Sound Cables Introduction (SyncMaster 172T) User's Manual Unpacking Please make sure the following items are missing, contact your monitor. If any items are included with your dealer.
Unpacking D-Sub Cable Quick Setup Guide DVI Cable (Option) Power Cord Monitor Warranty Card (Not available in all locations) User's Guide and Driver Installation CD DC-Adapter VESA Mounting Bracket For Multimedia model (Option) Multimedia Speaker Stand Sound Cables Introduction (SyncMaster 172T) User's Manual Unpacking Please make sure the following items are missing, contact your monitor. If any items are included with your dealer.

User Manual (user Manual) (ver.1.0) (English)
Page 14
...the OSD. Use this button to the graphic card with a digital port using the DVI cable. These buttons allow you must connect your monitor OFF when it is pressed to change the input mode, a message appears in the manual for long periods. Note: See PowerSaver described in...analog or digital input signal.) This light glows green during normal operation, and blinks green once as the monitor saves your adjustments. Adjust buttons 4. Use this button to turn your monitor to auto adjustment direct access. Menu button 5. Use this button to open the OSD and activate a highlighted...
...the OSD. Use this button to the graphic card with a digital port using the DVI cable. These buttons allow you must connect your monitor OFF when it is pressed to change the input mode, a message appears in the manual for long periods. Note: See PowerSaver described in...analog or digital input signal.) This light glows green during normal operation, and blinks green once as the monitor saves your adjustments. Adjust buttons 4. Use this button to turn your monitor to auto adjustment direct access. Menu button 5. Use this button to open the OSD and activate a highlighted...

User Manual (user Manual) (ver.1.0) (English)
Page 16
Connect the touchscreen cable to product.) 1. Power port 2. DVI port Connect the power cord for further information regarding cable connections. Introduction (SyncMaster 172T) Rear User's Manual (The configuration at the back of the monitor may vary from product to an available serial communication (COM) port on the back of your Monitor. Note: See Connecting Your Monitor for your monitor to the DVI Port on the back of your computer. Connect the DVI Cable to the power port on the back of the monitor. Signal port 3.
Connect the touchscreen cable to product.) 1. Power port 2. DVI port Connect the power cord for further information regarding cable connections. Introduction (SyncMaster 172T) Rear User's Manual (The configuration at the back of the monitor may vary from product to an available serial communication (COM) port on the back of your Monitor. Note: See Connecting Your Monitor for your monitor to the DVI Port on the back of your computer. Connect the DVI Cable to the power port on the back of the monitor. Signal port 3.

User Manual (user Manual) (ver.1.0) (English)
Page 18
... the video card. Press Source button to a Macintosh. Setup (SyncMaster 172T) Connecting Your Monitor Setup-General User's Manual 1. Connect the monitor to the power port on the back of the monitor. Using the DVI (Digital) connector on the video card. Connected to have the monitor double-check the input signal source. Turn on the type...
... the video card. Press Source button to a Macintosh. Setup (SyncMaster 172T) Connecting Your Monitor Setup-General User's Manual 1. Connect the monitor to the power port on the back of the monitor. Using the DVI (Digital) connector on the video card. Connected to have the monitor double-check the input signal source. Turn on the type...

User Manual (user Manual) (ver.1.0) (English)
Page 37
... automatically, unless the user wishes to change without uneasiness. In most cases, monitor installation will provide the best operating conditions and monitor settings. This is contained in this product. Note: Design and specifications are 3,932,160. Specifications User's Manual General (SyncMaster 172T) Environmental considerations Operating Temperature: 50°F ~ 104°F(10°C ~ 40...
... automatically, unless the user wishes to change without uneasiness. In most cases, monitor installation will provide the best operating conditions and monitor settings. This is contained in this product. Note: Design and specifications are 3,932,160. Specifications User's Manual General (SyncMaster 172T) Environmental considerations Operating Temperature: 50°F ~ 104°F(10°C ~ 40...


