
User Manual (user Manual) (ver.1.0) (English)
Page 2
Index Main Page Safety Instructions Notational Power Installation Cleaning Other Introduction Unpacking Front Rear Setup Connecting Your Monitor Installing the Monitor Driver - Manual Installing VESA compliant mounting User's Manual On-Screen Display Troubleshooting Check List Q & A Self-Test Feature Check Specifications General Specifications PowerSaver Preset Display Modes Information Service Terms Regulatory Natural Color For Better Display Authority Automatic -
Index Main Page Safety Instructions Notational Power Installation Cleaning Other Introduction Unpacking Front Rear Setup Connecting Your Monitor Installing the Monitor Driver - Manual Installing VESA compliant mounting User's Manual On-Screen Display Troubleshooting Check List Q & A Self-Test Feature Check Specifications General Specifications PowerSaver Preset Display Modes Information Service Terms Regulatory Natural Color For Better Display Authority Automatic -

User Manual (user Manual) (ver.1.0) (English)
Page 9
... your monitor does not operate normally - unplug it - No user serviceable parts inside. • This may cause an explosion or fire. er or service. • This may cause an electric shock or a fire. • Do not place any unusual sounds or smells coming from it immediately and contact an authorized deal- Safety Instructions User's Manual Other • Do not remove cover...
... your monitor does not operate normally - unplug it - No user serviceable parts inside. • This may cause an explosion or fire. er or service. • This may cause an electric shock or a fire. • Do not place any unusual sounds or smells coming from it immediately and contact an authorized deal- Safety Instructions User's Manual Other • Do not remove cover...

User Manual (user Manual) (ver.1.0) (English)
Page 12
... are missing, contact your dealer.11jk Multimedia Speaker Stand (Simple Stand or Pivot Stand & Pivot Software) Sound Cable General Monitor and Stand Power Cord Signal Cable DVI Cable (Option) Pivot Stand and S/W CD(Option) Quick Setup Guide Warranty Card (Not available in all locations) User's Guide and Driver Installation CD (Some models include a stand attached. ) PlFeoarsMeulmtimaedkiea msoudreel (Othpteionfo) llowing items are included with your monitor. Introduction User's Manual Unparking (SyncMaster 171T) Please make sure the following items are included with your...
... are missing, contact your dealer.11jk Multimedia Speaker Stand (Simple Stand or Pivot Stand & Pivot Software) Sound Cable General Monitor and Stand Power Cord Signal Cable DVI Cable (Option) Pivot Stand and S/W CD(Option) Quick Setup Guide Warranty Card (Not available in all locations) User's Guide and Driver Installation CD (Some models include a stand attached. ) PlFeoarsMeulmtimaedkiea msoudreel (Othpteionfo) llowing items are included with your monitor. Introduction User's Manual Unparking (SyncMaster 171T) Please make sure the following items are included with your...

User Manual (user Manual) (ver.1.0) (English)
Page 13
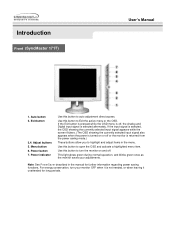
... turn your adjustments. Power indicator : This light glows green during normal operation, and blinks green once as the monitor saves your monitor OFF when it is not needed, or when leaving it unattended for further information regarding power saving functions. Auto button : Use this button to highlight and adjust items in the manual for long periods. Power button : Use this button to open the OSD and activate a highlighted menu item. 6. Menu button : Use this button to auto adjustment direct access. 2. Introduction Front User's Manual...
... turn your adjustments. Power indicator : This light glows green during normal operation, and blinks green once as the monitor saves your monitor OFF when it is not needed, or when leaving it unattended for further information regarding power saving functions. Auto button : Use this button to highlight and adjust items in the manual for long periods. Power button : Use this button to open the OSD and activate a highlighted menu item. 6. Menu button : Use this button to auto adjustment direct access. 2. Introduction Front User's Manual...
User Manual (user Manual) (ver.1.0) (English)
Page 14
... appears when the power is not needed, or when leaving it unattended for further information regarding power saving functions. Use this button to auto adjustment direct access. Exit button 3,4. Power indicator Use this button to turn your adjustments. Use this button to open the OSD and activate a highlighted menu item. This light glows green during normal operation, and blinks green once as the monitor saves your monitor OFF when it is turned on and off. Introduction Front (SyncMaster 171T) User's Manual 1. Auto button 2.
... appears when the power is not needed, or when leaving it unattended for further information regarding power saving functions. Use this button to auto adjustment direct access. Exit button 3,4. Power indicator Use this button to turn your adjustments. Use this button to open the OSD and activate a highlighted menu item. This light glows green during normal operation, and blinks green once as the monitor saves your monitor OFF when it is turned on and off. Introduction Front (SyncMaster 171T) User's Manual 1. Auto button 2.
User Manual (user Manual) (ver.1.0) (English)
Page 21
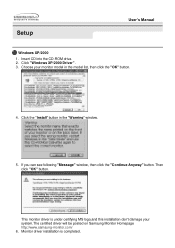
....samsung-monitor.com/ 6. Insert CD into the CD-ROM drive. 2. Click the "Install" button in the model list, then click the "OK" button. 4. Then click "OK" button. Monitor driver installation is under certifying MS logo,and this installation don't damage your monitor model in the "Warning" window. 5. Setup User's Manual Windows XP/2000 1. Click "Windows XP/2000 Driver". 3. If you can see following "Message" window, then click the "Continue Anyway" button. This monitor driver...
....samsung-monitor.com/ 6. Insert CD into the CD-ROM drive. 2. Click the "Install" button in the model list, then click the "OK" button. 4. Then click "OK" button. Monitor driver installation is under certifying MS logo,and this installation don't damage your monitor model in the "Warning" window. 5. Setup User's Manual Windows XP/2000 1. Click "Windows XP/2000 Driver". 3. If you can see following "Message" window, then click the "Continue Anyway" button. This monitor driver...
User Manual (user Manual) (ver.1.0) (English)
Page 22
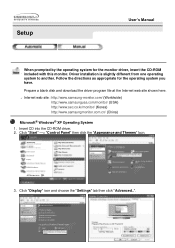
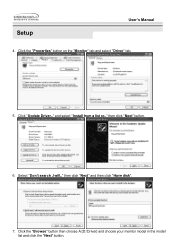
Setup User's Manual When prompted by the operating system for the operating system you have. Driver installation is slightly different from one operating system to another. Click "Display" icon and choose the "Settings" tab then click "Advanced..". Prepare a blank disk and download the driver program file at the Internet web site shown here. ? Internet web site : http://www.samsung-monitor.com/ (Worldwide...
Setup User's Manual When prompted by the operating system for the operating system you have. Driver installation is slightly different from one operating system to another. Click "Display" icon and choose the "Settings" tab then click "Advanced..". Prepare a blank disk and download the driver program file at the Internet web site shown here. ? Internet web site : http://www.samsung-monitor.com/ (Worldwide...
User Manual (user Manual) (ver.1.0) (English)
Page 23
then click "Next" button. 6. and select "Install from a list or.." Click the "Browse" button then choose A:(D:\Driver) and choose your monitor model in the model list and click the "Next" button. Click "Update Driver.." Select "Don't search ,I will.." then click "Next" and then click "Have disk". 7. Click the "Properties" button on the "Monitor" tab and select "Driver" tab. 5. Setup User's Manual 4.
then click "Next" button. 6. and select "Install from a list or.." Click the "Browse" button then choose A:(D:\Driver) and choose your monitor model in the model list and click the "Next" button. Click "Update Driver.." Select "Don't search ,I will.." then click "Next" and then click "Have disk". 7. Click the "Properties" button on the "Monitor" tab and select "Driver" tab. 5. Setup User's Manual 4.

User Manual (user Manual) (ver.1.0) (English)
Page 25
Setup User's Manual 10. Microsoft® Windows® 2000 Operating System When you can see "Digital Signature Not Found" on the "File Needed" window. 3. Choose A:(D:\Driver) then click the "Open" button and then click "OK" button. Double click the "Display" Icon. 3. Please stop installation Case2: If the "Properties" button is properly configured. And click the "Finish" button then the "Close" button. Click the "Browse" button on your monitor, follow...
Setup User's Manual 10. Microsoft® Windows® 2000 Operating System When you can see "Digital Signature Not Found" on the "File Needed" window. 3. Choose A:(D:\Driver) then click the "Open" button and then click "OK" button. Double click the "Display" Icon. 3. Please stop installation Case2: If the "Properties" button is properly configured. And click the "Finish" button then the "Close" button. Click the "Browse" button on your monitor, follow...
User Manual (user Manual) (ver.1.0) (English)
Page 26
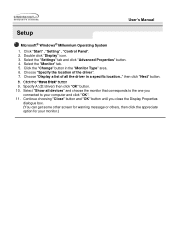
... and click "OK". 11. Choose "Display a list of the driver". 7. Specify A:\(D:\driver) then click "OK" button. 10. Click "Start" , "Setting" , "Control Panel". 2. Continue choosing "Close" button and "OK" button until you connected to your monitor.) Double click "Display" icon. 3. then click "Next" button. 8. Select the "Settings" tab and click "Advanced Properties" button. 4. Click the "Have Disk" button 9. User's Manual Setup Microsoft® Windows® Millennium Operating System 1. Click the "Change" button in a specific location.."
... and click "OK". 11. Choose "Display a list of the driver". 7. Specify A:\(D:\driver) then click "OK" button. 10. Click "Start" , "Setting" , "Control Panel". 2. Continue choosing "Close" button and "OK" button until you connected to your monitor.) Double click "Display" icon. 3. then click "Next" button. 8. Select the "Settings" tab and click "Advanced Properties" button. 4. Click the "Have Disk" button 9. User's Manual Setup Microsoft® Windows® Millennium Operating System 1. Click the "Change" button in a specific location.."
User Manual (user Manual) (ver.1.0) (English)
Page 27
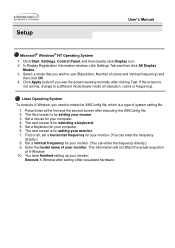
..., colors or frequency). The next screen is for selecting a keyboard. 5. Click Start, Settings, Control Panel, and then double-click Display icon. 2. In Display Registration Information window, click Settings Tab and then click All Display Modes. 3. Set a vertical frequency for your monitor. (You can enter the frequency directly.) 8. Execute X-Window after executing the X86Config file. 2. The third screen is not normal, change to use (Resolution, Number of all, set a horizontal frequency for your monitor. (You can enter the frequency directly.) 9. Setup User's Manual...
..., colors or frequency). The next screen is for selecting a keyboard. 5. Click Start, Settings, Control Panel, and then double-click Display icon. 2. In Display Registration Information window, click Settings Tab and then click All Display Modes. 3. Set a vertical frequency for your monitor. (You can enter the frequency directly.) 8. Execute X-Window after executing the X86Config file. 2. The third screen is not normal, change to use (Resolution, Number of all, set a horizontal frequency for your monitor. (You can enter the frequency directly.) 9. Setup User's Manual...
User Manual (user Manual) (ver.1.0) (English)
Page 46
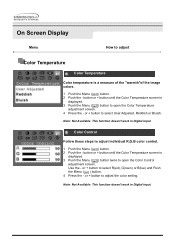
... User Adjusted, Reddish or Bluish. or + button to adjust individual R,G,B color control. 1 Push the Menu ( ) button. 2 Push the - Color Control Follow these steps to adjust the color setting. Use the - Note: Not Available This function doesn't work in Digital input. button or + button until the Color Temperature screen is a measure of the "warmth"of the image colors. 1 Push the Menu ( ) button. 2 Push the - On Screen Display Menu How to open the Color Temperature adjustment screen. 4 Press the - button or + button until the Color Temperature screen is displayed...
... User Adjusted, Reddish or Bluish. or + button to adjust individual R,G,B color control. 1 Push the Menu ( ) button. 2 Push the - Color Control Follow these steps to adjust the color setting. Use the - Note: Not Available This function doesn't work in Digital input. button or + button until the Color Temperature screen is a measure of the "warmth"of the image colors. 1 Push the Menu ( ) button. 2 Push the - On Screen Display Menu How to open the Color Temperature adjustment screen. 4 Press the - button or + button until the Color Temperature screen is displayed...
User Manual (user Manual) (ver.1.0) (English)
Page 47
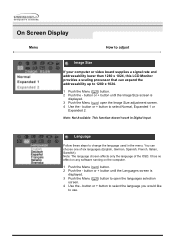
.... 3 Push the Menu ( ) open the languages selection screen. 4 Use the - button or + button to change the language used in Digital input. Note: Not Available This function doesn't work in the menu. button or + button to select the language you would like to use. button or + button until the Image Size screen is displayed. 3 Push the Menu ( ) button to open the Image Size adjustment screen. 4 Use the - On Screen Display Menu How to adjust Image Size If your computer or video board supplies a signal rate and addressability lower than 1280 x 1024, this LCD Monitor provides a scaling...
.... 3 Push the Menu ( ) open the languages selection screen. 4 Use the - button or + button to change the language used in Digital input. Note: Not Available This function doesn't work in the menu. button or + button to select the language you would like to use. button or + button until the Image Size screen is displayed. 3 Push the Menu ( ) button to open the Image Size adjustment screen. 4 Use the - On Screen Display Menu How to adjust Image Size If your computer or video board supplies a signal rate and addressability lower than 1280 x 1024, this LCD Monitor provides a scaling...

User Manual (user Manual) (ver.1.0) (English)
Page 52
... resolution and frequency that the monitor can properly handle. Make sure the video card is in it's slot. Check the signal cable connection. You can see "No Connection, Check Signal Cable" on the screen. Has the video card been set properly? Check the power cord connection and supply. Can you locked the On Screen Display (OSD) Menu to a crash between applications? Have you see this section to activate the monitor and restore the image on the screen? Troubleshooting User's Manual Check List Before calling for service, check...
... resolution and frequency that the monitor can properly handle. Make sure the video card is in it's slot. Check the signal cable connection. You can see "No Connection, Check Signal Cable" on the screen. Has the video card been set properly? Check the power cord connection and supply. Can you locked the On Screen Display (OSD) Menu to a crash between applications? Have you see this section to activate the monitor and restore the image on the screen? Troubleshooting User's Manual Check List Before calling for service, check...

User Manual (user Manual) (ver.1.0) (English)
Page 53
... The screen colors have changed the video card or the driver? Troubleshooting User's Manual Check List General The screen suddenly has become unbalanced. Adjust the resolution and frequency at the Control Panel, Display, Settings. Have you adjusted the resolution or frequency on the screen. See the video card manual to the Preset Display Modes). LED is a message that reads "Unrecognized monitor, Plug & Play (VESA DDC) monitor found". Install the monitor driver according to the Driver Installation Instructions. There is blinking but no images on...
... The screen colors have changed the video card or the driver? Troubleshooting User's Manual Check List General The screen suddenly has become unbalanced. Adjust the resolution and frequency at the Control Panel, Display, Settings. Have you adjusted the resolution or frequency on the screen. See the video card manual to the Preset Display Modes). LED is a message that reads "Unrecognized monitor, Plug & Play (VESA DDC) monitor found". Install the monitor driver according to the Driver Installation Instructions. There is blinking but no images on...

User Manual (user Manual) (ver.1.0) (English)
Page 54
... microphone, adjust the volume while keeping a certain distance from the speaker. The sound is no sound. Check if the power cord and the cable are properly connected to MAX. Troubleshooting User's Manual Check List For Multimedia model (SyncMaster 171T Option) Symptom Solutions There is too sharp. The sound is trouble with the monitor. 1. Check the following items if there is too weak. If you installed a new video card or if you have problems in installing the adapter (video) driver, boot...
... microphone, adjust the volume while keeping a certain distance from the speaker. The sound is no sound. Check if the power cord and the cable are properly connected to MAX. Troubleshooting User's Manual Check List For Multimedia model (SyncMaster 171T Option) Symptom Solutions There is too sharp. The sound is trouble with the monitor. 1. Check the following items if there is too weak. If you installed a new video card or if you have problems in installing the adapter (video) driver, boot...
User Manual (user Manual) (ver.1.0) (English)
Page 56
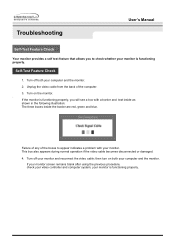
... video cable becomes disconnected or damaged. 4. your video controller and computer system; If your monitor screen remains blank after using the previous procedure, check your monitor is functioning properly. Turn on both your computer and the monitor. then turn on the monitor. . Troubleshooting User's Manual Self-Test Feature Check Your monitor provides a self test feature that allows you will see a box with your monitor and reconnect the video cable; Turn off your monitor...
... video cable becomes disconnected or damaged. 4. your video controller and computer system; If your monitor screen remains blank after using the previous procedure, check your monitor is functioning properly. Turn on both your computer and the monitor. then turn on the monitor. . Troubleshooting User's Manual Self-Test Feature Check Your monitor provides a self test feature that allows you will see a box with your monitor and reconnect the video cable; Turn off your monitor...
User Manual (user Manual) (ver.1.0) (English)
Page 57
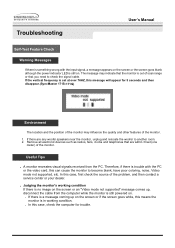
... monitor is trouble with the input signal, a message appears on the screen or the screen goes blank although the power indicator LED is in working condition If there is no image on the screen or an "Video mode not supported" message comes up on the screen or if the screen goes white, this means the monitor is still on . . Useful Tips . Therefore, if there is out of the problem, and then contact a service...
... monitor is trouble with the input signal, a message appears on the screen or the screen goes blank although the power indicator LED is in working condition If there is no image on the screen or an "Video mode not supported" message comes up on the screen or if the screen goes white, this means the monitor is still on . . Useful Tips . Therefore, if there is out of the problem, and then contact a service...
User Manual (user Manual) (ver.1.0) (English)
Page 66
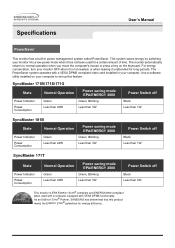
... Power saving mode EPA/ENERGY 2000 Green, Blinking Less than 3W Power Switch off Black Less than 1W SyncMaster 171T State Power Indicator Power Consumption Normal Operation Green Less than 40W Power saving mode EPA/ENERGY 2000 Green, Blinking Less than 3W Power Switch off Black Less than 0W This monitor is EPA ENERGY STAR® compliant and ENERGY2000 compliant when used with a computer equipped with a VESA DPMS compliant video card installed in power management system called PowerSaver. Specifications User's Manual...
... Power saving mode EPA/ENERGY 2000 Green, Blinking Less than 3W Power Switch off Black Less than 1W SyncMaster 171T State Power Indicator Power Consumption Normal Operation Green Less than 40W Power saving mode EPA/ENERGY 2000 Green, Blinking Less than 3W Power Switch off Black Less than 0W This monitor is EPA ENERGY STAR® compliant and ENERGY2000 compliant when used with a computer equipped with a VESA DPMS compliant video card installed in power management system called PowerSaver. Specifications User's Manual...
User Manual (user Manual) (ver.1.0) (English)
Page 82
... the pixels of picture by executing "auto adjustment function" in display screen that is pressed. If excessive force is applied, you can get better quality of RED, GREEN, BLUE and WHITE color seem to be seen. Resolution: 1280 x 1024 Vertical frequency (refresh rate): 60 Hz 2 TFT LCD panel manufactured by using advanced semiconductor technology with the quality of picture, you clean the monitor and the panel outside, please apply the recommended small amount of black pixels...
... the pixels of picture by executing "auto adjustment function" in display screen that is pressed. If excessive force is applied, you can get better quality of RED, GREEN, BLUE and WHITE color seem to be seen. Resolution: 1280 x 1024 Vertical frequency (refresh rate): 60 Hz 2 TFT LCD panel manufactured by using advanced semiconductor technology with the quality of picture, you clean the monitor and the panel outside, please apply the recommended small amount of black pixels...


