
User Manual (user Manual) (ver.1.0) (English)
Page 2
Manual Installing VESA compliant mounting User's Manual On-Screen Display Troubleshooting Check List Q & A Self-Test Feature Check Specifications General Specifications PowerSaver Preset Display Modes Information Service Terms Regulatory Natural Color For Better Display Authority Automatic - Index Main Page Safety Instructions Notational Power Installation Cleaning Other Introduction Unpacking Front Rear Setup Connecting Your Monitor Installing the Monitor Driver -
Manual Installing VESA compliant mounting User's Manual On-Screen Display Troubleshooting Check List Q & A Self-Test Feature Check Specifications General Specifications PowerSaver Preset Display Modes Information Service Terms Regulatory Natural Color For Better Display Authority Automatic - Index Main Page Safety Instructions Notational Power Installation Cleaning Other Introduction Unpacking Front Rear Setup Connecting Your Monitor Installing the Monitor Driver -
User Manual (user Manual) (ver.1.0) (English)
Page 9
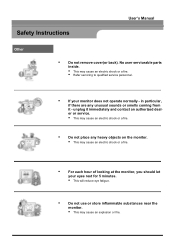
... your monitor does not operate normally - unplug it - No user serviceable parts inside. • This may cause an explosion or fire. er or service. • This may cause an electric shock or a fire. • Do not place any unusual sounds or smells coming from it immediately and contact an authorized deal- Safety Instructions User's Manual Other • Do not remove cover...
... your monitor does not operate normally - unplug it - No user serviceable parts inside. • This may cause an explosion or fire. er or service. • This may cause an electric shock or a fire. • Do not place any unusual sounds or smells coming from it immediately and contact an authorized deal- Safety Instructions User's Manual Other • Do not remove cover...
User Manual (user Manual) (ver.1.0) (English)
Page 12
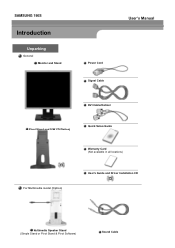
SAMSUNG 190S Introduction Unparking General Monitor and Stand User's Manual Power Cord Signal Cable DVI Cable(Option) Pivot Stand and S/W CD(Option) Quick Setup Guide Warranty Card (Not available in all locations) User's Guide and Driver Installation CD (SomFeor mMuoltdimeeldsiaimnocdleul d(Oeptaions)tand attached. ) Please make sure the following items are missing, contact your monitor. If any items are included with your dealer.11jk Multimedia Speaker Stand (Simple Stand or Pivot Stand & Pivot Software) Sound Cable
SAMSUNG 190S Introduction Unparking General Monitor and Stand User's Manual Power Cord Signal Cable DVI Cable(Option) Pivot Stand and S/W CD(Option) Quick Setup Guide Warranty Card (Not available in all locations) User's Guide and Driver Installation CD (SomFeor mMuoltdimeeldsiaimnocdleul d(Oeptaions)tand attached. ) Please make sure the following items are missing, contact your monitor. If any items are included with your dealer.11jk Multimedia Speaker Stand (Simple Stand or Pivot Stand & Pivot Software) Sound Cable

User Manual (user Manual) (ver.1.0) (English)
Page 13
... turn your adjustments. 6,7. For energy conservation, turn the monitor on and off. 5. Menu button : Use this button to Exit the active menu or the OSD. 3. Introduction Front User's Manual 1. Exit button : Use this button to auto adjustment direct access. 2. Power indicator : This light glows green during normal operation, and blinks green once as the monitor saves your monitor OFF when it is not needed, or when leaving it unattended for further information regarding power saving functions. Power button : Use this button to open...
... turn your adjustments. 6,7. For energy conservation, turn the monitor on and off. 5. Menu button : Use this button to Exit the active menu or the OSD. 3. Introduction Front User's Manual 1. Exit button : Use this button to auto adjustment direct access. 2. Power indicator : This light glows green during normal operation, and blinks green once as the monitor saves your monitor OFF when it is not needed, or when leaving it unattended for further information regarding power saving functions. Power button : Use this button to open...

User Manual (user Manual) (ver.1.0) (English)
Page 18
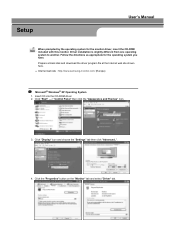
... 2. Plug the power cord for your monitor. 3. If your computer and monitor. Turn on your monitor displays an image, installation is complete. Connect the power cord of the multimedia stand to connect the monitor using the D-SUB connection cable. 4. In the case of an old model Macintosh, you need to the multimedia stand power port on the back of the monitor. 2. Setup-For Multimedia model (Option) 1. Connect the signal cable to the Macintosh computer using a special Mac adaptor. 5. SAMSUNG 190S Setup Connecting Your Monitor Setup-General User's Manual 1. Connect the monitor...
... 2. Plug the power cord for your monitor. 3. If your computer and monitor. Turn on your monitor displays an image, installation is complete. Connect the power cord of the multimedia stand to connect the monitor using the D-SUB connection cable. 4. In the case of an old model Macintosh, you need to the multimedia stand power port on the back of the monitor. 2. Setup-For Multimedia model (Option) 1. Connect the signal cable to the Macintosh computer using a special Mac adaptor. 5. SAMSUNG 190S Setup Connecting Your Monitor Setup-General User's Manual 1. Connect the monitor...
User Manual (user Manual) (ver.1.0) (English)
Page 21
... site shown here. Click "Display" icon and choose the "Settings" tab then click "Advanced..". 4. Click the "Properties" button on the "Monitor" tab and select "Driver" tab. Click "Start" -> "Control Panel" then click the "Appearance and Themes" Icon. 3. Setup User's Manual When prompted by the operating system for the operating system you have. z Internet web site : http://www.samsung-monitor.com/ (Europe) Microsoft®...
... site shown here. Click "Display" icon and choose the "Settings" tab then click "Advanced..". 4. Click the "Properties" button on the "Monitor" tab and select "Driver" tab. Click "Start" -> "Control Panel" then click the "Appearance and Themes" Icon. 3. Setup User's Manual When prompted by the operating system for the operating system you have. z Internet web site : http://www.samsung-monitor.com/ (Europe) Microsoft®...
User Manual (user Manual) (ver.1.0) (English)
Page 22
Click "Update Driver.." If you can see following "Message" window, then click the "Continue Anyway" button. Then click "OK" button. Setup User's Manual 5. Select "Don't search ,I will.." Click the "Browse" button then choose A:(D:\Driver) and choose your monitor model in the model list and click the "Next" button. 8. then click "Next" button. 6. and select "Install from a list or.." then click "Next" and then click "Have disk". 7.
Click "Update Driver.." If you can see following "Message" window, then click the "Continue Anyway" button. Then click "OK" button. Setup User's Manual 5. Select "Don't search ,I will.." Click the "Browse" button then choose A:(D:\Driver) and choose your monitor model in the model list and click the "Next" button. 8. then click "Next" button. 6. and select "Install from a list or.." then click "Next" and then click "Have disk". 7.
User Manual (user Manual) (ver.1.0) (English)
Page 23
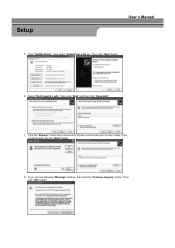
... these steps. 1. Setup User's Manual This monitor driver is under certifying MS logo,and this device so that I can see the "Digital Signature Not Found" window then click the "Yes"button. Click "Start" , "Setting" , "Control Panel". 2. Choose "Monitor". Click the "Close" button then click "OK" button continually. 10. Choose "OK" button on your monitor, follow next steps continually. 5. Choose "Display a list of the known drivers for this installation don't damage...
... these steps. 1. Setup User's Manual This monitor driver is under certifying MS logo,and this device so that I can see the "Digital Signature Not Found" window then click the "Yes"button. Click "Start" , "Setting" , "Control Panel". 2. Choose "Monitor". Click the "Close" button then click "OK" button continually. 10. Choose "OK" button on your monitor, follow next steps continually. 5. Choose "Display a list of the known drivers for this installation don't damage...
User Manual (user Manual) (ver.1.0) (English)
Page 24
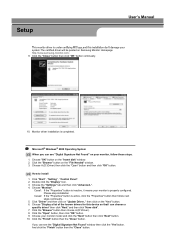
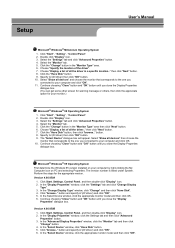
... "OK" button. 10. In the "Change Display Type" window, click "Change" and then click "Have Disk". 4. In the "Display Properties" window, click the Settings tab and then click "Advanced Properties" button. 3. Click the "Change" button in the "Monitor Type" area. 6. In the "Select Device" window, click "Have Disk" button. 5. Double click "Display" icon. 3. Choose "Specify the location of all the driver in a specific location.." Setup User's Manual Microsoft® Windows®...
... "OK" button. 10. In the "Change Display Type" window, click "Change" and then click "Have Disk". 4. In the "Display Properties" window, click the Settings tab and then click "Advanced Properties" button. 3. Click the "Change" button in the "Monitor Type" area. 6. In the "Select Device" window, click "Have Disk" button. 5. Double click "Display" icon. 3. Choose "Specify the location of all the driver in a specific location.." Setup User's Manual Microsoft® Windows®...

User Manual (user Manual) (ver.1.0) (English)
Page 25
..." dialogue box. Set a mouse for your monitor. (You can enter the frequency directly.) 9. First of resolution, colors or frequency). Set a vertical frequency for your computer. 6. In Display Registration Information window, click Settings Tab and then click All Display Modes. 3. If the screen is for setting your monitor. (You can enter the frequency directly.) 8. Enter the model name of your monitor. The next screen is not normal, change to the Preset Display Modes in the user guide.
..." dialogue box. Set a mouse for your monitor. (You can enter the frequency directly.) 9. First of resolution, colors or frequency). Set a vertical frequency for your computer. 6. In Display Registration Information window, click Settings Tab and then click All Display Modes. 3. If the screen is for setting your monitor. (You can enter the frequency directly.) 8. Enter the model name of your monitor. The next screen is not normal, change to the Preset Display Modes in the user guide.
User Manual (user Manual) (ver.1.0) (English)
Page 27
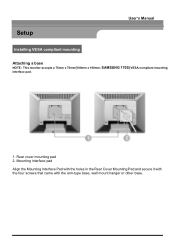
Mounting interface pad Align the Mounting Interface Pad with the holes in the Rear Cover Mounting Pad and secure it with the four screws that came with the arm-type base, wall mount hanger or other base. Setup User's Manual Installing VESA compliant mounting Attaching a base NOTE : This monitor accepts a 75mm x 75mm(100mm x 100mm: SAMSUNG 170S) VESA-compliant mounting interface pad. 1. Rear cover mounting pad 2.
Mounting interface pad Align the Mounting Interface Pad with the holes in the Rear Cover Mounting Pad and secure it with the four screws that came with the arm-type base, wall mount hanger or other base. Setup User's Manual Installing VESA compliant mounting Attaching a base NOTE : This monitor accepts a 75mm x 75mm(100mm x 100mm: SAMSUNG 170S) VESA-compliant mounting interface pad. 1. Rear cover mounting pad 2.

User Manual (user Manual) (ver.1.0) (English)
Page 28
... on a flat surface with a cushion beneath it with the four screws that came with the holes in the Rear Cover Mounting Pad and secure it to protect the screen. 3. Remove the four screws and then remove the Stand from the LCD monitor. SAMSUNG 190S Setup Installing VESA compliant mounting Removing the base User's Manual 1. Attaching a base NOTE: This monitor accepts a 100mm x 100mm VESA-compliant mounting interface pad. 1. Rear cover mounting pad 2. Turn off your monitor and unplug its power cord. 2.
... on a flat surface with a cushion beneath it with the four screws that came with the holes in the Rear Cover Mounting Pad and secure it to protect the screen. 3. Remove the four screws and then remove the Stand from the LCD monitor. SAMSUNG 190S Setup Installing VESA compliant mounting Removing the base User's Manual 1. Attaching a base NOTE: This monitor accepts a 100mm x 100mm VESA-compliant mounting interface pad. 1. Rear cover mounting pad 2. Turn off your monitor and unplug its power cord. 2.
User Manual (user Manual) (ver.1.0) (English)
Page 30
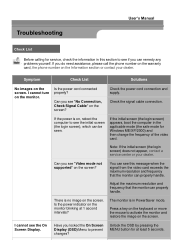
... screen (the login screen) does not appear, contact a service center or your dealer. Adjust the maximum resolution and frequency that the monitor can properly handle. There is in PowerSaver mode. Troubleshooting User's Manual Check List Before calling for service, check the information in this message when the signal from the video card exceeds the maximum resolution and frequency that the monitor can properly handle. Check the power cord connection and supply. If you see "Video mode not supported...
... screen (the login screen) does not appear, contact a service center or your dealer. Adjust the maximum resolution and frequency that the monitor can properly handle. There is in PowerSaver mode. Troubleshooting User's Manual Check List Before calling for service, check the information in this message when the signal from the video card exceeds the maximum resolution and frequency that the monitor can properly handle. Check the power cord connection and supply. If you see "Video mode not supported...
User Manual (user Manual) (ver.1.0) (English)
Page 32
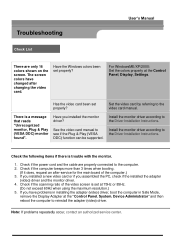
.... 2. Check if the power cord and the cable are only 16 colors shown on the screen. For WindowsME/XP/2000: Set the colors properly at the "Control Panel, System, Device Administrator" and then reboot the computer to the Driver Installation Instructions. The screen colors have problems in installing the adapter (video) driver, boot the computer in Safe Mode, remove the Display Adapter at the Control Panel, Display, Settings. Set the video card by referring to the Driver Installation Instructions. Install the monitor driver according to the video card manual. Check if...
.... 2. Check if the power cord and the cable are only 16 colors shown on the screen. For WindowsME/XP/2000: Set the colors properly at the "Control Panel, System, Device Administrator" and then reboot the computer to the Driver Installation Instructions. The screen colors have problems in installing the adapter (video) driver, boot the computer in Safe Mode, remove the Display Adapter at the Control Panel, Display, Settings. Set the video card by referring to the Driver Installation Instructions. Install the monitor driver according to the video card manual. Check if...

User Manual (user Manual) (ver.1.0) (English)
Page 33
... inside the monitor. How can I change the frequency? Note that video card support can be changed by reconfiguring the video card. Disconnect the power cord and then clean the monitor with a soft cloth, using either a cleaning solution or plain water. How can I set the Power Saving function? * Contact the video card manufacturer for details.) Windows ME/XP/2000: Set the resolution at the Control Panel, Display, Settings. How can I adjust the resolution? Do not leave any water to Windows/Computer Manual).
... inside the monitor. How can I change the frequency? Note that video card support can be changed by reconfiguring the video card. Disconnect the power cord and then clean the monitor with a soft cloth, using either a cleaning solution or plain water. How can I set the Power Saving function? * Contact the video card manufacturer for details.) Windows ME/XP/2000: Set the resolution at the Control Panel, Display, Settings. How can I adjust the resolution? Do not leave any water to Windows/Computer Manual).
User Manual (user Manual) (ver.1.0) (English)
Page 34
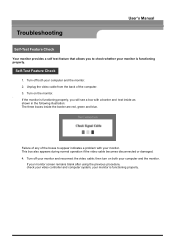
... a problem with a border and text inside as shown in the following illustration: The three boxes inside the border are red, green and blue. Failure of any of the computer. 3. This box also appears during normal operation if the video cable becomes disconnected or damaged. 4. Self-Test Feature Check 1. If your monitor screen remains blank after using the previous procedure, check your monitor...
... a problem with a border and text inside as shown in the following illustration: The three boxes inside the border are red, green and blue. Failure of any of the computer. 3. This box also appears during normal operation if the video cable becomes disconnected or damaged. 4. Self-Test Feature Check 1. If your monitor screen remains blank after using the previous procedure, check your monitor...
User Manual (user Manual) (ver.1.0) (English)
Page 35
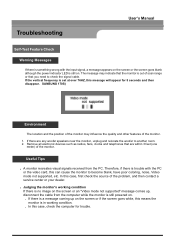
... vertical frequency is set at over 76HZ, this case, first check the source of the monitor. 1. Remove all electronic devices such as radios, fans, clocks and telephones that you need to check the signal cable. In this message will appear for trouble. Judging the monitor's working condition If there is no image on the screen or an "Video mode not supported" message comes up on the screen or if the screen goes white...
... vertical frequency is set at over 76HZ, this case, first check the source of the monitor. 1. Remove all electronic devices such as radios, fans, clocks and telephones that you need to check the signal cable. In this message will appear for trouble. Judging the monitor's working condition If there is no image on the screen or an "Video mode not supported" message comes up on the screen or if the screen goes white...
User Manual (user Manual) (ver.1.0) (English)
Page 40
Use a software utility installed on your computer to normal operation when you move the computer's mouse or press a key on the keyboard. Model Name: SAMSUNG 150S State Power Indicator Power Consumption Normal Operation Green Less than 30W Power saving mode EPA/ENERGY 2000 Green, Blinking Less than 2W Power Switch off Black Less than 1W Model Name: SAMSUNG 170S State Power Indicator Power Consumption Normal Operation Green Less than 40W Power saving mode EPA/ENERGY 2000...
Use a software utility installed on your computer to normal operation when you move the computer's mouse or press a key on the keyboard. Model Name: SAMSUNG 150S State Power Indicator Power Consumption Normal Operation Green Less than 30W Power saving mode EPA/ENERGY 2000 Green, Blinking Less than 2W Power Switch off Black Less than 1W Model Name: SAMSUNG 170S State Power Indicator Power Consumption Normal Operation Green Less than 40W Power saving mode EPA/ENERGY 2000...

User Manual (user Manual) (ver.1.0) (English)
Page 46
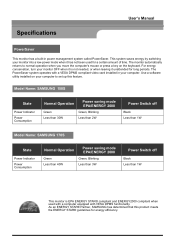
... 40W Power saving mode EPA/ENERGY 2000 Green, Blinking Less than 3W Power off Power off (Power button) (Power Switch) Black Less than 1W Black 0W This monitor is not needed, or when leaving it unattended for a certain amount of time. The PowerSaver system operates with VESA DPMS functionality. For energy conservation, turn your monitor OFF when it has not been used with a computer equipped with a VESA DPMS compliant video card installed in power...
... 40W Power saving mode EPA/ENERGY 2000 Green, Blinking Less than 3W Power off Power off (Power button) (Power Switch) Black Less than 1W Black 0W This monitor is not needed, or when leaving it unattended for a certain amount of time. The PowerSaver system operates with VESA DPMS functionality. For energy conservation, turn your monitor OFF when it has not been used with a computer equipped with a VESA DPMS compliant video card installed in power...
User Manual (user Manual) (ver.1.0) (English)
Page 58
... adjustment, use it . Resolution: 11024 x 7160824 (SAMSUNG 150S) Resolution: 1280 x 1024 (SAMSUNG 170S) Vertical frequency (refresh rate): 60 Hz 2 TFT LCD panel manufactured by using advanced semiconductor technology with the quality of picture, you can use FINE/COARSE adjustment function. Let LCD area not to be forced but to be bright sometimes or some of black pixels could be scrubbed out softly. Information User's Manual For Better Display 1 Adjust computer resolution and screen injection rate (refresh rate) in control panel of computer as window...
... adjustment, use it . Resolution: 11024 x 7160824 (SAMSUNG 150S) Resolution: 1280 x 1024 (SAMSUNG 170S) Vertical frequency (refresh rate): 60 Hz 2 TFT LCD panel manufactured by using advanced semiconductor technology with the quality of picture, you can use FINE/COARSE adjustment function. Let LCD area not to be forced but to be bright sometimes or some of black pixels could be scrubbed out softly. Information User's Manual For Better Display 1 Adjust computer resolution and screen injection rate (refresh rate) in control panel of computer as window...


