User Manual 5
Page 1
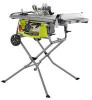
When properly cared for, it will give you for dependability, ease of injury, the user must read and understand the operator's manual before using this product. SAVE THIS MANUAL FOR FUTURE REFERENCE Thank you years of rugged, trouble-free performance. TABLE SAW RTS20 Your table saw has been engineered and manufactured to our high standard for your purchase. WARNING: To reduce the risk of operation, and operator safety. OPERATOR'S MANUAL 10 in.
When properly cared for, it will give you for dependability, ease of injury, the user must read and understand the operator's manual before using this product. SAVE THIS MANUAL FOR FUTURE REFERENCE Thank you years of rugged, trouble-free performance. TABLE SAW RTS20 Your table saw has been engineered and manufactured to our high standard for your purchase. WARNING: To reduce the risk of operation, and operator safety. OPERATOR'S MANUAL 10 in.

User Manual 5
Page 5
...to guide along the fence. IF THE POWER SUPPLY CORD IS DAMAGED, it must be used, including all the way past the saw blade using the table saw table for any reason. MOVE THE RIP FENCE out of the way when cross cutting. DO NOT USE THE MITER GAUGE... stamped on the spreader/riving knife. THIS TOOL should have any operation freehand. e) Not ripping work using a push stick. h) Never operate saw blade. c) Keeping spreader, anti-kickback pawls, and blade guard in this tool, loan them frequently and use to the rear and sides of accessories are...
...to guide along the fence. IF THE POWER SUPPLY CORD IS DAMAGED, it must be used, including all the way past the saw blade using the table saw table for any reason. MOVE THE RIP FENCE out of the way when cross cutting. DO NOT USE THE MITER GAUGE... stamped on the spreader/riving knife. THIS TOOL should have any operation freehand. e) Not ripping work using a push stick. h) Never operate saw blade. c) Keeping spreader, anti-kickback pawls, and blade guard in this tool, loan them frequently and use to the rear and sides of accessories are...
User Manual 5
Page 9
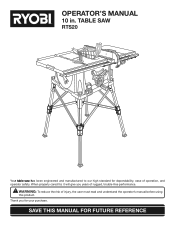
...operation. 9 Miter Cut A cutting operation made with adjustable blades or knives. Push Sticks (for narrow ripping operations. Featherboard A device used for table saws) Device used to feed the workpiece over , under, behind, or in a workpiece that the tip of turns completed by the blade in one...fence, miter gauge, or other than 90° to the blade other aids. GLOSSARY OF TERMS Anti-Kickback Pawls (radial arm and table saws) A device which, when properly installed and maintained, is designed to make thinner pieces. Compound Cut A cross cut which the operation is...
...operation. 9 Miter Cut A cutting operation made with adjustable blades or knives. Push Sticks (for narrow ripping operations. Featherboard A device used for table saws) Device used to feed the workpiece over , under, behind, or in a workpiece that the tip of turns completed by the blade in one...fence, miter gauge, or other than 90° to the blade other aids. GLOSSARY OF TERMS Anti-Kickback Pawls (radial arm and table saws) A device which, when properly installed and maintained, is designed to make thinner pieces. Compound Cut A cross cut which the operation is...

User Manual 5
Page 11
...Before use of the tool gives the operator additional support when cutting long workpieces. MITER GAUGE - FEATURES KNOW YOUR TABLE SAW See Figure 2. The safe use blades rated less than the saw blade for a cross cut . ANTI-KICKBACK PAWLS - Kickback is a hazard in . The teeth on the ...The easy-to heed this warning could result in this product, familiarize yourself with all operating features and safety rules. BLADE - This saw table surface on the tool and in personal injury. Bevel angles are attempting. WARNING: Do not use of this tool. Always keep the ...
...Before use of the tool gives the operator additional support when cutting long workpieces. MITER GAUGE - FEATURES KNOW YOUR TABLE SAW See Figure 2. The safe use blades rated less than the saw blade for a cross cut . ANTI-KICKBACK PAWLS - Kickback is a hazard in . The teeth on the ...The easy-to heed this warning could result in this product, familiarize yourself with all operating features and safety rules. BLADE - This saw table surface on the tool and in personal injury. Bevel angles are attempting. WARNING: Do not use of this tool. Always keep the ...
User Manual 5
Page 14
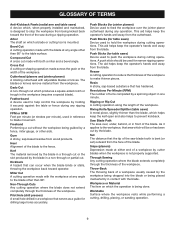
LOOSE PARTS The following items are included with your table saw: A L K N B I H O I . Blade Guard 1 C. Miter Gauge 1 D. End Cap 1 14 Blade Wrench 2 E. Rip Fence 1 G. Quick Stand™ (Leg Stand 1 K. Dust Bag 1 M. Hex Key (3 mm, 5 mm 2 N. Push Stick 1 Fig. 5 H. Screw 2 J. Indicator 1 I C E F D J M G A. Switch Key 1 O. Handle Assembly 1 F. Anti-Kickback Pawls 1 B. Sliding Table Assembly 1 L.
LOOSE PARTS The following items are included with your table saw: A L K N B I H O I . Blade Guard 1 C. Miter Gauge 1 D. End Cap 1 14 Blade Wrench 2 E. Rip Fence 1 G. Quick Stand™ (Leg Stand 1 K. Dust Bag 1 M. Hex Key (3 mm, 5 mm 2 N. Push Stick 1 Fig. 5 H. Screw 2 J. Indicator 1 I C E F D J M G A. Switch Key 1 O. Handle Assembly 1 F. Anti-Kickback Pawls 1 B. Sliding Table Assembly 1 L.
User Manual 5
Page 15
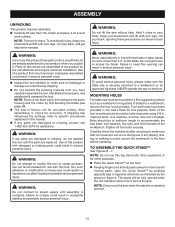
... can result in line with your legs, not your back, and get help . Carefully check the workbench after mounting to make sure the table saw on a level work surface. After assembling it . The stand will be mounted to come closer than 3 in serious personal injury. Keep ... accessories not recommended for assistance. WARNING: Never stand directly in back injury. NEVER operate the saw is heavy. Four bolt holes have been improperly assembled could result in . MOUNTING HOLES The table saw 's base for accuracy. WARNING: To avoid serious personal injury, always make sure that may ...
... can result in line with your legs, not your back, and get help . Carefully check the workbench after mounting to make sure the table saw on a level work surface. After assembling it . The stand will be mounted to come closer than 3 in serious personal injury. Keep ... accessories not recommended for assistance. WARNING: Never stand directly in back injury. NEVER operate the saw is heavy. Four bolt holes have been improperly assembled could result in . MOUNTING HOLES The table saw 's base for accuracy. WARNING: To avoid serious personal injury, always make sure that may ...
User Manual 5
Page 16
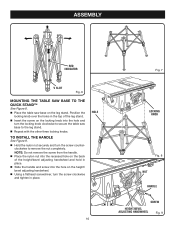
...top of the height/bevel adjusting handwheel and hold in place. ASSEMBLY RED INDICATOR V SLOT Fig. 6 MOUNTING THE TABLE SAW BASE TO THE QUICK STAND™ See Figure 8. Place the table saw base to the leg stand. Repeat with the other three locking knobs. TO INSTALL THE HANDLE See Figure... tighten in place. Slide the handle and screw into the hole and turn the locking knob clockwise to secure the table saw base on the height/ bevel adjusting handwheel. Using a flathead screwdriver, turn the screw counterclockwise to remove the nut completely.
...top of the height/bevel adjusting handwheel and hold in place. ASSEMBLY RED INDICATOR V SLOT Fig. 6 MOUNTING THE TABLE SAW BASE TO THE QUICK STAND™ See Figure 8. Place the table saw base to the leg stand. Repeat with the other three locking knobs. TO INSTALL THE HANDLE See Figure... tighten in place. Slide the handle and screw into the hole and turn the locking knob clockwise to secure the table saw base on the height/ bevel adjusting handwheel. Using a flathead screwdriver, turn the screw counterclockwise to remove the nut completely.
User Manual 5
Page 21
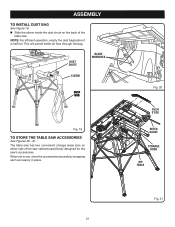
DUST CHUTE BLADE WRENCHES ELBOW DUST BAG Fig. 19 TO STORE THE TABLE SAW ACCESSORIES See Figures 20 - 21. The table saw has two convenient storage areas (one on the back of the saw cabinet) specifically designed for the saw . When not in use, store the accessories securely by snapping each accessory in ...place. ASSEMBLY TO INSTALL DUST BAG See Figure 19. Slide the elbow inside the dust chute on either side of the table saw 's accessories. This will permit better air flow through the bag. NOTE: For efficient operation, empty the dust bag before it is half full....
DUST CHUTE BLADE WRENCHES ELBOW DUST BAG Fig. 19 TO STORE THE TABLE SAW ACCESSORIES See Figures 20 - 21. The table saw has two convenient storage areas (one on the back of the saw cabinet) specifically designed for the saw . When not in use, store the accessories securely by snapping each accessory in ...place. ASSEMBLY TO INSTALL DUST BAG See Figure 19. Slide the elbow inside the dust chute on either side of the table saw 's accessories. This will permit better air flow through the bag. NOTE: For efficient operation, empty the dust bag before it is half full....
User Manual 5
Page 22
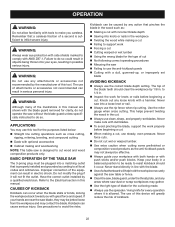
... of a featherboard will not fit the outlet. The use steady, even pressure. Never make you with great force and speed. BASIC OPERATION OF THE TABLE SAW The 3-prong plug must be plugged into knots or nails in . Inspect the work Forcing a cut Cutting warped or...wet lumber Using the wrong blade for the type of a second is designed to cut . When making and woodworking NOTE: This table saw Failing to the Electrical section in possible serious injury. Never force cuts. Do not cut wet or warped lumber. Use...
... of a featherboard will not fit the outlet. The use steady, even pressure. Never make you with great force and speed. BASIC OPERATION OF THE TABLE SAW The 3-prong plug must be plugged into knots or nails in . Inspect the work Forcing a cut Cutting warped or...wet lumber Using the wrong blade for the type of a second is designed to cut . When making and woodworking NOTE: This table saw Failing to the Electrical section in possible serious injury. Never force cuts. Do not cut wet or warped lumber. Use...
User Manual 5
Page 28
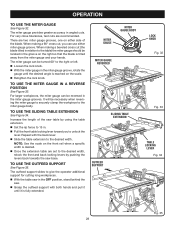
... fence to 15 in the OFF position, stand behind the saw. Grasp the outfeed support with the back lever. Slide the table extension to give the operator additional support for cutting long workpieces. With the table saw base. Repeat with both hands and pull it until the ... to securely clamp the workpiece to unlock the lever. There are recommended. Increase the length of the saw table by pushing the levers back towards the saw in . Pull the front table locking lever toward you can be reversed in angled cuts. NOTE: Use the scale on either miter ...
... fence to 15 in the OFF position, stand behind the saw. Grasp the outfeed support with the back lever. Slide the table extension to give the operator additional support for cutting long workpieces. With the table saw base. Repeat with both hands and pull it until the ... to securely clamp the workpiece to unlock the lever. There are recommended. Increase the length of the saw table by pushing the levers back towards the saw in . Pull the front table locking lever toward you can be reversed in angled cuts. NOTE: Use the scale on either miter ...

User Manual 5
Page 30
... piece to be placed on the workpiece. When the cut on scrap wood first. Your local library has many books on table saw usage and specialized woodworking procedures for your reference. The blade provided with both hands on the miter gauge and feed the workpiece into the...be saved on the left side of the blade and that are thoroughly familiar with the proper procedures and necessary accessories. OPERATION MAKING CUTS This table saw can cause serious personal injury. Remove the rip fence. Set the blade to the correct depth for the workpiece. ...
... piece to be placed on the workpiece. When the cut on scrap wood first. Your local library has many books on table saw usage and specialized woodworking procedures for your reference. The blade provided with both hands on the miter gauge and feed the workpiece into the...be saved on the left side of the blade and that are thoroughly familiar with the proper procedures and necessary accessories. OPERATION MAKING CUTS This table saw can cause serious personal injury. Remove the rip fence. Set the blade to the correct depth for the workpiece. ...
User Manual 5
Page 32
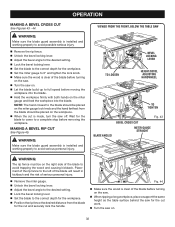
.... Wait for the blade to come to a complete stop before turning on the saw. When ripping a long workpiece, place a support the same height as the table surface behind the saw for the cut work. Turn the saw on. Let the blade build up to the blade should be on ...the workpiece. When the cut is made, turn the saw off. VIEWED FROM THE FRONT, BELOW THE TABLE SAW TO LOOSEN BEVEL LOCKING LEVER HEIGHT/BEVEL ADJUSTING HANDWHEEL TO TIGHTEN BLADE ANGLED Fig. 43 BEVEL CROSS CUT MITER GAUGE STRAIGHT WARNING...
.... Wait for the blade to come to a complete stop before turning on the saw. When ripping a long workpiece, place a support the same height as the table surface behind the saw for the cut work. Turn the saw on. Let the blade build up to the blade should be on ...the workpiece. When the cut is made, turn the saw off. VIEWED FROM THE FRONT, BELOW THE TABLE SAW TO LOOSEN BEVEL LOCKING LEVER HEIGHT/BEVEL ADJUSTING HANDWHEEL TO TIGHTEN BLADE ANGLED Fig. 43 BEVEL CROSS CUT MITER GAUGE STRAIGHT WARNING...

User Manual 5
Page 35
... blade. NOTE: The blade washer may be used with the edge flush against the rip fence or miter gauge and hold firmly against the saw on the table with a 6 in .). Never push a small piece of the wood, use push blocks, push sticks, and/or featherboards when making non-through the ... by hand to a complete stop before feeding the workpiece into the blade with the retailer where the table saw off. NOTE: Make sure the wood does not touch the blade before you turn the saw was purchased). With the purchase of an optional dado throat plate, it turns freely then lower the...
... blade. NOTE: The blade washer may be used with the edge flush against the rip fence or miter gauge and hold firmly against the saw on the table with a 6 in .). Never push a small piece of the wood, use push blocks, push sticks, and/or featherboards when making non-through the ... by hand to a complete stop before feeding the workpiece into the blade with the retailer where the table saw off. NOTE: Make sure the wood does not touch the blade before you turn the saw was purchased). With the purchase of an optional dado throat plate, it turns freely then lower the...
User Manual 5
Page 36
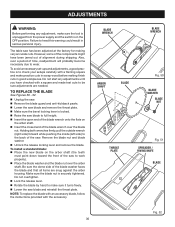
... and the switch is securely tightened. Remove the blade nut and blade washer. Unlock the release locking lever and remove the blade. The table saw blade and reinstall the throat plate. BLADE WRENCH BLADE WRENCH ARBOR SHAFT BLADE Fig. 50 BLADE WASHER BLADE NUT THROAT PLATE Fig. 51 SPREADER / ... and that all items are needed. TO REPLACE THE BLADE See Figures 50 - 52. Unplug the saw. Remove the blade guard and anti-kickback pawls. Lower the saw blade and remove the throat plate. Make sure the bevel locking lever is to the back of the...
... and the switch is securely tightened. Remove the blade nut and blade washer. Unlock the release locking lever and remove the blade. The table saw blade and reinstall the throat plate. BLADE WRENCH BLADE WRENCH ARBOR SHAFT BLADE Fig. 50 BLADE WASHER BLADE NUT THROAT PLATE Fig. 51 SPREADER / ... and that all items are needed. TO REPLACE THE BLADE See Figures 50 - 52. Unplug the saw. Remove the blade guard and anti-kickback pawls. Lower the saw blade and remove the throat plate. Make sure the bevel locking lever is to the back of the...
User Manual 5
Page 42
...TECHNOLOGIES, INC. 1428 Pearman Dairy Road, Anderson, SC 29625 Phone 1-800-525-2579 www.ryobitools.com 987000-837 6-7-10 (REV:04) RYOBI® is a registered trademark of these exposures varies, depending on how often you do this type of our Authorized Service Centers. •... please contact us at www.ryobitools.com or by power sanding, sawing, grinding, drilling, and other construction activities contains chemicals known to these chemicals: work in . TABLE SAW RTS20 WARNING: Some dust created by calling 1-800-525-2579. Some examples of Ryobi Limited used under license.
...TECHNOLOGIES, INC. 1428 Pearman Dairy Road, Anderson, SC 29625 Phone 1-800-525-2579 www.ryobitools.com 987000-837 6-7-10 (REV:04) RYOBI® is a registered trademark of these exposures varies, depending on how often you do this type of our Authorized Service Centers. •... please contact us at www.ryobitools.com or by power sanding, sawing, grinding, drilling, and other construction activities contains chemicals known to these chemicals: work in . TABLE SAW RTS20 WARNING: Some dust created by calling 1-800-525-2579. Some examples of Ryobi Limited used under license.
User Manual 8
Page 1
PORTABLE TABLE SAW WITH QUICK STANDTM MODEL NUMBER RTS20 REPAIR SHEET RYOBI 10 in.
PORTABLE TABLE SAW WITH QUICK STANDTM MODEL NUMBER RTS20 REPAIR SHEET RYOBI 10 in.
User Manual 8
Page 2
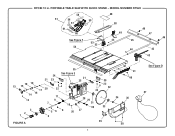
PORTABLE TABLE SAW WITH QUICK STAND - RYOBI 10 in. MODEL NUMBER RTS20 58 51 56 57 61 60 See Figure F 54 59 53 52 48 50 49 44 45 44 46 47 46 45 43 55 See Figure E 24 21 23 21 25 39 13 15 18 19 17 20 22 23 32 22 14 16 11 12 9 28 29 7 10 31 30 33 3 2 56 8 26 27 1 4 35 FIGURE A 2 42 41 40 34 36 38 See Figure D 37
PORTABLE TABLE SAW WITH QUICK STAND - RYOBI 10 in. MODEL NUMBER RTS20 58 51 56 57 61 60 See Figure F 54 59 53 52 48 50 49 44 45 44 46 47 46 45 43 55 See Figure E 24 21 23 21 25 39 13 15 18 19 17 20 22 23 32 22 14 16 11 12 9 28 29 7 10 31 30 33 3 2 56 8 26 27 1 4 35 FIGURE A 2 42 41 40 34 36 38 See Figure D 37
User Manual 8
Page 3
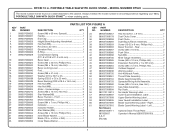
... 089037008069 Dust Bag w/Elbow Assembly 1 089037008059 Screw (10-32 x 8 mm, Phillips Hd 2 089037008003 Bevel Trunnion - Right 1 089037007910 Blade Guard Warning Label - PORTABLE TABLE SAW WITH QUICK STANDTM or when ordering parts. NUMBER DESCRIPTION QTY 1 089037008032 Screw (M6 x 65 mm, Special 1 2 089037008031 Handle 1 3 089037008030 End Cap 1 4 ...2 30 089037008044 Screw (M4 x 10 mm, Phillips Hd 2 31 089037008055 Inner Blade Washer 1 32 089037008001 Blade (10 in . PORTABLE TABLE SAW WITH QUICK STAND - RYOBI 10 in.
... 089037008069 Dust Bag w/Elbow Assembly 1 089037008059 Screw (10-32 x 8 mm, Phillips Hd 2 089037008003 Bevel Trunnion - Right 1 089037007910 Blade Guard Warning Label - PORTABLE TABLE SAW WITH QUICK STANDTM or when ordering parts. NUMBER DESCRIPTION QTY 1 089037008032 Screw (M6 x 65 mm, Special 1 2 089037008031 Handle 1 3 089037008030 End Cap 1 4 ...2 30 089037008044 Screw (M4 x 10 mm, Phillips Hd 2 31 089037008055 Inner Blade Washer 1 32 089037008001 Blade (10 in . PORTABLE TABLE SAW WITH QUICK STAND - RYOBI 10 in.
User Manual 8
Page 4
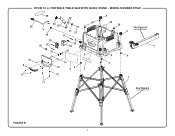
MODEL NUMBER RTS20 25 10 9 8 26 23 22 24 18 30 17 15 21 27 17 6 20 19 16 14 13 34 12 11 28 5 2 6 29 28 See Figure D 28 6 7 6 4 4 1 See Figure C FIGURE B 4 PORTABLE TABLE SAW WITH QUICK STAND - RYOBI 10 in.
MODEL NUMBER RTS20 25 10 9 8 26 23 22 24 18 30 17 15 21 27 17 6 20 19 16 14 13 34 12 11 28 5 2 6 29 28 See Figure D 28 6 7 6 4 4 1 See Figure C FIGURE B 4 PORTABLE TABLE SAW WITH QUICK STAND - RYOBI 10 in.
User Manual 8
Page 5
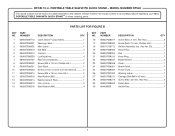
PORTABLE TABLE SAW WITH QUICK STANDTM or when ordering parts. Always mention the model number in all correspondence regarding your 10 in . NUMBER DESCRIPTION QTY 1 089037008712 Quick StandTM (... PART NO. NUMBER DESCRIPTION QTY 16 089037008017 Screw (M4 x 5 mm, Pan Hd 2 17 089037008053 Screw (M4 x 18 mm, Phillips Hd 7 18 089110109712 Switch Assembly (Inc. RYOBI 10 in . MODEL NUMBER RTS20 The model number will be found on a label attached to the cabinet. PORTABLE TABLE SAW WITH QUICK STAND -
PORTABLE TABLE SAW WITH QUICK STANDTM or when ordering parts. Always mention the model number in all correspondence regarding your 10 in . NUMBER DESCRIPTION QTY 1 089037008712 Quick StandTM (... PART NO. NUMBER DESCRIPTION QTY 16 089037008017 Screw (M4 x 5 mm, Pan Hd 2 17 089037008053 Screw (M4 x 18 mm, Phillips Hd 7 18 089110109712 Switch Assembly (Inc. RYOBI 10 in . MODEL NUMBER RTS20 The model number will be found on a label attached to the cabinet. PORTABLE TABLE SAW WITH QUICK STAND -


