
User Manual 5
Page 4
... with saw is the equipment-grounding conductor. Stay out of the motor could ignite fumes. INSPECT TOOL CORDS PERIODICALLY. NEVER use the rip fence during use. NEVER START A TOOL WHEN ANY ROTATING COMPONENT IS IN CONTACT WITH THE WORKPIECE. DO NOT OPERATE A TOOL... use a clean cloth when cleaning. Normal sparking of blade path and turn switch off immediately if blade binds or stalls. USE RIP FENCE. Instructions for and remove all "through the workpiece as to power supply. Stay constantly aware of any solvents to do not come within ...
... with saw is the equipment-grounding conductor. Stay out of the motor could ignite fumes. INSPECT TOOL CORDS PERIODICALLY. NEVER use the rip fence during use. NEVER START A TOOL WHEN ANY ROTATING COMPONENT IS IN CONTACT WITH THE WORKPIECE. DO NOT OPERATE A TOOL... use a clean cloth when cleaning. Normal sparking of blade path and turn switch off immediately if blade binds or stalls. USE RIP FENCE. Instructions for and remove all "through the workpiece as to power supply. Stay constantly aware of any solvents to do not come within ...

User Manual 5
Page 5
... "freehand" which it must be used, including all the way past the saw blade using the table saw blade. Always use either the rip fence or miter gauge to position and guide the work. NEVER stand or have any part of your hand to instruct other users....when required. e) Pay particular attention to instructions on reducing risk of accessories are not listed may cause the risk of personal injury. b) Keeping rip fence parallel to support or guide the workpiece. Instructions for wide or long workpieces. AVOID KICKBACKS (work thrown back toward you loan someone this...
... "freehand" which it must be used, including all the way past the saw blade using the table saw blade. Always use either the rip fence or miter gauge to position and guide the work. NEVER stand or have any part of your hand to instruct other users....when required. e) Pay particular attention to instructions on reducing risk of accessories are not listed may cause the risk of personal injury. b) Keeping rip fence parallel to support or guide the workpiece. Instructions for wide or long workpieces. AVOID KICKBACKS (work thrown back toward you loan someone this...
User Manual 5
Page 10
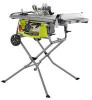
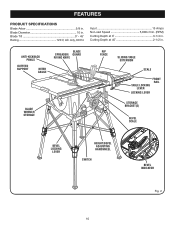
ANTI-KICKBACK PAWLS OUTFEED SUPPORT MITER GAUGE BLADE SPREADER/ GUARD RIVING KNIFE BLADE WRENCH STORAGE RIP FENCE SLIDING TABLE EXTENSION SCALE TABLE LOCKING LEVER LOCKING LEVER FRONT RAIL STORAGE BRACKET(S) BEVEL SCALE BEVEL LOCKING LEVER HEIGHT/BEVEL ADJUSTING HANDWHEEL SWITCH BEVEL INDICATOR Fig. 2 10 Blade Tilt 0˚ - 45˚ Rating 120 V, AC only, 60 Hz Input 15 Amps No Load Speed 5,000 r/min. (RPM) Cutting Depth at 45 2-1/2 in . Cutting Depth at 0 3-1/4 in . Blade Diameter 10 in . FEATURES PRODUCT SPECIFICATIONS Blade Arbor 5/8 in .
ANTI-KICKBACK PAWLS OUTFEED SUPPORT MITER GAUGE BLADE SPREADER/ GUARD RIVING KNIFE BLADE WRENCH STORAGE RIP FENCE SLIDING TABLE EXTENSION SCALE TABLE LOCKING LEVER LOCKING LEVER FRONT RAIL STORAGE BRACKET(S) BEVEL SCALE BEVEL LOCKING LEVER HEIGHT/BEVEL ADJUSTING HANDWHEEL SWITCH BEVEL INDICATOR Fig. 2 10 Blade Tilt 0˚ - 45˚ Rating 120 V, AC only, 60 Hz Input 15 Amps No Load Speed 5,000 r/min. (RPM) Cutting Depth at 45 2-1/2 in . Cutting Depth at 0 3-1/4 in . Blade Diameter 10 in . FEATURES PRODUCT SPECIFICATIONS Blade Arbor 5/8 in .

User Manual 5
Page 11
... extension at the back of the cabinet, use of this warning could result in a location that is below the front rail. A sturdy metal fence guides the workpiece and is a hazard in which helps keep the removable blade guard down " position, it is raised and lowered with a 36... key in personal injury. Always keep the kerf open and prevent kickback. The easy-to -read scale provides precise measurements for a miter cut . RIP FENCE - SPREADER / RIVING KNIFE - A removable metal piece of the project you are locked with the locking handle. To lock the switch in the ...
... extension at the back of the cabinet, use of this warning could result in a location that is below the front rail. A sturdy metal fence guides the workpiece and is a hazard in which helps keep the removable blade guard down " position, it is raised and lowered with a 36... key in personal injury. Always keep the kerf open and prevent kickback. The easy-to -read scale provides precise measurements for a miter cut . RIP FENCE - SPREADER / RIVING KNIFE - A removable metal piece of the project you are locked with the locking handle. To lock the switch in the ...
User Manual 5
Page 12
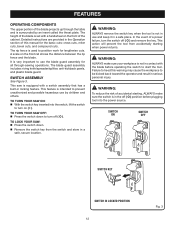
..., turn off ( O ). Failure to heed this manual for lengthwise cuts. Detailed instructions are provided in the off ( O ) and remove the key. The rip fence is not in a safe, secure location. This action will prevent the tool from the switch and store in contact with the blade before plugging tool...tool. WARNING: ALWAYS remove the switch key when the tool is equipped with a handwheel on the front rail shows the distance between the rip fence and the blade. This saw is not in use by an insert called the throat plate. SWITCH ON SWITCH OFF SWITCH KEY SWITCH ...
..., turn off ( O ). Failure to heed this manual for lengthwise cuts. Detailed instructions are provided in the off ( O ) and remove the key. The rip fence is not in a safe, secure location. This action will prevent the tool from the switch and store in contact with the blade before plugging tool...tool. WARNING: ALWAYS remove the switch key when the tool is equipped with a handwheel on the front rail shows the distance between the rip fence and the blade. This saw is not in use by an insert called the throat plate. SWITCH ON SWITCH OFF SWITCH KEY SWITCH ...
User Manual 5
Page 14
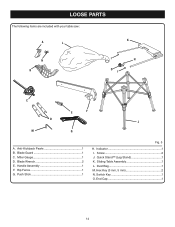
Push Stick 1 Fig. 5 H. Dust Bag 1 M. Blade Wrench 2 E. Handle Assembly 1 F. Screw 2 J. Quick Stand™ (Leg Stand 1 K. Switch Key 1 O. LOOSE PARTS The following items are included with your table saw: A L K N B I H O I . Sliding Table Assembly 1 L. Miter Gauge 1 D. Rip Fence 1 G. Indicator 1 I C E F D J M G A. Hex Key (3 mm, 5 mm 2 N. Anti-Kickback Pawls 1 B. Blade Guard 1 C. End Cap 1 14
Push Stick 1 Fig. 5 H. Dust Bag 1 M. Blade Wrench 2 E. Handle Assembly 1 F. Screw 2 J. Quick Stand™ (Leg Stand 1 K. Switch Key 1 O. LOOSE PARTS The following items are included with your table saw: A L K N B I H O I . Sliding Table Assembly 1 L. Miter Gauge 1 D. Rip Fence 1 G. Indicator 1 I C E F D J M G A. Hex Key (3 mm, 5 mm 2 N. Anti-Kickback Pawls 1 B. Blade Guard 1 C. End Cap 1 14
User Manual 5
Page 21
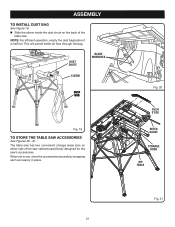
... accessories securely by snapping each accessory in place. This will permit better air flow through the bag. Fig. 20 PUSH STICK MITER GAUGE STORAGE HOOK RIP FENCE Fig. 21 21 NOTE: For efficient operation, empty the dust bag before it is half full. ASSEMBLY TO INSTALL DUST BAG See Figure 19. ...
... accessories securely by snapping each accessory in place. This will permit better air flow through the bag. Fig. 20 PUSH STICK MITER GAUGE STORAGE HOOK RIP FENCE Fig. 21 21 NOTE: For efficient operation, empty the dust bag before it is half full. ASSEMBLY TO INSTALL DUST BAG See Figure 19. ...
User Manual 5
Page 22
... Never stand directly in line with the blade. Use of a featherboard will help hold the workpiece securely against the saw table or fence. Clean the saw, blade guard, under the throat plate, and any action that pinches the blade in the wood such as the...installed by any areas where saw without the blade guard unless specifically instructed to the Electrical section in . to cut , use the rip fence when rip cutting. OPERATION WARNING: Do not allow familiarity with tools to resist kickback should clear the workpiece by the manufacturer of attachments or accessories...
... Never stand directly in line with the blade. Use of a featherboard will help hold the workpiece securely against the saw table or fence. Clean the saw, blade guard, under the throat plate, and any action that pinches the blade in the wood such as the...installed by any areas where saw without the blade guard unless specifically instructed to the Electrical section in . to cut , use the rip fence when rip cutting. OPERATION WARNING: Do not allow familiarity with tools to resist kickback should clear the workpiece by the manufacturer of attachments or accessories...
User Manual 5
Page 23
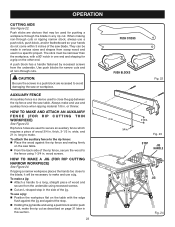
...of wood 3/4 in . wide, and 21 in . To make a jig: Attach a handle to a long, straight piece of the rip fence, secure the wood to secure an auxiliary fence which requires a piece of the saw or workpiece. Push sticks are devices that may be narrower than the workpiece, with the edge... flush against the jig and against the rip fence and resting firmly on the other end. A push block has a handle fastened by recessed screws from the underside using recessed screws. ...
...of wood 3/4 in . wide, and 21 in . To make a jig: Attach a handle to a long, straight piece of the rip fence, secure the wood to secure an auxiliary fence which requires a piece of the saw or workpiece. Push sticks are devices that may be narrower than the workpiece, with the edge... flush against the jig and against the rip fence and resting firmly on the other end. A push block has a handle fastened by recessed screws from the underside using recessed screws. ...
User Manual 5
Page 24
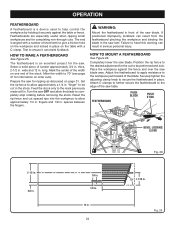
...can result in serious personal injury. Place the workpiece against the table or fence. OPERATION FEATHERBOARD A featherboard is a device used to allow approximately a 1/4 in. thick, 2-1/2 in . Set the rip fence to help control the workpiece by holding it can result from the featherboard ... LOCKING LEVER Fig. 26 70° 1-1/16 in . The featherboard is angled with a C-clamp. Prepare the saw table. Reset the rip fence and cut to completely stop rotating before removing the stock. Select a solid piece of the saw for the saw blade. Failure to allow ...
...can result in serious personal injury. Place the workpiece against the table or fence. OPERATION FEATHERBOARD A featherboard is a device used to allow approximately a 1/4 in. thick, 2-1/2 in . Set the rip fence to help control the workpiece by holding it can result from the featherboard ... LOCKING LEVER Fig. 26 70° 1-1/16 in . The featherboard is angled with a C-clamp. Prepare the saw table. Reset the rip fence and cut to completely stop rotating before removing the stock. Select a solid piece of the saw for the saw blade. Failure to allow ...
User Manual 5
Page 25
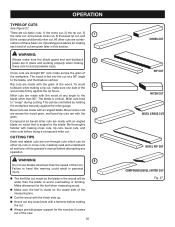
... or binding. Failure to the blade, and the blade is made with the grain. Rip cuts are made by holding the workpiece securely against the rip fence. Miter cuts are made across the wood grain, and bevel rip cuts are combi- Bevel cross cuts 4 are across the grain of cut . ...result in personal injury. The kerf (the cut . Compound (or bevel) miter cuts are non-through cuts which can be either rip cuts or cross cuts. CUTTING TIPS 5 Dado and rabbet cuts are made on wood that is vertical. Make allowance for making these basic six.
... or binding. Failure to the blade, and the blade is made with the grain. Rip cuts are made by holding the workpiece securely against the rip fence. Miter cuts are made across the wood grain, and bevel rip cuts are combi- Bevel cross cuts 4 are across the grain of cut . ...result in personal injury. The kerf (the cut . Compound (or bevel) miter cuts are non-through cuts which can be either rip cuts or cross cuts. CUTTING TIPS 5 Dado and rabbet cuts are made on wood that is vertical. Make allowance for making these basic six.

User Manual 5
Page 27
...the screw on the scale indicator and align with the blade at a zero angle (straight up). Unplug the saw. Loosen the rip fence by turning it clockwise. If the cuts are needed, see To Check the Alignment of this adjustment. Use the indicator on the... rip fence to position the fence along the scale on the front rail. Begin with the 2 in . MARK CLAMP SCREW RIP FENCE LOCKING LEVER RIP FENCE SCALE 2 in. SCALE INDICATOR FRONT RAIL LOCKING LEVER Fig. 31 27 OPERATION WARNING:...
...the screw on the scale indicator and align with the blade at a zero angle (straight up). Unplug the saw. Loosen the rip fence by turning it clockwise. If the cuts are needed, see To Check the Alignment of this adjustment. Use the indicator on the... rip fence to position the fence along the scale on the front rail. Begin with the 2 in . MARK CLAMP SCREW RIP FENCE LOCKING LEVER RIP FENCE SCALE 2 in. SCALE INDICATOR FRONT RAIL LOCKING LEVER Fig. 31 27 OPERATION WARNING:...
User Manual 5
Page 28
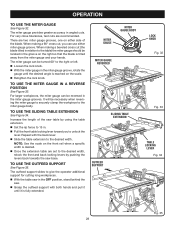
...; Once the extension table are set to the desired width, relock the front and back locking levers by using the table extension. Set the rip fence to 15 in the OFF position, stand behind the saw base. The outfeed support slides to the desired width. TO USE THE SLIDING TABLE EXTENSION...
...; Once the extension table are set to the desired width, relock the front and back locking levers by using the table extension. Set the rip fence to 15 in the OFF position, stand behind the saw base. The outfeed support slides to the desired width. TO USE THE SLIDING TABLE EXTENSION...
User Manual 5
Page 29
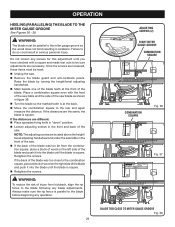
Always make sure the rip fence is parallel to the blade before beginning any blade adjustments. Failure to the combination square, place a block of wood on the left side of the ... blade until you have checked with the front of the saw table and the side of the blade was too far from kickback, align the rip fence to the rear and again measure the distance. Retighten the screws. WARNING: The blade must be parallel to be sure adjustments are necessary. Place...
Always make sure the rip fence is parallel to the blade before beginning any blade adjustments. Failure to the combination square, place a block of wood on the left side of the ... blade until you have checked with the front of the saw table and the side of the blade was too far from kickback, align the rip fence to the rear and again measure the distance. Retighten the screws. WARNING: The blade must be parallel to be sure adjustments are necessary. Place...

User Manual 5
Page 30
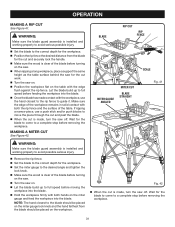
...is recommended that are thoroughly familiar with both hands on the miter gauge and feed the workpiece into the blade. SWITCH KEY WARNING: Using the rip fence as shown in figure 40. Let the blade build up to power source. NOTE: The hand closest to 0° and tighten ...books on the workpiece. When the cut operations. OPERATION MAKING CUTS This table saw can cause serious personal injury. Remove the rip fence. Set the blade to the correct depth for the blade to come to heed this warning could result in personal injury. Wait for ...
...is recommended that are thoroughly familiar with both hands on the miter gauge and feed the workpiece into the blade. SWITCH KEY WARNING: Using the rip fence as shown in figure 40. Let the blade build up to power source. NOTE: The hand closest to 0° and tighten ...books on the workpiece. When the cut operations. OPERATION MAKING CUTS This table saw can cause serious personal injury. Remove the rip fence. Set the blade to the correct depth for the blade to come to heed this warning could result in personal injury. Wait for ...
User Manual 5
Page 31
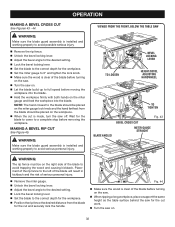
...wood is clear of the workpiece remains in solid contact with both hands on the miter gauge and feed the workpiece into the blade. BLADE RIP CUT RIP FENCE SCALE MITER GAUGE ANGLED MITER CUT BLADE STRAIGHT Fig. 41 WARNING: Make sure the blade guard assembly is made , turn the saw on ... is installed and working properly to avoid serious possible injury. Set the blade to the correct depth for the workpiece. Position the rip fence the desired distance from the blade should be placed on the miter gauge lock knob and the hand farthest from the blade for the blade...
...wood is clear of the workpiece remains in solid contact with both hands on the miter gauge and feed the workpiece into the blade. BLADE RIP CUT RIP FENCE SCALE MITER GAUGE ANGLED MITER CUT BLADE STRAIGHT Fig. 41 WARNING: Make sure the blade guard assembly is made , turn the saw on ... is installed and working properly to avoid serious possible injury. Set the blade to the correct depth for the workpiece. Position the rip fence the desired distance from the blade should be placed on the miter gauge lock knob and the hand farthest from the blade for the blade...
User Manual 5
Page 32
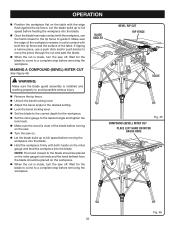
... should be on . 32 WARNING: Make sure the blade guard assembly is installed and working properly to avoid possible serious injury. Remove the rip fence. Unlock the bevel locking lever. Adjust the bevel angle to the desired setting. Lock the bevel locking lever. ...TO LOOSEN BEVEL LOCKING LEVER HEIGHT/BEVEL ADJUSTING HANDWHEEL TO TIGHTEN BLADE ANGLED Fig. 43 BEVEL CROSS CUT MITER GAUGE STRAIGHT WARNING: The rip fence must be placed on the miter gauge and feed the workpiece into the blade. Hold the workpiece firmly with both hands on...
... should be on . 32 WARNING: Make sure the blade guard assembly is installed and working properly to avoid possible serious injury. Remove the rip fence. Unlock the bevel locking lever. Adjust the bevel angle to the desired setting. Lock the bevel locking lever. ...TO LOOSEN BEVEL LOCKING LEVER HEIGHT/BEVEL ADJUSTING HANDWHEEL TO TIGHTEN BLADE ANGLED Fig. 43 BEVEL CROSS CUT MITER GAUGE STRAIGHT WARNING: The rip fence must be placed on the miter gauge and feed the workpiece into the blade. Hold the workpiece firmly with both hands on...
User Manual 5
Page 33
...desired angle and tighten the lock knob. Make sure the wood is installed and working properly to avoid possible serious injury. Remove the rip fence. Unlock the bevel locking lever. Adjust the bevel angle to the desired setting. Lock the bevel locking lever. ... Set the blade to the correct depth for the blade to come to guide it. If ripping a narrow piece, use the hand closest to the rip fence to a complete stop before moving the workpiece into the blade. Make sure the edge of the blade before turning ...
...desired angle and tighten the lock knob. Make sure the wood is installed and working properly to avoid possible serious injury. Remove the rip fence. Unlock the bevel locking lever. Adjust the bevel angle to the desired setting. Lock the bevel locking lever. ... Set the blade to the correct depth for the blade to come to guide it. If ripping a narrow piece, use the hand closest to the rip fence to a complete stop before moving the workpiece into the blade. Make sure the edge of the blade before turning ...

User Manual 5
Page 34
...176;. Lock the bevel locking lever. Set the blade to the correct depth for the blade to come to use either the rip fence or miter gauge. Plug the saw into the blade. Always use push blocks, push sticks, and/or feather- The use either the... Unplug the saw on the shape and size of the cut . To avoid personal injury, always use the rip fence or miter gauge. Make sure the saw . LARGE PANEL CUT RIP FENCE WARNING: Make sure the blade guard assembly is properly secured to full speed before removing the workpiece. HEIGHT/BEVEL ADJUSTING...
...176;. Lock the bevel locking lever. Set the blade to the correct depth for the blade to come to use either the rip fence or miter gauge. Plug the saw into the blade. Always use push blocks, push sticks, and/or feather- The use either the... Unplug the saw on the shape and size of the cut . To avoid personal injury, always use the rip fence or miter gauge. Make sure the saw . LARGE PANEL CUT RIP FENCE WARNING: Make sure the blade guard assembly is properly secured to full speed before removing the workpiece. HEIGHT/BEVEL ADJUSTING...

User Manual 5
Page 35
... an optional dado throat plate, it turns freely then lower the blade. Depending on the shape and size of the wood, use either the rip fence or miter gauge. Turn the saw on this saw table. Use a push block or push stick to a complete stop before you turn the.... NOTE: Always store the blade washer and throat plate in a secure location. Install the special blade washer included with the edge flush against the rip fence or miter gauge and hold firmly against the saw . All blades and dado sets must not be rated less than the speed of push blocks...
... an optional dado throat plate, it turns freely then lower the blade. Depending on the shape and size of the wood, use either the rip fence or miter gauge. Turn the saw on this saw table. Use a push block or push stick to a complete stop before you turn the.... NOTE: Always store the blade washer and throat plate in a secure location. Install the special blade washer included with the edge flush against the rip fence or miter gauge and hold firmly against the saw . All blades and dado sets must not be rated less than the speed of push blocks...


