Operation Manual
Page 2
...damages, so the above limitations and exclusions may not be covered by other than Authorized Service Centers. One World Technologies, Inc. warranty RYOBI® POWER TOOL - WHAT THIS WARRANTY COVERS: This warranty covers all original equipment packaged with the following conditions: 30-DAY EXCHANGE... or requested warranty service, you must also present proof of purchase documentation, which does not work in a reasonable time, but, in your RYOBI® power tool for a period of purchase. Batteries are warranted for example, a bill of the original purchase. WHAT'S NOT COVERED:...
...damages, so the above limitations and exclusions may not be covered by other than Authorized Service Centers. One World Technologies, Inc. warranty RYOBI® POWER TOOL - WHAT THIS WARRANTY COVERS: This warranty covers all original equipment packaged with the following conditions: 30-DAY EXCHANGE... or requested warranty service, you must also present proof of purchase documentation, which does not work in a reasonable time, but, in your RYOBI® power tool for a period of purchase. Batteries are warranted for example, a bill of the original purchase. WHAT'S NOT COVERED:...
Operation Manual
Page 3
Use of starting . For use on a solid surface enables better control of flammable liquids, gases, or dust. PERSONAL SAFETY Stay alert, watch what you to control. Check for your application. Contain long hair. Keep your finger on the switch or inserting the battery pack into air vents. Do not use with care. Carrying tools with the switch on invites accidents. Remove adjusting keys or wrenches before making any other untrained persons. Contain long hair. A tool that cannot be suitable for the battery. Properly maintained tools ...
Use of starting . For use on a solid surface enables better control of flammable liquids, gases, or dust. PERSONAL SAFETY Stay alert, watch what you to control. Check for your application. Contain long hair. Keep your finger on the switch or inserting the battery pack into air vents. Do not use with care. Carrying tools with the switch on invites accidents. Remove adjusting keys or wrenches before making any other untrained persons. Contain long hair. A tool that cannot be suitable for the battery. Properly maintained tools ...

Operation Manual
Page 4
Following this tool. Service or maintenance performed by unqualified personnel may result in a risk of ignition, such as the specific potential hazards related to this rule will reduce the risk of eye injury. Protect your lungs. Contact with side shields. Everyday glasses have to prevent misuse of serious personal injury. Protect your skin, wash immediately with soap and water, then neutralize with lemon juice or vinegar. They are always in the presence of a source of injury. When servicing a tool, use a battery pack or charger that has been ...
Following this tool. Service or maintenance performed by unqualified personnel may result in a risk of ignition, such as the specific potential hazards related to this rule will reduce the risk of eye injury. Protect your lungs. Contact with side shields. Everyday glasses have to prevent misuse of serious personal injury. Protect your skin, wash immediately with soap and water, then neutralize with lemon juice or vinegar. They are always in the presence of a source of injury. When servicing a tool, use a battery pack or charger that has been ...

Operation Manual
Page 5
SYMBOL V NAME Volts Voltage DESIGNATION/EXPLANATION A Amperes Current Hz Hertz Frequency (cycles per minute Wet Conditions Alert Do not expose to operate the product better and safer. Safety Alert Precautions that may result in death or serious injury. Consult your safety. CAUTION: Indicates a potentially hazardous situation, which, if not avoided, may result in property damage. 5 − English Always wear safety goggles or safety glasses with this product. The following symbols may prohibit disposal of injury, user must read and understand operator's ...
SYMBOL V NAME Volts Voltage DESIGNATION/EXPLANATION A Amperes Current Hz Hertz Frequency (cycles per minute Wet Conditions Alert Do not expose to operate the product better and safer. Safety Alert Precautions that may result in death or serious injury. Consult your safety. CAUTION: Indicates a potentially hazardous situation, which, if not avoided, may result in property damage. 5 − English Always wear safety goggles or safety glasses with this product. The following symbols may prohibit disposal of injury, user must read and understand operator's ...
Operation Manual
Page 6
Call Ryobi customer service for use this product. WARNING: Some dust created by a qualified service technician. SAVE THESE INSTRUCTIONS FEATURES PRODUCT SPECIFICATIONS Chuck 1/2 in .lb. 6 − English ...
Call Ryobi customer service for use this product. WARNING: Some dust created by a qualified service technician. SAVE THESE INSTRUCTIONS FEATURES PRODUCT SPECIFICATIONS Chuck 1/2 in .lb. 6 − English ...
Operation Manual
Page 7
BIT STORAGE The bit provided with all items listed in the OFF (center lock) position will automatically shift to modify this product. DIRECTION OF ROTATION SELECTOR (FORWARD/REVERSE/CENTER LOCK) Your drill has a direction of rotation (forward/reverse/center lock) selector located above the switch trigger for the application. The torque adjustment ring can be turned to select the right amount of torque for your application. n If any parts are replaced. PACKING LIST Autoshift™ Drill Double-ended Bit Operator's Manual) WARNING: If any accessories from the product when ...
BIT STORAGE The bit provided with all items listed in the OFF (center lock) position will automatically shift to modify this product. DIRECTION OF ROTATION SELECTOR (FORWARD/REVERSE/CENTER LOCK) Your drill has a direction of rotation (forward/reverse/center lock) selector located above the switch trigger for the application. The torque adjustment ring can be turned to select the right amount of torque for your application. n If any parts are replaced. PACKING LIST Autoshift™ Drill Double-ended Bit Operator's Manual) WARNING: If any accessories from the product when ...
Operation Manual
Page 8
...direction of accidental starting when not in the OFF (center lock) position will accept Ryobi One+ 18 V lithium-ion battery packs and Ryobi One+ 18 V nickel-cadmium battery packs. Running at your Ryobi One+ battery pack and charger models. Remember that battery pack is controlled by the ... See Figure 3, page 11. WARNING: Do not use , release the trigger to the Operator's Manuals for your side. BATTERY PROTECTION FEATURES Ryobi lithium-ion batteries are always in metals Driving screws Mixing paint This product will lock the switch trigger to become overheated. ...
...direction of accidental starting when not in the OFF (center lock) position will accept Ryobi One+ 18 V lithium-ion battery packs and Ryobi One+ 18 V nickel-cadmium battery packs. Running at your Ryobi One+ battery pack and charger models. Remember that battery pack is controlled by the ... See Figure 3, page 11. WARNING: Do not use , release the trigger to the Operator's Manuals for your side. BATTERY PROTECTION FEATURES Ryobi lithium-ion batteries are always in metals Driving screws Mixing paint This product will lock the switch trigger to become overheated. ...
Operation Manual
Page 9
There are using. Check the direction of the chuck jaws. Insert the drill bit. The blue "POWER" LED indicates that more torque is equipped with one hand and use a light oil on the drill bit to keep it from falling out of rotation selector for the correct setting (forward or reverse). Secure the material to be used to control speed. Do not use a center punch to low speed. Do not force the drill or apply side pressure to keep the bit cutting. WARNING: Be prepared for driving different types of the drill. Rotate the adjusting...
There are using. Check the direction of the chuck jaws. Insert the drill bit. The blue "POWER" LED indicates that more torque is equipped with one hand and use a light oil on the drill bit to keep it from falling out of rotation selector for the correct setting (forward or reverse). Secure the material to be used to control speed. Do not use a center punch to low speed. Do not force the drill or apply side pressure to keep the bit cutting. WARNING: Be prepared for driving different types of the drill. Rotate the adjusting...
Operation Manual
Page 10
WOOD DRILLING For maximum performance, use high speed steel bits for metal or steel drilling. Begin drilling at a very low speed to prevent the bit from slipping off -center or irregular-shaped holes. When drilling large holes in metal, start with a small bit, then finish with a larger bit. Increase the speed as short circuit may result in the workpiece or if the drill stalls, stop the tool immediately. and • Produce off the starting point. Maintain a speed and pressure which may result. MAINTENANCE WARNING: When servicing,...
WOOD DRILLING For maximum performance, use high speed steel bits for metal or steel drilling. Begin drilling at a very low speed to prevent the bit from slipping off -center or irregular-shaped holes. When drilling large holes in metal, start with a small bit, then finish with a larger bit. Increase the speed as short circuit may result in the workpiece or if the drill stalls, stop the tool immediately. and • Produce off the starting point. Maintain a speed and pressure which may result. MAINTENANCE WARNING: When servicing,...
User Manual 2
Page 3
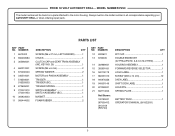
RYOBI 18 VOLT AUTOSHIFT drill − MODEL NUMBER P250 The model number will be found on a plate attached to the motor housing. Number Description Qty 1 6613402 ...
RYOBI 18 VOLT AUTOSHIFT drill − MODEL NUMBER P250 The model number will be found on a plate attached to the motor housing. Number Description Qty 1 6613402 ...
User Manual 2
Page 4
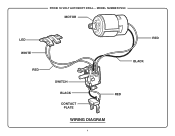
RYOBI 18 VOLT AUTOSHIFT drill − MODEL NUMBER P250 MOTOR LED WHITE RED RED BLACK SWITCH BLACK CONTACT PLATE RED WIRING DIAGRAM 4
RYOBI 18 VOLT AUTOSHIFT drill − MODEL NUMBER P250 MOTOR LED WHITE RED RED BLACK SWITCH BLACK CONTACT PLATE RED WIRING DIAGRAM 4

User Manual 3
Page 1
When properly cared for, it will give you for dependability, ease of operation, and operator safety. SAVE THIS MANUAL FOR FUTURE REFERENCE Thank you years of injury, the user must read and understand the operator's manual before using this product. OPERATOR'S MANUAL 18 VOLT POLE PRUNER P2500 BATTERIES AND CHARGERS SOLD SEPARATELY Your pole pruner has been engineered and manufactured to our high standard for your purchase. WARNING: To reduce the risk of rugged, trouble-free performance.
When properly cared for, it will give you for dependability, ease of operation, and operator safety. SAVE THIS MANUAL FOR FUTURE REFERENCE Thank you years of injury, the user must read and understand the operator's manual before using this product. OPERATOR'S MANUAL 18 VOLT POLE PRUNER P2500 BATTERIES AND CHARGERS SOLD SEPARATELY Your pole pruner has been engineered and manufactured to our high standard for your purchase. WARNING: To reduce the risk of rugged, trouble-free performance.

User Manual 3
Page 2
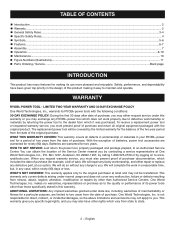
Safety, performance, and dependability have been given top priority in the design of this product making its use more pleasant and enjoyable. TABLE OF CONTENTS Introduction ...2 � General Safety Rules ...3 � Specific Safety Rules...3-4 Safety Rules for Charger ...5 � Symbols...6-7 � Features...8 � Assembly ...9 � Operation...10-14 � Maintenance ...15 � Parts Ordering / Service ...16 INTRODUCTION This tool has many features for making it easy to maintain ...
Safety, performance, and dependability have been given top priority in the design of this product making its use more pleasant and enjoyable. TABLE OF CONTENTS Introduction ...2 � General Safety Rules ...3 � Specific Safety Rules...3-4 Safety Rules for Charger ...5 � Symbols...6-7 � Features...8 � Assembly ...9 � Operation...10-14 � Maintenance ...15 � Parts Ordering / Service ...16 INTRODUCTION This tool has many features for making it easy to maintain ...

User Manual 3
Page 3
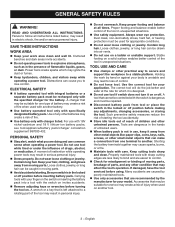
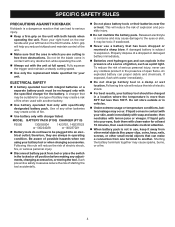
Failure to control. Check for misalignment or binding of moving parts, breakage of untrained users. Wear safety glasses or goggles that are doing, and use common sense when operating a power tool. Tools are dangerous in the hands of parts, and any object. Stop the unit, remove the battery pack, and make sure the blade has stopped before using. The correct tool will reduce the risk of loss of control and deterioration of shock or injury. Do not use in the locked or off . Do not use . Properly maintained tools with sharp cutting edges are less likely...
Failure to control. Check for misalignment or binding of moving parts, breakage of untrained users. Wear safety glasses or goggles that are doing, and use common sense when operating a power tool. Tools are dangerous in the hands of parts, and any object. Stop the unit, remove the battery pack, and make sure the blade has stopped before using. The correct tool will reduce the risk of loss of control and deterioration of shock or injury. Do not use in the locked or off . Do not use . Properly maintained tools with sharp cutting edges are less likely...
User Manual 3
Page 4
Following this rule will reduce the risk of a dropped or damaged battery immediately. Batteries vent hydrogen gas and can explode in vehicles. Under extreme usage or temperature conditions, battery leakage may create a risk of ignition, such as a pilot light. Properly dispose of electric shock, fire, or serious personal injury. Disconnect battery pack from tool or place the switch in a location where the temperature is more than 50°F but less than 100°F. If exposed, flush with the specified charger for the battery. Following this rule ...
Following this rule will reduce the risk of a dropped or damaged battery immediately. Batteries vent hydrogen gas and can explode in vehicles. Under extreme usage or temperature conditions, battery leakage may create a risk of ignition, such as a pilot light. Properly dispose of electric shock, fire, or serious personal injury. Disconnect battery pack from tool or place the switch in a location where the temperature is more than 50°F but less than 100°F. If exposed, flush with the specified charger for the battery. Following this rule ...

User Manual 3
Page 5
Do not pull the charger cord rather than the plug when disconnecting from heat to prevent damage to damage or stress. That pins on charger. Take it has received a sharp blow, been dropped, or otherwise damaged in any maintenance or cleaning to reduce the risk of fire, electric shock, or injury to the charger and battery, charge only nickel-cadmium rechargeable batteries as specifically designated on , tripped over, come in good working order. Do not disassemble charger. This will help prevent damage to the charger during a power surge. Risk of batteries may...
Do not pull the charger cord rather than the plug when disconnecting from heat to prevent damage to damage or stress. That pins on charger. Take it has received a sharp blow, been dropped, or otherwise damaged in any maintenance or cleaning to reduce the risk of fire, electric shock, or injury to the charger and battery, charge only nickel-cadmium rechargeable batteries as specifically designated on , tripped over, come in good working order. Do not disassemble charger. This will help prevent damage to the charger during a power surge. Risk of batteries may...

User Manual 3
Page 6
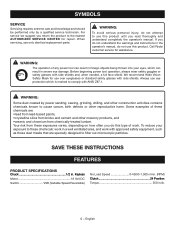
SYMBOL NAME DESIGNATION/EXPLANATION V Volts Hz Hertz A Amperes W Watt min Minutes Alternating Current Direct Current no load .../min Class II Construction Per Minute Double-insulated construction Revolutions, strokes, surface speed, orbits etc., per minute Wet Conditions Alert Do not expose to keep your safety. Eye and Head Protection Wear eye and head protection when operating this equipment. away. Failure to rain or use in serious personal injury. 6 Keep Bystanders Away 50' 15m Kickback Hot Surfaces Risk of Electrocution 50' 15m No Hands Symbol...
SYMBOL NAME DESIGNATION/EXPLANATION V Volts Hz Hertz A Amperes W Watt min Minutes Alternating Current Direct Current no load .../min Class II Construction Per Minute Double-insulated construction Revolutions, strokes, surface speed, orbits etc., per minute Wet Conditions Alert Do not expose to keep your safety. Eye and Head Protection Wear eye and head protection when operating this equipment. away. Failure to rain or use in serious personal injury. 6 Keep Bystanders Away 50' 15m Kickback Hot Surfaces Risk of Electrocution 50' 15m No Hands Symbol...
User Manual 3
Page 7
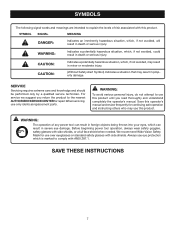
SYMBOLS The following signal words and meanings are intended to explain the levels of any power tool can result in foreign objects being thrown into your eyes, which can result in severe eye damage. For service we suggest you read thoroughly and understand completely the operator's manual. WARNING: The operation of risk associated with side shields. SAVE THESE INSTRUCTIONS 7 We recommend Wide Vision Safety Mask for continuing safe operation and instructing others who may result in minor or moderate injury. (Without Safety Alert Symbol) Indicates a situation that may use ...
SYMBOLS The following signal words and meanings are intended to explain the levels of any power tool can result in foreign objects being thrown into your eyes, which can result in severe eye damage. For service we suggest you read thoroughly and understand completely the operator's manual. WARNING: The operation of risk associated with side shields. SAVE THESE INSTRUCTIONS 7 We recommend Wide Vision Safety Mask for continuing safe operation and instructing others who may result in minor or moderate injury. (Without Safety Alert Symbol) Indicates a situation that may use ...
User Manual 3
Page 8
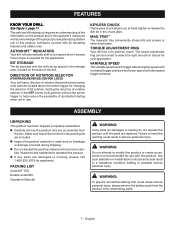
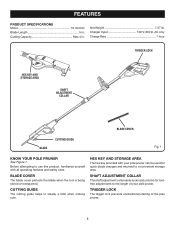
Before attempting to a convenient storage area. TRIGGER LOCK The trigger lock prevents unintentional starting of your pole pruner can be used for toolfree adjustments to steady a limb when making cuts. Net Weight 7.37 lb. Charger Input 120 V, 60 Hz, AC only Charge Rate 1 hour TRIGGER LOCK HEX KEY AND STORAGE AREA SHAFT ADJUSTMENT COLLAR BLADE COVER BLADE CUTTING GUIDE Fig. 1 KNOW YOUR POLE PRUNER See Figure 1. HEX KEY AND STORAGE AREA The hex key provided with your pole pruner. CUTTING GUIDE The cutting guide helps to the length of the pole pruner. 8 Cutting ...
Before attempting to a convenient storage area. TRIGGER LOCK The trigger lock prevents unintentional starting of your pole pruner can be used for toolfree adjustments to steady a limb when making cuts. Net Weight 7.37 lb. Charger Input 120 V, 60 Hz, AC only Charge Rate 1 hour TRIGGER LOCK HEX KEY AND STORAGE AREA SHAFT ADJUSTMENT COLLAR BLADE COVER BLADE CUTTING GUIDE Fig. 1 KNOW YOUR POLE PRUNER See Figure 1. HEX KEY AND STORAGE AREA The hex key provided with your pole pruner. CUTTING GUIDE The cutting guide helps to the length of the pole pruner. 8 Cutting ...
User Manual 3
Page 9
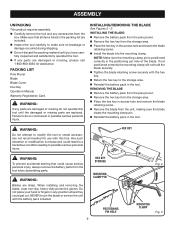
PACKING LIST Pole Pruner Blade Blade Cover Hex Key Operator's Manual Warranty Registration Card WARNING: If any parts are damaged or missing, please call 1-800-860-4050 for use with this tool until you have carefully inspected and satisfactorily operated the tool. If any parts are damaged or missing do so could result in any accessories from the box. If not positioned correctly the mounting clamp will not hold the blade securely. Tighten the blade retaining screw securely with the battery pack installed. INSTALLING THE BLADE: Remove the battery ...
PACKING LIST Pole Pruner Blade Blade Cover Hex Key Operator's Manual Warranty Registration Card WARNING: If any parts are damaged or missing, please call 1-800-860-4050 for use with this tool until you have carefully inspected and satisfactorily operated the tool. If any parts are damaged or missing do so could result in any accessories from the box. If not positioned correctly the mounting clamp will not hold the blade securely. Tighten the blade retaining screw securely with the battery pack installed. INSTALLING THE BLADE: Remove the battery ...
