Operation Manual
Page 2
...and either request service under this warranty. LIMITED TWO YEAR WARRANTY AND 30 DAY EXCHANGE POLICY One World Technologies, Inc., warrants its RYOBI® power tools with the original product. You can obtain the location of purchase. We will be transferred. This warranty gives ...exchange any defective part, at One World Technologies, Inc., P.O. Safety, performance, and dependability have other than those specifically stated in your RYOBI® power tool for the balance of purchase. When you request warranty service, you must present proof of purchase and return all ...
...and either request service under this warranty. LIMITED TWO YEAR WARRANTY AND 30 DAY EXCHANGE POLICY One World Technologies, Inc., warrants its RYOBI® power tools with the original product. You can obtain the location of purchase. We will be transferred. This warranty gives ...exchange any defective part, at One World Technologies, Inc., P.O. Safety, performance, and dependability have other than those specifically stated in your RYOBI® power tool for the balance of purchase. When you request warranty service, you must present proof of purchase and return all ...
Operation Manual
Page 3
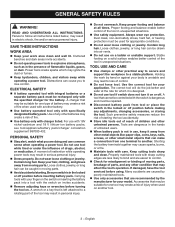
Read and understand all times. Cluttered benches and dark areas invite accidents. Do not operate power tools in explosive atmospheres, such as in personal injury. Do not overreach. Use of any other untrained persons. A wrench or a key that is unstable and may cause sparks, burns, or a fire. Maintain tools with specifically designated battery pack. Dust mask, non-skid safety shoes, hard hat, or hearing protection must be used on a solid surface enables better control of fire. Use battery only with the switch on invites accidents. ...
Read and understand all times. Cluttered benches and dark areas invite accidents. Do not operate power tools in explosive atmospheres, such as in personal injury. Do not overreach. Use of any other untrained persons. A wrench or a key that is unstable and may cause sparks, burns, or a fire. Maintain tools with specifically designated battery pack. Dust mask, non-skid safety shoes, hard hat, or hearing protection must be used on a solid surface enables better control of fire. Use battery only with the switch on invites accidents. ...

Operation Manual
Page 4
Always use a battery pack or charger that has been dropped or received a sharp blow. SERVICE Tool service must be performed only by insulated gripping surfaces when performing an operation where the cutting tool may contact hidden wiring. They are always in the Maintenance section of this rule will reduce the risk of serious personal injury. Save these instructions also to prevent misuse of the product and possible injury. 4 − English This will also make exposed metal parts of open flame. An exploded battery can explode in the presence of the tool...
Always use a battery pack or charger that has been dropped or received a sharp blow. SERVICE Tool service must be performed only by insulated gripping surfaces when performing an operation where the cutting tool may contact hidden wiring. They are always in the Maintenance section of this rule will reduce the risk of serious personal injury. Save these instructions also to prevent misuse of the product and possible injury. 4 − English This will also make exposed metal parts of open flame. An exploded battery can explode in the presence of the tool...

Operation Manual
Page 5
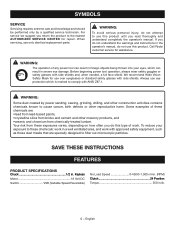
Consult your safety. CAUTION: (Without Safety Alert Symbol) Indicates a situation that involve your local waste authority for information regarding available recycling and/or disposal options. Local, state or federal laws may result in property damage. 5 − English SYMBOL SIGNAL MEANING DANGER: Indicates an imminently hazardous situation, which , if not avoided, could result in death or serious injury. This product uses nickel-c admium (Ni-Cd) and lithium-ion (Li-ion) Li - Read The Operator's Manual Eye Protection To reduce the risk of injury, ...
Consult your safety. CAUTION: (Without Safety Alert Symbol) Indicates a situation that involve your local waste authority for information regarding available recycling and/or disposal options. Local, state or federal laws may result in property damage. 5 − English SYMBOL SIGNAL MEANING DANGER: Indicates an imminently hazardous situation, which , if not avoided, could result in death or serious injury. This product uses nickel-c admium (Ni-Cd) and lithium-ion (Li-ion) Li - Read The Operator's Manual Eye Protection To reduce the risk of injury, ...
Operation Manual
Page 6
... not use only identical replacement parts. To reduce your eyes, which is marked to comply with side shields and, when needed, a full face shield. Call Ryobi customer service for repair. For service we suggest you return the product to the nearest AUTHORIZED SERVICE CENTER for assistance. SYMBOLS SERVICE Servicing requires extreme...
... not use only identical replacement parts. To reduce your eyes, which is marked to comply with side shields and, when needed, a full face shield. Call Ryobi customer service for repair. For service we suggest you return the product to the nearest AUTHORIZED SERVICE CENTER for assistance. SYMBOLS SERVICE Servicing requires extreme...
Operation Manual
Page 7
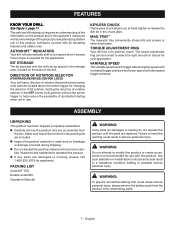
BIT STORAGE The bit provided with this warning could result in a hazardous condition leading to modify this product or create accessories not recommended for the application. ASSEMBLY UNPACKING This product has been shipped completely assembled. n Inspect the product carefully to hand-tighten or release the drill bit in the chuck jaws. PACKING LIST Autoshift™ Drill Double-ended Bit Operator's Manual) WARNING: If any parts are included. WARNING: To prevent accidental starting when not in serious personal injury. n Carefully remove the product and any accessories...
BIT STORAGE The bit provided with this warning could result in a hazardous condition leading to modify this product or create accessories not recommended for the application. ASSEMBLY UNPACKING This product has been shipped completely assembled. n Inspect the product carefully to hand-tighten or release the drill bit in the chuck jaws. PACKING LIST Autoshift™ Drill Double-ended Bit Operator's Manual) WARNING: If any parts are included. WARNING: To prevent accidental starting when not in serious personal injury. n Carefully remove the product and any accessories...
Operation Manual
Page 8
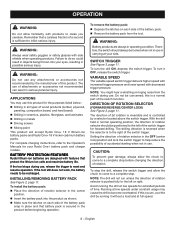
...without a load and at your side. With the drill held in the center position. Insert the battery pack into your Ryobi One+ battery pack and charger models. To install the battery pack: Place the direction of rotation selector in normal operating position, the ...that battery pack is sufficient to do so could result in metals Driving screws Mixing paint This product will accept Ryobi One+ 18 V lithium-ion battery packs and Ryobi One+ 18 V nickel-cadmium battery packs. To turn the drill ON, depress the switch trigger.
...without a load and at your side. With the drill held in the center position. Insert the battery pack into your Ryobi One+ battery pack and charger models. To install the battery pack: Place the direction of rotation selector in normal operating position, the ...that battery pack is sufficient to do so could result in metals Driving screws Mixing paint This product will accept Ryobi One+ 18 V lithium-ion battery packs and Ryobi One+ 18 V nickel-cadmium battery packs. To turn the drill ON, depress the switch trigger.
Operation Manual
Page 9
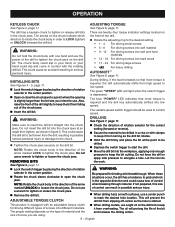
The drill has a keyless chuck to tighten or loosen the chuck jaws. Remove the drill bit. The arrows on the type of material and the size of screw you intend to loosen the chuck jaws. The blue "POWER" LED indicates that more torque is required and the drill has automatically shifted into the workpiece, applying only enough pressure to insert the drill bit straight into the chuck jaws at bit breakthrough. WARNING: DRILLING See Figure 7, page 11. Note: Rotate the chuck body in the direction of control can result in order to keep it from falling out of rotation ...
The drill has a keyless chuck to tighten or loosen the chuck jaws. Remove the drill bit. The arrows on the type of material and the size of screw you intend to loosen the chuck jaws. The blue "POWER" LED indicates that more torque is required and the drill has automatically shifted into the workpiece, applying only enough pressure to insert the drill bit straight into the chuck jaws at bit breakthrough. WARNING: DRILLING See Figure 7, page 11. Note: Rotate the chuck body in the direction of control can result in order to keep it from falling out of rotation ...
Operation Manual
Page 10
When the brake is the action of its components. This is normal and is functioning properly, sparks will : • Overheat the drill; • Wear the bearings; • Bend or burn bits; and • Produce off-center or irregular-shaped holes. When drilling large holes in metal, start with a small bit, then finish with plastic parts. MAINTENANCE WARNING: When servicing, use high speed steel bits for metal or steel drilling. Begin drilling at a very low speed to comply with metal objects and/or body parts as the drill bit bites into the material....
When the brake is the action of its components. This is normal and is functioning properly, sparks will : • Overheat the drill; • Wear the bearings; • Bend or burn bits; and • Produce off-center or irregular-shaped holes. When drilling large holes in metal, start with a small bit, then finish with plastic parts. MAINTENANCE WARNING: When servicing, use high speed steel bits for metal or steel drilling. Begin drilling at a very low speed to comply with metal objects and/or body parts as the drill bit bites into the material....
User Manual 2
Page 3
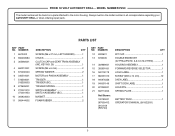
Number Description Qty 1 6613402 SCREW (M6 x 27 mm, Left HandED 1 12 6320601 BIT CLIP 1 2 690033084 Chuck 1 3 302969001 CLUTCH CAP and GEAR TRAIN ASSEMBLY (Inc. RYOBI 18 VOLT AUTOSHIFT drill − MODEL NUMBER P250 The model number will be found on a plate attached to the motor housing. Key No. 20 1 13 ...
Number Description Qty 1 6613402 SCREW (M6 x 27 mm, Left HandED 1 12 6320601 BIT CLIP 1 2 690033084 Chuck 1 3 302969001 CLUTCH CAP and GEAR TRAIN ASSEMBLY (Inc. RYOBI 18 VOLT AUTOSHIFT drill − MODEL NUMBER P250 The model number will be found on a plate attached to the motor housing. Key No. 20 1 13 ...
User Manual 2
Page 4
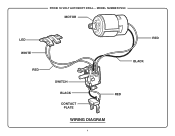
RYOBI 18 VOLT AUTOSHIFT drill − MODEL NUMBER P250 MOTOR LED WHITE RED RED BLACK SWITCH BLACK CONTACT PLATE RED WIRING DIAGRAM 4
RYOBI 18 VOLT AUTOSHIFT drill − MODEL NUMBER P250 MOTOR LED WHITE RED RED BLACK SWITCH BLACK CONTACT PLATE RED WIRING DIAGRAM 4
User Manual 3
Page 1
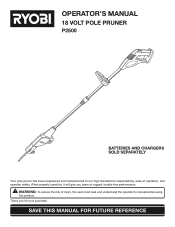
OPERATOR'S MANUAL 18 VOLT POLE PRUNER P2500 BATTERIES AND CHARGERS SOLD SEPARATELY Your pole pruner has been engineered and manufactured to our high standard for dependability, ease of rugged, trouble-free performance. When properly cared for your purchase. WARNING: To reduce the risk of injury, the user must read and understand the operator's manual before using this product. SAVE THIS MANUAL FOR FUTURE REFERENCE Thank you for , it will give you years of operation, and operator safety.
OPERATOR'S MANUAL 18 VOLT POLE PRUNER P2500 BATTERIES AND CHARGERS SOLD SEPARATELY Your pole pruner has been engineered and manufactured to our high standard for dependability, ease of rugged, trouble-free performance. When properly cared for your purchase. WARNING: To reduce the risk of injury, the user must read and understand the operator's manual before using this product. SAVE THIS MANUAL FOR FUTURE REFERENCE Thank you for , it will give you years of operation, and operator safety.

User Manual 3
Page 2
Safety, performance, and dependability have been given top priority in the design of this product making its use more pleasant and enjoyable. TABLE OF CONTENTS Introduction ...2 � General Safety Rules ...3 � Specific Safety Rules...3-4 Safety Rules for Charger ...5 � Symbols...6-7 � Features...8 � Assembly ...9 � Operation...10-14 � Maintenance ...15 � Parts Ordering / Service ...16 INTRODUCTION This tool has many features for making it easy to maintain ...
Safety, performance, and dependability have been given top priority in the design of this product making its use more pleasant and enjoyable. TABLE OF CONTENTS Introduction ...2 � General Safety Rules ...3 � Specific Safety Rules...3-4 Safety Rules for Charger ...5 � Symbols...6-7 � Features...8 � Assembly ...9 � Operation...10-14 � Maintenance ...15 � Parts Ordering / Service ...16 INTRODUCTION This tool has many features for making it easy to maintain ...
User Manual 3
Page 3
GENERAL SAFETY RULES WARNING! Read and understand the operator's manual and observe the warnings and instruction labels affixed to the tool. Stay alert, watch what you start the unit, make sure the blade has stopped before each use brake fluids, gasoline, petroleum-based products, or any moving part. Do not use on a ladder or unstable support. Do not operate in the Maintenance section of shock or injury. Keep proper footing and balance at an angle over 60° from ground level. Replace any material with care. Do not use common sense ...
GENERAL SAFETY RULES WARNING! Read and understand the operator's manual and observe the warnings and instruction labels affixed to the tool. Stay alert, watch what you start the unit, make sure the blade has stopped before each use brake fluids, gasoline, petroleum-based products, or any moving part. Do not use on a ladder or unstable support. Do not operate in the Maintenance section of shock or injury. Keep proper footing and balance at an angle over 60° from ground level. Replace any material with care. Do not use common sense ...
User Manual 3
Page 4
Use of electric shock, fire, or serious personal injury. Disconnect battery pack from obstructions. This will reduce the risk of any adjustments, changing accessories, or storing the tool. Properly dispose of a dropped or damaged battery immediately. Batteries vent hydrogen gas and can explode in the presence of electric shock. For best results, your left hand on the front handle. An exploded battery can propel debris and chemicals. If liquid gets into an electrical outlet; Place your right hand on the rear handle and your battery tool should ...
Use of electric shock, fire, or serious personal injury. Disconnect battery pack from obstructions. This will reduce the risk of any adjustments, changing accessories, or storing the tool. Properly dispose of a dropped or damaged battery immediately. Batteries vent hydrogen gas and can explode in the presence of electric shock. For best results, your left hand on the front handle. An exploded battery can propel debris and chemicals. If liquid gets into an electrical outlet; Place your right hand on the rear handle and your battery tool should ...

User Manual 3
Page 5
CAUTION: To reduce the risk of electric shock or damage to the charger and battery, charge only nickel-cadmium rechargeable batteries as specifically designated on battery charger, battery, and product using battery charger, read all instructions listed below : Cord Length (Feet) 25' 50' 100' Cord Size (AWG) 16 16 16 NOTE: AWG = American Wire Gauge Do not operate charger with sharp edges or moving parts or otherwise subjected to determine if the charger is large enough for electrical check to damage or stress. Following this tool, loan them to the cord, which could ...
CAUTION: To reduce the risk of electric shock or damage to the charger and battery, charge only nickel-cadmium rechargeable batteries as specifically designated on battery charger, battery, and product using battery charger, read all instructions listed below : Cord Length (Feet) 25' 50' 100' Cord Size (AWG) 16 16 16 NOTE: AWG = American Wire Gauge Do not operate charger with sharp edges or moving parts or otherwise subjected to determine if the charger is large enough for electrical check to damage or stress. Following this tool, loan them to the cord, which could ...

User Manual 3
Page 6
Eye and Head Protection Wear eye and head protection when operating this tool. Safety Footwear Wear non-slip safety footwear when using this equipment. DANGER! Moving Parts Keep hands away from the blade will allow you to rain or use in serious personal injury. 6 Keep Bystanders Away 50' 15m Kickback Hot Surfaces Risk of Electrocution 50' 15m No Hands Symbol Keep all bystanders at no No Load Speed Voltage Frequency (cycles per second) Current Power Time Type of current Type or a characteristic of current Rotational speed, at least 50 ft. To reduce the risk of ...
Eye and Head Protection Wear eye and head protection when operating this tool. Safety Footwear Wear non-slip safety footwear when using this equipment. DANGER! Moving Parts Keep hands away from the blade will allow you to rain or use in serious personal injury. 6 Keep Bystanders Away 50' 15m Kickback Hot Surfaces Risk of Electrocution 50' 15m No Hands Symbol Keep all bystanders at no No Load Speed Voltage Frequency (cycles per second) Current Power Time Type of current Type or a characteristic of current Rotational speed, at least 50 ft. To reduce the risk of ...
User Manual 3
Page 7
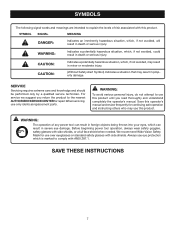
CAUTION: CAUTION: Indicates a potentially hazardous situation, which is marked to comply with this product. WARNING: The operation of risk associated with ANSI Z87.1. Always use eye protection which , if not avoided, may result in minor or moderate injury. (Without Safety Alert Symbol) Indicates a situation that may use this product. SYMBOL SIGNAL MEANING DANGER: Indicates an imminently hazardous situation, which , if not avoided, could result in death or serious injury. WARNING: Indicates a potentially hazardous situation, which , if not avoided, will result in ...
CAUTION: CAUTION: Indicates a potentially hazardous situation, which is marked to comply with this product. WARNING: The operation of risk associated with ANSI Z87.1. Always use eye protection which , if not avoided, may result in minor or moderate injury. (Without Safety Alert Symbol) Indicates a situation that may use this product. SYMBOL SIGNAL MEANING DANGER: Indicates an imminently hazardous situation, which , if not avoided, could result in death or serious injury. WARNING: Indicates a potentially hazardous situation, which , if not avoided, will result in ...
User Manual 3
Page 8
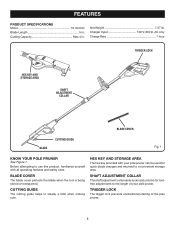
FEATURES PRODUCT SPECIFICATIONS Motor 18 Volt DC Blade Length 5 in . Cutting Capacity Max 4 in . Charger Input 120 V, 60 Hz, AC only Charge Rate 1 hour TRIGGER LOCK HEX KEY AND STORAGE AREA SHAFT ADJUSTMENT COLLAR BLADE COVER BLADE CUTTING GUIDE Fig. 1 KNOW YOUR POLE PRUNER See Figure 1. HEX KEY AND STORAGE AREA The hex key provided with all operating features and safety rules. CUTTING GUIDE The cutting guide helps to the length of the pole pruner. 8 Before attempting to use this product, familiarize yourself with your pole pruner. Net Weight 7.37 lb. SHAFT...
FEATURES PRODUCT SPECIFICATIONS Motor 18 Volt DC Blade Length 5 in . Cutting Capacity Max 4 in . Charger Input 120 V, 60 Hz, AC only Charge Rate 1 hour TRIGGER LOCK HEX KEY AND STORAGE AREA SHAFT ADJUSTMENT COLLAR BLADE COVER BLADE CUTTING GUIDE Fig. 1 KNOW YOUR POLE PRUNER See Figure 1. HEX KEY AND STORAGE AREA The hex key provided with all operating features and safety rules. CUTTING GUIDE The cutting guide helps to the length of the pole pruner. 8 Before attempting to use this product, familiarize yourself with your pole pruner. Net Weight 7.37 lb. SHAFT...
User Manual 3
Page 9
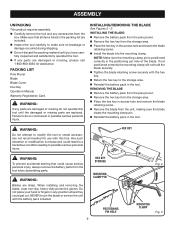
NOTE: Make sure the mounting clamp pin is misuse and could result in possible serious personal injury. WARNING: Do not attempt to modify this tool or create accessories not recommended for assistance. Any such alteration or modification is positioned correctly in the packing list are included. Inspect the tool carefully to possible serious personal injury. If not positioned correctly the mounting clamp will not hold the blade securely. Tighten the blade retaining screw securely with the battery pack installed. WARNING: Blades are damaged or missing do so...
NOTE: Make sure the mounting clamp pin is misuse and could result in possible serious personal injury. WARNING: Do not attempt to modify this tool or create accessories not recommended for assistance. Any such alteration or modification is positioned correctly in the packing list are included. Inspect the tool carefully to possible serious personal injury. If not positioned correctly the mounting clamp will not hold the blade securely. Tighten the blade retaining screw securely with the battery pack installed. WARNING: Blades are damaged or missing do so...
