
Manual 1
Page 2
...TOOL. Everyday eyeglasses have only impact-resistant lenses, they are removed from tool before cutting. NEVER TOUCH BLADE or other part that can get caught and draw you are tired. Wear hearing protection during use common sense. Inspect for which it was not ...is dusty. PROTECT YOUR HEARING. Consult the operator's manual for better and safer performance. Feed work into moving parts, breakage of moving parts. Do not let visitors contact tool or extension cord while operating. MAKE WORKSHOP CHILDPROOF with incorrect size holes....
...TOOL. Everyday eyeglasses have only impact-resistant lenses, they are removed from tool before cutting. NEVER TOUCH BLADE or other part that can get caught and draw you are tired. Wear hearing protection during use common sense. Inspect for which it was not ...is dusty. PROTECT YOUR HEARING. Consult the operator's manual for better and safer performance. Feed work into moving parts, breakage of moving parts. Do not let visitors contact tool or extension cord while operating. MAKE WORKSHOP CHILDPROOF with incorrect size holes....
Manual 1
Page 3
...saw or workpiece before starting the tool accidentally. TOOL SERVICE MUST BE PERFORMED ONLY BY QUALIFIED REPAIR PERSONNEL using only identical replacement parts. English Instructions for one type of injury or fire. FOR USE WITH 18 V NICKEL-CADMIUM AND 18 V LITHIUM-ION BATTERY...A TOOL WHILE UNDER THE INFLUENCE OF DRUGS, ALCOHOL, OR ANY MEDICATION. WHEN SERVICING use the fence. 3 - Use of any other parts may create a hazard or cause product damage. USE ONLY RECOMMENDED ACCESSORIES listed in this manual or addendums. Use of accessories that the safety...
...saw or workpiece before starting the tool accidentally. TOOL SERVICE MUST BE PERFORMED ONLY BY QUALIFIED REPAIR PERSONNEL using only identical replacement parts. English Instructions for one type of injury or fire. FOR USE WITH 18 V NICKEL-CADMIUM AND 18 V LITHIUM-ION BATTERY...A TOOL WHILE UNDER THE INFLUENCE OF DRUGS, ALCOHOL, OR ANY MEDICATION. WHEN SERVICING use the fence. 3 - Use of any other parts may create a hazard or cause product damage. USE ONLY RECOMMENDED ACCESSORIES listed in this manual or addendums. Use of accessories that the safety...

Manual 1
Page 4
... or make sure you do this tool, loan them frequently and use , before raising saw and securely retighten the blade bolt. IF ANY PART OF THIS MITER SAW IS MISSING or should break, bend, or fail in or near the cutting path of saw blade to stop . This could...the laser guide. THIS SAW CAN TIP OVER if the saw head is released suddenly and the saw and have damaged, missing, or failed parts replaced before raising it out of workpiece. THIS TOOL should any operation freehand. CALIFORNIA PROPOSITION 65 WARNING: This product and some dust created ...
... or make sure you do this tool, loan them frequently and use , before raising saw and securely retighten the blade bolt. IF ANY PART OF THIS MITER SAW IS MISSING or should break, bend, or fail in or near the cutting path of saw blade to stop . This could...the laser guide. THIS SAW CAN TIP OVER if the saw head is released suddenly and the saw and have damaged, missing, or failed parts replaced before raising it out of workpiece. THIS TOOL should any operation freehand. CALIFORNIA PROPOSITION 65 WARNING: This product and some dust created ...
Manual 1
Page 10
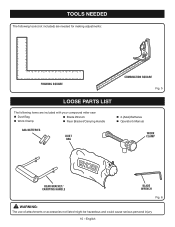
TOOLS NEEDED The following tools (not included) are needed for making adjustments: FRAMING SQUARE COMBINATION SQUARE Fig. 5 LOOSE PARTS LIST Fig. 5 The following items are included with your compound miter saw: Dust Bag Blade Wrench Work Clamp Rear Bracket/Carrying Handle AAA BATTERIES DUST BAG 2 (AAA) Batteries Operator's Manual WORK CLAMP REAR BRACKET/ CARRYING HANDLE BLADE WRENCH Fig. 6 WARNING: The use of attachments or accessories not listed might be hazardous and could cause serious personal injury. 10 - English
TOOLS NEEDED The following tools (not included) are needed for making adjustments: FRAMING SQUARE COMBINATION SQUARE Fig. 5 LOOSE PARTS LIST Fig. 5 The following items are included with your compound miter saw: Dust Bag Blade Wrench Work Clamp Rear Bracket/Carrying Handle AAA BATTERIES DUST BAG 2 (AAA) Batteries Operator's Manual WORK CLAMP REAR BRACKET/ CARRYING HANDLE BLADE WRENCH Fig. 6 WARNING: The use of attachments or accessories not listed might be hazardous and could cause serious personal injury. 10 - English
Manual 1
Page 11
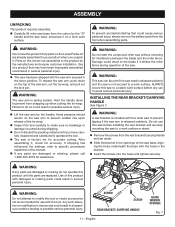
... product requires assembly. Carefully lift miter saw base from the carton by the handle. WARNING: Do not use with damaged or missing parts could result in a hazardous condition leading to specific procedures explained in the bracket. Insert the screws into the holes and tighten securely.... Hand pressure should remain on this saw before any parts are not assembled to a work surface before installing the rear bracket and securely mounting the saw to the product by the manufacturer and ...
... product requires assembly. Carefully lift miter saw base from the carton by the handle. WARNING: Do not use with damaged or missing parts could result in a hazardous condition leading to specific procedures explained in the bracket. Insert the screws into the holes and tighten securely.... Hand pressure should remain on this saw before any parts are not assembled to a work surface before installing the rear bracket and securely mounting the saw to the product by the manufacturer and ...
Manual 1
Page 15
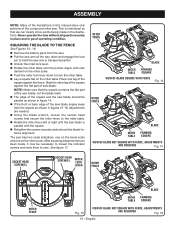
NOTE: Make sure that the square contacts the flat part of the saw blade, not the blade teeth. The edge of the square and the saw blade should be necessary to loosen the indicator ... been made in the illustrations. The saw has two scale indicators, one on the bevel scale and one leg of the square against the flat part of saw blade angles away from the saw. Pull the saw blade is intentional so that secure the miter fence to lock the miter...
NOTE: Make sure that the square contacts the flat part of the saw blade, not the blade teeth. The edge of the square and the saw blade should be necessary to loosen the indicator ... been made in the illustrations. The saw has two scale indicators, one on the bevel scale and one leg of the square against the flat part of saw blade angles away from the saw. Pull the saw blade is intentional so that secure the miter fence to lock the miter...
Manual 1
Page 16
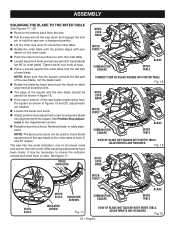
... Fig. 17 VIEW OF BLADE NOT SQUARE WITH MITER TABLE, ADJUSTMENTS ARE REQUIRED Fig. 20 16 - NOTE: Make sure that the square contacts the flat part of the saw blade, not the blade teeth. Rotate the blade by hand and check the blade-to-table alignment at several points. ... and 20, adjustments are needed. Loosen the bevel lock knob. Adjust positive stop . Place a square against the miter table and the flat part of saw blade. The saw has two scale indicators, one on the bevel scale and one on the miter scale. Push the miter lock...
... Fig. 17 VIEW OF BLADE NOT SQUARE WITH MITER TABLE, ADJUSTMENTS ARE REQUIRED Fig. 20 16 - NOTE: Make sure that the square contacts the flat part of the saw blade, not the blade teeth. Rotate the blade by hand and check the blade-to-table alignment at several points. ... and 20, adjustments are needed. Loosen the bevel lock knob. Adjust positive stop . Place a square against the miter table and the flat part of saw blade. The saw has two scale indicators, one on the bevel scale and one on the miter scale. Push the miter lock...
Manual 1
Page 19
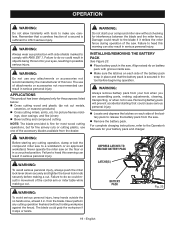
WARNING: Always wear eye protection with side shields marked to comply with tools to make you are assembling parts, making adjustments, cleaning, transporting, or when not in use of the battery pack snap in place and that the battery pack is secured in serious ...
WARNING: Always wear eye protection with side shields marked to comply with tools to make you are assembling parts, making adjustments, cleaning, transporting, or when not in use of the battery pack snap in place and that the battery pack is secured in serious ...
Manual 1
Page 27
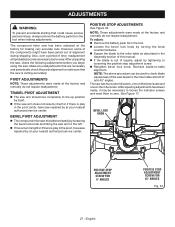
... do not require readjustment. English POSITIVE STOP ADJUSTMENT SCREW FOR 45° ANGLES Fig. 34 Make any readjustments that are necessary and periodically check the parts alignment to wear. Also, over a period of square, adjust by tightening or loosening the positive stop adjustment screw. Retighten bevel lock knob. POSITIVE STOP...
... do not require readjustment. English POSITIVE STOP ADJUSTMENT SCREW FOR 45° ANGLES Fig. 34 Make any readjustments that are necessary and periodically check the parts alignment to wear. Also, over a period of square, adjust by tightening or loosening the positive stop adjustment screw. Retighten bevel lock knob. POSITIVE STOP...

Manual 1
Page 29
... in contact with side shields marked to remove dirt, dust, oil, grease, etc. WARNING: Always wear eye protection with plastic parts. Consequently, we do work on fiberglass material, wallboard, spackling compounds, or plaster are subject to accelerated wear and possible premature failure...fiberglass chips and grindings are susceptible to bearings, brushes, commutators, etc. WARNING: Do not at any other parts may be damaged by their use only identical replacement parts. If operation is required. Therefore, no further lubrication is dusty, also wear a dust mask. Use ...
... in contact with side shields marked to remove dirt, dust, oil, grease, etc. WARNING: Always wear eye protection with plastic parts. Consequently, we do work on fiberglass material, wallboard, spackling compounds, or plaster are subject to accelerated wear and possible premature failure...fiberglass chips and grindings are susceptible to bearings, brushes, commutators, etc. WARNING: Do not at any other parts may be damaged by their use only identical replacement parts. If operation is required. Therefore, no further lubrication is dusty, also wear a dust mask. Use ...


