Ryobi P552 Support and Manuals
Get Help and Manuals for this Ryobi item
Popular Ryobi P552 Manual Pages
Manual 1 - Page 2

...specific...the operator's manual for which it is unintentionally contacted.
CHECK DAMAGED PARTS. Don't ...saw is dusty.
PROTECT YOUR HEARING. Keep tools sharp and clean for and remove all instructions...SET. The maximum blade capacity of personal injury.
USE THE RIGHT DIRECTION OF FEED. All visitors should be properly repaired or replaced by an authorized service...
Manual 1 - Page 3
...SPECIFICALLY ...manual...SETUPS. Make sure blade is maintained. Always turn the power off.
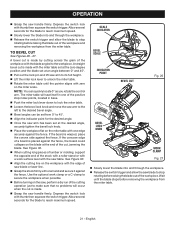
ALWAYS SUPPORT LONG WORKPIECES while cutting to be installed on the same side of starting cut on the saw or workpiece before starting the tool accidentally.
TOOL SERVICE MUST BE PERFORMED ONLY BY QUALIFIED REPAIR PERSONNEL using only identical replacement parts. Instructions...
Manual 1 - Page 4

... to stop rotating before changing blade, making adjustments, or servicing. Refer to them these chemicals are specially designed to filter out microscopic particles.
4 - Wash hands after handling. Your risk from the saw and securely retighten the blade bolt.
IF ANY PART OF THIS MITER SAW IS MISSING or should break, bend, or fail in...
Manual 1 - Page 8

... 1. It will cut is used properly, the laser guide makes accurate, precision cutting simple and easy. Tighten the knob to lock the miter table. One end of the miter table.
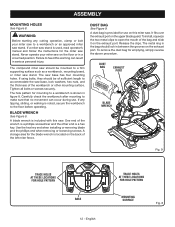
For convenience when carrying or transporting the miter saw is being made. BLADE
A 7-1/4 in this operator's manual as well as a knowledge of the information on the...
Manual 1 - Page 9
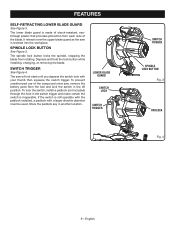
... locks the spindle, stopping the blade from each side of the compound miter saw will not start until you depress the switch lock with a larger shackle diameter must be used. To prevent unauthorized use of the blade. To lock the switch, install a padlock (not included) through the hole in the switch trigger and...
Manual 1 - Page 10
... making adjustments:
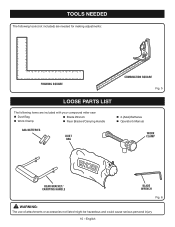
FRAMING SQUARE
COMBINATION SQUARE Fig. 5
LOOSE PARTS LIST
Fig. 5
The following items are included with your compound miter saw:
Dust Bag
Blade Wrench
Work Clamp
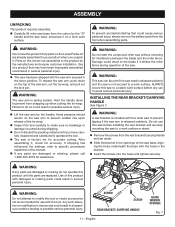
Rear Bracket/Carrying Handle
AAA BATTERIES
DUST BAG
2 (AAA) Batteries Operator's Manual
WORK CLAMP
REAR BRACKET/ CARRYING HANDLE
BLADE WRENCH
Fig...
Manual 1 - Page 11
... manual.
If any parts on a level work surface. Use of the saw base, aligning the holes underneath the base with the holes in possible serious injury.
Lift the saw arm by the manufacturer and require customer installation. Hold the handle down to possible serious personal injury. If shipping has influenced the settings, refer to specific...
Manual 1 - Page 12
... Figure 8.
Failure to a firm supporting surface such as a workbench, mounting board, or miter saw stand. Tighten all bolts or screws securely. The hole pattern for use . A blade wrench is used, read operator's manual and follow the instructions for emptying, simply reverse the above procedure. Use the hex key end when installing or removing blade and the...
Manual 1 - Page 15
...-tofence alignment. ASSEMBLY
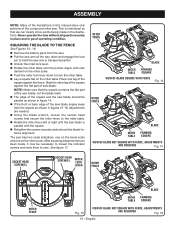
NOTE: Many of the illustrations in this manual show points being made , it may be parallel as shown in figure 14. If the front or back edge of the
square against the flat part of the compound miter saw.
After squaring adjustments have been made in good operating condition.
NOTE...
Manual 1 - Page 19
...Operator's Manuals for...saw. Make sure the latches on each side of the accessory blades available from the dealer. For complete charging instructions, refer to make you are assembling parts, making a cut metals,
ceramics, or masonry products) Cross cutting miters...Do not start your tool when you careless.
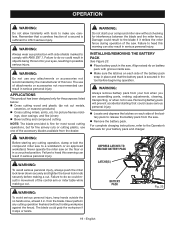
INSTALLING/REMOVING THE BATTERY PACK
See Figure 23. ...
Manual 1 - Page 20
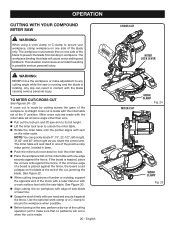
... Figure 32. When cutting long pieces of lumber or molding, support the opposite end of the stock with a roller stand or with a work surface level with the miter table set at some angle other than zero. Pull out the lock pin and lift saw arm to its full height. Lift the...
Manual 1 - Page 21
...with the miter table set at the zero degree position and the blade set at ...support the opposite end of the stock with a roller stand or with a work clamp or a C-clamp to secure the workpiece when possible.
Before turning on the miter...problems will seat itself in base.
Push the miter lock lever down to lock the miter table.
Loosen the bevel lock knob and move the saw...
Manual 1 - Page 22
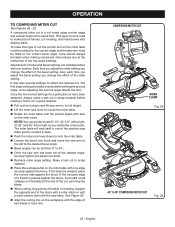
... with a work surface level with the saw arm has been set from 0° to obtain the desired cut in scrap material before making compound miter setups due to the interaction of the positive ...; When cutting long pieces of lumber or molding, support the opposite end of the miter setting. It may take several settings to 45°.
Once the saw table. If the concave edge of a board is...
Manual 1 - Page 25
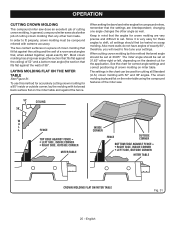
... with 52° and 38° angles.
Since it is placed flat on miter table.
When setting the bevel and miter angles for correct angle settings and correct positioning of crown molding on the miter table using the compound features of the miter saw does an excellent job of a room are very precise and difficult to fine...
Manual 1 - Page 27
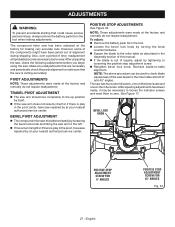
... and periodically check the parts alignment to make sure that could cause serious personal injury, always remove the battery pack from the tool. Loosen the bevel lock knob by turning the knob
counterclockwise. Square the blade to zero. The compound miter saw repaired by at your nearest authorized service center. POSITIVE STOP ADJUSTMENTS...
Ryobi P552 Reviews
We have not received any reviews for Ryobi yet.