
Manual 1
Page 2
... making it was purchased. TABLE OF CONTENTS Introduction...2 Warranty...2 General Power Tool Safety Warnings...3-4 Drill Safety Warnings...5 Symbols...6 Features...7 Assembly...8 Operation...8-10 Maintenance...11 Figure Numbers (Illustrations)...12-13 Parts Ordering / Service...Back page INTRODUCTION This tool has many features for direct, indirect, or incidental...
... making it was purchased. TABLE OF CONTENTS Introduction...2 Warranty...2 General Power Tool Safety Warnings...3-4 Drill Safety Warnings...5 Symbols...6 Features...7 Assembly...8 Operation...8-10 Maintenance...11 Figure Numbers (Illustrations)...12-13 Parts Ordering / Service...Back page INTRODUCTION This tool has many features for direct, indirect, or incidental...

Manual 1
Page 3
... starting. The term "power tool" in the warnings refers to follow the warnings and instructions may result in any adapter plugs with 18V nickel-cadmium and 18V lithium-ion battery packs, see tool/appliance/battery pack/charger correlation supplement 987000-432. Do not use the power tool if the switch does not turn it on and off -position before turning the power tool on invites accidents. Remove any adjusting key or wrench...
... starting. The term "power tool" in the warnings refers to follow the warnings and instructions may result in any adapter plugs with 18V nickel-cadmium and 18V lithium-ion battery packs, see tool/appliance/battery pack/charger correlation supplement 987000-432. Do not use the power tool if the switch does not turn it on and off -position before turning the power tool on invites accidents. Remove any adjusting key or wrench...
Manual 1
Page 4
.... Follow instructions in the hands of untrained users. Maintain power tools. English Check for operations different from those intended could result in use, keep it away from other metal objects, like paper clips, coins, keys, nails, screws or other small metal objects, that may affect the power tool's operation. BATTERY TOOL USE AND CARE Recharge only with the charger specified by a qualified repair person using only identical replacement parts...
.... Follow instructions in the hands of untrained users. Maintain power tools. English Check for operations different from those intended could result in use, keep it away from other metal objects, like paper clips, coins, keys, nails, screws or other small metal objects, that may affect the power tool's operation. BATTERY TOOL USE AND CARE Recharge only with the charger specified by a qualified repair person using only identical replacement parts...
Manual 1
Page 5
...; Hold power tool by power sanding, sawing, grinding, drilling, and other reproductive harm. English Following this type of electric shock, fire, or serious personal injury. Do not place battery tools or their batteries near fire or heat. If you do this rule will reduce the risk of work in a well-ventilated area and with approved safety equipment, such as a pilot light. Your risk...
...; Hold power tool by power sanding, sawing, grinding, drilling, and other reproductive harm. English Following this type of electric shock, fire, or serious personal injury. Do not place battery tools or their batteries near fire or heat. If you do this rule will reduce the risk of work in a well-ventilated area and with approved safety equipment, such as a pilot light. Your risk...
Manual 1
Page 6
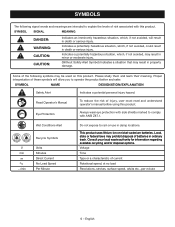
... Safety Alert Symbol) Indicates a situation that may be used on this product. Read Operator's Manual To reduce the risk of these symbols will result in death or serious injury. Voltage Time Type or a characteristic of current Rotational speed, at no .../min Recycle Symbols Volts Minutes Direct Current No Load Speed Per Minute Do not expose to explain the levels of batteries...
... Safety Alert Symbol) Indicates a situation that may be used on this product. Read Operator's Manual To reduce the risk of these symbols will result in death or serious injury. Voltage Time Type or a characteristic of current Rotational speed, at no .../min Recycle Symbols Volts Minutes Direct Current No Load Speed Per Minute Do not expose to explain the levels of batteries...
Manual 1
Page 7
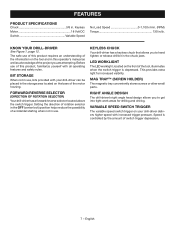
... and safety rules. English FORWARD/REVERSE SELECTOR (DIRECTION OF ROTATION SELECTOR) Your drill-driver has a forward/reverse selector located above the switch trigger. Before use . Setting the direction of rotation selector in the OFF (center lock) position helps reduce the possibility of accidental starting when not in the chuck jaws. RIGHT ANGLE DESIGN The drill-driver's right angle head design allows you to hand tighten or release drill bit in use of this operator's manual...
... and safety rules. English FORWARD/REVERSE SELECTOR (DIRECTION OF ROTATION SELECTOR) Your drill-driver has a forward/reverse selector located above the switch trigger. Before use . Setting the direction of rotation selector in the OFF (center lock) position helps reduce the possibility of accidental starting when not in the chuck jaws. RIGHT ANGLE DESIGN The drill-driver's right angle head design allows you to hand tighten or release drill bit in use of this operator's manual...

Manual 1
Page 8
... personal injury, always remove the battery pack from the box. Use of attachments or accessories not recommended can result in serious personal injury. If the product stops during shipping. n Inspect the product carefully to do not operate this tool or create accessories not recommended for your eyes and other possible serious injuries. Right Angle Drill-Driver Double-ended Bits Operator's Manual WARNING: If any...
... personal injury, always remove the battery pack from the box. Use of attachments or accessories not recommended can result in serious personal injury. If the product stops during shipping. n Inspect the product carefully to do not operate this tool or create accessories not recommended for your eyes and other possible serious injuries. Right Angle Drill-Driver Double-ended Bits Operator's Manual WARNING: If any...
Manual 1
Page 9
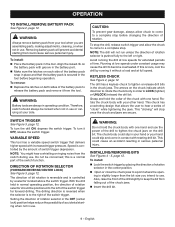
..." will stop before beginning operation. To turn it OFF, release the switch trigger. To turn the drill ON, depress the switch trigger. To install: Lock the switch trigger by a selector located above the switch trigger. Removing battery pack will not run unless the direction of rotation selector is controlled by running the drill at full speed. To remove: Depress the latches on the drill bit. To stop . Speed is pushed fully to tighten the chuck jaws...
..." will stop before beginning operation. To turn it OFF, release the switch trigger. To turn the drill ON, depress the switch trigger. To install: Lock the switch trigger by a selector located above the switch trigger. Removing battery pack will not run unless the direction of rotation selector is controlled by running the drill at full speed. To remove: Depress the latches on the drill bit. To stop . Speed is pushed fully to tighten the chuck jaws...

Manual 1
Page 10
... remove: Lock the switch trigger by placing the direction of the brake. and • Produce off the starting point. Also, lubricate the bit with clamps to keep the bit cutting. OPERATION WARNING: Make sure to insert the drill bit straight into the chuck jaws at an angle then tighten, as shown in figure 6. English Do not insert the drill bit into the chuck jaws. Let the tool do the work. When the switch trigger...
... remove: Lock the switch trigger by placing the direction of the brake. and • Produce off the starting point. Also, lubricate the bit with clamps to keep the bit cutting. OPERATION WARNING: Make sure to insert the drill bit straight into the chuck jaws at an angle then tighten, as shown in figure 6. English Do not insert the drill bit into the chuck jaws. Let the tool do the work. When the switch trigger...
Manual 1
Page 11
... the spindle and develop a wobble. Lithium-ion and nickel-cadmium batteries must be damaged by placing the direction of its components. Failure to remove dirt, dust, oil, grease, etc. NOTE: The screw has left hand threads. Periodically check the chuck screw for easy removal. Open the chuck jaws and remove the hex key. NOTE: The chuck screw has left hand threads. Insert the hex key in a counterclockwise direction. MAINTENANCE WARNING: When servicing, use .
... the spindle and develop a wobble. Lithium-ion and nickel-cadmium batteries must be damaged by placing the direction of its components. Failure to remove dirt, dust, oil, grease, etc. NOTE: The screw has left hand threads. Periodically check the chuck screw for easy removal. Open the chuck jaws and remove the hex key. NOTE: The chuck screw has left hand threads. Insert the hex key in a counterclockwise direction. MAINTENANCE WARNING: When servicing, use .
Manual 2
Page 3
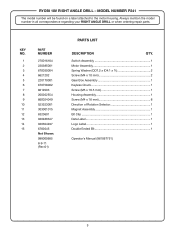
MODEL NUMBER P241 The model number will be found on a label attached to the motor housing. Switch Assembly 1 Motor Assembly 1 Spring Washer (OD7.2 x ID4.1 x 1t 2 Screw (M4 x 10 mm 2 Gear Box Assembly 1 Keyless Chuck 1 Screw (M5 x 18.5 mm 1 Housing Assembly 1 Screw (M4 x 16 mm 8 Direction of Rotation Selector 1 Magnet Assembly 1 Bit Clip 1 Data Label 1 Logo Label 1 Double Ended Bit 1 Operator's Manual (961067751) 3 Always mention the model number in all correspondence regarding your RIGHT ANGLE DRILL or when ordering repair parts. RYOBI 18V RIGHT...
MODEL NUMBER P241 The model number will be found on a label attached to the motor housing. Switch Assembly 1 Motor Assembly 1 Spring Washer (OD7.2 x ID4.1 x 1t 2 Screw (M4 x 10 mm 2 Gear Box Assembly 1 Keyless Chuck 1 Screw (M5 x 18.5 mm 1 Housing Assembly 1 Screw (M4 x 16 mm 8 Direction of Rotation Selector 1 Magnet Assembly 1 Bit Clip 1 Data Label 1 Logo Label 1 Double Ended Bit 1 Operator's Manual (961067751) 3 Always mention the model number in all correspondence regarding your RIGHT ANGLE DRILL or when ordering repair parts. RYOBI 18V RIGHT...
Manual 2
Page 4
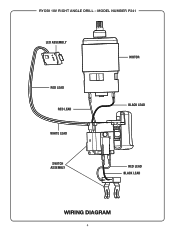
RYOBI 18V RIGHT ANGLE DRILL - MODEL NUMBER P241 LED ASSEMBLY RED LEAD RED LEAD WHITE LEAD SWITCH ASSEMBLY MOTOR BLACK LEAD RED LEAD BLACK LEAD WIRING DIAGRAM 4
RYOBI 18V RIGHT ANGLE DRILL - MODEL NUMBER P241 LED ASSEMBLY RED LEAD RED LEAD WHITE LEAD SWITCH ASSEMBLY MOTOR BLACK LEAD RED LEAD BLACK LEAD WIRING DIAGRAM 4


