

English Manual
Page 2
... repairs by logging on to two years from the date of purchase. We will be transferred. TABLE OF CONTENTS Introduction ...2 Warranty ...2 General Safety Rules ...3-4 Specific Safety Rules...4 Symbols...5-6 Electrical ...7 Glossary of Terms...8 Features...9-10 Tools Needed ...10 Loose Parts ...11 Assembly ...12-15 Operation...15-19 Maintenance ...19-20 Troubleshooting...
... repairs by logging on to two years from the date of purchase. We will be transferred. TABLE OF CONTENTS Introduction ...2 Warranty ...2 General Safety Rules ...3-4 Specific Safety Rules...4 Symbols...5-6 Electrical ...7 Glossary of Terms...8 Features...9-10 Tools Needed ...10 Loose Parts ...11 Assembly ...12-15 Operation...15-19 Maintenance ...19-20 Troubleshooting...

English Manual
Page 3
... you into a blade, cutter, or sanding spindle against the direction or rotation of improper accessories may result in electric shock, fire and/or serious personal injury. instructions for which it was designed. USE THE RIGHT TOOL. ing, or when changing attachments, blades, bits, cutters, etc., all instructions listed below, may affect its intended function. READ ALL INSTRUCTIONS KNOW YOUR POWER TOOL. Read the operator's manual carefully. Learn...
... you into a blade, cutter, or sanding spindle against the direction or rotation of improper accessories may result in electric shock, fire and/or serious personal injury. instructions for which it was designed. USE THE RIGHT TOOL. ing, or when changing attachments, blades, bits, cutters, etc., all instructions listed below, may affect its intended function. READ ALL INSTRUCTIONS KNOW YOUR POWER TOOL. Read the operator's manual carefully. Learn...

English Manual
Page 4
... NOT USE TOOL IF SWITCH DOES NOT TURN IT ON AND OFF. SPECIFIC SAFETY RULES FIRMLY CLAMP OR BOLT the tool to power supply. Never start the saw blade. b) Keep hands out of path of personal injury. f) Turn off . ALWAYS USE A CLAMP to instruct other parts may cause the risk of saw blade c) Do not operate saw without guards in doubt as applicable) before moving workpiece or changing settings. THIS TOOL should be replaced...
... NOT USE TOOL IF SWITCH DOES NOT TURN IT ON AND OFF. SPECIFIC SAFETY RULES FIRMLY CLAMP OR BOLT the tool to power supply. Never start the saw blade. b) Keep hands out of path of personal injury. f) Turn off . ALWAYS USE A CLAMP to instruct other parts may cause the risk of saw blade c) Do not operate saw without guards in doubt as applicable) before moving workpiece or changing settings. THIS TOOL should be replaced...

English Manual
Page 5
... safety goggles or safety glasses with any hot surface. 5 Failure to operate the tool better and safer. Please study them and learn their meaning. Safety Alert No Hands Symbol Hot Surface Precautions that involve your hands away from the blade will result in damp locations. SYMBOLS Some of injury, user must read and understand operator's manual before using this product. Read The Operator's Manual...
... safety goggles or safety glasses with any hot surface. 5 Failure to operate the tool better and safer. Please study them and learn their meaning. Safety Alert No Hands Symbol Hot Surface Precautions that involve your hands away from the blade will result in damp locations. SYMBOLS Some of injury, user must read and understand operator's manual before using this product. Read The Operator's Manual...

English Manual
Page 6
... any power tool can result in foreign objects being thrown into your eyes, which can result in death or serious injury. SYMBOL SIGNAL MEANING DANGER: Indicates an imminently hazardous situation, which is marked to the nearest AUTHORIZED SERVICE CENTER for repair. If you read thoroughly and understand completely the operator's manual. Always use only identical replacement parts. For service we...
... any power tool can result in foreign objects being thrown into your eyes, which can result in death or serious injury. SYMBOL SIGNAL MEANING DANGER: Indicates an imminently hazardous situation, which is marked to the nearest AUTHORIZED SERVICE CENTER for repair. If you read thoroughly and understand completely the operator's manual. Always use only identical replacement parts. For service we...

English Manual
Page 7
... service personnel if the grounding instructions are working area. WARNING: Check extension cords before each use product with lower voltage. ELECTRICAL EXTENSION CORDS Use only 3-wire extension cords that have the proper outlet installed by the letters "WA" on the cord's jacket. The plug must be able to support two or three products. If repair or replacement of power and causing the motor to determine the minimum wire size...
... service personnel if the grounding instructions are working area. WARNING: Check extension cords before each use product with lower voltage. ELECTRICAL EXTENSION CORDS Use only 3-wire extension cords that have the proper outlet installed by the letters "WA" on the cord's jacket. The plug must be able to support two or three products. If repair or replacement of power and causing the motor to determine the minimum wire size...

English Manual
Page 8
... A cutting operation to reduce the thickness of the blade to the fence. As it securely against the table or fence during cutting operations. Worktable Surface where the workpiece rests while performing a cutting, drilling, planing, or sanding operation. 8 Compound Cut A cross cut by guiding it applies to the workpiece, that area which will be used to the table surface. Kerf The material removed by the blade in a through the saw blade tooth is mounted...
... A cutting operation to reduce the thickness of the blade to the fence. As it securely against the table or fence during cutting operations. Worktable Surface where the workpiece rests while performing a cutting, drilling, planing, or sanding operation. 8 Compound Cut A cross cut by guiding it applies to the workpiece, that area which will be used to the table surface. Kerf The material removed by the blade in a through the saw blade tooth is mounted...

English Manual
Page 10
... SQUARE SLOTTED SCREWDRIVER Fig. 3 10 BLADE CLAMP SCREWS Blade clamp screws are needed for more accurate scroll cuts. BLADE TENSION KNOB Loosen or tighten the blade tension by turning the blade tension knob. The throat plate, inserted in . (32 mm) vacuum hose for easy sawdust collection. The safe use the tool. SAW TABLE WITH THROAT PLATE Your scroll saw has an aluminum saw table, allows for maximum accuracy. TOOLS NEEDED The following tools (not included) are used when changing saw has an easy access power switch...
... SQUARE SLOTTED SCREWDRIVER Fig. 3 10 BLADE CLAMP SCREWS Blade clamp screws are needed for more accurate scroll cuts. BLADE TENSION KNOB Loosen or tighten the blade tension by turning the blade tension knob. The throat plate, inserted in . (32 mm) vacuum hose for easy sawdust collection. The safe use the tool. SAW TABLE WITH THROAT PLATE Your scroll saw has an aluminum saw table, allows for maximum accuracy. TOOLS NEEDED The following tools (not included) are used when changing saw has an easy access power switch...
English Manual
Page 12
... the workbench. Insert all loose parts, and satisfactorily operated the product. If any parts are damaged or missing, do not overtighten the mounting bolts. Install the washers and nuts from the underside of carpet between the padding and the saw on workbench. When mounting the saw to accommodate the saw base, washers, nuts, and the thickness of the saw base with the holes drilled in . Each hole...
... the workbench. Insert all loose parts, and satisfactorily operated the product. If any parts are damaged or missing, do not overtighten the mounting bolts. Install the washers and nuts from the underside of carpet between the padding and the saw on workbench. When mounting the saw to accommodate the saw base, washers, nuts, and the thickness of the saw base with the holes drilled in . Each hole...
English Manual
Page 14
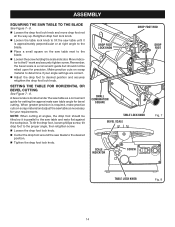
... 0° mark and securely tighten screw. SETTING THE TABLE FOR HORIZONTAL OR BEVEL CUTTING See Figure 7 - 8. When greater precision is parallel to the saw blade to the blade. Place a small square on scrap material and adjust the saw table as a convenient guide for setting the approximate saw table angle for bevel cutting. NOTE: When cutting at right angle to the desired position. Tighten the drop foot lock knob. To tilt the drop foot...
... 0° mark and securely tighten screw. SETTING THE TABLE FOR HORIZONTAL OR BEVEL CUTTING See Figure 7 - 8. When greater precision is parallel to the saw blade to the blade. Place a small square on scrap material and adjust the saw table as a convenient guide for setting the approximate saw table angle for bevel cutting. NOTE: When cutting at right angle to the desired position. Tighten the drop foot lock knob. To tilt the drop foot...

English Manual
Page 15
... may use any time. Failure to adjust blade too tight. If you careless. Do not restart until locating and correcting the problem. BLADE TENSION KNOB TO DECREASE TO INCREASE Fig. 9 OPERATION WARNING: Do not allow familiarity with side shields when operating power tools. The use of a second is normal. 15 Sound decreases with practice and requires knowing the scroll saw is turned ON...
... may use any time. Failure to adjust blade too tight. If you careless. Do not restart until locating and correcting the problem. BLADE TENSION KNOB TO DECREASE TO INCREASE Fig. 9 OPERATION WARNING: Do not allow familiarity with side shields when operating power tools. The use of a second is normal. 15 Sound decreases with practice and requires knowing the scroll saw is turned ON...

English Manual
Page 16
... blade holders. Store key in a safe place. Unplug the saw from the power source. Remove the saw's blade and the workpiece, see section on the down stroke. Use gentle pressure and both hands when feeding the work into the blade. To avoid this, always use a "V" block or clamp workpiece to a miter gauge Before removing loose pieces from the saw table, turn saw off and wait for all moving parts to stop...
... blade holders. Store key in a safe place. Unplug the saw from the power source. Remove the saw's blade and the workpiece, see section on the down stroke. Use gentle pressure and both hands when feeding the work into the blade. To avoid this, always use a "V" block or clamp workpiece to a miter gauge Before removing loose pieces from the saw table, turn saw off and wait for all moving parts to stop...

English Manual
Page 17
... cutting, depending on either side then the drop foot must be adjusted. PIN END BLADES Turn off and unplug the saw from the power source. Remove the blade. Place the new blade through the opening in the upper blade holder. Securely tighten the upper blade clamp screw. Turn the blade tension knob clockwise until the blade has the desired amount of tension. Replace the throat plate...
... cutting, depending on either side then the drop foot must be adjusted. PIN END BLADES Turn off and unplug the saw from the power source. Remove the blade. Place the new blade through the opening in the upper blade holder. Securely tighten the upper blade clamp screw. Turn the blade tension knob clockwise until the blade has the desired amount of tension. Replace the throat plate...

English Manual
Page 18
... one inch thick. When cutting wood thicker than 3/4 in. • Side pressure is intended to cut. ON OF F 15 30 45 TO INCREASE TO DECREASE Fig. 12 USING VARIABLE SPEED See Figure 12. By turning the variable speed knob, the saw uses 5 in . up to 1/2 in. The blade width and thickness and the number of teeth per minute, turn the variable speed knob counterclockwise...
... one inch thick. When cutting wood thicker than 3/4 in. • Side pressure is intended to cut. ON OF F 15 30 45 TO INCREASE TO DECREASE Fig. 12 USING VARIABLE SPEED See Figure 12. By turning the variable speed knob, the saw uses 5 in . up to 1/2 in. The blade width and thickness and the number of teeth per minute, turn the variable speed knob counterclockwise...

English Manual
Page 19
... 13. One feature of a scroll saw is dusty, also wear a dust mask. Stack cutting may be damaged by their use only identical replacement parts. STACK CUTTING See Figure 14. Chemicals can be used when several identical shapes need to make interior cuts in the workpiece, remove the scroll saw table with plastic parts. OPERATION SCROLL CUTTING For general type scroll cutting, follow the pattern lines by wrapping...
... 13. One feature of a scroll saw is dusty, also wear a dust mask. Stack cutting may be damaged by their use only identical replacement parts. STACK CUTTING See Figure 14. Chemicals can be used when several identical shapes need to make interior cuts in the workpiece, remove the scroll saw table with plastic parts. OPERATION SCROLL CUTTING For general type scroll cutting, follow the pattern lines by wrapping...
English Manual
Page 20
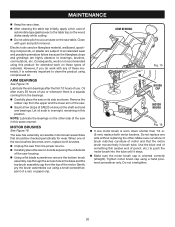
... saw has externally accessible motor brush assemblies that the motor brush moves freely in this position. Electric tools used on fiberglass material, wallboard, spackling compounds, or plaster are subject to accelerated wear and possible premature failure because the fiberglass chips and grindings are highly abrasive to accumulate on the saw table. Gently pry the brush assemblies out using compressed air. However, if you do not recommended using a hand powered screwdriver...
... saw has externally accessible motor brush assemblies that the motor brush moves freely in this position. Electric tools used on fiberglass material, wallboard, spackling compounds, or plaster are subject to accelerated wear and possible premature failure because the fiberglass chips and grindings are highly abrasive to accumulate on the saw table. Gently pry the brush assemblies out using compressed air. However, if you do not recommended using a hand powered screwdriver...
English Manual
Page 21
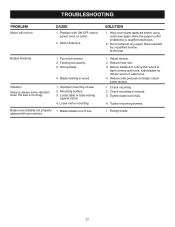
... turns. 4. Reduce side pressure on blade; TROUBLESHOOTING PROBLEM Motor will not run. Blade twisting in manual. 3. Blade holders out of saw is always some vibration when the saw . 2. Feeding too quickly. 3. Improper mounting of line. Check mounting in wood. Tighten table lock knob. 4. Vibration (there is running). 1. Blade runout (blade not properly 1. Have worn parts replaced before using scroll saw again. Have repaired by a qualified electrician. 2. Motor defective. Loose table or table resting against motor. 4. Have the proper outlet installed...
... turns. 4. Reduce side pressure on blade; TROUBLESHOOTING PROBLEM Motor will not run. Blade twisting in manual. 3. Blade holders out of saw is always some vibration when the saw . 2. Feeding too quickly. 3. Improper mounting of line. Check mounting in wood. Tighten table lock knob. 4. Vibration (there is running). 1. Blade runout (blade not properly 1. Have worn parts replaced before using scroll saw again. Have repaired by a qualified electrician. 2. Motor defective. Loose table or table resting against motor. 4. Have the proper outlet installed...

English Manual
Page 22
... ORDER REPAIR PARTS When ordering repair parts, always give the following information: • MODEL NUMBER • SERIAL NUMBER SC164VS Ryobi® is a registered trademark of Authorized Service Centers. • MODEL NO. Please call or visit. You can also check our web site at www.ryobitools.com for a complete list of Ryobi Limited used under license. Your risk from these exposures varies, depending on a plate attached...
... ORDER REPAIR PARTS When ordering repair parts, always give the following information: • MODEL NUMBER • SERIAL NUMBER SC164VS Ryobi® is a registered trademark of Authorized Service Centers. • MODEL NO. Please call or visit. You can also check our web site at www.ryobitools.com for a complete list of Ryobi Limited used under license. Your risk from these exposures varies, depending on a plate attached...

Repair Sheet
Page 3
... TABLE LOCK KNOB 1 45 S1603003 BLADE 2 46 TSC07011 * SCREW (M4 X 16 mm 2 WARNING: Improper repair of your Scroll Saw or when ordering repair parts. Number Description Qty. For the service center nearest you call 1-800-525-2579. * Standard Hardware Item - RYOBI 16 in damage to the motor housing. PARTS LIST Key Part Key Part No. No. May Be Purchased Locally 3 Always mention the model number in all correspondence regarding your tool requires safety...
... TABLE LOCK KNOB 1 45 S1603003 BLADE 2 46 TSC07011 * SCREW (M4 X 16 mm 2 WARNING: Improper repair of your Scroll Saw or when ordering repair parts. Number Description Qty. For the service center nearest you call 1-800-525-2579. * Standard Hardware Item - RYOBI 16 in damage to the motor housing. PARTS LIST Key Part Key Part No. No. May Be Purchased Locally 3 Always mention the model number in all correspondence regarding your tool requires safety...

Repair Sheet
Page 4
... PARTS LIST Key Part Description Qty. DROP FOOT 1 * TOOTH WASHER (M5 1 ROLL PIN 4 SWITCH PLATE 1 MOTOR 1 ECCENTRIC 1 SAW TABLE 1 * SCREW (M6 X 30 mm 1 PLASTIC TUBING 1 ADJUSTMENT LEVEL 1 BELLOWS LOCK 1 BELLOWS 1 * TOOTH WASHER (M4 4 * SCREW (M8 X 8 mm 1 * SCREW (4.2 X 8 mm 1 * SCREW (M5 X 8 mm 2 * SCREW (M4 X 6 mm 2 * SCREW (M5 X 35 mm 5 * SCREW (M5 X 30 mm 3 DUST BLOWER 1 DROP FOOT LOCK KNOB 1 BEARING RETAINER 1 BOLT RETAINER 2 SWITCH BOX 1 ON/OFF SWITCH 1 RUBBER FOOT 2 74 TSC07018 * SCREW (4.2 X 13 mm 4 75 S1601023D COVER PLATE...
... PARTS LIST Key Part Description Qty. DROP FOOT 1 * TOOTH WASHER (M5 1 ROLL PIN 4 SWITCH PLATE 1 MOTOR 1 ECCENTRIC 1 SAW TABLE 1 * SCREW (M6 X 30 mm 1 PLASTIC TUBING 1 ADJUSTMENT LEVEL 1 BELLOWS LOCK 1 BELLOWS 1 * TOOTH WASHER (M4 4 * SCREW (M8 X 8 mm 1 * SCREW (4.2 X 8 mm 1 * SCREW (M5 X 8 mm 2 * SCREW (M4 X 6 mm 2 * SCREW (M5 X 35 mm 5 * SCREW (M5 X 30 mm 3 DUST BLOWER 1 DROP FOOT LOCK KNOB 1 BEARING RETAINER 1 BOLT RETAINER 2 SWITCH BOX 1 ON/OFF SWITCH 1 RUBBER FOOT 2 74 TSC07018 * SCREW (4.2 X 13 mm 4 75 S1601023D COVER PLATE...


