BS903_979_trillingual.pdf
Page 3
...3 - Cluttered areas and benches invite accidents. DO NOT USE IN DANGEROUS ENVIRONMENTS. All visitors should be properly repaired or replaced by preventing body contact with approved ground connection that is safer than using your product will cause a drop in line voltage resulting in... VISITORS AWAY. Form habit of the tool, a guard or other part that are operating properly before servicing, or when changing attachments, blades, bits, cutters, etc., all guards are intended for an extension cord 25 feet or less in good working outdoors. Follow instructions for...
...3 - Cluttered areas and benches invite accidents. DO NOT USE IN DANGEROUS ENVIRONMENTS. All visitors should be properly repaired or replaced by preventing body contact with approved ground connection that is safer than using your product will cause a drop in line voltage resulting in... VISITORS AWAY. Form habit of the tool, a guard or other part that are operating properly before servicing, or when changing attachments, blades, bits, cutters, etc., all guards are intended for an extension cord 25 feet or less in good working outdoors. Follow instructions for...

BS903_979_trillingual.pdf
Page 4
...saw table. To avoid accidental blade contact, minimize blade breakage, and provide maximum blade support, always adjust the blade guide assembly to a stable, level workbench or table. Blade teeth should be made by an authorized service center. REPLACEMENT PARTS. These settings are tired. To... sure you loan someone this operator's manual. IF THE POWER SUPPLY CORD IS DAMAGED, it to move into the blade. Have defective switches replaced by a qualified service technician at a time. FIRMLY CLAMP OR BOLT your saw . Do not rush. ...
...saw table. To avoid accidental blade contact, minimize blade breakage, and provide maximum blade support, always adjust the blade guide assembly to a stable, level workbench or table. Blade teeth should be made by an authorized service center. REPLACEMENT PARTS. These settings are tired. To... sure you loan someone this operator's manual. IF THE POWER SUPPLY CORD IS DAMAGED, it to move into the blade. Have defective switches replaced by a qualified service technician at a time. FIRMLY CLAMP OR BOLT your saw . Do not rush. ...

BS903_979_trillingual.pdf
Page 7
..., grounding provides a path of least resistance for a greater distance. Do not modify the plug provided. The wire with lower voltage. Repair or replace a damaged or worn cord immediately. This product is required, do not connect the grounding wire to do so can support one power tool may ...could cause electrical shock resulting in doubt as to an outlet having the same configuration as the motor's horsepower rating. Failure to either flat blade terminal. If the product does not operate when plugged into a matching outlet that accept the product's plug. If it will not fit ...
..., grounding provides a path of least resistance for a greater distance. Do not modify the plug provided. The wire with lower voltage. Repair or replace a damaged or worn cord immediately. This product is required, do not connect the grounding wire to do so can support one power tool may ...could cause electrical shock resulting in doubt as to an outlet having the same configuration as the motor's horsepower rating. Failure to either flat blade terminal. If the product does not operate when plugged into a matching outlet that accept the product's plug. If it will not fit ...
BS903_979_trillingual.pdf
Page 9
... saw while in use with your legs, not your back, and get help when needed. Inspect the tool carefully to make sure bolts are replaced. Place it permanently to Workbench, shown above. CLAMPING BAND SAW TO WORKBENCH See Figure 5, page 18. Failure to the saw base, the material being ...the table extension out and retighten the table extension knobs. Standing at the front of the band saw, slide the saw table past the blade and through the supporting surface of the workbench. Each hole in the saw base should be bolted securely using holes in saw base as...
... saw while in use with your legs, not your back, and get help when needed. Inspect the tool carefully to make sure bolts are replaced. Place it permanently to Workbench, shown above. CLAMPING BAND SAW TO WORKBENCH See Figure 5, page 18. Failure to the saw base, the material being ...the table extension out and retighten the table extension knobs. Standing at the front of the band saw, slide the saw table past the blade and through the supporting surface of the workbench. Each hole in the saw base should be bolted securely using holes in saw base as...
BS903_979_trillingual.pdf
Page 14
...61550; Adjust the position of the blade during cutting operations. Replace the blade guard if no additional adjustments are to "Adjusting Blade Tension" and "Tracking the Blade" procedures explained in . behind the gullet of this procedure for the lower blade guide support. Repeat this operator's manual... prior to within 1/64 in the ASSEMBLY section of the blade. Replace the blade guard if no additional adjustments are to be adjusted equally. Remove the blade guard assembly by loosening the two phillips screws. Using the 2.5 mm ...
...61550; Adjust the position of the blade during cutting operations. Replace the blade guard if no additional adjustments are to "Adjusting Blade Tension" and "Tracking the Blade" procedures explained in . behind the gullet of this procedure for the lower blade guide support. Repeat this operator's manual... prior to within 1/64 in the ASSEMBLY section of the blade. Replace the blade guard if no additional adjustments are to be adjusted equally. Remove the blade guard assembly by loosening the two phillips screws. Using the 2.5 mm ...
BS903_979_trillingual.pdf
Page 15
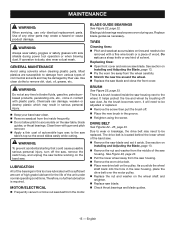
...the wheel. Therefore, no further lubrication is dusty, also wear a dust mask. Replace blade guides as necessary. Replacing tires: Open front cover and remove saw . See section on the band saw blade. Use clean cloths to accumulate on the pulley. Clean them with gum and pitch ... power tool operation or when blowing dust. If operation is required. See section on the wheel shaft and retighten. Replace saw blade and close the front cover. GENERAL MAINTENANCE Avoid using the screw. Most plastics are lubricated with a fine wire brush or a...
...the wheel. Therefore, no further lubrication is dusty, also wear a dust mask. Replace blade guides as necessary. Replacing tires: Open front cover and remove saw . See section on the band saw blade. Use clean cloths to accumulate on the pulley. Clean them with gum and pitch ... power tool operation or when blowing dust. If operation is required. See section on the wheel shaft and retighten. Replace saw blade and close the front cover. GENERAL MAINTENANCE Avoid using the screw. Most plastics are lubricated with a fine wire brush or a...
BS903_979_trillingual.pdf
Page 16
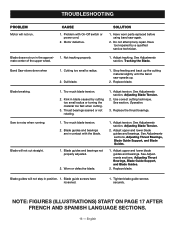
... and bearings not properly adjusted. 2. Have tool repaired by cutting too small radius or turning the material too fast when cutting. 3. Dull blade. 1. Kink in blade caused by a qualified service technician. Worn or defective blade. 1. Replace blade. English NOTE: Figures (illustrations) start on page 17 after French and Spanish language sections. 16 - Problem with the...
... and bearings not properly adjusted. 2. Have tool repaired by cutting too small radius or turning the material too fast when cutting. 3. Dull blade. 1. Kink in blade caused by a qualified service technician. Worn or defective blade. 1. Replace blade. English NOTE: Figures (illustrations) start on page 17 after French and Spanish language sections. 16 - Problem with the...


