English Manual
Page 12
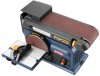
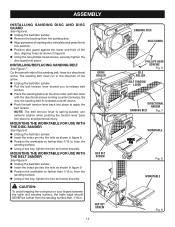
... disc with the directional arrows running counterclockwise. n Using the two phillips head screws, securely tighten the disc guard into position. installing/REPLACING sanding belt See Figure 7. n Place the sanding belt over the drive roller and idler roller with plate and press firmly into place. n Position the worktable no farther than 1/16 in figure 6.
... disc with the directional arrows running counterclockwise. n Using the two phillips head screws, securely tighten the disc guard into position. installing/REPLACING sanding belt See Figure 7. n Place the sanding belt over the drive roller and idler roller with plate and press firmly into place. n Position the worktable no farther than 1/16 in figure 6.
English Manual
Page 16
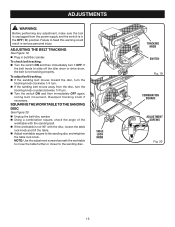
... tool is unplugged from the disc, turn the tracking knob counterclockwise 1/4 turn. n Turn the switch ON and then immediately OFF again, noting belt movement. Readjust tracking knob if necessary. NOTE: Use the adjustment screws beneath the worktable to move the table further or closer to slide off ...the idler drum or drive drum, the belt is not 90° with the sanding belt. To check belt tracking: n Turn the switch ON and then immediately turn . n Using a combination square, check the angle...
... tool is unplugged from the disc, turn the tracking knob counterclockwise 1/4 turn. n Turn the switch ON and then immediately OFF again, noting belt movement. Readjust tracking knob if necessary. NOTE: Use the adjustment screws beneath the worktable to move the table further or closer to slide off ...the idler drum or drive drum, the belt is not 90° with the sanding belt. To check belt tracking: n Turn the switch ON and then immediately turn . n Using a combination square, check the angle...
English Manual
Page 17
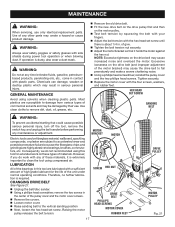
...a sufficient amount of the motor bracket) may create a hazard or cause product damage. n Remove the old drive belt. Tighten securely. Electric tools used on the drive belt (and improper adjustment of high grade lubricant for extended work with plastic parts. LUBRICATION All of the bearings in...dust. motor BRACKEt motor screw hex nut drive belt PHILLIPS HEAD SCREWS motor cover rubber feet 17 drive pulley motor pulley Fig. 21 n Fit the new drive belt on the drive pulley first and then on the drive belt may be damaged by squeezing the belt with the four screws, washers, and...
...a sufficient amount of the motor bracket) may create a hazard or cause product damage. n Remove the old drive belt. Tighten securely. Electric tools used on the drive belt (and improper adjustment of high grade lubricant for extended work with plastic parts. LUBRICATION All of the bearings in...dust. motor BRACKEt motor screw hex nut drive belt PHILLIPS HEAD SCREWS motor cover rubber feet 17 drive pulley motor pulley Fig. 21 n Fit the new drive belt on the drive pulley first and then on the drive belt may be damaged by squeezing the belt with the four screws, washers, and...


