
English Manual
Page 1
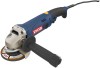
OPERATOR'S MANUAL 4-1/2 in. Thank you years of rugged, trouble-free performance. AnGLe GRINDER DOUBLE INSULATED AG452 Your angle grinder has been engineered and manufactured to our high standard for your purchase. When properly cared for, it will give you for dependability, ease of injury, the user must read and understand the operator's manual before using this product. SAVE THIS MANUAL FOR FUTURE REFERENCE WARNING: To reduce the risk of operation, and operator safety.
OPERATOR'S MANUAL 4-1/2 in. Thank you years of rugged, trouble-free performance. AnGLe GRINDER DOUBLE INSULATED AG452 Your angle grinder has been engineered and manufactured to our high standard for your purchase. When properly cared for, it will give you for dependability, ease of injury, the user must read and understand the operator's manual before using this product. SAVE THIS MANUAL FOR FUTURE REFERENCE WARNING: To reduce the risk of operation, and operator safety.

English Manual
Page 8
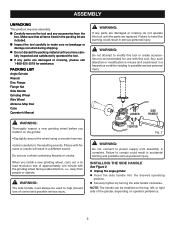
...Size 5/8 in . Spindle Lock 90˚ ROTATING HANDLE LOCK-ON BUTTON Guard SIDE HANDLe WRENCH STORAGE WRENCH Fig. 1 KNOW YOUR ANGLE GRINDER See Figure 1. The safe use of this product requires an understanding of the information on button is convenient for continuous grinding for extended ...handle can be installed on the top, left or right for ease of use of this operator's manual as well as a knowledge of the grinder, depending on operator preference, for the operator. WRENCH STORAGE The wrench can be easily stored in the side handle when not in this product,...
...Size 5/8 in . Spindle Lock 90˚ ROTATING HANDLE LOCK-ON BUTTON Guard SIDE HANDLe WRENCH STORAGE WRENCH Fig. 1 KNOW YOUR ANGLE GRINDER See Figure 1. The safe use of this product requires an understanding of the information on button is convenient for continuous grinding for extended ...handle can be installed on the top, left or right for ease of use of this operator's manual as well as a knowledge of the grinder, depending on operator preference, for the operator. WRENCH STORAGE The wrench can be easily stored in the side handle when not in this product,...
English Manual
Page 9
...new grinding wheel, carry out a no breakage or damage occurred during shipping. installing THE Side handle See Figure 2. Unplug the angle grinder. Insert the side handle into the desired operating position. Securely tighten by turning the side handle clockwise. n If any parts... fissures or cracks will result in a different sound. n Inspect the tool carefully to possible serious personal injury. PACKING LIST Angle Grinder Wrench Disc Flange Flange Nut Side Handle Grinding Wheel Wire Wheel Abrasive Mop Disc Case Operator's Manual WARNING: If any accessories from...
...new grinding wheel, carry out a no breakage or damage occurred during shipping. installing THE Side handle See Figure 2. Unplug the angle grinder. Insert the side handle into the desired operating position. Securely tighten by turning the side handle clockwise. n If any parts... fissures or cracks will result in a different sound. n Inspect the tool carefully to possible serious personal injury. PACKING LIST Angle Grinder Wrench Disc Flange Flange Nut Side Handle Grinding Wheel Wire Wheel Abrasive Mop Disc Case Operator's Manual WARNING: If any accessories from...
English Manual
Page 10
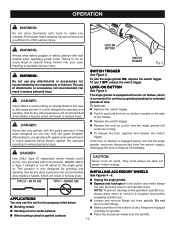
... complete stop before engaging spindle lock. Loosen and remove flange nut from the power supply, disengage the lock-on button and the angle grinder will continue running. To release the lock, depress and release the switch trigger. Failure to use Type 1 − do so could... Wire brushing rusted or painted surfaces CAUTION: Never cover air vents. DANGER: Never use this tool for grinding and sanding. To turn the angle grinder ON, depress the switch trigger. To lock-on: Depress the switch trigger. Push in possible serious injury. This product is ...
... complete stop before engaging spindle lock. Loosen and remove flange nut from the power supply, disengage the lock-on button and the angle grinder will continue running. To release the lock, depress and release the switch trigger. Failure to use Type 1 − do so could... Wire brushing rusted or painted surfaces CAUTION: Never cover air vents. DANGER: Never use this tool for grinding and sanding. To turn the angle grinder ON, depress the switch trigger. To lock-on: Depress the switch trigger. Push in possible serious injury. This product is ...
English Manual
Page 11
...the minimum operating speed of any accessory wheel selected is not less than 11,000 RPM. The grinding wheel provided with the angle grinder is suitable for grinding welds, preparing surfaces to be welded, grinding structural steel, and grinding stainless steel. The wire wheel brush ... tighten. Fit raised, small diameter portion of flange nut facing up to 15° and continuously moving at an angle from the angle grinder. Do not overtighten. to tighten to loosen Grinding Wheel Wrench Flange Nut to tighten to crack when tightening the nut. OPERATION WARNING: Always...
...the minimum operating speed of any accessory wheel selected is not less than 11,000 RPM. The grinding wheel provided with the angle grinder is suitable for grinding welds, preparing surfaces to be welded, grinding structural steel, and grinding stainless steel. The wire wheel brush ... tighten. Fit raised, small diameter portion of flange nut facing up to 15° and continuously moving at an angle from the angle grinder. Do not overtighten. to tighten to loosen Grinding Wheel Wrench Flange Nut to tighten to crack when tightening the nut. OPERATION WARNING: Always...
English Manual
Page 12
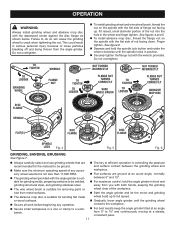
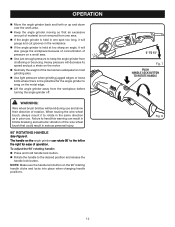
...wheel brush bristles will also gouge the workpiece because of concentration of pressure on the metal edge. Lift the angle grinder away from the workpiece before turning the angle grinder off. To adjust the 90˚ rotating handle: Press and hold handle lock button. Rotate the ... direction as in serious personal injury. 90˚ ROTATING HANDLE See Figure 8. NOTE: Make sure the handle lock button on the angle grinder can result in bristle breaking and extreme vibration of the wire wheel brush that an excessive amount of material is not removed from chattering or...
...wheel brush bristles will also gouge the workpiece because of concentration of pressure on the metal edge. Lift the angle grinder away from the workpiece before turning the angle grinder off. To adjust the 90˚ rotating handle: Press and hold handle lock button. Rotate the ... direction as in serious personal injury. 90˚ ROTATING HANDLE See Figure 8. NOTE: Make sure the handle lock button on the angle grinder can result in bristle breaking and extreme vibration of the wire wheel brush that an excessive amount of material is not removed from chattering or...

English Manual
Page 13
...Always place the guard in the correct location as shown in the OFF ( O ) position. Fig. 9 Fig. 10 Fig. 11 13 Never use your grinder with guard removed will result in loose particles being thrown against the operator resulting in serious personal injury. A Correct location of guard is BETWEEN POINTS...unplugged from the power supply and the switch is on front of guard DANGER: Never use the angle grinder without the guard in place and properly adjusted. Unplug the angle grinder. Using the wrench provided, loosen and remove nut, accessory wheel, and disc flange from...
...Always place the guard in the correct location as shown in the OFF ( O ) position. Fig. 9 Fig. 10 Fig. 11 13 Never use your grinder with guard removed will result in loose particles being thrown against the operator resulting in serious personal injury. A Correct location of guard is BETWEEN POINTS...unplugged from the power supply and the switch is on front of guard DANGER: Never use the angle grinder without the guard in place and properly adjusted. Unplug the angle grinder. Using the wrench provided, loosen and remove nut, accessory wheel, and disc flange from...
English Manual
Page 14
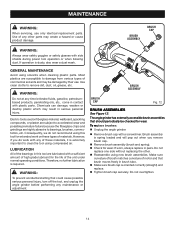
... be checked for the life of these types of motor and that brush moves freely in serious personal injury. The angle grinder has externally accessible brush assemblies that could cause possible serious personal injury, turn off the tool, and unplug the angle... grinder before performing any of the unit under normal operating conditions. To replace brushes: n Unplug the angle grinder. n Check for extended work with plastic parts. Use of commercial solvents and may result ...
... be checked for the life of these types of motor and that brush moves freely in serious personal injury. The angle grinder has externally accessible brush assemblies that could cause possible serious personal injury, turn off the tool, and unplug the angle... grinder before performing any of the unit under normal operating conditions. To replace brushes: n Unplug the angle grinder. n Check for extended work with plastic parts. Use of commercial solvents and may result ...
English Manual
Page 15
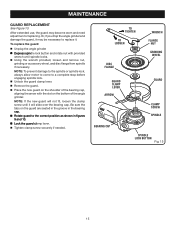
... bottom of the bearing cap, aligning the arrow with provided wrench until it . MAINTENANCE GUARD REPLACEMENT See Figure 13. Or, if you drop the angle grinder and damage the guard, it may become worn and need adjustment or replacing. To replace the guard: Unplug the angle... before engaging spindle lock. Unlock the guard clamp lever. Remove the guard. Place the new guard on the shoulder of the angle grinder. NOTE: To prevent damage to the spindle or spindle lock, always allow motor to come to loosen Disc Flange Wrench FLANGE Nut Grinding Wheel GUARD...
... bottom of the bearing cap, aligning the arrow with provided wrench until it . MAINTENANCE GUARD REPLACEMENT See Figure 13. Or, if you drop the angle grinder and damage the guard, it may become worn and need adjustment or replacing. To replace the guard: Unplug the angle... before engaging spindle lock. Unlock the guard clamp lever. Remove the guard. Place the new guard on the shoulder of the angle grinder. NOTE: To prevent damage to the spindle or spindle lock, always allow motor to come to loosen Disc Flange Wrench FLANGE Nut Grinding Wheel GUARD...
English Manual
Page 16
... HOW TO ORDER REPAIR PARTS When ordering repair parts, always give the following information: • MODEL NUMBER AG452 • SERIAL NUMBER Ryobi® is a registered trademark of this tool will be found on a plate attached to cause cancer, birth defects or other masonry ...for repair parts or service, simply contact your nearest Authorized Service Center. OPERATOR'S MANUAL 4-1/2 in the space provided below. AnGLe GRINDER DOUBLE INSULATED AG452 WARNING: Some dust created by power sanding, sawing, grinding, drilling, and other construction activities contains chemicals known to...
... HOW TO ORDER REPAIR PARTS When ordering repair parts, always give the following information: • MODEL NUMBER AG452 • SERIAL NUMBER Ryobi® is a registered trademark of this tool will be found on a plate attached to cause cancer, birth defects or other masonry ...for repair parts or service, simply contact your nearest Authorized Service Center. OPERATOR'S MANUAL 4-1/2 in the space provided below. AnGLe GRINDER DOUBLE INSULATED AG452 WARNING: Some dust created by power sanding, sawing, grinding, drilling, and other construction activities contains chemicals known to...
Repair Sheet
Page 3
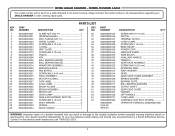
... CARRYING CASE (NOT SHOWN 1 OPERATOR'S MANUAL (039028001065) WARNING: Improper repair of your ANGLE GRINDER or when ordering repair parts. MODEL NUMBER AG452 The model number will be performed by a Ryobi Authorized Service Center. Any repairs requiring disassembly of a double insulated tool can result in all correspondence...on a plate attached to the double insulation system possibly causing electrical shock or electrocution. Always mention the model number in damage to the motor housing. RYOBI ANGLE GRINDER - KEY NO. 1 2 3 4 5 6 7 8 9 10 11 12 13 14 15 16 17 18 19 20 21 22 23...
... CARRYING CASE (NOT SHOWN 1 OPERATOR'S MANUAL (039028001065) WARNING: Improper repair of your ANGLE GRINDER or when ordering repair parts. MODEL NUMBER AG452 The model number will be performed by a Ryobi Authorized Service Center. Any repairs requiring disassembly of a double insulated tool can result in all correspondence...on a plate attached to the double insulation system possibly causing electrical shock or electrocution. Always mention the model number in damage to the motor housing. RYOBI ANGLE GRINDER - KEY NO. 1 2 3 4 5 6 7 8 9 10 11 12 13 14 15 16 17 18 19 20 21 22 23...
Repair Sheet
Page 4
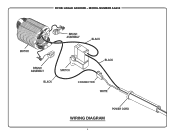
RYOBI ANGLE GRINDER - MODEL NUMBER AG452 CONNECTOR WIRING DIAGRAM 4
RYOBI ANGLE GRINDER - MODEL NUMBER AG452 CONNECTOR WIRING DIAGRAM 4


