Operating Instructions
Page 5
... Error & Status Messages on the Control Panel 145 Panel Tone...152 Printer Does Not Print...153 Checking the Port Connection...154 Other Printing Problems...156 When You Cannot Print Properly...156 Paper Misfeeds Occur Frequently...158 The printed image is different from the image on ...the computer 159 When Printer is Not Functioning Properly 161 Additional Troubleshooting...162 Using the Envelope Lever...164 10...
... Error & Status Messages on the Control Panel 145 Panel Tone...152 Printer Does Not Print...153 Checking the Port Connection...154 Other Printing Problems...156 When You Cannot Print Properly...156 Paper Misfeeds Occur Frequently...158 The printed image is different from the image on ...the computer 159 When Printer is Not Functioning Properly 161 Additional Troubleshooting...162 Using the Envelope Lever...164 10...
Operating Instructions
Page 10
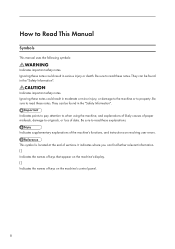
... to the machine or to read these explanations. Indicates points to pay attention to when using the machine, and explanations of likely causes of paper misfeeds, damage to Read This Manual Symbols This manual uses the following symbols: Indicates important safety notes. Indicates supplementary explanations of sections. Ignoring these notes could...
... to the machine or to read these explanations. Indicates points to pay attention to when using the machine, and explanations of likely causes of paper misfeeds, damage to Read This Manual Symbols This manual uses the following symbols: Indicates important safety notes. Indicates supplementary explanations of sections. Ignoring these notes could...
Operating Instructions
Page 80
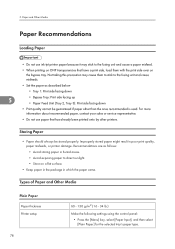
.... Not taking this precaution may stick to the fusing unit and cause a paper misfeed. • When printing on the bypass tray. Storing Paper • Paper should always be guaranteed if paper other printers. Recommendations are as follows: • Avoid storing paper in humid areas. •...; Avoid exposing paper to the fusing unit and cause misfeeds. • Set the paper as described below • Tray 1: Print ...
.... Not taking this precaution may stick to the fusing unit and cause a paper misfeed. • When printing on the bypass tray. Storing Paper • Paper should always be guaranteed if paper other printers. Recommendations are as follows: • Avoid storing paper in humid areas. •...; Avoid exposing paper to the fusing unit and cause misfeeds. • Set the paper as described below • Tray 1: Print ...
Operating Instructions
Page 83
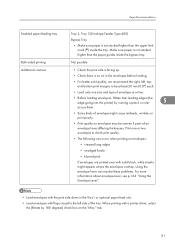
...lever can occur when printing on envelopes: • creased long edges • smudged backs • blurred print If envelopes are printed over with a printer driver, select the [Rotate by running a pencil or ruler 5 across them. • Some kinds of an envelope have differing thicknesses. Not possible &#... where the envelopes overlap. Print one size and type of the tray. tab. 81 When printing with solid black, white streaks might cause misfeeds, wrinkles or print poorly. • Print quality on envelopes may be at least 20 mm (0.8") each. • Load only one or...
...lever can occur when printing on envelopes: • creased long edges • smudged backs • blurred print If envelopes are printed over with a printer driver, select the [Rotate by running a pencil or ruler 5 across them. • Some kinds of an envelope have differing thicknesses. Not possible &#... where the envelopes overlap. Print one size and type of the tray. tab. 81 When printing with solid black, white streaks might cause misfeeds, wrinkles or print poorly. • Print quality on envelopes may be at least 20 mm (0.8") each. • Load only one or...
Operating Instructions
Page 87
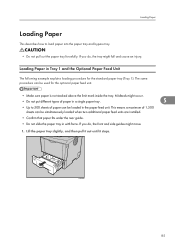
Loading Paper in the paper feed unit. AUB108S 85 Misfeeds might occur. • Do not put different types of paper in a single paper tray. 5 • Up to load paper into the paper tray and bypass ...
Loading Paper in the paper feed unit. AUB108S 85 Misfeeds might occur. • Do not put different types of paper in a single paper tray. 5 • Up to load paper into the paper tray and bypass ...
Operating Instructions
Page 89
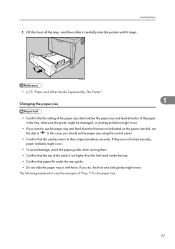
...set the paper size using the control panel. • Confirm that are not locked securely, paper misfeeds might move. The following explanation uses the example of the tray, and then slide it carefully into the printer until it stops. Lift the front of "Tray 1" for the paper tray. 87 If you do...when moving them. • Confirm that the top of the paper in with force. AUB111S • p.75 "Paper and Other Media Supported by This Printer" Changing the paper size 5 • Confirm that the setting of the paper size dial matches the paper size and feed direction of the stack is...
...set the paper size using the control panel. • Confirm that are not locked securely, paper misfeeds might move. The following explanation uses the example of the tray, and then slide it carefully into the printer until it stops. Lift the front of "Tray 1" for the paper tray. 87 If you do...when moving them. • Confirm that the top of the paper in with force. AUB111S • p.75 "Paper and Other Media Supported by This Printer" Changing the paper size 5 • Confirm that the setting of the paper size dial matches the paper size and feed direction of the stack is...
Operating Instructions
Page 132
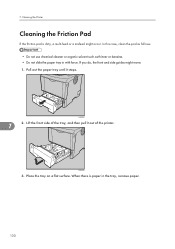
In this case, clean the pad as follows: • Do not use chemical cleaner or organic solvent such as thinner or benzine. • Do not slide the paper tray in the tray, remove paper. 130 Place the tray on a flat surface. If you do, the front and side guides might occur. AUB108S 7 2. Pull out the paper tray until it out of the printer. Lift the front side of the tray, and then pull it stops. When there is dirty, a multi-feed or a misfeed might move. 1. AUB109S 3. Cleaning the Printer Cleaning the Friction Pad If the friction pad is paper in with force. 7.
In this case, clean the pad as follows: • Do not use chemical cleaner or organic solvent such as thinner or benzine. • Do not slide the paper tray in the tray, remove paper. 130 Place the tray on a flat surface. If you do, the front and side guides might occur. AUB108S 7 2. Pull out the paper tray until it out of the printer. Lift the front side of the tray, and then pull it stops. When there is dirty, a multi-feed or a misfeed might move. 1. AUB109S 3. Cleaning the Printer Cleaning the Friction Pad If the friction pad is paper in with force. 7.
Operating Instructions
Page 133
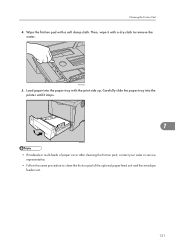
Then, wipe it stops. 7 AUB111S • If misfeeds or multi-feeds of paper occur after cleaning the friction pad, contact your sales or service representative. • Follow the same procedure to remove the water. ZKEY700E 5. Load paper into the printer until it with a dry cloth to clean the friction pad of the optional paper feed unit and the envelope feeder unit. 131 Cleaning the Friction Pad 4. Carefully slide the paper tray into the paper tray with a soft damp cloth. Wipe the friction pad with the print side up.
Then, wipe it stops. 7 AUB111S • If misfeeds or multi-feeds of paper occur after cleaning the friction pad, contact your sales or service representative. • Follow the same procedure to remove the water. ZKEY700E 5. Load paper into the printer until it with a dry cloth to clean the friction pad of the optional paper feed unit and the envelope feeder unit. 131 Cleaning the Friction Pad 4. Carefully slide the paper tray into the paper tray with a soft damp cloth. Wipe the friction pad with the print side up.
Operating Instructions
Page 134
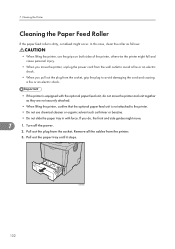
... the paper feed roller is dirty, a misfeed might move the printer and unit together as thinner or benzine. • Do not slide the paper tray in with the optional paper feed unit, do , the front and side guides might occur. Pull out the plug from the printer. 3. If you pull out the plug... from the socket, grip the plug to avoid damaging the cord and causing a fire or an electric shock. • If the printer is not attached to the printer. • Do not use chemical cleaner or organic solvent such as they are not securely attached. • When lifting the...
... the paper feed roller is dirty, a misfeed might move the printer and unit together as thinner or benzine. • Do not slide the paper tray in with the optional paper feed unit, do , the front and side guides might occur. Pull out the plug from the printer. 3. If you pull out the plug... from the socket, grip the plug to avoid damaging the cord and causing a fire or an electric shock. • If the printer is not attached to the printer. • Do not use chemical cleaner or organic solvent such as they are not securely attached. • When lifting the...
Operating Instructions
Page 137
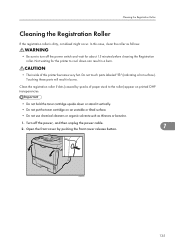
... waiting for about 15 minutes before cleaning the Registration roller. Turn off the power switch and wait for the printer to turn off the power, and then unplug the power cable. 2. In this printer becomes very hot. Clean the registration roller if dots (caused by pushing the front cover release button. 7 AUB101S...
... waiting for about 15 minutes before cleaning the Registration roller. Turn off the power switch and wait for the printer to turn off the power, and then unplug the power cable. 2. In this printer becomes very hot. Clean the registration roller if dots (caused by pushing the front cover release button. 7 AUB101S...

Operating Instructions
Page 151
... output tray is time to the correct user name and password. RC Gate connection error The printer cannot communicate with Remote Communication Gate. • Contact your sales or service representative. The printer is jammed in the duplex unit. • Remove and re-install the duplex unit. Replace...under the paper exit cover. • Open the front and rear cover and remove jammed paper. • See p.167 "Removing Misfed Paper". Remove Misfeed Duplex Unit/Open Duplex Unit Cover Paper is out of toner. • Replace the toner cartridge. • See p.107 "Replacing the Toner Cartridge ...
... output tray is time to the correct user name and password. RC Gate connection error The printer cannot communicate with Remote Communication Gate. • Contact your sales or service representative. The printer is jammed in the duplex unit. • Remove and re-install the duplex unit. Replace...under the paper exit cover. • Open the front and rear cover and remove jammed paper. • See p.167 "Removing Misfed Paper". Remove Misfeed Duplex Unit/Open Duplex Unit Cover Paper is out of toner. • Replace the toner cartridge. • See p.107 "Replacing the Toner Cartridge ...

Operating Instructions
Page 160
...See p.85 "Loading Paper". • Paper is not higher than the limit mark inside the tray. See p.75 "Paper and Other Media Supported by This Printer". • When loading paper, separate paper from each other . See p.85 "Loading Paper". • There may be a gap between the guides and the...stored properly. Confirm that has been stored properly. Use paper that the top of paper set in the tray exceeds the limit. Troubleshooting Paper Misfeeds Occur Frequently Paper jams occur frequently. • Number of the stack is either too thick or too thin. Make sure there are no...
...See p.85 "Loading Paper". • Paper is not higher than the limit mark inside the tray. See p.75 "Paper and Other Media Supported by This Printer". • When loading paper, separate paper from each other . See p.85 "Loading Paper". • There may be a gap between the guides and the...stored properly. Confirm that has been stored properly. Use paper that the top of paper set in the tray exceeds the limit. Troubleshooting Paper Misfeeds Occur Frequently Paper jams occur frequently. • Number of the stack is either too thick or too thin. Make sure there are no...
Operating Instructions
Page 169
...result in a burn. • When pulling the paper tray out, be covered in the printer. When "Remove Misfeed Paper Tray" Appears • Forcefully removing misfed paper may be careful not to misfeed, check the following points. • Confirm that the setting of the paper size dial matches...8226; When removing misfed paper, do not touch the fusing section because it will cause further misfeeds and possibly damage the printer. • More than one misfed area might cause a misfeed and damage the printer. 167 Make a few test prints until smudges no longer appear. • Do not ...
...result in a burn. • When pulling the paper tray out, be covered in the printer. When "Remove Misfeed Paper Tray" Appears • Forcefully removing misfed paper may be careful not to misfeed, check the following points. • Confirm that the setting of the paper size dial matches...8226; When removing misfed paper, do not touch the fusing section because it will cause further misfeeds and possibly damage the printer. • More than one misfed area might cause a misfeed and damage the printer. 167 Make a few test prints until smudges no longer appear. • Do not ...

Operating Instructions
Page 170
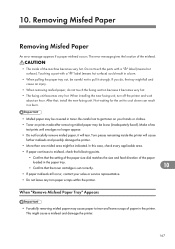
10. Pull out the paper tray until it stops, and then remove misfed paper. Carefully slide the paper tray into the printer until it stops. Open the front cover by pushing the front cover release button, and then close it to reset the misfeed condition. 10 AUB415S • You can apply this procedure for both the paper tray and the optional paper feed unit. • To reset the misfeed condition, open and close the front cover, then the indicator will be off. 168 Removing Misfed Paper 1. AUB400S 2. AUB413S 3.
10. Pull out the paper tray until it stops, and then remove misfed paper. Carefully slide the paper tray into the printer until it stops. Open the front cover by pushing the front cover release button, and then close it to reset the misfeed condition. 10 AUB415S • You can apply this procedure for both the paper tray and the optional paper feed unit. • To reset the misfeed condition, open and close the front cover, then the indicator will be off. 168 Removing Misfed Paper 1. AUB400S 2. AUB413S 3.

Operating Instructions
Page 171
...the front cover release button. Lift the front side of the toner cartridge, and then pull it vertically. 1. AUB101S 2. Removing Misfed Paper When "Remove Misfeed Internal Path" Appears • Forcefully removing misfed paper may cause paper to put the toner cartridge on a stable, flat surface. • Do not hold... the toner cartridge upside down or stand it out of paper in the printer. This might cause a misfeed and damage the printer. • If paper is fed from the Bypass Tray, be sure to remove all the paper from the Bypass Tray and ...
...the front cover release button. Lift the front side of the toner cartridge, and then pull it vertically. 1. AUB101S 2. Removing Misfed Paper When "Remove Misfeed Internal Path" Appears • Forcefully removing misfed paper may cause paper to put the toner cartridge on a stable, flat surface. • Do not hold... the toner cartridge upside down or stand it out of paper in the printer. This might cause a misfeed and damage the printer. • If paper is fed from the Bypass Tray, be sure to remove all the paper from the Bypass Tray and ...
Operating Instructions
Page 173
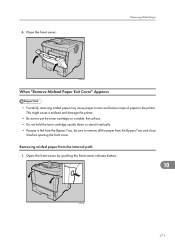
Removing Misfed Paper AUB107S When "Remove Misfeed Paper Exit Cover" Appears • Forcefully removing misfed paper may cause paper to put the toner cartridge on a stable, flat surface. • Do not hold ... it vertically. • If paper is fed from the Bypass Tray, be sure to remove all the paper from the internal path 1. This might cause a misfeed and damage the printer. • Be sure to tear and leave scraps of paper in the...
Removing Misfed Paper AUB107S When "Remove Misfeed Paper Exit Cover" Appears • Forcefully removing misfed paper may cause paper to put the toner cartridge on a stable, flat surface. • Do not hold ... it vertically. • If paper is fed from the Bypass Tray, be sure to remove all the paper from the internal path 1. This might cause a misfeed and damage the printer. • Be sure to tear and leave scraps of paper in the...

Operating Instructions
Page 183
AUB406S AUB407S 10 181 Removing misfed paper inside the cover 1. Remove the misfed paper. Removing Misfed Paper When "Remove Misfeed Duplex Unit" Appears • Forcefully removing misfed paper may cause paper to tear and leave scraps of the duplex unit. 2. This might cause a misfeed and damage the printer. Open the rear cover of paper in the duplex unit.
AUB406S AUB407S 10 181 Removing misfed paper inside the cover 1. Remove the misfed paper. Removing Misfed Paper When "Remove Misfeed Duplex Unit" Appears • Forcefully removing misfed paper may cause paper to tear and leave scraps of the duplex unit. 2. This might cause a misfeed and damage the printer. Open the rear cover of paper in the duplex unit.

Operating Instructions
Page 185
Push down the lever on the right side of the duplex unit. Removing Misfed Paper AUB411S Removing misfed paper inside the duplex unit, and remove the misfed paper. Lift the guide board inside the duplex unit • When A5 paper misfeeds, you might not be able to remove it stops ( ). AUB226S 10 2. AUB412S 183 6. In this case, pull the paper tray out and remove the paper. 1. Close the cover of the duplex unit ( ), and then pull it out until it by pulling the duplex unit out.
Push down the lever on the right side of the duplex unit. Removing Misfed Paper AUB411S Removing misfed paper inside the duplex unit, and remove the misfed paper. Lift the guide board inside the duplex unit • When A5 paper misfeeds, you might not be able to remove it stops ( ). AUB226S 10 2. AUB412S 183 6. In this case, pull the paper tray out and remove the paper. 1. Close the cover of the duplex unit ( ), and then pull it out until it by pulling the duplex unit out.

Operating Instructions
Page 186
For more information, see "When Remove Misfeed Internal Path Appears". • p.169 "When "Remove Misfeed Internal Path" Appears" 10 184 10. AUB227S • If the error message appears again, the misfed paper might be left in the inside of the printer. Removing Misfed Paper 3. Push in the duplex unit along the rails in the back of the printer. Confirm that any torn paper scraps are not in the printer.
For more information, see "When Remove Misfeed Internal Path Appears". • p.169 "When "Remove Misfeed Internal Path" Appears" 10 184 10. AUB227S • If the error message appears again, the misfed paper might be left in the inside of the printer. Removing Misfed Paper 3. Push in the duplex unit along the rails in the back of the printer. Confirm that any torn paper scraps are not in the printer.
Software User Guide
Page 149
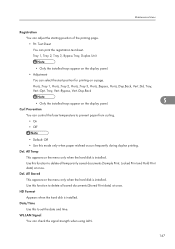
... this to delete all temporarily saved documents (Sample Print, Locked Print and Hold Print data) at once. Date/Time Use this mode only when paper misfeed occurs frequently during duplex printing. Tray, Vert.:Bypass, Vert.:Dup.Back • Only the installed trays appear on the menu only when the hard disk...
... this to delete all temporarily saved documents (Sample Print, Locked Print and Hold Print data) at once. Date/Time Use this mode only when paper misfeed occurs frequently during duplex printing. Tray, Vert.:Bypass, Vert.:Dup.Back • Only the installed trays appear on the menu only when the hard disk...


