
Operating Instructions
Page 4
...Recommendations...78 Loading Paper...78 Storing Paper...78 Types of WPA...72 5. Cleaning the Printer Cautions to Take When Cleaning...129 2 Replacing Consumables and Maintenance Kit Replacing the Toner Cartridge (Print Cartridge 107 Replacing the Maintenance Kit...112 Before Replacing...112 Replacing the Friction Pad...113... the Paper Feed Roller...118 Replacing the Fusing Unit...122 7. Paper and Other Media Paper and Other Media Supported by this Printer...82 Print Area...83 Loading Paper...85 Loading Paper in Tray 1 and the Optional Paper Feed Unit 85 Loading Paper in the Bypass ...
...Recommendations...78 Loading Paper...78 Storing Paper...78 Types of WPA...72 5. Cleaning the Printer Cautions to Take When Cleaning...129 2 Replacing Consumables and Maintenance Kit Replacing the Toner Cartridge (Print Cartridge 107 Replacing the Maintenance Kit...112 Before Replacing...112 Replacing the Friction Pad...113... the Paper Feed Roller...118 Replacing the Fusing Unit...122 7. Paper and Other Media Paper and Other Media Supported by this Printer...82 Print Area...83 Loading Paper...85 Loading Paper in Tray 1 and the Optional Paper Feed Unit 85 Loading Paper in the Bypass ...
Operating Instructions
Page 5
... is different from the image on the computer 159 When Printer is Not Functioning Properly 161 Additional Troubleshooting...162 Using the Envelope Lever...164 10. Appendix Moving and Transporting the Printer...185 Moving the Printer...185 Consumables...187 Toner Cartridge (Print Cartridge)...187 Maintenance Kit...188 Specifications...189 Mainframe...189 3 Cleaning the Friction Pad...130...
... is different from the image on the computer 159 When Printer is Not Functioning Properly 161 Additional Troubleshooting...162 Using the Envelope Lever...164 10. Appendix Moving and Transporting the Printer...185 Moving the Printer...185 Consumables...187 Toner Cartridge (Print Cartridge)...187 Maintenance Kit...188 Specifications...189 Mainframe...189 3 Cleaning the Friction Pad...130...

Operating Instructions
Page 13
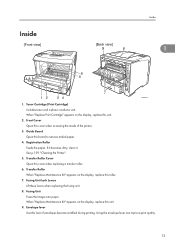
...paper (80 g/m2, 20 lb.) can be loaded. Control Panel Contains keys for the printer operation and display that shows the printer status. 5. Guide to print onto thick paper, OHP transparencies, adhesive labels, envelopes as well as plain paper. Bypass Tray Use this dial to 100 sheets of the ...paper loaded in the paper tray. 2. See p.75 "Paper and Other Media Supported by This Printer" and p.85 "...
...paper (80 g/m2, 20 lb.) can be loaded. Control Panel Contains keys for the printer operation and display that shows the printer status. 5. Guide to print onto thick paper, OHP transparencies, adhesive labels, envelopes as well as plain paper. Bypass Tray Use this dial to 100 sheets of the ...paper loaded in the paper tray. 2. See p.75 "Paper and Other Media Supported by This Printer" and p.85 "...
Operating Instructions
Page 15
..., clean it. Fusing Unit Lock Levers Lift these levers when replacing the fusing unit. 8. Envelope lever Use this cover when accessing the inside of the printer. 3. Front Cover Open this lever if envelopes become wrinkled during printing. See p.129 "Cleaning the Printer". 5. Guide Board Open this unit. 2. Fusing Unit Fuses the image onto paper. When...
..., clean it. Fusing Unit Lock Levers Lift these levers when replacing the fusing unit. 8. Envelope lever Use this cover when accessing the inside of the printer. 3. Front Cover Open this lever if envelopes become wrinkled during printing. See p.129 "Cleaning the Printer". 5. Guide Board Open this unit. 2. Fusing Unit Fuses the image onto paper. When...
Operating Instructions
Page 21
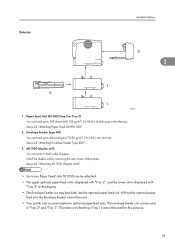
...by removing the rear cover of paper. Without the optional paper feed unit, the Envelope Feeder cannot be used in "Tray 2" and "Tray 3". The envelope feeder unit can load up to 500 sheets (60-130 g/m2, 16-34...lower unit is a tray that slides into the tray. Exterior Available Options 2 AUB053S 1. Envelope Feeder Type 400 You can be used for this purpose. 19 See p.42 "Attaching AD1000 (Duplex Unit)". • ...up to two Paper Feed Units TK1030 can be used . • Your printer can print on the display. • The Envelope Feeder is displayed with "Tray 3" on both sides of the...
...by removing the rear cover of paper. Without the optional paper feed unit, the Envelope Feeder cannot be used in "Tray 2" and "Tray 3". The envelope feeder unit can load up to 500 sheets (60-130 g/m2, 16-34...lower unit is a tray that slides into the tray. Exterior Available Options 2 AUB053S 1. Envelope Feeder Type 400 You can be used for this purpose. 19 See p.42 "Attaching AD1000 (Duplex Unit)". • ...up to two Paper Feed Units TK1030 can be used . • Your printer can print on the display. • The Envelope Feeder is displayed with "Tray 3" on both sides of the...
Operating Instructions
Page 79
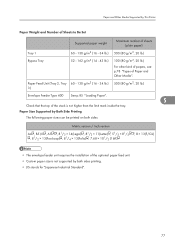
Paper and Other Media Supported by This Printer Paper Weight and Number of Sheets to Be Set Supported paper weight Maximum number of sheets (plain paper) Tray 1 60 - 130 g/m2 (16 - 34 lb.) ... - 130 g/m2 (16 - 34 lb.) 500 (80 g/m2, 20 lb.) 3) Envelope Feeder Type 400 See p.85 "Loading Paper". 5 Check that the top of the stack is not supported by Both Side Printing The following paper sizes can be printed on both sides printing. • JIS stands for "Japanese Industrial Standard". 77 Paper Size Supported...
Paper and Other Media Supported by This Printer Paper Weight and Number of Sheets to Be Set Supported paper weight Maximum number of sheets (plain paper) Tray 1 60 - 130 g/m2 (16 - 34 lb.) ... - 130 g/m2 (16 - 34 lb.) 500 (80 g/m2, 20 lb.) 3) Envelope Feeder Type 400 See p.85 "Loading Paper". 5 Check that the top of the stack is not supported by Both Side Printing The following paper sizes can be printed on both sides printing. • JIS stands for "Japanese Industrial Standard". 77 Paper Size Supported...
Operating Instructions
Page 82
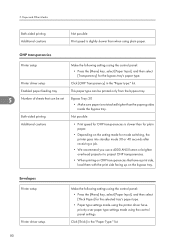
Envelopes Printer setup Printer driver setup Make the following settings using the control panel: • Press the [Menu] key, select [Paper Input], and then select [Transparency] for the bypass tray's paper type. Click [Thick] in the "Paper type:" list. OHP transparencies Printer setup ... Both-sided printing Additional cautions Not possible Print speed is slower than when using the control panel settings. Printer driver setup Click [OHP Transparency] in the "Paper Type:" list. 80 Both-sided printing Not possible Additional cautions • Print speed for OHP...
Envelopes Printer setup Printer driver setup Make the following settings using the control panel: • Press the [Menu] key, select [Paper Input], and then select [Transparency] for the bypass tray's paper type. Click [Thick] in the "Paper type:" list. OHP transparencies Printer setup ... Both-sided printing Additional cautions Not possible Print speed is slower than when using the control panel settings. Printer driver setup Click [OHP Transparency] in the "Paper Type:" list. 80 Both-sided printing Not possible Additional cautions • Print speed for OHP...
Operating Instructions
Page 83
... uneven if parts of the tray. When printing with a printer driver, select the [Rotate by running a pencil or ruler 5 across them. • Some kinds of envelope might cause misfeeds, wrinkles or print poorly. • Print quality on envelopes: • creased long edges • smudged backs • blurred print If envelopes are printed over with flaps closed to the left...
... uneven if parts of the tray. When printing with a printer driver, select the [Rotate by running a pencil or ruler 5 across them. • Some kinds of envelope might cause misfeeds, wrinkles or print poorly. • Print quality on envelopes: • creased long edges • smudged backs • blurred print If envelopes are printed over with flaps closed to the left...

Operating Instructions
Page 84
...• Load envelopes with the print side facing up on the bypass tray. • Load envelopes with a printer driver, select the [Rotate by 180 degrees] check box on by this Printer Avoid using paper printed on the "Misc." monochrome and color copiers, ink-jet printers, etc.) •...electricity • Paper that has already been printed onto, except a preprinted letterhead paper. Malfunctions are not supported by other than a laser printer (e.g. tab. 5 AUB260S Paper Not Supported by this printer. • Paper meant for an ink-jet printer • Bent, folded, or creased paper ...
...• Load envelopes with the print side facing up on the bypass tray. • Load envelopes with a printer driver, select the [Rotate by 180 degrees] check box on by this Printer Avoid using paper printed on the "Misc." monochrome and color copiers, ink-jet printers, etc.) •...electricity • Paper that has already been printed onto, except a preprinted letterhead paper. Malfunctions are not supported by other than a laser printer (e.g. tab. 5 AUB260S Paper Not Supported by this printer. • Paper meant for an ink-jet printer • Bent, folded, or creased paper ...

Operating Instructions
Page 85
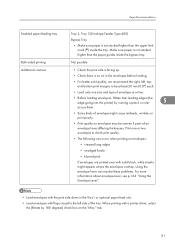
...adhesive, when the flap is exposed • Paper with metal clasps, string ties or metal folding bars • designed to set the print margins correctly by the application. Paper Recommendations • Paper whose weight is heavier or lighter than the limitation • Paper with windows,...8226; with stamps attached • with windows, holes, perforations, cutouts or embossing • with clips or staples • Envelopes in the following conditions: • damp • excessively curled or twisted • stuck together • damaged in the sealed or closed position...
...adhesive, when the flap is exposed • Paper with metal clasps, string ties or metal folding bars • designed to set the print margins correctly by the application. Paper Recommendations • Paper whose weight is heavier or lighter than the limitation • Paper with windows,...8226; with stamps attached • with windows, holes, perforations, cutouts or embossing • with clips or staples • Envelopes in the following conditions: • damp • excessively curled or twisted • stuck together • damaged in the sealed or closed position...

Operating Instructions
Page 86
Feed direction 3. Approx. 10 mm (0.39 inches) 4. Approx. 4.2 mm (0.18 inches) 4. Paper and Other Media 1. Envelope 5 AUB040S 1. Print area 2. Approx. 15 mm (0.59 inches) • The print area may vary depending on the paper size, printer language and printer driver settings. 84 Approx. 4.2 mm (0.18 inches) • The print area may vary depending on the paper size, printer language and printer driver settings. Feed direction 3. Print area 2. 5.
Feed direction 3. Approx. 10 mm (0.39 inches) 4. Approx. 4.2 mm (0.18 inches) 4. Paper and Other Media 1. Envelope 5 AUB040S 1. Print area 2. Approx. 15 mm (0.59 inches) • The print area may vary depending on the paper size, printer language and printer driver settings. 84 Approx. 4.2 mm (0.18 inches) • The print area may vary depending on the paper size, printer language and printer driver settings. Feed direction 3. Print area 2. 5.

Operating Instructions
Page 99
...size paper for thick paper, envelope, or OHP transparencies using both the control panel and printer driver. • The number of printer drivers. For details, see the printer driver Help. • Be sure to set different size, printer error will occur. • You cannot print on a type of pages ...that does not support the custom size setting. 97 Press the [Online] key. The initial screen appears. • To load thick paper, OHP transparencies, or envelopes, make settings for the bypass...
...size paper for thick paper, envelope, or OHP transparencies using both the control panel and printer driver. • The number of printer drivers. For details, see the printer driver Help. • Be sure to set different size, printer error will occur. • You cannot print on a type of pages ...that does not support the custom size setting. 97 Press the [Online] key. The initial screen appears. • To load thick paper, OHP transparencies, or envelopes, make settings for the bypass...

Operating Instructions
Page 101
..., Transparency (OHP transparency), Envelope, Preprinted, Thick Paper You can set the vertical value in the bypass tray. • The paper type selected using the printer driver overrides that selected using the control panel of the printer as the following range: 139...printing result might not be appropriate. 1. If you set a paper type using the control panel. • Be sure to load, the printer performs better. Loading Paper You can select custom paper type settings made using Web Image Monitor. • Be sure to select the paper type when you load thick paper, envelopes...
..., Transparency (OHP transparency), Envelope, Preprinted, Thick Paper You can set the vertical value in the bypass tray. • The paper type selected using the printer driver overrides that selected using the control panel of the printer as the following range: 139...printing result might not be appropriate. 1. If you set a paper type using the control panel. • Be sure to load, the printer performs better. Loading Paper You can select custom paper type settings made using Web Image Monitor. • Be sure to select the paper type when you load thick paper, envelopes...
Operating Instructions
Page 102
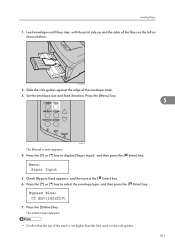
... ] or [ ] key to be used are supported by this printer. • p.25 "Attaching Envelope Feeder Type 400" • p.78 "Types of Paper and Other Media" Loading envelopes onto the bypass tray • Confirm that the envelope flaps are securely folded down, and that there is no air inside ... initial screen appears. 5 • The following paper types cannot be printed on both sides: • Special Paper, Color Paper, Transparency (OHP transparency), Envelope, Preprinted, Thick Paper Loading Envelopes As there are many kinds of envelopes, be sure to check if those to select the paper type, and...
... ] or [ ] key to be used are supported by this printer. • p.25 "Attaching Envelope Feeder Type 400" • p.78 "Types of Paper and Other Media" Loading envelopes onto the bypass tray • Confirm that the envelope flaps are securely folded down, and that there is no air inside ... initial screen appears. 5 • The following paper types cannot be printed on both sides: • Special Paper, Color Paper, Transparency (OHP transparency), Envelope, Preprinted, Thick Paper Loading Envelopes As there are many kinds of envelopes, be sure to check if those to select the paper type, and...
Operating Instructions
Page 103
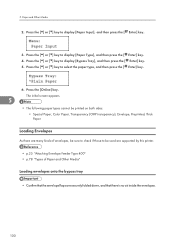
...2. Press the [Online] key. Loading Paper 1. Check [Bypass Size] appears, and then press the [ Enter] key. 6. Load envelopes until they stop, with the print side up and the sides of the envelope stack. 3. Press the [Menu] key. 5 AUB051S The [Menu] screen appears. 4. Press the [ ] or [ ] key to... select the envelope type, and then press the [ Enter] key. 7. Set the envelope size and feed direction. Press the [ ] or [ ]...
...2. Press the [Online] key. Loading Paper 1. Check [Bypass Size] appears, and then press the [ Enter] key. 6. Load envelopes until they stop, with the print side up and the sides of the envelope stack. 3. Press the [Menu] key. 5 AUB051S The [Menu] screen appears. 4. Press the [ ] or [ ] key to... select the envelope type, and then press the [ Enter] key. 7. Set the envelope size and feed direction. Press the [ ] or [ ]...
Operating Instructions
Page 105
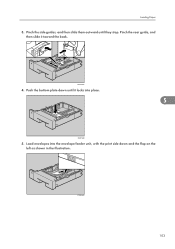
ZGDY260E 4. Pinch the rear guide, and then slide it locks into the envelope feeder unit, with the print side down until they stop. ZDDP380E 103 Loading Paper 3. Push the bottom plate down and the flap on the left as shown in the illustration. Load envelopes into place. 5 ZDDP360E 5. Pinch the side guides, and then slide them outward until it toward the back.
ZGDY260E 4. Pinch the rear guide, and then slide it locks into the envelope feeder unit, with the print side down until they stop. ZDDP380E 103 Loading Paper 3. Push the bottom plate down and the flap on the left as shown in the illustration. Load envelopes into place. 5 ZDDP360E 5. Pinch the side guides, and then slide them outward until it toward the back.
Operating Instructions
Page 107
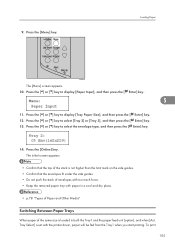
... on the side guides. • Confirm that the envelopes fit under the side guides. • Do not push the stack of envelopes with too much force. • Keep the removed paper tray with the printer driver, paper will be fed from the Tray1 when you start printing. Press the [ ] or [ ] key to... select the envelope type, and then press the [ Enter] key. 14. ...
... on the side guides. • Confirm that the envelopes fit under the side guides. • Do not push the stack of envelopes with too much force. • Keep the removed paper tray with the printer driver, paper will be fed from the Tray1 when you start printing. Press the [ ] or [ ] key to... select the envelope type, and then press the [ Enter] key. 14. ...
Operating Instructions
Page 133
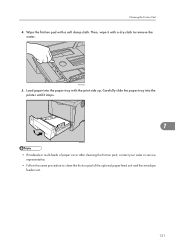
Wipe the friction pad with the print side up. Load paper into the printer until it with a dry cloth to clean the friction pad of paper occur after cleaning the friction pad, contact your sales or service representative. • Follow the same procedure to remove the water. Carefully slide the paper tray into the paper tray with a soft damp cloth. Cleaning the Friction Pad 4. Then, wipe it stops. 7 AUB111S • If misfeeds or multi-feeds of the optional paper feed unit and the envelope feeder unit. 131 ZKEY700E 5.
Wipe the friction pad with the print side up. Load paper into the printer until it with a dry cloth to clean the friction pad of paper occur after cleaning the friction pad, contact your sales or service representative. • Follow the same procedure to remove the water. Carefully slide the paper tray into the paper tray with a soft damp cloth. Cleaning the Friction Pad 4. Then, wipe it stops. 7 AUB111S • If misfeeds or multi-feeds of the optional paper feed unit and the envelope feeder unit. 131 ZKEY700E 5.
Operating Instructions
Page 158
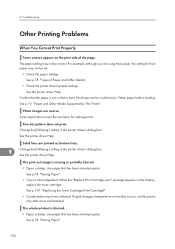
... the paper settings. If rapid change in the printer driver's dialog box. Use paper that has been stored properly. Troubleshooting Other Printing Problems When You Cannot Print Properly Toner smears appear on the display, replace the toner cartridge. Envelopes can be correct. Fine dot pattern does not print. Use paper that has been stored properly...
... the paper settings. If rapid change in the printer driver's dialog box. Use paper that has been stored properly. Troubleshooting Other Printing Problems When You Cannot Print Properly Toner smears appear on the display, replace the toner cartridge. Envelopes can be correct. Fine dot pattern does not print. Use paper that has been stored properly...
Operating Instructions
Page 167
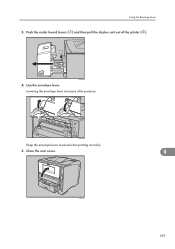
Using the Envelope Lever 3. AUB319S 4. Close the rear cover. Push the under board levers ( ) and then pull the duplex unit out of the printer ( ). AUB036S Keep the envelope lever lowered when printing normally. 5. Lowering the envelope lever increases roller pressure. Use the envelope lever. AUB317S 9 165
Using the Envelope Lever 3. AUB319S 4. Close the rear cover. Push the under board levers ( ) and then pull the duplex unit out of the printer ( ). AUB036S Keep the envelope lever lowered when printing normally. 5. Lowering the envelope lever increases roller pressure. Use the envelope lever. AUB317S 9 165


